
Matching Gauge for Amigurumi
Gauge matters to ensure your amigurumi ends up the right size. If stitches are too tight, pieces won’t fit together; if too loose, stuffing can spill and shapes wobble. A consistent fabric helps your doll hold its shape after stuffing. Gauge influences yarn choices, hook size, and how many rounds you’ll need. Start by swatching with your chosen yarn to see how your stitches behave.
Aim to match the pattern’s gauge, or modify the pattern to fit your yarn. Think of gauge like a recipe: a pinch more or less tension can change the result. Compare your swatch to the pattern’s gauge, then decide whether to switch hooks or yarn. The right gauge makes assembly smoother and the finish cleaner, especially around tiny seams.
Keep a quick gauge log. When you try a new yarn, you won’t guess—you’ll test. You’ll thank yourself later when limbs align and the head sits squarely. Gauge isn’t glamorous, but it’s the quiet boss behind the neat amigurumi finish. This is also the core idea behind Yarn Substitutions: How to Swap Yarns Without Ruining Your Pattern.
Measure your stitch gauge for firmness
Create a swatch a few inches wide and tall. Count stitches per inch and rows per inch, then compare to the pattern. If you’re close to the pattern’s stitch count, your fabric will hold stuffing without looking stiff. If looser, pieces may sag and lose shape.
Count in a 1-inch square several times for consistency. If your gauge is off, try one hook size smaller to tighten, or larger to loosen. Test with the same yarn to confirm the change. This quick check helps you avoid committing to a large round count before you’re sure.
Maintain even tension to prevent uneven seams. A steady grip and mindful motion keep a firm, uniform fabric. When you nail your gauge, you’ll sew pieces with clean edges and snug seams.
Adjust hook size when swapping yarns
Swapping yarns will likely shift your gauge. A thicker yarn calls for a bigger hook; a thinner yarn needs a smaller hook to keep stitch size consistent. Do a small swatch with the new yarn and compare to the pattern’s gauge to see how much to adjust.
If your swatch is looser than the pattern, go one hook size smaller and retest. If tighter, try one hook size larger. Don’t jump more than one size at a time. When you find the hook that yields the right gauge, note it next to the yarn and pattern for future projects.
Remember, not all yarns behave the same. A yarn with a soft halo or loose plies can make stitches look bigger or smaller. Take your time with the swap to avoid lumps and gaps in the final piece.
Knit or crochet a small swatch
Your swatch is your truth-teller. Knit or crochet a tiny piece with the new yarn and hook, then measure stitches and rows per inch. This square saves you from wasting time on a big project that won’t fit. Compare the swatch to the pattern’s gauge. If it matches closely, you’re good to go. If not, adjust the hook size and re-swatch until you land on the target. Keep notes on your final hook and yarn combo for future reuse.
Convert Yarn Weight and Yardage
You’ll need to translate yarn weight and yardage so your amigurumi turns out just right. Different brands label weights differently, but you can compare by gauge and yardage. If your chosen yarn is lighter than the pattern calls for, you’ll need more yards; if heavier, fewer yards. Keep your hook size and stitch count in mind, as they affect the final look as much as the yarn itself.
Yarn weight conversions aren’t a fixed number; they’re a small map you use every time you shop. Aim to match the overall fabric thickness. If your yarn feels the same in your hands and the stitches resemble the sample, you’re on the right track. When unsure, err on extra yardage to avoid running short.
As you work, record the yarn used, its weight, and yardage for future projects. You’ll start seeing patterns: which brands match your favorite weights, and how many yards you typically need at a given gauge. This reduces guesswork and helps keep your amigurumi consistent.
Use yarn weight conversion charts
Yarn weight charts map categories like lace, light, DK, worsted, and bulky to their approximate wraps per inch and yardage per weight. Use these charts as a guide, not a rule. Compare your yarn’s texture and thickness to the chart’s sample swatches. If your yarn falls between two categories, start with the lighter category and test a small swatch to check gauge. You’ll save time by testing swatches before committing to a full project.
Keep a quick reference: note the yarn brand, weight label, and the closest chart category. If substituting, aim for a yarn in the same range on the chart. Yardage can vary by brand even at the same weight, so always check the label. This helps you avoid running short or ending up with a project that’s too small.
When choosing a substitute, you might find two yarns with the same weight but different yardages per skein. Calculate how many skeins you’ll need to reach the same total yards as your original. It’s a quick math check before you crochet a stitch. Your aim is the same finished size and density, not just the same label.
Compare yardage vs weight for substitution
Compare yardage and weight side by side to avoid surprises. A heavier yarn with more yardage per skein could change size if you don’t adjust stitches or scale. A lighter yarn with less yardage could look sparse or shrink. Balance weight to maintain fabric thickness and yardage to reach the same total length.
Before buying, calculate: total yards in the pattern and yards per skein of the substitute. Decide how many skeins you’ll need. If the substitute has more yardage per skein, you might reduce skein count or adjust hook size to stay within pattern size. Use a quick swatch to confirm.
If unsure, treat substitution as a test. Crochet a small swatch at your planned gauge, then measure to see if the final piece will hit the right dimensions. You’ll gain a tangible feel for whether the yardage and weight align with the pattern’s needs.
Recalculate skeins before you start
Recalculate skeins to prevent mid-project panic. Determine exact skein count based on chosen yarn, weight, and yardage. Use a quick worksheet: total yards in the pattern, yards per skein of your yarn, and divide to get skeins needed. Round up to be safe. It’s better to have a little extra than run out mid-stitches.
Finalize your skein plan and verify total yardage against the pattern’s requirements. If you’ve added texture or larger stitches, you may need to adjust. Keep notes in your project file so you don’t repeat the same miscalculation. You’re aiming for a precise balance between weight and yardage to keep shape and size consistent.
Choose Fiber for Shape and Feel
Fiber choice affects stiffness and softness, influencing how your amigurumi sits in your hands. For crisper edges, choose sturdier fibers; for cuddly toys, go softer. Balance structure with comfort to avoid a shapeless blob.
- Synthetic fibers like acrylics offer bright colors and reliable shape, great for beginners.
- Natural fibers such as cotton or wool add texture and a premium feel but can shrink or lose shape if stuffing isn’t careful.
Consider how the piece will be used. A frequent hugger may benefit from softer fibers; a display piece may need stiffer fiber to hold form. Fiber choice sets the foundation for how yarn, stitches, and stuffing work together.
Match substitute yarn fiber content
When swapping yarns, align fiber content to keep the same feel and spring. If your main yarn is acrylic, seek a substitute with a similar blend. If switching to cotton, match density and stretch so the pattern still fits. Do a small test row to feel how it behaves before committing to the whole piece.
If your original yarn brand is discontinued, find a fiber that behaves similarly in stitches with comparable density. The goal is to maintain the balance between firmness and softness the pattern expects.
Color and fiber shifts matter too. Some fibers dye differently, which can affect the final look. Choose a substitute that matches not just the look but the feel you want in your amigurumi.
Consider fiber effects on stuffing and drape
Different fibers hold stuffing differently. A stiffer fiber pushes stuffing into sharper shapes; a softer fiber may require more stuffing to achieve the same form and can feel puffier. Drape depends on both fiber and how you fill.
For a structured head and limbs, pick fibers that resist collapsing. For plush cuddles, choose fibers that compress gently and keep a soft silhouette. Drape also influences eye and facial feature placement, so think about alignment as you stuff.
Experiment with a small piece to feel the differences. You’ll notice where you gain control: stiffer fibers hold shapes, softer fibers give warm, squishy rounds. Use that knowledge to decide how much stuffing your main project needs.
Test fiber with your stuffing
Before finishing a big project, test how your chosen fiber works with stuffing. Stitch a tiny sample, stuff it, and observe how it sits. If the shape holds, you’re on the right track. If it collapses or looks uneven, adjust the fiber choice or stuffing amount.
Testing helps you avoid surprises in the final piece and ensures your amigurumi keeps its pose after use.
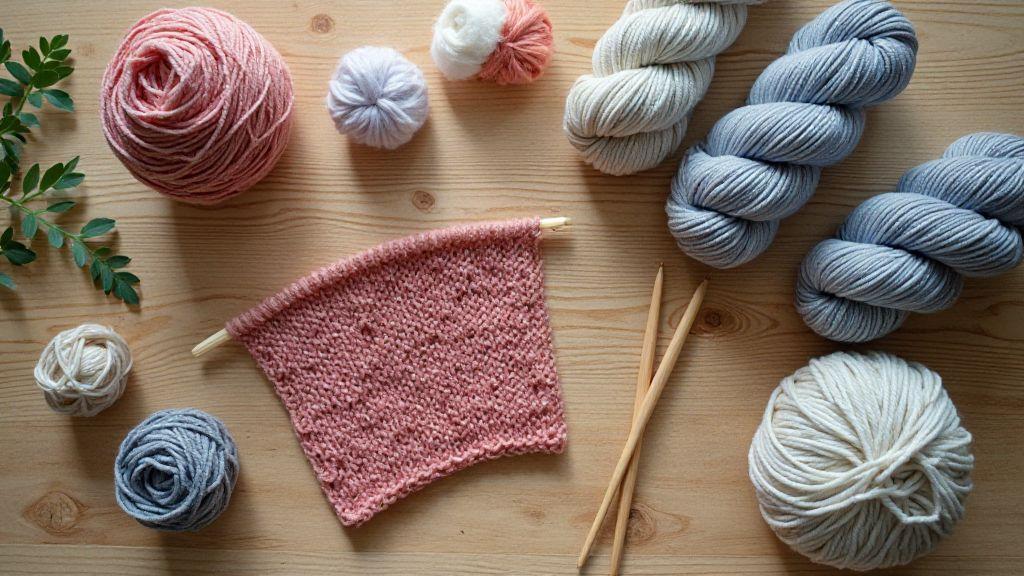
Choosing Compatible Yarns
Selecting yarns that work well together from start to finish is key. Think of it like building a small team where every member has similar tension and behavior. Smooth vs. fuzzy textures matter; staying in the same family (e.g., cotton with cotton or acrylic with acrylic) helps maintain even tension. Test your chosen yarns together with a small swatch to see how they cooperate.
- Pick yarns with similar ply and twist for stitch definition. Mismatched twist can cause uneven stitching.
- Choose durable, washable fibers for toys to survive handling and washing. Acrylic, cotton, and certain blends are strong choices.
- Verify colorfastness before stitching. Test swatches for color bleed and use dye-stable skeins to keep colors clean.
Pick similar ply and twist for stitch definition
Similar ply and twist help stitches lock and edges stay sharp. Mismatched twist can make decreases look unclear. If one yarn feels slippery, a slight hook-size tweak may be needed. When ply and twist match, your amigurumi edges stay crisp and professional.
Verify colorfastness before stitching
Test colors with a damp cloth or wash to ensure no bleeding between colors. Use dye-stable skeins and check colors across lots to keep them consistent.
Crochet Yarn Substitution Tips
When swapping yarns, follow straightforward rules to keep fabric the same size and feel. Match weight, fiber content, and gauge as closely as possible. Start with a swatch and compare to the pattern gauge. Small changes in yarn can alter softness or stiffness, so keep notes as you go.
Check weight category (wraps per inch) and compare to the pattern’s recommended weight. If exact matches aren’t available, find a substitute that yields a similar swatch surface. Also, review fiber and care instructions since some fibers behave differently after washing.
Keep a quick note of each substitution attempt to reuse successful substitutions in future projects and avoid re-learning the wheel.
How to substitute yarn without changing pattern tension
To maintain size and stitch placement, choose a substitute in the same weight category as the original (e.g., DK for DK). Swatch in the same stitch pattern and gauge, and compare to the pattern’s gauge. If off, adjust by changing hook size or tension. Document how each hook size affects fabric to replicate later.
If substitution changes fabric width or height, recalculate stitches and rows. Use swatch measurements to compute a new gauge and adjust the pattern accordingly. Small hook-size changes plus tension tweaks usually keep dimensions close. Prioritize balanced, even stitches to preserve the texture.
Note: Differences if substituting yarn in knitting patterns
In knitting, substitutions can cause bigger changes in drape and gauge due to stitch placement on needles. You’ll likely adjust needle size more often than you would adjust a crochet hook. Keep swatches handy and compare both stitch definition and overall size.
Adjust hook and tension as needed
If your swatch is too loose, decrease hook size by one; if too tight, increase. This fine-tuning aligns the new yarn’s thickness with the pattern’s tension. Record which hook size worked for quick reference next time.
Follow a Simple Yarn Substitution Guide
You’ll stay confident swapping yarns without losing shape or size. Start with the basics: weight, fiber, and gauge. If unsure, choose a yarn with the same weight category and similar feel. Your goal is a fabric that behaves like the pattern intended.
- Check gauges with a swatch before committing.
- If the swatch is off, adjust hook size or tension and re-swatch.
- Keep a log of yarn name, weight, gauge results, and tension tweaks for future projects.
Make a prototype to check size and feel
Create a small prototype using the same stitches and dimensions to see if the fabric’s drape and rigidity match the original. If the substitute feels too stiff or too floppy, tweak hook size or tension until you get a closer match. This prototype is your reality check.
If the prototype matches, you’ve nailed Yarn Substitutions: How to Swap Yarns Without Ruining Your Pattern. If not, adjust one variable at a time—hook size, tension, or swatching with a different substitute—until the fabric sits right in your hands. This building intuition saves frustration later.
Record gauge and yardage changes for next time
After finishing, note the gauge achieved with the substitute, any yardage differences, and how the fabric changed. This becomes your quick reference for future projects, helping you stay true to size without re-swatching. If you needed more or less yarn than the pattern suggested, log that too to avoid surprises on your next project. Your notes are your cheat sheet for consistent results.

Clara Fern — Crochet Artist & Amigurumi Designer
Clara Fern is a crochet artist and amigurumi designer based in Austin, Texas. With 9 years of experience working with yarn and hook, she transformed a lifelong passion for handcraft into a creative mission: making amigurumi accessible, fun, and deeply rewarding for crafters of all levels.
Clara discovered amigurumi during a trip to Japan in 2017, where she fell in love with the art of bringing tiny characters to life through crochet. Back home in Texas, she spent years studying color theory, design principles, and advanced crochet techniques — developing her own signature style that blends kawaii aesthetics with original character design.
Through maclafersa.com, Clara shares everything she has learned — from choosing the right yarn and reading your first pattern, to designing fully original amigurumi characters from scratch. Her writing is known for being clear, detailed, and genuinely helpful, with no steps skipped and no secrets kept.
When she’s not crocheting, Clara enjoys watercolor painting, visiting local yarn shops, and drinking way too much coffee while sketching new character ideas.


