
How Head Size Affects the Overall Look of Your Amigurumi
Understanding head size is the fastest way to control the overall look of your amigurumi. The size and shape of the head read first to the eye, shaping the vibe—from cute and playful to refined or lifelike. By considering head size early, you set a visual anchor for the entire doll, influencing balance, posture, and how other details read from across the room. This guide dives into how head size affects the read, and offers practical tests and pattern adjustments to achieve the look you want.
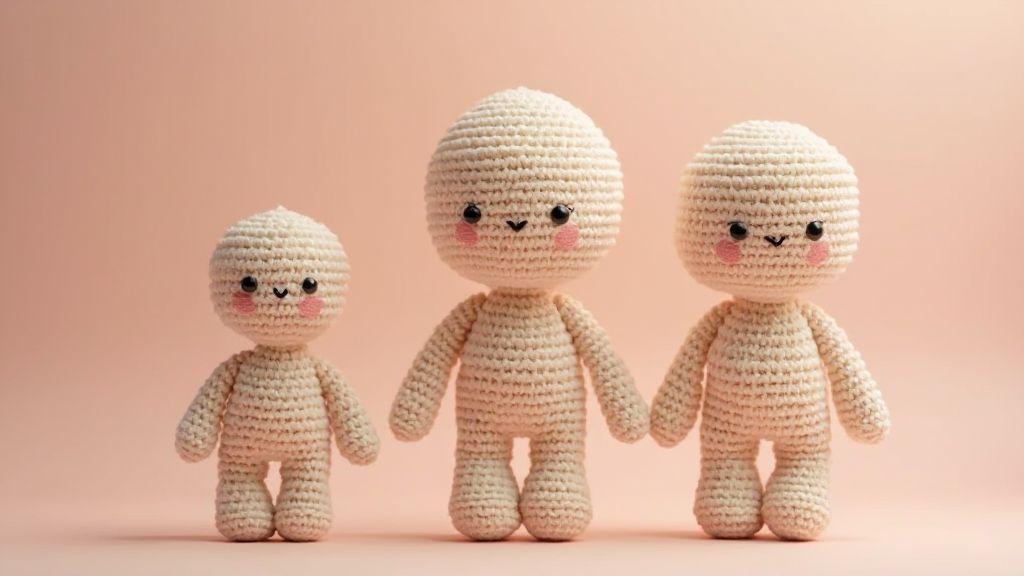
Head-to-body ratio amigurumi to balance your doll
Creating a balanced amigurumi starts with understanding how the head and body relate. The read of your doll shifts with the ratio, from cute to whimsical to lifelike. A steady head-to-body balance helps the doll sit naturally in your hands and on display, and it strengthens how sturdy the pose feels. A well-balanced head makes the arms and legs read as intentional, not accidental. Keep proportions in mind as you crochet for a polished result.
Your design choices influence perception more than you might expect. A bigger head reads as more expressive, while a smaller head can make the body feel longer or more athletic. Texture, stuffing, and where you attach limbs all push the final feel. By planning the ratio before you stitch, you save time reworking later and create a clear visual anchor for the whole project.
If you want a playful, approachable doll, start with a slightly larger head and shorter body. For a traditional toy vibe, keep the head modest and the body a touch longer. The balance you choose sets the casual or refined mood of the finished piece. Remember, the head is the first thing people notice—set a comfortable proportion for your style.
Measure amigurumi head size before you crochet
Before you hook, decide a head size goal. Measure a few rounds on scrap yarn to estimate final circumference. Aim for a repeatable notch that tells you, this is the head I want. Once settled, crochet with confidence, adjusting stitches to keep the head round and smooth. If the head turns out too large, recalc by reducing a few stitches early and adjusting the neck landmarks.
Keep a simple note of your preferred head measurement and round count. This becomes your go-to for future dolls, saving time and ensuring consistency. If you’re unsure, start with a head circumference around 3 to 3.5 inches for a small friend, then scale up as needed. Your hands will thank you for the clearer target.
See how head-to-body ratio amigurumi changes perception
The ratio changes how people read your doll at a glance. A larger head draws the eye, shortening the perceived body and making the pose feel playful. A smaller head lengthens the body, adding motion and grace. You’ll notice discussions about your work shift from is that cute? to that looks balanced. Every accessory can nudge the eye toward balance or exaggeration.
For a modern feel, push the head a notch smaller and elongate the body slightly. For a classic toy look, keep the head a touch larger and shorten the body. You’re shaping not just a doll, but a story in yarn—your choices create a vibe, from endearing to chic. Use the head-to-body ratio as a compass to guide every stitch.
Quick ratio rule of thumb
Aim for the head to be about one-third to one-half of the total height. For a 9-inch doll, a 3-inch head works well; for a 12-inch doll, a 4-inch head fits nicely. Test a few sizes on scrap yarn, then lock in your favorite range.
Use effect of head size on cuteness to charm buyers
Your amigurumi’s head size can be the magic switch that makes buyers fall in love at a glance. A bigger head reads as youth and can feel more playful or innocent, while a balanced head shows detail and character, letting craftsmanship shine. Shops often rely on head size to set a vibe, so choose proportions that tell the story you want.
For warmth and protection appeal, opt for a bigger head. It reads cuddly and approachable, like a plush friend. For chic uniqueness or a mature vibe, a smaller head can let body language and expression take center stage. Remember, the head is the star in a crowd—the size you choose guides the first impression, so align it with your brand and mood.
To test, compare two prototypes side by side. Ask friends which one they’d pick for a quick gift. Note what works, then adjust patterns for consistent cute or cool reads.
Why larger amigurumi head size looks younger
A larger head signals youth through baby-like cues: big eyes, round cheeks, and a rounded skull read as soft and protective. Buyers often feel warmer toward this look, which suits goofier or carefree vibes. But beware of overdoing it; too-large a head can flatten expression or make the figure top-heavy. If in doubt, test a noticeably bigger head against the body and adjust for balance and read.
When a smaller head changes age and tone
A smaller head shifts tone toward sophistication or swagger, giving space for the neck and shoulders to express more. It often reads as older or more confident. A tiny head can also make facial details pop, emphasizing a modern or artsy vibe. Balance remains key to keep the pose natural and readable.
Simple size tests you can try
Prepare three versions: standard, slightly bigger, and slightly smaller heads. Place them side by side and get quick feedback from friends or customers. Note which reads as must-have and why. Use those notes to steer your next batch or pattern adjustments.
Use a simple checklist for each test: head-to-body ratio, facial expression clarity, and ease of posing. If the bigger head dulls expression, scale back slightly. If the smaller head makes posing stiff, adjust up a bit. Your goal is a balanced look that reads clearly from a distance and up-close.
Improve facial feature placement amigurumi for expression
The face tells a story, and feature placement brings that story to life. Decide eye size, mouth shape, and cheek blush before pulling yarn tight. Sketch a quick layout on scrap fabric or a reference toy, then map stitches to those guides so every stitch has purpose. The goal is a clear read of emotion at any scale, without crowding the head.
Expression comes from how features relate to the head. For a gentle, friendly look, place eyes a touch lower on a larger head and give a soft smile. For bold or surprised expressions, center the mouth and raise eyebrows with small stitches above the eyes. Test placements on swatches before committing to the main piece for a read that’s warm, curious, or mischievous.
Treat placement as a compass for your design. If the head is round and large, lower the eyes to preserve balance and avoid top heaviness. If the head is small, center features to keep the face expressive and readable from a distance. The aim is clear emotion, not a busy face.
Lower eyes on larger heads to keep balance
Small eye height adjustments can shift the mood. For oversized heads, lower the eyes to give the face room to breathe and soften the look. Test with a simple gauge: wrap a string from the crown to the eye line and compare the feel. The softer, grounded look reads as approachable and balanced.
Center features on small heads to stay expressive
On small heads, center the features for easy readability. Mark a vertical centerline and place eyes on it, with the nose and mouth along the same line and evenly spaced. A centered face reads clearly and quickly, especially for toys meant for kids or quick online photos where the face is the star.
Mark placement before you sew
Mark where you’ll sew facial features before stitching. Quick guides save rework and keep lines clean. Decide exact height and width, then check from multiple angles for balance. Sew with confidence once you’re happy, ensuring the final face reads as planned. Marking early helps you visualize the read and reduces guesswork during sewing.
Apply stitch count and shaping head to change size
You control size by adjusting stitch count and shaping. Decide how big the head should be, then map increases or decreases. Bigger heads get more rounds or gentle increases; smaller heads use fewer stitches and quicker decreases. Maintain steady tension for a proportional head.
Think of stitch count as the head’s skeleton. Too few stitches makes a peaky head; too many makes it balloon. Use markers to track increases and decreases so you can see how each round changes width and height. If your grip feels tight, loosen a bit; if loose, tighten slightly. Small grip tweaks help avoid mushy or stiff areas. Practice on a tiny head gauge swatch to find the rhythm that keeps the head proportional to the body.
Add rounds and increases to grow the head
Adding rounds grows the head. Use a steady increase pattern—one stitch per round for several rounds, then every other round for slower growth. Keep increases evenly spaced to maintain a round silhouette. Monitor height as well as width to avoid tilting.
Tighten rounds and decreases to shrink the head
To shrink, switch to every-other-round decreases, then every round as you near the target size. Space decreases evenly for a smooth taper. If you see flattening, switch to decreases between stitches. Pause to count and compare for symmetry. Finish with a gentle taper and optional blocking for a clean, rounded finish that matches the rest of the amigurumi.
Make pattern adjustments for head size without breaking design
When you change head size, keep torso and limb proportions in mind to maintain balance. A bigger head may require a fuller neck and upper chest to preserve silhouette. Use lighter yarn or a smaller hook for the head while keeping body stitches consistent so the shift feels deliberate. Test with a small head gauge swatch beside the body to see how the scale reads.
Head size changes alter expression and pose. A larger head may push eyes higher or further apart; adjust the neck and shoulder connections to keep a natural silhouette. If the head shrinks, pull the shoulders in slightly to maintain grounding. Treat the change as a design move, not a repair, and consider hat, hair, or accessory placement to fit the new size.
Scale the body when you change head size
Proportion the body to the head: extend the torso or widen shoulders for a larger head, or shorten the torso and narrow shoulders for a smaller head. Check balance by curling the figure into a natural stance and testing weight distribution.
Adjust torso stitch density if the head grows or shrinks. A bigger head may require softer torso transitions, while a smaller head might benefit from slightly denser torso stitching to maintain fullness at the neck and shoulders. Pin patterns and measure against your gauge to keep consistency.
Keep limbs proportional. Longer limbs help a bigger head feel balanced; shorter limbs suit a smaller head. Recheck joint placement to match the revised scale and view the pose from multiple angles during sewing.
Recalculate limbs for pattern adjustments for head size
Extend arm and leg lengths when the head grows, so the figure can reach and sit without tipping. Shorten limbs slightly for a smaller head to preserve a grounded stance. Adjust elbow and knee angles for a natural look, and rethink joints to flow with the new proportions. If you’re using seamless joins, plan seam lines to follow the updated silhouette.
Test-fit pieces as you go with pins to catch proportional issues early. Tiny tweaks—lengths, angles, or seam placements—can keep the final look cohesive and balanced.
Do the math on paper first
Map proportions before crocheting. Write the desired head circumference, then translate to neck, shoulder, and torso stitch counts. Estimate limb length from head to toe and the width of each arm for balance. This plan saves time and stitches by making the overall shape clear from the start.
Plan gauge changes alongside head size. If you increase the head by 2 cm, note how many extra rows this adds to the neck and torso. If you reduce, map out where to trim without thinning arms or hips. The aim is a clean, harmonious scale that feels intentional.
Keep notes handy for future edits. A clear number system helps you recreate the look or adjust patterns later. Remember, the right head size is about the character’s overall feel, not just size.
Design large head small body amigurumi for maximum cuteness
A large head with a tiny body signals instant cuteness. Start with a head that dominates the silhouette, a body that just supports a pose, and tiny limbs that read as detail. Use a bright color for the head to draw attention, and a softer body shade so the head pops. Picture a sleepy critter or curious friend—the hug-ready vibe should be immediate. The bold head-to-body ratio should feel approachable, not intimidating.
Shape the head with round, plump curves for a friendly look. Add minimal surface details like a small tuft or blush to amplify personality without clutter. Keep the neck short so the head sits prominently, ensuring cohesion across the figure. The mood shifts with the head size: bigger heads with shiny eyes and a small smile read as expressive and cartoonish, boosting perceived cuteness.
Use big eyes and short limbs for a cute look
Big eyes command attention and convey emotion. Place eyes to nearly halve the head’s height, just below center. Pupil color and a small highlight bring the eyes to life. Pair with short limbs to keep the focus on the face. Slightly tighter stitches in the limbs help shape and prevent floppy extremities. A tiny nose and mouth with a soft smile and subtle blush on the cheeks maintain warmth without clutter. Test different placements to read warmth, mischief, or curiosity clearly from a distance.
Add a weighted base to keep it upright
A weighted base helps your amigurumi stand tall. Start with a small bead or poly-pellet in the bottom before closing. Place weight toward the center of gravity for stability. A flat, stitched circular base or an internal weighted core can be used, depending on your pattern. The extra heft helps the figure sit confidently for photos and displays.
Test sit and adjust. If it tips, redistribute stuffing or adjust ballast. The goal is a sturdy base that keeps the head prominent and the body balanced for reliable posing.
Test balance with stuffing levels
Balance with stuffing as you go. Firm stuffing around the torso supports the head; softer limbs keep the figure cuddly. If the head feels heavy, add stuffing near the torso or a slight lower weight. If the body seems bulky, reduce torso stuffing to preserve proportions. Experiment with standing, sitting, or perched poses to find the most natural balance. Accessorize thoughtfully, as hats or scarves can alter weight distribution and require tweaks to stuffing or base.
Style small head large body amigurumi for grown-up looks
To achieve a grown-up vibe, balance a slightly larger torso with a smaller head. Use shape, texture, and color to tell a story. Clean lines, subtle shading, and tailored details (like a seam line) help the piece feel deliberate. Neutral tones with a single accent can keep the look elegant. Accessories should complement, not overwhelm, the head.
Test different shapes as you go. If the head feels too large, shrink the neck and shoulders slightly. If the torso dominates, shorten the limbs and lighten contrast. Keep notes to reproduce or adjust the look in future projects. The result should feel like a small sculpture on display.
Add longer limbs and torso detail for balance
Longer limbs shift the visual center of gravity for a steadier presence. Extend the arms and add subtle curvature to the forearms. A longer torso with a gentle taper creates a grounded silhouette. Add a center seam or a slim belt to cue clothing. Slight knee bends and darker inner shading can emphasize length without overpowering the form. Ensure the head remains human-scale to maintain harmony.
Use hair and clothes to shift focus from the head
Hair, clothing, and accessories guide focus along the outfit. A voluminous hairstyle or layered cut can draw attention away from the head, while a cardigan, scarf, or blazer frames the torso and limbs. Texture and color contrast help keep the head in proportion. Clothing details—like a ribbed cardigan or satin-like torso stitch—add depth without crowding the face. The aim is a refined silhouette where outfit framing devices direct the eye.
Try posture tests on a table
Lay the amigurumi on a flat surface to study balance. A stable tripod stance often reads as confident. If wobbly, adjust stuffing or ballast. A slight head tilt can convey curiosity or calm maturity. Test multiple poses and choose a default that feels grounded, with variations saved for future projects. Posture becomes part of storytelling and helps reinforce the grown-up vibe you’re after.
Check amigurumi proportions and balance for stability
Test overall proportions to prevent tipping after hugs. If the head dominates too much, adjust body length or limb placement. A simple silhouette supports stability and play. On a surface, nudge the figure to identify sway, then fix with stuffing adjustments, joint tightness, or a small base. Visual weight should feel intentional, not top-heavy, with the head size reading as part of the design rather than an afterthought.
Heavier heads need more base support
Larger heads often require stronger base support. Widen the neck opening and reinforce the core to prevent sagging. Anchor the head to the body with extra stitches or a small internal dowel to distribute weight evenly. A sturdy base makes the doll confident in every pose, especially when reworking patterns or adding accessories.
Consider a weighted core inside the head or base of the neck if reworking an existing pattern. A little extra weight helps gravity act predictably without altering facial features. If the head remains visually heavy, widen the base slightly or add a subtle flare at the bottom to balance the silhouette.
Use appropriate stuffing and secure joints
Choose stuffing thoughtfully: medium-firm in the head and a firmer core near the neck. Avoid overstuffing limbs to keep movement flexible. Secure joints thoroughly—insert limbs with multiple passes and add knots or a dab of fabric glue if allowed. Even stuffing distribution helps prevent bumps and keeps the pose stable as you play with the piece.
Follow design tips for amigurumi proportions when you edit patterns
Small proportion changes can have big effects on balance and pose. Start by measuring head, body, and limbs against your target look. If the head seems too large, scale the body or neck increments to preserve harmony. A good rule is to adjust the next piece by a smaller amount than you think needed, then test again. This preserves charm while avoiding awkward shapes. Test standing and sitting positions after edits to confirm stability.
Texture and fabric tension matter. If stitches pull or fabric feels stiff, you may be exaggerating proportions. Soften with looser stitches or different yarn in certain areas (like cheeks or ears) to keep the design approachable. Document exact changes to reuse in future patterns, building confidence as you fine-tune proportions.
Design confidence grows with practice. If unsure about a head-to-body ratio, sketch a side profile and compare with a beloved toy. Borrow ideas from patterns you admire, then tailor them to your style. The goal is a cohesive look where every part supports the head’s presence without overpowering the body.
Compare photos to judge your amigurumi head size
Photos are a powerful judge for head size. Take front, side, and back shots against a ruler, then compare to target sizes and reference toys. Look for unintended roundness, height, or width. If a discrepancy appears, note where it shows—jawline, crown, or temple—and adjust in the next stitching round. After each tweak, rephotograph and compare with consistent lighting to keep progress measurable.
Build a small photo checklist: head height, width, jaw angle, and ear placement. A growing library of head designs gives you fast references to reuse or adapt. The more you photograph, the better you’ll understand how head size shifts the overall vibe of your amigurumi.
Make swatches to test stitch count and shaping head
Create swatches to test how many stitches fit into a given width and how that affects head shaping. If the swatch is underfilled, add stitches or tighten tension; if too bulky, reduce stitches or loosen technique. Swatches save you from committing to a whole piece with a lopsided head.
Use swatches to practice shaping the head during pattern edits. Try different decreases near the crown or jaw to sculpt a natural curve. Compare results side by side to see how each change shifts proportion. When you’re happy, transfer the method to your live project for a consistent look.
Keep notes on which swatch method matched your target. Include yarn type, hook size, and stitch count. These notes become your recipe for repeats or future updates. Testing in small bites builds confidence without risking a full piece failed by a single misstep.
Keep a simple checklist for adjustments
- Check head-to-body balance and adjust gradually.
- Compare front and side photos to verify proportions.
- Use swatches to validate stitch counts before finalizing shaping.
- Note texture changes if you switch yarn or tension.
- Record exact adjustments to reuse in future patterns.

Clara Fern — Crochet Artist & Amigurumi Designer
Clara Fern is a crochet artist and amigurumi designer based in Austin, Texas. With 9 years of experience working with yarn and hook, she transformed a lifelong passion for handcraft into a creative mission: making amigurumi accessible, fun, and deeply rewarding for crafters of all levels.
Clara discovered amigurumi during a trip to Japan in 2017, where she fell in love with the art of bringing tiny characters to life through crochet. Back home in Texas, she spent years studying color theory, design principles, and advanced crochet techniques — developing her own signature style that blends kawaii aesthetics with original character design.
Through maclafersa.com, Clara shares everything she has learned — from choosing the right yarn and reading your first pattern, to designing fully original amigurumi characters from scratch. Her writing is known for being clear, detailed, and genuinely helpful, with no steps skipped and no secrets kept.
When she’s not crocheting, Clara enjoys watercolor painting, visiting local yarn shops, and drinking way too much coffee while sketching new character ideas.


