
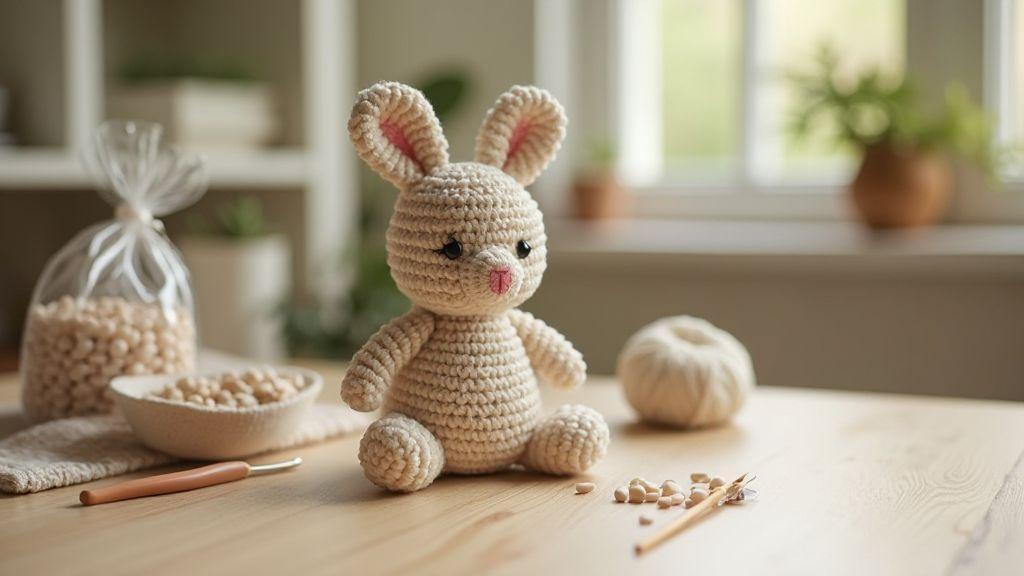
Best pellets for amigurumi
When you’re shaping amigurumi, the right pellets give your stuffed friend the perfect pose and feel. You want a balance of weight, safety, and ease of use. Poly pellets are a common choice because they’re light, affordable, and easy to sew around. They compress well, so you can place them where you need extra stability without making the whole piece bulky. If you want your toy to stand up or sit with a bit of gravity, try a mix of weight and fiber fluff to keep the body soft but grounded. Remember to fill gradually and press gently as you go, so you don’t lump one spot with too much heft.
For a beginner, poly pellets are forgiving and versatile. They’re small enough to distribute evenly, yet substantial enough to help your stuffed character keep its shape. If you’re aiming for a more stable base, you can add a small amount of heavier pellets toward the bottom and keep the upper sections airy. This gives you a natural sit or stand without making the torso too stiff. The key is to test your balance as you sew, so your amigurumi can enjoy a confident, upright posture when you finish.
If you want a lighter option, try micro-poly pellets. They still provide a stable core but feel less dense in your hand. They’re great for delicate creatures or when your design has short limbs. You’ll find that micro pellets plus a touch of stuffing can deliver a graceful, seated pose that still feels cuddly. Always compare weight against size; a tiny head with heavy pellets can tip your model unexpectedly, so plan your distribution early.
Why you might choose poly pellets
Poly pellets are the default for many makers, and for good reason. They’re affordable, easy to find, and work well across most amigurumi designs. You can control density by changing how much you add. If you want a softer toy that sits lightly, use fewer pellets and more fiber fill. If you want a sturdier figure that sits up straight, add more pellets at the bottom and heavier sections. This approach makes your final product feel balanced, not top-heavy.
Poly pellets are smooth and compact, so they don’t poke through stitches easily. They’re also less likely to shift inside the body as you seam or pose your piece. You’ll enjoy a predictable outcome: your amigurumi stays put after you finish, instead of flopping when touched. And because they’re widely used, you’ll find compatible stuffing blends and tutorials, which keeps your process smooth and frustration-free.
If safety matters in your project, poly pellets are a solid pick. They’re typically BPA-free and designed for crafts, making them a safer option for kids’ toys. You can still seal your project well with a tight finish, so the pellets stay inside where they belong. With poly pellets, you can focus on the look and pose of your amigurumi without worrying about unexpected shifts.
When you should avoid glass beads
Glass beads bring weight, but they’re tricky for amigurumi. They’re hard and can break stitches if you overfill or press too much. If you’re working on a small creature or a toy meant for frequent handling, glass beads can create an uneven feel. They also don’t compress well, so your toy might end up stiff rather than cuddly. If your pattern needs a soft, flexible body, skip glass beads and keep to poly or micro-poly pellets.
Another reason to avoid glass beads is safety. Sharp edges can arise if the inner lining cracks, and beads can become a choking hazard if a seam fails. For your peace of mind, choose materials that remain safe even after heavy use. You’ll thank yourself later when you don’t have to worry about little hands reaching for loose beads. If you’re curious about weight, you can experiment with a tiny amount of glass beads inside a sealed inner pouch, but only if your pattern allows for a controlled test and extra safeguarding.
If you’re making larger pieces, you might think glass beads will add heft fast. But you can achieve similar effects with heavier poly pellets or a weighted insert. You’ll get the same upright stance without the risk of tearing stitches or risking safety. In short: avoid glass beads when you want a soft, cuddly feel and a durable finish.
Choose child-safe pellets
When your project is for kids, pick child-safe pellets. Look for products labeled non-toxic and hypoallergenic. These pellets reduce risk if a seam should fail or a toy takes a tumble. Child-safe options often come in smooth shapes that slide easily into cavities without snagging yarn. They’re a practical choice for both beginners and seasoned makers who want to keep projects kid-friendly and easy to clean. You’ll feel confident knowing your toy stays safe during plays and hugs.
Safety isn’t just about material; it’s about the full build. Use a tight inner lining and strong stitching so pellets stay in place. Consider adding a small pouch or fabric divider inside the limbs to keep weight evenly distributed. When you finish, double-check the seams by gently pressing along the surface. If you notice any give, reinforce those areas. Your amigurumi will hold its pose and keep its charm, and you’ll enjoy the satisfaction of a well-made piece that can stand up to daily use.
How to weight amigurumi for balance
When you want your amigurumi to stand or sit just right, the weight you use and where you put it matters more than you think. You’ll feel the difference the moment you pick up your stuffed friend and notice how solid it feels in your hands. The goal is a calm, balanced toy that won’t topple with the tiniest wobble. Start by picturing a tiny, steady core inside your work, not a heavy bottom that makes every movement sting. Your aim is to create a stable feel without making the overall yarn look stiff or bulky. Think of balancing a small statue: too much weight high up and you’ll tip forward; too little weight and you’ll slump. You want a comfortable, confident stance from the moment you place it on a shelf or your lap.
Weighing your piece is not about adding mass everywhere. It’s about smart placement and using the right materials so your amigurumi sits upright with ease. You’ll notice better pose retention if the center of gravity sits low and centered. This makes your doll or animal feel grounded, not wobbly. Keep in mind that different shapes need different approaches: a cat may need a bit more belly weight to stay upright, while a bear might balance best with evenly distributed pellets along the bottom. The trick is to test a little, adjust, and keep your eyes on the prize—a natural, self-assured stance that looks handcrafted with purpose.
As you work, you’ll also appreciate how the weight impacts your yarn tension and seam integrity. If you cram too much weight into a small cavity, the fabric can pucker, and seams may strain. If you keep the heavy stuff in safe, snug pockets, you preserve the smooth, clean finish you’re after. Remember: a well-weighted amigurumi feels alive in your hands, not forced. Your end result should invite people to pick it up, inspect the stitch work, and smile at its steady posture.
Place weight low and center it
Placing weight low and at the center is your first big move toward balance. You’ll want the majority of the pellets or pellet-like filling to live near the base, where gravity does the work for you. A solid foundation means less wobble if your toy bumps a table or shifts in your lap. Use a small, breathable bag or a tight fabric pouch to hold the pellets, then tuck it into the bottom hollow of your amigurumi. This keeps the surrounding stitches neat and prevents the pellets from rolling into places you can’t fix without ripping apart your work.
Centering as you place the weight helps. A slight shift to the left or right can feel like a tilt in a real person’s posture. If you test by standing it up or letting it rest on a flat surface, take note where it leans. Move a few grams from one side to the other until you feel the toy settle evenly. A compact center of gravity makes every pose more forgiving—you can switch from sitting to standing without it flopping.
Test how it sits before closing
Before you close up the final opening, give your amigurumi a few real-world tests. Set it on a flat surface and observe its natural stance. Does it lean forward when you lightly press its chest, or does it bob when you touch the head? These tiny cues tell you where to tweak the weight. If it wobbles, shift a tiny amount of weight from one edge of the base to another until the toy sits evenly on all four corners of a pretend world.
Try a few different positions as you test: a casual sit, a full standing pose, and a gentle lean. If you notice a stubborn tilt, re-center the weight and re-check. Don’t rush this step—consistency in balance now saves you from post-cleanup repairs later. You want a finish that looks effortless, not patched together.
Stuffing order pellets and fiberfill
You want your project to keep its shape, so start by laying a solid foundation. Pellets go in first to give weight and balance, and then you’ll wrap in fiberfill to mold the form. Think of it like building a sturdy core before you add the soft outer layers. By stacking the elements in this order, you prevent sagging and keep your amigurumi upright as you sew.
When you add pellets, keep them in a contained area or small pouch to stay organized. This helps you avoid clumps that can throw off weight distribution later. As you place the pellets, you’ll notice the form begin to take shape. The fiberfill around them acts like a cushion that supports the pellets while you shape the rest of the piece. It’s a simple step, but it makes a big difference in how your final piece sits.
If you’re ever unsure you’ve got the right balance, gently press and adjust. The goal is a stable base with a natural silhouette, not a hard ball. By keeping pellets in a guided core and surrounding them evenly with fiberfill, you’ll prevent wobble and maintain a clean, professional look.
Add pellets first in the base
Begin with a compact, evenly spread layer of pellets for the base. This gives your amigurumi its core weight and stability. Don’t overfill; you want some room for the fiberfill to cushion and shape around the pellets. If you pack too tightly, you’ll feel the base harden and lose the soft, friendly bounce many people expect in these projects. Keeping a calm, measured pace here saves you from later touch-ups.
Keep pellets close to the bottom to form a solid footline or base edge. As you work, you’ll see the structure become more confident, almost like it’s standing up on its own. This is exactly what you’re aiming for: a base that supports everything above without tipping.
Pack fiberfill around pellets to shape
Wrap the pellets with fiberfill and pull the material snugly to shape the torso or body. Focus on distributing the fiberfill evenly so there aren’t hollow spots. If you notice a gap, add small amounts at a time and smooth the surface. The fiberfill should feel firm but not stiff, giving you a plush, friendly look while holding the form.
As you wrap, think about the final pose. You want a gentle curve where the body meets the base, and a natural taper toward the head or limbs. Small adjustments here can transform a flat, loose piece into something that sits and looks right on a shelf or in your hands.
Pack evenly to prevent lumps
Work in small sections and press evenly as you go. If you see a lump, smooth it out and re-distribute the surrounding fiberfill. Even packing avoids visible seams or bumps that ruin the silhouette. Your goal is a seamless surface that keeps the weighted core feeling balanced and comfortable to hold.
Using poly pellets in amigurumi
You’ll get steadier dolls when you use poly pellets. They add weight low in the body, helping your pieces sit and pose without slumping. Think of them as the feet of your stuffed art: small, quiet, but mighty in balance. When you place them correctly, your amigurumi feels alive, not floppy. Use a light hand at first, then adjust with more pellets if needed. Your goal is a natural feel, not a brick in the middle.
Poly pellets come in many sizes. Smaller pellets hug the curves of your stitched forms better, while larger ones can shift the center of gravity for bigger figures. You want a distribution that keeps the head from tipping forward and the torso from tipping back. Start by filling the bottom third or so of the body, then test sit. If it wobbles, add a bit more weight to the lower area. If it sits perfectly, you’re done. Remember, you can always add, but you can’t easily remove—so go slow and test often.
Mixing pellets with fiberfill can also help. The fill cushions the pellets, reducing noise and movement. It gives your amigurumi a softer, more natural weight. If you notice lumps, press gently to even them out. A well-balanced doll will stay upright on a shelf or in a display pose, and that small effort pays off when you or your friend hugs it.
Measure how many pellets you need
Measure your required weight with your piece empty and your chosen position in mind. Start with a modest amount, about a third of the body’s length in pellets, and test how it sits. If it tilts, add a little more to the lower section. You can compare the feel to balancing a small bag of rice in a toy. Too much weight and it sinks; too little and it tips.
Keep notes on how your doll responds to changes. Write down how many ounces or grams you used for future projects. Each amigurumi is different, so your numbers won’t be exact from one toy to the next. Your notes become your cheat sheet for future builds. If you find your model is stubborn, try shifting a few pellets toward the back or sides to rebalance.
When you’re happy with the pose, seal the pellets inside a bag before placing them in the body. This keeps them from shifting unpredictably if you need to rework the stuffing later. The bag also helps prevent leaks and keeps your work neat. Measure once, then recheck after stuffing to confirm your balance.
Keep your pellets dry and clean
Pellets should stay dry and free of dust. Damp pellets can clump and shift, throwing off balance. Store them in a dry area and avoid touching with damp hands when you handle your project. If you notice moisture, dry them outside of the project before resealing. A quick wipe with a clean cloth can remove surface dust that makes your doll look less polished.
If you spill small amounts of pellets, collect them with a funnel or a small scoop so you don’t lose them. Keeping them clean means your finished piece remains professional and sturdy. Dirty pellets also feel gritty in your hands, which takes away from the soft feel you want in an amigurumi.
When you’re ready to refill, do so in a clean space. Have a bag or container ready to minimize mess. You’ll thank yourself later when your work area stays tidy and your pellets stay in good condition for the long run.
Store spare pellets safely
Store spare pellets in a sealable bag or container. Label the bag with the weight or grain size so you don’t mix them up. A small plastic tub with a tight lid keeps moisture out and prevents spills if you move your project around. Keeping them in a dedicated spot reduces waste and saves time on your next project.
If you share your craft space, use a separate container for each type of pellet you own. Clear containers help you see what you have at a glance, so you don’t buy duplicates. A little organization goes a long way for seamless projects.
Securing pellets in crochet toys
You want your crochet toys to sit right and feel solid. The trick is to secure the weighted pellets so they stay put and don’t shift around. Start by choosing a sturdy inner method that keeps the pellets from leaking and shifting. Think of it like packing a lunch bag: you want the contents snug, not rolling around. Your goal is a toy that sits up and holds its shape, even after play time.
First, plan your inner space. You’ll place the pellets in an inner pouch or bag before you sew the final seams. This pouch acts as a barrier, so any movement stays contained. Use a fabric bag or a sturdy piece of fabric folded into a pouch with a tight seam. The outer shell stays clean and unstressed, while the pellets work from the inside to balance weight. This keeps your crochet toy from tipping or sagging when you set it on a shelf or hand it to a kid.
Test and adjust as you go. Weigh the toy with the pellets inside and check how it sits. If it leans too far, add a little more weight or adjust the pouch placement. The inner pouch should be secure, but easy to check if you need to add more pellets later. As you work, you’ll learn where the balance point is, and you’ll gain confidence in making durable, upright toys.
Put pellets in an inner pouch or bag
Your first move is to create a dedicated inner pouch that holds all the pellets. Use a fabric that won’t tear or stretch easily, and sew the edges closed with a tight stitch. Place the pellets inside the pouch and seal it well. This keeps the weight contained and prevents the pellets from shifting into seams. A well-sewn inner pouch is the backbone of a toy that sits upright without wobbling.
Next, position the pouch inside the crochet toy where it will do the most good. Typically you’ll place it toward the bottom or in a hollow area that acts as a natural ballast. Make sure the pouch lies flat and doesn’t bunch up in one spot. If the pouch creates a lump, adjust its position before you seal the outer fabric. When you’re done, the metal or plastic pellets stay stable and your toy looks polished.
Finally, check the outer fabric for any pinching or strain around the pouch. If you notice tension, shift the pouch a touch and re-sew the inner lining. A properly placed pouch protects the seams and keeps the look clean. You want a toy that holds its shape with confidence, not a limp, floppy doll.
Sew openings twice to stop leaks
Leak-proofing is a must. Sew every opening twice to ensure pellets stay where they belong. Start with a secure backstitch or ladder stitch at the edge, then go over it again with a second pass. This double seam acts like a safety net, catching any tiny threads that might unravel later. It’s a quick step that pays off in long-lasting sturdiness.
After you finish the second seam, tug gently on the fabric near the seam to test for give. If anything shifts, reinforce that area again. A small extra stitch now saves you bigger problems later, especially if a child loves the toy and handles it a lot. Your aim is a foolproof seal that keeps the inner pouch intact through play.
Now, examine the surrounding seams for any stress signs. If you see pinholes or stretched threads where the pellet pouch sits, reinforce with extra stitches. You’re building a durable toy that can take daily love and still maintain its upright posture.
Test seams to ensure no escape
Run a thorough seam test by gently pressing and flexing the toy. If you notice any movement where the pellets could escape, repair immediately. Re-sew with a stronger stitch and consider adding a small fabric patch over the seam for extra protection. This power-check ensures your finishing is as solid as a brick, giving you peace of mind.
DIY weighted amigurumi base
You’ll get a stable, sit-ready amigurumi when you follow these steps. First, you’ll create a wide, flat base that can rest with confidence on a table or shelf. Think of it like giving your toy a sturdy little pedestal so it doesn’t tip over when you post photos or set it down after a hug. Keep the base broad and even, using light stitches that don’t pull the fabric. The goal is a low, flat footprint that hugs the surface you place it on, not a tall, wobbling foot. When you’re done, you’ll notice the difference in how your amigurumi sits—more like a plush sculpture and less like a wobbly ball.
Next, you’ll add pellets in layers to balance weight. Layering lets you tune how the toy tilts toward or away from you. Start with a thin layer at the bottom to stop sinking into the stuffing, then add a slightly thicker middle layer for stability, and finish with a light top layer so the head and torso don’t press unevenly. You’ll adjust as you go, testing the sit by placing the finished piece on a flat surface and watching how it settles. If it leans, peel back a bit and redistribute pellets until the tilt feels natural and comfy.
Finally, you’ll use a fabric pocket to hold the pellets. This pocket keeps the weight contained and your amigurumi’s seams clean from pellet dust. Sew the pocket inside the base area before you close up the toy, making sure it lies flat and doesn’t poke through. A simple fabric pouch with a snug closing seam is all you need. This approach makes future adjustments easy—just unzip, tweak the pellets, and reseal. You’ll appreciate how tidy and secure the base stays, especially if you’ll be moving your amigurumi often.
Make a wide flat base for sitting
To begin, you’ll shape a base that’s broad enough to cradle the bottom of your amigurumi. Use a sturdy fabric and bright, tight stitches so the base spreads weight evenly. A flat, circular or oval form works best, but match the shape to your toy’s footprint. You want a base that won’t rock when your creation sits on a shelf or in a display box. If you’ve used a round body, a slightly larger circle under the torso keeps everything grounded. The wider the base, the less you’ll see tilt when you place the toy down.
Then, you’ll prepare the stuffing and the outer cover so the base looks neat. Pack the base with a light, even fill before you add pellets. The goal is a smooth, solid plane with no lumps that catch on fabric. Smooth edges and a clean seam line help the base sit flat, and a little extra fabric around the edge keeps the slope gentle rather than abrupt. Keep testing by placing the toy on a flat surface as you sew, and adjust the base until it sits with confidence.
Finally, you’ll finish by sewing the base to the rest of the amigurumi securely. Use small, hidden stitches that don’t affect the surface texture. A secure bond helps the base stay flat even with handling or moving. You’ll feel the difference when you lift your toy—the base should feel sturdy, not flexible or wobbly. This foundation is what makes the whole piece come together and stand up to daily use.
Add pellets in layers for balance
Layering pellets lets you fine-tune how your amigurumi sits. Start with a light layer at the bottom to prevent sinking into the stuffing and to anchor the base. Add a middle layer for balance, making sure it sits evenly, then a lighter top layer so the upper body doesn’t tilt forward. Your goal is balanced weight distribution that meets your toy’s shape and posture. If the head tilts, add a little more weight toward the back or bottom layer; if the torso tilts, adjust the middle layer accordingly. Small changes here make a big difference in the final sit.
As you layer, test the sit frequently. Place the completed piece on a flat surface and observe its stance. If it wobbles, you can peel back a layer and move pellets into a different pocket or adjust the overall fill. Don’t overstuff at once—tiny adjustments add up. You’ll learn how much weight your design needs by trial and error, and you’ll feel more confident with each toy you complete.
Finally, you’ll lock in the layers with the pocket placement. The pellets should sit low enough to avoid bulk at the neck or chest, which can throw the posture off. Keep the layers evenly distributed so the weight doesn’t pile on one side. When you achieve a steady, upright sit, you’ve earned a reliable base that makes posing and showcasing your amigurumi easier than ever.
Amigurumi sitting stability techniques
- You want your amigurumi to sit upright and steady, right? You’ll get there with careful weight placement and a few simple tricks. Start by testing how your toy leans when you gently set it down. If it tilts, you know you need to adjust before you finish sealing. The goal is a natural, balanced posture that stays put on a shelf or in your hands. Think of it like balancing a small statue: a tiny shift in weight can make a big difference in stability. By focusing on where the weight sits, you’ll keep your toy from toppling over during play or display.
- Practice makes perfect, so work in stages. After you’ve attached limbs, place your amigurumi on a flat surface and observe. If a leg or arm sticks out too far, it can push the center of gravity off-kilter. You can fix this with minor repositioning or by adding a small bit of weight to the opposite side. The aim is a calm, centered sit that looks natural. Don’t rush the process—tiny tweaks today save you from wobble problems tomorrow.
- Keep notes on what works. When you find a setup that balances nicely, jot down where you added weight and how much. Your future projects will thank you for that map. Consistency matters, especially if you’re making a whole family of characters. A little documentation helps you reproduce stable sits without redoing the entire piece. Remember, your best-looking sit often comes from small, deliberate adjustments.
Move limbs to help balance your toy
- Position each limb with balance in mind. If one leg bears too much weight, your amigurumi will lean. Move the limb slightly toward the heavier side to even things out, then test again by setting it down. It’s a quick, repeatable step you’ll use often. When you adjust, imagine you’re nudging a tiny balance scale to the middle.
- Adjust the arms for subtle steadiness. Sometimes the arms pull the toy forward or back. Tuck or slide an arm a touch closer to the body or reposition it so the chest area sits level. A small tweak here can stop front-leaning or tail-dipping. You’ll notice the difference on the first try if you keep your changes small and incremental.
Give feet flat surfaces or weighted paws
- Flat feet create a solid base. If your amigurumi’s feet are rounded or pointy, they can roll or wobble. Flatten the bottom surfaces a bit or add a tiny, flat pad using fabric scraps or felt. The cleaner the bottom, the more stable the toy will sit. It’s a simple tweak that makes a big impact without changing the look you worked hard to achieve.
- Weighted paws anchor the toy. If the feet aren’t enough, tuck a small weight into each paw or behind the legs. The goal is to lower the center of gravity enough that the toy won’t tip with a gentle nudge. Use safe, soft weights like small pellets wrapped in fabric. You’ll feel the difference when you set your amigurumi down—the sit stays put.
Use markers to find best weight spots
- Mark the balance spots as you test. Place your amigurumi on a flat surface and add weight gradually, moving it around to see where it sits best. Use a small, removable marker (like a pin or thread) to note the exact spots you added weight. This creates a map you can reuse on future projects, speeding up the process next time.
- Refine the balance with measured increments. After you locate a promising weight, test from different angles and adjust in tiny steps. If the toy still wobbles, shift the marker location slightly and re-test. The goal is a repeatable, stable sit you can predict every time.
Safety tips for weighted amigurumi
Keep the weight low and controlled to prevent tipping or risk for little hands. When you plan your design, think about how the toy will sit, how it’ll move, and where the pellets will live. A balanced shape makes it easier to plush up without odd lumps that could squish the pellets and leak. If you use weights, test the balance by placing the figure on a flat surface and nudging it gently. The goal is to have it sit upright without wobbling or tipping over during normal play.
Now, consider your yarn and seams. Strong seams are non-negotiable when pellets are inside. Double-seam and secure the last stitch so there’s no way for tiny fingers to reach the pellets. If you notice a seam starting to loosen after a few days of play, reinforce it right away. A loose seam is more than a cosmetic issue—it’s a safety risk. Also, think about the opening you’ll use to insert the pellets. Keep it small and secure, and never leave a big gap that could spill pellets out.
Finally, test the finished toy with supervision before it goes to a child’s room. If it wobbles or leaks a little, fix it before any rough handling begins. Your aim is a toy that sits nicely, stays intact, and feels sturdy in every hug.
Keep small pellets away from kids
Pellets can be tempting to tiny fingers, so you’ll want to keep them out of reach. Use a tightly closed inner pouch or liner made from a durable fabric that’s stitched into place. Label the pouch clearly in a way that’s easy to read so parents know there’s something inside the toy they should avoid swallowing or inhaling. If pellets spill, clean them up quickly and recheck the seam for any weakening. It only takes a small hole to let loose a big mess, so make sure every pellet is locked away behind strong stitching.
When you’re choosing pellets, go for non-toxic, low-dust options designed for crafts. These reduce the chance of irritation if a seam breaks. It’s also smart to avoid shiny, loose granules that could cling to small hands or travel across the floor. Regularly inspect the toy after play and remind care partners to do the same. You’re aiming for a toy that’s safe in the moment and reliable over time.
Remember, supervision is key with younger kids. Even a well-made toy deserves a guardian’s watchful eye. Teach kids gentle handling and show them how to participate in play without squeezing the toy too hard. Your careful approach keeps everyone safe while you enjoy the craft.
Choose washable options and seal well
Washability matters because you’ll want to clean the toy without fear of pellets escaping. Choose fabrics and fillings that tolerate gentle washing or spot cleaning, and design the inner pouch so it won’t shed fibers or loosen seams after a wash. When you seal the pellet area, use a zipper, snap, or a snug fabric flap that can be secured before washing. A proper seal keeps colors bright and pellets inside, even after splashes or accidental dips.
Seal every edge where the pellets touch the inner fabric. Use a food-grade or craft-safe sealer that won’t degrade the material over time. If you use a needle and thread, go with a strong, high-quality thread and backstitch at the openings. A well-sealed interior means your amigurumi stays safe and looks neat, even after multiple cleanings.
If you’re unsure about a wash method, test a small piece first. Let it dry completely and then check that the seal holds. Your goal is a toy that cleans up nicely without losing its weight balance or shape. A washable, well-sealed design keeps your craft practical and enjoyable.
Label toys with care and safety notes
Add clear labels so caretakers know how to handle the toy safely. Include a note that indicates there are weighted pellets inside and advise gentle play. You might put the label on the underside or inside a removable card, so it’s visible but doesn’t affect the toy’s look. Bold the safety points on the label so they catch the eye, and use simple language that anyone can understand.
A brief instruction like: Contains weighted pellets. Do not open. Washable on gentle cycle helps guardians know exactly what to do. If you include care instructions, keep them short and direct. Your label should serve as a quick safety reminder during busy moments. This small step can prevent mishaps and reassure parents about playtime.
Sewing and finishing for long-term hold
You want your project to stay solid, not sag or wobble after a few weeks. Start by planning your stitching so the layers stay together when weight is added. Use a sturdy needle and a thread that matches the fabric’s stress points. As you sew, keep consistent tension and avoid long, loose runs that can pull apart. When you finish a seam, backstitch at the ends to lock the stitches in place. This creates a strong backbone that resists everyday use and washing.
Next, reinforce high-stress areas where weight sits or where repeated movement happens. These spots are the first to fail, so doubled seams or a zigzag stitch can add reliability. If you’re working with a soft filling, pin the layers in place before stitching to stop shifting. You can also add a small fabric patch on the inside for extra grip. The goal is to make every seam carry the load, not just the surface looks.
Finally, plan the finishing touches like trimming threads closely, turning corners smoothly, and pressing without scorching. A clean edge reduces snagging and gives your project a neat, professional finish. If you’re gifting, take a moment to ensure every seam is flat and every thread end is tucked away. A well-finished piece feels sturdy in the hand and says you cared enough to do it right.
Reinforce seams where weight sits
When weight sits, your seams take the hit. You’ll want double stitching or a box stitch pattern at those points. This locks the fabric layers and fills the seam with extra grab. If you’re sewing by hand, use a tight, even backstitch that repeats where the load is greatest. For machine work, a reinforced backstitch at the start and end of each weight-bearing seam does wonders. Don’t skip this—the first week is when the real stress shows up, and you’ll be grateful you reinforced it.
Another solid approach is to add a small inner lining or a fabric patch where the weight sits. This spreads the pressure over a larger area and prevents tearing. If your project is heavy, consider a stronger yarn or thicker thread for those seams. You’ll notice the difference in how long the piece holds its shape and how little it strains during use.
Use tight stitches and strong yarn
Tight stitches lock fabric fibers so they don’t pull apart under pressure. Set your stitch length to a snug setting and test on scrap first to avoid puckering. A tighter stitch also produces a cleaner edge that wears better over time. Pair this with a strong yarn or thread—nylon, cotton-wrapped polyester, or a waxed thread can handle heavier loads without snapping. The right combination makes your project feel sturdy rather than flimsy.
When you choose yarn, think about weight, flexibility, and how you’ll handle the piece. A slightly thicker yarn resists stretching, while a more flexible one helps the item keep its shape after use. If you’re stitching by hand, use longer, even stitches to distribute tension evenly. If you’re using a machine, a reinforced needle and proper tension keep loops from fluttering and snagging.
How to Use Weighted Pellets to Make Your Amigurumi Sit Upright (quick recap)
- Start with poly pellets for a safe, versatile base, and consider micro-poly pellets for lighter, delicate builds.
- Weigh and place weight low and center to establish a stable center of gravity.
- Use a snug inner pouch to contain pellets, then wrap with fiberfill to shape.
- Test sits frequently as you sew—adjust weight in small increments until the pose stays upright.
- Seal openings twice and reinforce high-stress seams for long-term hold.
- Choose washable options and clearly label toys with care and safety notes.
Want to know more about How to Use Weighted Pellets to Make Your Amigurumi Sit Upright? Combine the strategies above for a dependable, display-ready friend that sits, stands, and hugs back with confidence.

Clara Fern — Crochet Artist & Amigurumi Designer
Clara Fern is a crochet artist and amigurumi designer based in Austin, Texas. With 9 years of experience working with yarn and hook, she transformed a lifelong passion for handcraft into a creative mission: making amigurumi accessible, fun, and deeply rewarding for crafters of all levels.
Clara discovered amigurumi during a trip to Japan in 2017, where she fell in love with the art of bringing tiny characters to life through crochet. Back home in Texas, she spent years studying color theory, design principles, and advanced crochet techniques — developing her own signature style that blends kawaii aesthetics with original character design.
Through maclafersa.com, Clara shares everything she has learned — from choosing the right yarn and reading your first pattern, to designing fully original amigurumi characters from scratch. Her writing is known for being clear, detailed, and genuinely helpful, with no steps skipped and no secrets kept.
When she’s not crocheting, Clara enjoys watercolor painting, visiting local yarn shops, and drinking way too much coffee while sketching new character ideas.


