
Pick your first free beginner amigurumi pattern
Amigurumi is a fun game you can win with your own two hands. Choose a simple, satisfying first pattern to feel a small victory rather than a maze. You’ll learn basic stitches, reading patterns, and how to keep your tension even. Start with a design using few shapes and basic rounds—this is your stepping stone to bigger projects.
Match your mood: cozy, go for a little stuffed animal friend; curious, try a quick, cheeky creature. The key is to choose something you won’t get bored of mid-row. Your first project should show quick progress and boost your confidence for the next steps in your amigurumi journey.
As you pick, think about yarn weight and hook size that feel comfortable. A thicker yarn and larger hook move faster and reveal stitches clearly. With practice, your stitches will become neater, and you’ll celebrate a tiny victory—learning to read stitches, count rounds, and keep your work tidy.
Choose a simple beginner amigurumi pattern free
Pick a pattern with clear, simple shapes described in easy terms, short rounds, and a few color changes. A single crochet pattern makes mistakes easier to spot and fix. A pattern that explains each round plainly helps you feel steady and see progress from the start.
Choosing a free pattern is also about trust. Look for creators who show close-up photos of each step and notes like sew seam after stuffing or leave a long tail. When you can see how stitches sit on the fabric, you’ll learn faster and avoid common missteps. A good beginner pattern walks you through the basics and gives you small, doable tasks you can finish in one sitting.
Look for clear photos and stitch counts
Clear photos guide you as you learn, helping you see how stitches should look and where to place your yarn. If a photo shows a messy edge or loose stitch, you’ll know you’re on the right track to fix it. The more close-ups the better, especially of the start, seam lines, and finishing touches. You’ll feel confident when you can compare your work to the pictures and spot what to adjust.
Stitch counts matter, too. A pattern that lists stitches per round keeps you in check. If you’re off by a few, you’ll spot and fix it before you’re deep into the pattern. A pattern with clear counts and notes saves time and prevents frustration.
Download a starter pattern free
Downloading a starter pattern for free is smart. It lets you practice without spending a dime and gives you a feel for the designer’s style. Choose a file that includes both written instructions and a pattern chart, if possible. A good starter pattern includes supplies, a simple gauge note, and a plan for stuffing and finishing to help you set up quickly.
After you download, save the file where you can reach it easily. Organize patterns by difficulty so you can grab a new starter project as soon as you finish one. A tidy habit now saves time later and keeps your love for amigurumi alive. If you hit a snag, you’ll have a reliable, readable pattern to fall back on. Your future self will thank you for starting with clarity and simplicity.
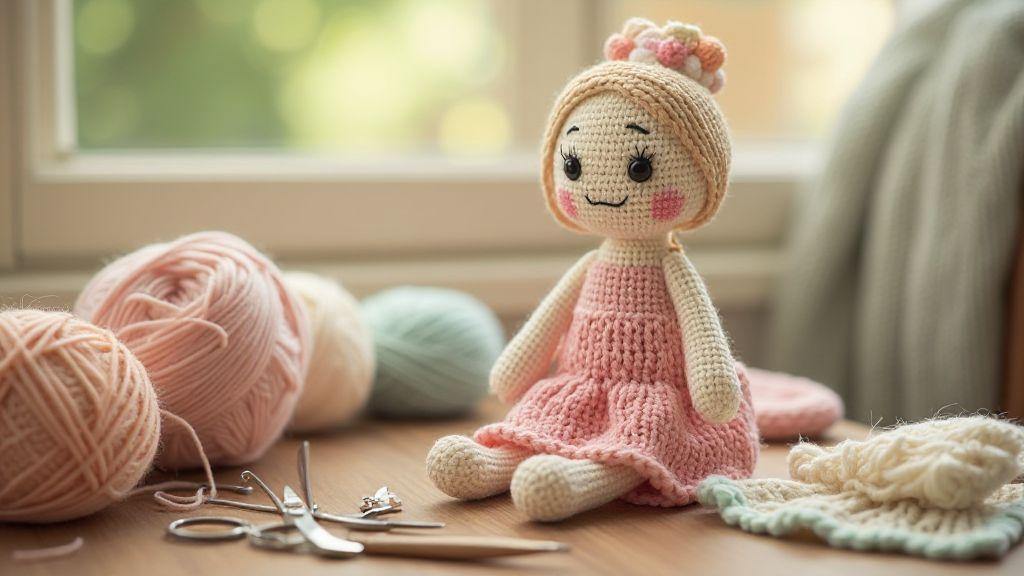
How to Make Your First Amigurumi Doll: Free Step-by-Step Pattern
Think: How to Make Your First Amigurumi Doll: Free Step-by-Step Pattern. Let this goal guide your learning, keeping you focused on tight, even stitches, steady round-by-round progress, and a clean finish. This free pattern path helps you learn and celebrate small wins.
Finish your first doll and notice neat stitches, even stuffing, and tidy seams. You’ll learn to attach limbs, add a face, and sew up without gaps. Each step builds confidence for the next project. Patterns aren’t puzzles—you’re learning a repeatable set of steps you can apply to different shapes and colors. Your first amigurumi doll is proof you can learn, practice, and create.
Pick yarn weight and hook size that match the pattern
You want your finished piece to look like the photo, not a lopsided mess. Start by checking the pattern’s recommended yarn weight and hook size, then pull those exact options. If you’re new, stick with the suggested combo; it’s your best bet for smooth stitches and proper scale. When in doubt, a quick swatch lets you see how your yarn and hook work together before you dive in.
If you can’t find exact numbers, choose a similar weight and adjust later. A slightly smaller hook tightens stitches and a slightly larger hook loosens them. The aim is clean, even stitches, so test a few rows and compare to the pattern’s tension. Once your swatch matches, you’ll feel confident continuing.
Collect stuffing, safety eyes, yarn needle, and stitch markers
Your doll needs a soft, safe body and little details. Gather stuffing that’s fluffy and clean, plus safety eyes if your pattern uses them. For kids’ toys, safety eyes are important, so check age recommendations. A yarn needle closes tiny seams and threads ends, and stitch markers help you see your place in the rounds, preventing missed stitches or twists.
Keep scissors handy for trimming tails and a spare yarn tail for quick repairs. Group these in a tray or box so you don’t hunt mid-pattern. With everything together, you’ll stitch with better accuracy and fewer interruptions, finishing with a neat, polished look.
Prepare your tools before you start
Lay out your tools in order: hook, yarn, stuffing, eyes, needle, and markers. Having them ready reduces pauses, keeping you steady from first stitch to final seam. If you’re using safety eyes or small parts, attach them early as the head takes shape. Double-check you have a spare needle and a few spare tails for quick fixes.
Master the basic amigurumi stitches tutorial
Learning amigurumi starts with your stitches. You’ll feel the rhythm as your hook moves and your yarn counts tell you you’re on track. Think of this as laying bricks: steady hands, even mortar, and a clear plan. You’ll practice core stitches until they become comfortable, then you’ll see your figures take shape. This section builds a foundation you can trust for every project.
First, you’ll learn the magic ring. This lets you start in the center with a tight, adjustable loop that closes cleanly. Next comes the single crochet, the workhorse stitch of amigurumi. Finally, you’ll master the invisible decrease, which hides the decline. Combine these stitches for rounds with clean edges and no visible gaps, giving your dolls a professional look.
As you practice, focus on tension and counting. Your goal is even rounds from start to finish. If you’re off, you’ll see bumps or uneven edges. Count out loud or keep a small rhythm to stay on track. With time, your rows will look the same, round after round, and your stitches will feel automatic.
Learn magic ring, single crochet, and invisible decrease
You’ll begin with the magic ring. Hold the yarn so the tail sits across your palm, wrap to form a loop, then pull through with the working yarn. Tighten until the center closes. Now you’ll work your first round in single crochet stitches. Insert the hook, yarn over, pull up a loop, yarn over, and pull through both loops. Repeat until the round is finished, then join or continue as directed.
Next comes the invisible decrease. Insert your hook into the next stitch, yarn over, and pull up a loop. Then insert into the following stitch, yarn over, and pull up another loop. Yarn over and pull through the two loops to reduce two stitches to one. Continue around the round with consistent tension for a neat decrease, especially at the top of heads or limbs.
Practice tension and counting for even rounds
Your goal is steady tension and precise counting. If your tension is too tight, stitches may curl; too loose, and your work will gape. Practice with a small swatch, count stitches per round, and compare. Use a marker to track the last stitch, so you stay on target. With consistency, your rounds will sit flat and edges stay even, making your final piece look polished.
Repeat stitch practice until confident
Keep practicing these stitches until you’re confident with real projects. Start with a tiny practice piece like a ball or simple head, applying magic ring, single crochet, and invisible decrease to shape it. When you’re comfortable, move to more complex patterns, but always return to basics if you stumble. The repetition helps you recognize what you’re doing right and where to adjust your grip or tension.
How to Make Your First Amigurumi Doll: Free Step-by-Step Pattern
You’ll want a clear, friendly guide as you begin. This pattern gives you a gentle path from magic ring to finished doll. Use it to practice your stitches in a real, rewarding project. You’ll see how each technique fits together, and you’ll celebrate the tiny wins along the way—like a perfectly neat head or a seam that hides well.
Read a free crochet amigurumi doll pattern step by step
You’ll dive into a simple, friendly process that guides you from first stitches to a cuddly doll. As you follow along, you’ll see how small changes in rounds make big differences in shape. Think of it like building a toy from a mini blueprint: each round is a brick you lay with care. If you’re new to crochet amigurumi, this step-by-step approach helps you stay confident and steady, so your doll comes out close to your vision. You’ll learn to adjust tension and stitch counts to get the look you want, whether you’re making a sleepy panda or a playful bunny.
When you read a free pattern, you’ll notice you’re following a story in stitches. The round-by-round plan keeps you organized, so you won’t lose track of where you are. You’ll use simple abbreviations that save time and keep your hands moving. With each completed section, you gain a win you can use on your next project. This approach makes crocheting feel less like guessing and more like a craft you can own.
As you work, you’ll build a tiny world you can hold and gift. You’ll learn how to keep yarn tidy, how to stuff just right, and how to sew pieces together so your doll sits naturally. The more you practice, the smoother your hands become, and your confidence grows with every round. This is your chance to turn ordinary yarn into something someone will treasure.
Follow rounds, increases, and decreases in order
You’ll keep to the exact order the pattern gives you, and that’s how you avoid mistakes. Following rounds in order helps your doll grow the right shape at the right pace. When you see an increase, add stitches exactly where the pattern tells you, and when you see a decrease, close up smoothly so the body remains in shape. Keeping the rhythm helps you learn how each stitch changes the curve of your doll.
If you get stuck, slow down and re-count. It’s okay to check your work at the end of a round and compare with the pattern’s round number. Using the order keeps your texture even and your seams neat. With practice, you’ll recognize the feel of a correct round by the tension you’ve built in your hands and start predicting where increases or decreases land, which speeds you up over time.
Use abbreviations and pattern notes to avoid mistakes
Abbreviations are shortcuts to speed and accuracy. Look for magic ring, inc, dec, st, and rnd. Quick notes about each help you stay on track: the magic ring starts your round with a tight center; inc increases stitch count evenly; dec closes spaces smoothly; st is the base stitch; rnd refers to each round. Pattern notes flag tricky spots, like where to place increases or how to stuff limbs. Paying attention to notes saves you from second-guessing later and keeps your work consistent.
Remember tips like no joining (crochet in the round) or tight weave (pull a bit firmer) to avoid common slipups. These tiny, mighty hints keep your fabric neat and your joins clean.
Mark your progress as you go
Tracking progress helps you stay motivated and catch errors early. After completing a round or a key section (head, body, or limbs), mark your progress with a simple note on the pattern or in your notebook. A check, dot, or highlighted line shows how far you’ve come. This habit makes it easier to resume after a break and compare your current doll with the pattern photo.
Marking progress builds a reusable record. You’ll learn what you did right and what to tweak next time, noticing patterns in your own stitching—where you tend to tighten or loosen—and adjusting on future patterns. Your future dolls will thank you for the steady habit you started today.
Crochet the head, body, arms, and legs with ease
Crochet each part in a smooth, steady rhythm, checking gauge for even size. When tension stays consistent, the head, body, arms, and legs align like puzzle pieces you’ll assemble later. If your yarn has memory, give it a gentle tug after each round to settle it, then continue with confidence. Practice makes perfect, and small, deliberate moves add up to tidy shapes you’ll be proud to show off.
Label pieces in your mind (or with a sticky note) so you know which is which. The head might need slightly tighter rounds, while limbs stay a touch looser for flexibility. If you pause, use a stitch marker to mark the last stitch and resume without losing count. When you finish a piece, close the last round firmly but not so tight that you warp the shape. Clean, even edges matter for a cohesive finished doll.
When joining parts later, keep a calm rhythm now. If a round feels off, measure quickly and adjust the next rounds. Stay focused on pattern counts; small deviations early can multiply later. With steady pace and careful counting, you’ll have a head and limbs that look naturally matched, ready for assembly.
Make identical limbs by copying rounds and counts
The secret to matching limbs is copying the exact rounds and counts for each arm and leg. Keep rounds labeled and work from the same starting round for every limb. Once you write down the sequence, you’ll repeat it reliably. When switching limbs, ensure the same number of stitches and the same increases and decreases so they mirror each other.
Pause to place a stitch marker at the start of each new limb to keep the beginning and ending on the same note. Double-check counts before closing a limb; a missing stitch can throw off the entire set. Treat each limb as a mirror of the last to save time and reduce frustration during assembly.
Keep tension steady and compare stitches side by side to confirm alignment. If there’s a tiny difference, adjust the next rounds to keep shapes uniform.
Shape the head and body using increases and decreases
Use increases and decreases to shape the head first, forming a smooth dome, then apply the same approach to the body for a natural torso line. Plan where curves peak and place increases and decreases there. If unsure, visualize the silhouette and mark shaping points with a stitch marker. Slow, deliberate shaping yields a living, curved form rather than a flat one. Check symmetry and balance as you go, adjusting increases and decreases on opposite sides to even out the shape. By the end, you’ll have curves that flow naturally from neck to crown and from shoulders to hips.
Use amigurumi stuffing and assembly tips
Choose stuffing that’s firm yet soft so the form stays lively. Press gently in small amounts to avoid lumps, adding more as needed to fill hollow spots evenly. Smooth the surface as you go so the overall shape stays balanced. Stuffing should reflect the character’s mood—soft curves for a sleepy bear, sharper angles for a brave fox. Weighing the bottom or paws sparingly can help with balance; rotate pieces while filling to keep density even. When assembly begins, lay out the pieces and plan the sewing order. Tidy, tight seams make the toy look polished and hold its shape through play and washing.
Stuff firmly but evenly to keep shape
Stuff in small increments to avoid overpacking. If you notice a flat spot, add stuffing there and press into place. Aim for a consistent silhouette from tip to tail. Don’t rush—steady stuffing yields a better toy. Consider the character’s personality when shaping curves and density. If weighting is used, add only a little to avoid shifting balance.
Rotate the piece as you fill to maintain even density. Check thickness with light pressure and ensure there’s resistance rather than a hard edge. This careful approach keeps the amigurumi looking right from every angle.
Sew pieces together with ladder stitch for neat seams
Ladder stitch gives clean joins. Start with a knot inside, then bring the needle up through the edge of one piece and down through the edge of the other, making evenly spaced stitches that hide inside the seam. Keep stitches uniform in length so the seam lies flat. If you see a gap, pull gently to close it without warping the fabric. The seam line should become almost invisible as you go.
Switch between pieces to avoid snagging fibers. When done, secure with a knot inside and trim close to the knot. A neat seam helps the toy hold its shape and reduces loose threads, which is safer for kids. Tight, tidy stitching is the backbone of a durable amigurumi.
Add eyes, hair, and facial details safely
Choose durable options that stay put. Safety eyes that snap in place, or embroidery for a softer kid-friendly look, are both good choices. If using safety eyes, ensure backing is secure and snug. For embroidery, keep stitches small and tight to avoid snagging. Place features to maintain a balanced, friendly face and hide stray threads inside seams.
For hair, loop yarn through small, evenly spaced stitches and knot inside with a tight stitch. For mohair or yarn strands, keep sections short and secure with backstitches so hair stays in place. A light brush after finishing helps reveal gaps to fill. Finishing begins with neat starts and ends for a polished look.
Choose safety eyes or embroider features for kids
For kids, safety matters. If you choose safety eyes, pick posts designed to resist tugging and test with a gentle pull. If you embroider features, keep stitches small, tight, and close together to prevent loosening. Practice on scrap fabric to find the right tension. The face should read clearly and be friendly, not a tangle of loose threads.
If you’re unsure, start with embroidery for the mouth and nose and reserve safety eyes for final touches around the eyes or cheeks. This preserves a soft look while keeping the safest option on the most-tugged areas.
Attach hair or yarn details with small stitches
Attach hair with short, precise stitches. Anchor strands with small knots inside, then secure with tight backstitches. For yarn curls, stitch across the base in a grid to hold evenly and avoid long loose loops. Space strands evenly and mirror them for symmetry. Hide the final knot inside a seam allowance or beneath a hairline, and trim close to the knot for a neat edge.
Finish features cleanly for a polished doll
Weave in all ends with a hidden knot inside the head or neck seam. Trim tightly and brush fibers to settle them. If gaps appear around the eyes or mouth, add tiny stitches to close them instead of adding new threads. A clean finish makes your doll look professional and ready for hugs.
Troubleshoot common first amigurumi project pattern issues
Even the best patterns can pose challenges. Learn to spot tension mistakes, uneven shapes, and where to adjust as you crochet. By the end, you’ll finish a cute mini creature with clean stitches and smooth curves.
First, check for even stitches. Gaps or holes can mean slipping yarn or off tension. Compare to the pattern photos and count stitches in a few rows to confirm. If gaps appear mid-piece, you may have pulled too tight or too loose in the previous round. Fixing early saves time later.
Next, ensure you’re following the pattern’s sequence for increases and decreases. A missing increase or extra decrease can throw off shape. Quick tally: do the stitches per round match the pattern? If not, pause, find the divergence, and correct before continuing.
Fix gaps, loose stitches, and uneven stuffing
When you spot a gap, tighten nearby stitches and adjust stuffing. If a gap remains, insert a small bump of yarn through the gap to close it without creating a lump. If stitches are loose, go back to the last round and snug them slightly as you proceed. For stuffing, use small bits and compress evenly to avoid lumps. If a limb looks flat, add tiny amounts of stuffing through the seam and smooth gently.
Uneven stuffing happens when you rush. Pause to distribute the filling evenly, pressing along seams to balance the shape. This helps the amigurumi keep its intended form and prevents wobble later.
Adjust hook size or yarn if your gauge is off
If your stitches are too tight or too loose, adjust accordingly. Try a hook one size larger for tighter stitches; one size smaller for looser. If the yarn seems off from the pattern gauge, switch to a similar weight and recheck with a swatch before continuing. Small, safe tweaks preserve proportions and improve finish.
Correct mistakes early to save time
When you notice a miscount or wrong stitch, fix it now. It’s easier to correct a single row than backtrack later. Mark your place with a removable stitch marker, then rework the stitches to match the pattern. If you miss an increase or inadvertently add one, fix it immediately and re-check the round count. Early corrections save you from redoing large sections.
Before moving on to the next part, verify the final piece’s shape. If a head is flat or a limb isn’t forming, compare to the photos and adjust your next rounds. Trust your eye and fix when you can.
Find downloadable amigurumi pattern free and next steps
Discover a world of free amigurumi patterns you can start today. Look for Beginner or Easy patterns with clear photos and step-by-step instructions. When you start, choose a design that matches your comfort level, and remember that every stitch you finish brings you closer to the next, bigger project. Create a folder or bookmark system so you can return to favorites without hunting again. Build a personal library you can reference whenever you want to try something new.
Patterns with glossary terms or tips for common issues save time. If a pattern has many photos, use them as a guide to check your work. Save your favorites and note tweaks you make so the designs become easier next time.
Batch-print or save patterns for offline study. This keeps your hands busy while you learn and protects your place when you’re away from the internet. Tag patterns by difficulty and by planned month to work on them. Your future self will thank you for the organization—and you’ll see your skills grow faster than you expect.
Search for easy amigurumi doll tutorial for beginners
Look for a tutorial that breaks down each round into small, clear steps. It should explain why you twist stitches and show how to hide ends neatly. A good beginners’ tutorial uses simple language and plenty of photos or short videos. If unsure, pause and compare your stitches to the picture to spot mismatches sooner.
Keep a notebook or digital notes of questions you have. When you finish your first practice doll, revisit the tutorial to see what you improved. A printable cheat sheet for basics like slip knots, single crochets, and increases is invaluable. The more you practice with these easy steps, the more your hands remember the motions, and your first amigurumi doll will start looking more like the pattern.
Move from first amigurumi project pattern to new designs
After finishing your first project, branch out by choosing patterns that introduce one new technique at a time—different eyes, noses, or hair textures. This keeps learning manageable and exciting. As you try new designs, you’ll notice tension, stitch consistency, and color changes becoming smoother. Keep a small gallery of finished dolls as your progress track and a source of pride.
When selecting your next design, look for notes from other makers. Tips you’ll read about—like changing yarn thickness or stuffing differently—save time and frustration. Each new design is a chance to apply what you’ve learned and push your skills just enough to stay motivated.
Save patterns and keep practicing regularly
Saving patterns is part of building a practice routine. Set a weekly goal, like finishing one small doll or practicing a new stitch three times. Consistency matters more than speed, so choose a pace that fits your life. When you save patterns, add notes about changes or tricky spots. Those notes become your personal guide for the next similar design.
Revisit saved patterns to reinforce skills. As you practice, you’ll finish projects faster with cleaner ends. Keep a dedicated bag with a few skeins, hooks, and a needle near your workspace to make your next stitch effortless. With steady practice, you’ll enjoy solving little challenges and watch your amigurumi talent grow.

Clara Fern — Crochet Artist & Amigurumi Designer
Clara Fern is a crochet artist and amigurumi designer based in Austin, Texas. With 9 years of experience working with yarn and hook, she transformed a lifelong passion for handcraft into a creative mission: making amigurumi accessible, fun, and deeply rewarding for crafters of all levels.
Clara discovered amigurumi during a trip to Japan in 2017, where she fell in love with the art of bringing tiny characters to life through crochet. Back home in Texas, she spent years studying color theory, design principles, and advanced crochet techniques — developing her own signature style that blends kawaii aesthetics with original character design.
Through maclafersa.com, Clara shares everything she has learned — from choosing the right yarn and reading your first pattern, to designing fully original amigurumi characters from scratch. Her writing is known for being clear, detailed, and genuinely helpful, with no steps skipped and no secrets kept.
When she’s not crocheting, Clara enjoys watercolor painting, visiting local yarn shops, and drinking way too much coffee while sketching new character ideas.


