
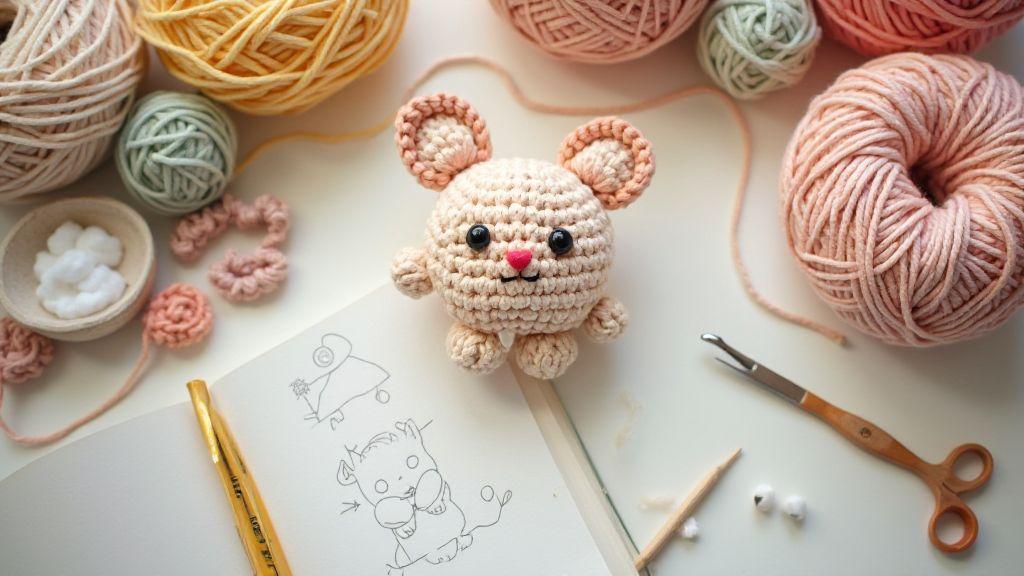
Spark your amigurumi idea
You want a spark that turns into a snug, cuddly project. Start by noticing what makes you smile in everyday life. A stuffed animal you loved as a kid, a favorite snack mascot, or a quirky animal you spot at the park can all be seeds for your idea. Write down three feelings you want your amigurumi to give—cute, funny, brave—and then pick one as your hero. Your goal is a clear vibe, so your final piece feels honest and close to you.
Look for simple real-life references. A small pet, a playful bird, or even a drawing you made as a kid can guide shape and proportions. Don’t chase perfection; instead, copy the shapes you recognize. Round heads read friendly, long ears say perkiness, and short limbs suggest goofiness. Use these clues to map your character’s silhouette before you stitch, so your amigurumi feels coherent from the first loop to the last knot.
How to Create Your First Original Amigurumi Character starts with a single, honest idea. Imagine your character wearing a tiny hat or holding a favorite item. Sketch a rough plan: head shape, body length, limb positions, and any cute details. This isn’t art school; it’s a quick map you can follow while you crochet. Remember, originality shines when you mix familiar shapes with a tiny twist—like a bunny with striped ears or a fox wearing tiny glasses. Your unique touch will make your character memorable.
Quick idea checklist
- Define your character’s vibe (cute, quirky, brave) and pick one focal trait.
- Choose a simple shape as your base (sphere head, oval body, short limbs).
- Add one distinctive detail (hat, accessory, color block) to stand out.
- Think about pose—standing, sitting, or playful action—to guide stitching.
Look for simple real-life references
Your everyday world is a goldmine. Notice a friend’s goofy grin, a pet’s expression, or a plant with a funny leaf shape. Use these cues to shape your amigurumi’s face and posture. Simple references keep your pattern approachable and your character relatable. When you mix real life with crochet, your idea stops feeling abstract and starts feeling real.
Capture small details that tell a story. A tiny scarf, a favorite color combination, or a small prop can give your character personality without complicating the pattern. If you spot a whisker tilt or a curious eye, note how it changes the mood. These tiny choices matter and will show up in your stitches, making your character feel alive.
How to Create Your First Original Amigurumi Character
You’ll want a practical path from concept to yarn. Start with a basic ball for the head and a rounded cylinder for the body. Keep the stitch count simple so you can adjust as you go. Add limbs with short, straight pieces and secure them where you want your character to move or sit. Then introduce your signature twist—like a color-block sweater or a tiny backpack.
Finish with a few embellishments that don’t overwhelm the form. A single eye detail, a smile line, or a tiny accessory can punch up character without breaking the pattern. If a detail doesn’t feel right, swap it for something you love more. The key is to stay flexible and let your original idea evolve as you crochet.
Quick idea checklist
- Define the vibe, choose a simple base shape, and add one distinctive detail.
- Use a straightforward pattern to keep progress steady and fun.
- Add a tiny prop or accessory to tell your story.
Choose yarn and hook for your amigurumi
You’ve decided to dive into amigurumi, and the first step is picking yarn and a hook that fit your project and your hands. Your choices affect softness, stitch definition, and how easy the pieces come together. Start by thinking about what you want your finished toy to feel like and how durable you need it to be. If you want a cuddly plush, you’ll lean toward softer fibers; if you want sharp details, you’ll choose a yarn that holds shape well. Your journey begins with recognizing how tiny differences in yarn weight and fiber can change the whole character of your amigurumi. Remember, the right combination makes the process smoother, not messier.
As you experiment, note how you hold your hook and yarn. Some people prefer a snug grip, others a loose one. The way you hold them changes your tension and the look of your stitches. If you’re just starting, keep a simple, comfortable setup: a medium-weight yarn and a hook that feels natural in your hand. You’ll learn quickly which textures you like for different characters, from fuzzy animals to sleek creatures. Your comfort matters because it keeps you creating rather than stalling.
When you finish a few practice pieces, you’ll see patterns: certain yarns bloom with color, others stay crisp. You’ll also discover that your favorite hook size can vary by brand, even within the same weight category. This is normal. Trust your hands, and don’t be afraid to swap yarns or hooks as you grow. Your choices today lay the foundation for a smooth, enjoyable making journey.
Best yarn types for amigurumi
Your best bets start with a few dependable yarns. Cotton is a classic for amigurumi because it offers excellent stitch definition and is easy to wash. It doesn’t stretch as much as some other fibers, which helps your shapes stay sharp. If you want a softer end feel, look for cotton blends that include a bit of acrylic for extra fluff. For beginners, a medium weight (like DK or Worsted) cotton blend hits the sweet spot of ease and definition. Your goal is clear: crisp stitches that hold their form and colors that stay true after a few wash cycles.
Another solid option is acrylic yarn. It’s widely available, affordable, and forgiving on tight stitches. Acrylic can give you a soft, cuddly result that’s perfect for creatures you carry around. You’ll appreciate its resilience if you’re going to handle your amigurumi a lot or gift them to kids. If you’re making a lot of pieces in different colors, acrylic also helps keep costs down. Just be mindful of the texture; some acrylics can be a little splitty, so slow, deliberate stitching helps.
For textured effects, consider polyester or nylon blends. They add subtle sheen and can help your amigurumi catch light in fun ways. They’re great for small details like eyes, noses, or tiny accessories. If you want a fuzzy look, you can opt for a short-pile yarn, but know that it may blur stitch definition a bit. Your choice should align with the character you’re dreaming up and how you want people to feel when they hug it. Your design goals decide the fiber.
Pick the right hook size
Your hook size sets the rhythm of your stitches. Start with the yarn’s label guidance, but be prepared to adjust based on your tension. If your stitches look loose and the fabric is airy, go down a hook size. If you find your fabric too dense or stiff, try a larger hook. The right size keeps your stitches even and your amigurumi sturdy. You’ll quickly learn that a 2.0 mm to 3.5 mm range covers most beginner projects, but your exact pick depends on the yarn weight and your personal tension.
Try this practical approach: crochet a small swatch with your chosen yarn and hook, then measure how tight or loose your stitches feel. Your goal is a fabric that’s firm enough to hold shape but not so stiff that you can’t insert stuffing smoothly. If you’re aiming for a softer, squishier look, you might prefer a slightly looser gauge. Your hook choice will influence edge crispness around details like ears and noses. Let your samples guide you toward the hook that makes your vision easiest to achieve.
When you’re deciding, keep a little kit handy: a few hook sizes in the common ranges, and a couple of yarns you’re excited to use. You’ll learn faster by testing while you design rather than guessing. Your future amigurumi will thank you for taking the time to dial in the perfect hook size now.
Yarn and hook chart
- Small swatch, big insight: check your gauge with a quick test. Your chart helps you lock in the right setup before you commit to a full project.
- If you’re aiming for crisp stitches and sturdy structure, pair cotton DK with a 3.0 mm hook. For a plush, cuddly finish, cotton blend with a 3.5 mm hook works nicely. If you want a softer, kid-friendly feel, try acrylic Worsted with a 3.0 to 3.25 mm hook range. Your best bet is to test a few combos and see which one matches your vibe.
- For textured or fuzzy yarns, start lighter on hook size to preserve some stitch definition but avoid making the fabric too loose. A smaller hook can help keep the shape intact when you stuff.
- Always label your experiments. Note yarn weight, fiber, hook size, and your impression of tension. Your future self will thank you when you’re recreating a character or troubleshooting a tight corner.
Plan amigurumi proportions and size
When you plan your amigurumi, you set the rules that guide every stitch. You’ll decide how tall it will be, how long the limbs are, and how big the head feels next to the body. This thinking before you hook saves you from rework later and keeps your design cohesive. Your plan should consider how the proportions will express character—cute and chunky for a baby look, or slender and sleek for a playful creature. By choosing a target height and a basic proportion pattern, you give yourself a clear path from sketch to finished piece. This is where your creativity meets practical limits, so you don’t overcomplicate things too early.
Think about the audience and use. If you want a plush that kids can hug easily, go bigger with a wide head and short limbs. If you’re aiming for a more delicate insect or fairy, you’ll want longer limbs and a petite head. Your plan should include a rough sketch or a quick note of the key measurements you want to hit. Keep the plan flexible enough to adapt as you crochet, but strong enough to keep your overall look consistent. Remember, your plan isn’t a prison—it’s a roadmap that helps you stay on brand while you experiment.
Your plan should also map texture and density. Decide early where you’ll add stuffing, where you’ll use tighter stitches for details, and where you’ll place features like eyes or ears. This planning makes it easier to compare progress with your target size and catch sizing issues before you’re finished. With a clear plan, you can focus on creativity while your hands do the work.
Use an amigurumi proportions and sizing guide
A sizing guide is your quick reference for getting the right feel. You’ll use it to keep percentages consistent from head to body. For example, many beginner-friendly designs use a head-to-body ratio around 1:1.5 or 1:2, depending on the look you want. You can jot these numbers down and compare them as you go, so your final piece doesn’t wander off target. A guide helps you stay true to your idea, even when you’re excited about a new detail.
You’ll also rely on a gauge check. Crochet a small test swatch to dial in your stitch tightness. If your swatch is too firm, your final amigurumi grows smaller than planned; if it’s too loose, it grows bigger. Note your gauge and adjust your hook size or tension so the final size matches your plan. Your guide is there to keep you honest about size while you explore texture and style.
Use consistent measurement points. Measure head height, body length, and limb length in a way that translates to all your pieces. That consistency makes assembly smoother and your proportions predictable. If you’re comparing ideas from different designs, you can map them onto the same scale and see which one fits your plan best. Your guide keeps your creativity connected to the numbers that matter.
Gauge and finished size basics
Gauge isn’t just a number; it’s the bridge between your idea and reality. You want your finished piece to look like what you pictured, not a random blob. Start by making a test piece in the same materials you’ll use for the final design. Check how tall it is when you finish, then compare to your target. If you’re off, adjust your hook size or tension until you hit the mark. That small step saves you from big rework later.
Finished size is what your audience will actually notice. You’ll decide early how big you want your amigurumi to be and then tailor your loops and stuffing to hit that size. Stuffing is a big lever: more stuffing makes a chunkier figure; less makes it leaner. Use partial stuffing in tricky places to shape the silhouette without overdoing it. Your attention to gauge and finish makes your character feel tangible and real.
Simple sizing rules
- Target a clear head-to-body ratio (like 1:1.5 or 1:2) and stick with it.
- Use the same stuffing density throughout the main body to avoid lumpy areas.
- Test by crocheting a quick prototype, measure, and refine.
Design your amigurumi face and expression
Your amigurumi’s face is the first mood you share with your audience, so make it intentional. Start by thinking about what feeling you want to capture—cute, surprised, sleepy, or mischievous. Use a simple shape as a base: round for softness, oval for a classic look, or a small triangle for a wink. You’ll want to keep the face proportional to the head so the expression reads clearly from a distance. When you plan, sketch lightly or pin felt in place first, so you can adjust before you stitch. Your goal is a face that communicates your character at a glance, not a maze of tiny details.
To keep your design cohesive, choose a few bold features that anchor the expression. A single curved mouth can convey warmth, while tiny stitched lines above the eyes can signal surprise or worry. Color choices matter, too: dark brows can add attitude, while a soft blush can soften a fierce expression. Remember to test one feature at a time; this helps you see how each element changes the overall feel without overloading the face.
Finally, you’ll want to consider lighting and sightlines. Position features so they read well from the front and in photos. A hero eye that dominates the upper third of the face often looks friendly and engaging. If you want your character to be instantly recognizable, design a signature detail—an eyebrow shape, a tiny heart on a cheek, or a distinctive smile line. Your aim is to make the face feel alive and readable with minimal effort.
Position eyes for the right look
Eye placement is the magic switch for expression. Start by centering the eyes on the face, but don’t be afraid to tilt them a notch to change mood. Low, close-set eyes can feel bashful; higher, spaced eyes read curious or surprised. If you’re stitching eyes, consider scale: larger eyes read as sweeter and younger, smaller eyes can look more thoughtful or mischievous. Use a single eye style to keep the character cohesive unless you’re intentionally mixing for a playful vibe.
The direction your eyes look matters, too. Eyes facing straight ahead feel confident and open. If you want a dreamy or curious look, tilt the pupils slightly upward. For a shy vibe, angle the gaze a touch downward and add light-catching highlights to keep them lively. Remember to pin or stitch the eyes in place before securing the head to the body, so you don’t have to redo the whole face if something seems off. Small tweaks here make a big difference in expressiveness.
When you add highlights, do it with careful stops—just a little white or light color can simulate sparkle without turning the eyes into a toy from a distance. If you’re sewing, a small white dot can go on the upper right of each pupil to imitate reflection. This tiny hint makes your amigurumi feel awake and personable, not blank. Keep your eye technique consistent so your character looks intentional, not accidental.
Designing amigurumi faces and expressions
You design the face by choosing a few anchors that guide every line you stitch. Pick a mouth shape that matches your character’s personality: a crescent smile shows warmth; a straight line can feel serious; a tiny downturned curve screams grumpiness with charm. Make sure the mouth is visible when the toy sits upright; test it by placing the head on a flat surface and looking from eye level. If the mouth vanishes, resize or reposition it so the expression reads clearly.
Brow and cheek details are your expression’s helpers. A bold brow can frame the eyes with intention—think arch for excitement or straight for sternness. Small cheeks or a blush circle under the eyes can soften a look or add youthfulness. Use stitches or felt scraps consistently to avoid a mishmash of textures. If you’re unsure, start with one focal feature (eyes or mouth) and add a second element later once the main expression feels right.
Texture and technique matter, too. Embroidery satin stitches can give clean lines, while padded felt can add depth to the brows or mouth. If you’re a beginner, practice on scrap fabric until you’re confident with clean curves. The goal is a face that communicates a story with minimal elements—your character should feel alive at a quick glance.
Expression testing guide
Test your expression by looking at your amigurumi from different angles and in lighting similar to where it will be shown. Step back and view the face at eye level and from slightly above to see if the mood holds. If the expression loses impact from the side, you may need to adjust the mouth line or eye shape.
Create a quick set of photos to compare versions. Then pick your favorite and note what changed—eye size, brow angle, mouth curve. This keeps your workflow efficient and helps you reproduce the same look later. If you’re not happy with the result, tweak one element at a time rather than reworking the whole face. A small change can restore the expression you’re aiming for.
Test with friends or fellow crafters and get honest feedback. A second pair of eyes will spot unreadable expressions you missed. Use their notes to finalize the face. Remember, facials are what make your character memorable, so invest time into dialing in the right look.
Write a beginner amigurumi pattern
You’re about to turn a simple idea into a tiny, cuddly creation. Start with a clear plan: what creature or object do you want, what size, and what colors? Keep it simple so your first pattern feels doable. You’ll love the confidence you get from finishing something you can hold in your hands. As you go, think about how you’d explain it to a friend who asks, How do you make that? That mindset keeps your pattern practical and easy to follow. You’ll find that breaking the project into small, repeatable steps makes every stitch count. Remember to note the exact stitches, rounds, and increases you use so you can recreate it or tweak it later.
Think about your target size and yarn. If you want a palm-sized critter, choose a medium-weight yarn and a hook that creates a tight fabric. Tight stitches prevent stuffing from showing and holes from forming. Your pattern should tell readers to pull tight when finishing and to stuff firmly but evenly. A good beginner pattern reads like a recipe: list materials, steps, and a few tips. You’re guiding your future self as much as your reader. When you finish, you’ll see your design come to life and you’ll know you learned something new in the process.
Keep a calm pace as you draft. Use simple terms and short sentences. Include a few optional shortcuts for faster results, but clearly mark them. Your readers will appreciate that you’re not assuming prior experience. If you write with your future self in mind, you’ll avoid common snags like loose ends or uneven stuffing. With practice, you’ll gain speed and confidence, and you’ll be excited to share your next original amigurumi.
Follow a beginner amigurumi pattern writing guide
Think of a guide as your path to clarity. You want readers to finish with a finished toy, not a pile of yarn scraps. Use consistent terminology and repeat key actions so beginners hear the same cues every time. You’ll love how a steady rhythm in your guide helps readers predict the next step and stay motivated. When you describe stitches, name them once, then use short codes or numbers in the steps to keep the flow clean. This makes your pattern easy to skim and follow, even for someone who learns best by repeating actions.
Your guide should include a materials list, a gauge note, and a clear sequence of rounds or rows. Don’t skip a gauge section if it matters to size—your reader will thank you for it. Add quick tips for common hiccups, such as avoiding gaps at the joints or how to hide a finishing knot. These little notes become stars in your pattern, guiding beginners toward success without frustration. Finally, finish with a test round: ask your reader to crochet a small sample swatch to check tension before diving into the project.
As you write, picture your reader standing at a table with a hook in hand. Speak to them directly, using commands like Ch 6 or sc around. Bold important steps so they pop on the page. You’re not just listing actions; you’re teaching a skill. A well-structured guide saves you questions later and helps your pattern become a go-to resource for new crafters. That credibility is what makes readers come back for more of your patterns.
Pattern template
- Materials: You’ll need [yarn type], color(s), hook size, stuffing, needle, and any safety eyes or embellishments. List quantities clearly and note substitutes.
- Abbreviations: Use simple codes and define them once. For example: ch = chain, sc = single crochet, inc = increase, dec = decrease.
- Pattern notes: Include gauge, tension, and any special tips. State how many rounds or rows you’ll use for each piece.
- Pattern body: Write in numbered rounds or steps. Use bold for the first mention of each stitch type and for any crucial actions like pull tight or sew securely.
- Finishing: Give clear instructions for attaching pieces, weaving ends, and adding eyes or noses. Remind readers to stuff firmly for a neat final shape.
- Size and adjustments: Offer a quick note on how to resize or modify for different ages or preferences. Encourage readers to test and tweak.
Shape parts with basic stitches
You’ll shape every part of your amigurumi by picking the right stitches and tension. Start simple: use tight, even stitches so the stuffing stays put and your pieces hold their form. You can shape an arm or a leg by increasing and decreasing in places that you want to widen or taper. Remember to keep your consistency; if one piece is looser, the whole character can look uneven. Practice a few little shapes first—tiny spheres for hands, short tubes for legs—before you commit to a full character. Your stitches become the blueprint for how your toy will feel in your hands.
When you’re shaping, think about the texture you want. A dense fabric holds stuffing better and keeps shapes crisp, while a looser fabric gives you flexibility for poseable limbs. Mix stitches deliberately: for a rounded head, stick with single crochet worked tightly; for a pointed hat or ears, use increases in certain rounds to push the shape outward. You’ll notice small changes add up to big differences in the final silhouette. Consistency is your best tool here, so you can repeat shapes across different parts with confidence.
Finally, consider seam lines as part of the design. You can hide them in natural curves or highlight them with a contrasting yarn for a handcrafted look. If you want a cute, chunky feel, keep your stitches short and close, so the surface is smooth and compact. If you’re after a softer, squashy vibe, give yourself a touch more slack in the fabric. Your shape is the first thing people notice, so make every stitch count.
Magic ring, increases, and decreases
A Magic Ring is your gateway to neat, round starts. You’ll wrap and pull tight to close the center, then continue with your first round of stitches. The ring helps you avoid a hole in the middle, which keeps your character clean and professional. Practice a few rounds in a practice piece until you can pull it snug every time. Once you’ve got the hang, you’ll use the Magic Ring as the foundation for heads, ears, and other rounded parts. Mastery here unlocks cleaner shapes across your entire project.
Increases and decreases are your shaping hands. Increase when you want to widen a section—think the top of a head or a shoulder—by adding stitches in a round. Decrease when you want to taper, like narrowing a neck or creating a snout. The trick is to keep the pattern even: don’t skip increases or decreases, and count consistently round after round. If you need a smooth transition, slow down and make one extra stitch in a tricky spot. Your ability to manage increases and decreases determines how natural your character looks.
If you’re pairing increases and decreases, you’ll often come back to the Magic Ring as a starting point for each new body part. Tidy color changes and careful stitch counting will keep your seams nearly invisible. When you finish a section, switch to the next color or move to a new stitch pattern with confidence. Your increases and decreases are like the skeleton of your design—solid, predictable, and essential for a polished look.
How to create an amigurumi character with stitch choices
You shape a character by choosing stitches that match the mood you want. A tight, compact fabric gives a cute, plump look; a looser fabric produces a more cuddly, squashy vibe. Start with a simple head and body, and plan where you’ll add arms, legs, and ears. Each part gets its own set of stitches and a few increases or decreases to fit the scale you’re aiming for. Your choices set the personality of your character before you sew on any eyes or nose. Pick a consistent stitch rhythm so the whole piece feels intentional and cohesive.
Color is your ally. Use color changes to define features, like a muzzle or inner ears, and keep them deliberate. If you want a friendly smile, place it where the light would naturally hit a rounded cheek. If you’re designing a character with personality, exaggerate tiny details—like a little tuft of hair or a curved tail—using short rows or partial rounds. Your stitches tell the story of your character, so choose them to support the emotion you want to evoke. Remember: how you stitch communicates as much as what you stitch.
As you assemble parts, think about how they’ll move in your hands. You want joints that feel sturdy but not stiff. If your arms are too stiff, add a few more rounds of slip stitches or use a slightly different tension to create a gentler curve. If a leg needs to stand, reinforce the base with a few extra stitches before you sew it on. Your stitch choices shape not just the look, but the feel and durability of your amigurumi. For beginners, keep the design simple and gradually add more complex features as you gain confidence.
Add details and accessories
You’re about to take your amigurumi from neat to memorable. Details matter because they show your character’s story and personality. Start by choosing colors that pop against your main yarn; a small accent can transform a plain figure. Think about practical things too—like a tiny hat, a scarf, or a belt—so your creation feels complete, not just stitched together. When you plan, sketch quick ideas on paper and keep a stash of tiny pieces you might reuse, such as buttons or seed beads. The goal is to make your amigurumi feel alive, as if it could step off the shelf and say hello.
Next, consider how texture changes the look. You can mix stitches to add depth—slip stitches for a subtle line, single crochets for solid weight, and a few surface details to suggest hair or fur. Tiny embroidery can add facial expressions without changing the whole face. If you’re worried about scale, start with one prominent feature, like a scarf with tassels or a tiny backpack, then add subtler touches later. Your attention to small details is what will set your work apart and give it character.
Finally, plan for durability. Accessories should stay put with a few secure stitches or a dab of fabric glue when appropriate. Hide threads by weaving them inside the body, and seal embellishments with a light tack to prevent loss during play or display. Remember, you’re crafting something that could be hugged, so secure any fiddly bits well. Keep your design cohesive by repeating color or texture motifs across accessories, so everything feels tied together rather than random.
Embroider and attach small features
Small features can define your amigurumi’s mood. Embroider a tiny smile, eyebrows, or freckles to give instant expression without bulky yarn sculpting. Use a blunt tapestry needle and short, neat stitches to keep the surface smooth. If you prefer a bolder look, outline eyes in a contrasting color and fill with a few stitches to create depth. You can also add tiny cheeks with a blush of pink using a cotton candy shade, dabbed softly for a sweet touch. This is where your character starts to feel alive, so take your time and test on a scrap felt or yarn first.
Attach small features with care. Sew on eyes securely, using a backstitch that goes through the body or a safety eye with a washer, depending on your pattern and safety needs. Add tiny ears, noses, or mustaches by threading through the surrounding stitches and knotting firmly on the inside. If you’re adding beads or sequins, stitch them down with a couple of tight stitches so they don’t loosen with play. Your goal is clean, tidy placement that sits flush and looks intentional, not glued-on.
When you’re unsure, practice on a spare oval to perfect your technique before committing to your main piece. This keeps your final amigurumi neat and your nerves calm. Remember, small, precise details can carry a big emotional punch—that’s the magic you’re aiming for.
Adding details and accessories to amigurumi
Choosing the right details is about storytelling. You’ll create a backstory with colors, shapes, and textures that hint at who your character is. A tiny hat implies whimsy; a backpack suggests adventure; little boots can signal someone always on the move. Use a limited color palette to keep things cohesive, then sprinkle in one or two standout accents to draw the eye. If you’re stuck, borrow ideas from everyday objects you love—miniature keys, buttons, or charms often spark a perfect accessory concept.
Practical tips help your accessories stay put. Use a few extra stitches to anchor a strap, or attach a small magnet for a removable charm—handy if you want to change the look. For durability, reinforce high-stress areas with extra passes of yarn while you’re sewing on features. Don’t fear tiny details; they’re where your personality shines and where your audience will connect with your character. And if you’re unsure about scale, compare it to something real—like a coin or a coin-sized charm—to keep everything proportional.
Accessory list
- Tiny hats, scarves, or collars
- Seed beads, buttons, and small charms
- Embroidery floss in contrasting colors
- Beads for eyes or freckles, safely secured
- Tiny backpacks or belts
- Small yarn tassels or pom-poms
- Removable magnets or safety eyes (per safety guidelines)
Make your design original
You want your amigurumi to stand out, not blend in with the crowd. To make that happen, you’ll lean into your personal spark—your favorite shapes, textures, and stories. Start by asking yourself what vibe you want: cheeky, cozy, whimsical, or bold? Then surface that vibe in every stitch, from the eye shape to the limb length. Your goal is distinctness you can feel as soon as you see it. Use your own ideas as the engine that powers each piece, not a collection of copied looks. When you own your design voice, your amigurumi becomes yours alone, and that authenticity shines in every project you share.
You’ll also push for originality by experimenting with form. Try playing with proportions, asymmetry, or unexpected details like a tiny accessory or unusual ear shape. Don’t fear bold choices—they signal your creative hand. And keep a sketch pad handy; rough doodles plus quick notes can become the seeds of real character. By treating every project as a chance to add a personal twist, you’ll build a recognizable signature that your audience can’t ignore.
Finally, protect your originality by documenting your process. Jot down what inspired you, which stitches you used, and why a certain color combo works. This record helps you refine your style over time and shows others your thoughtful approach. When you present your work, highlight the choices that make it unique; that clarity makes your originality feel intentional and professional.
Tips for making original amigurumi characters
You can craft original characters by starting with a simple idea and then letting it evolve. Begin with a theme you love—like a forest creature or space explorer—and map out 3 distinctive features: a signature shape, a special texture, and a telling detail (a scarf, a hat, or a curious button eye). Use these anchors to guide every decision, from stitch choice to color palette. A small but memorable feature can become your design’s calling card, so choose something you’ll enjoy highlighting in photos and captions. When you try new stitches or textures, you’re giving your character depth that viewers can feel with their eyes.
As you iterate, mix-and-match ideas until something feels fresh. Swap a round head for a polygonal one, or pair a classic body with oversized limbs for comic effect. Don’t shy away from color experiments: a bold, contrasting palette or a gentle, unexpected combination can turn a simple form into something surprising. If a choice isn’t landing, you’ve got permission to pivot—your best original work often comes from quick, honest rethinks, not stubborn rigidity.
Finally, bring your character to life with a bit of story. Give it a tiny backstory or a quirky habit, and tuck that into your product photos and captions. A relatable narrative makes your original design more memorable and easier for people to connect with. Your character becomes more than yarn—it becomes a personality your audience wants to follow.
Creating original amigurumi designs with color and form
Your color and form choices are the fastest way to signal originality. Start by selecting a palette that isn’t a direct copy of a popular character—think how you can bend familiar hues into something new. Pair bold accents with softer bases to create visual interest, and use color blocks to emphasize your character’s silhouette. Form matters just as much as color: play with head size, limb length, and body shape to craft a look that is unmistakably yours. The most original designs often come from combining contrasting ideas in a harmonious way, not from chasing a single trending color.
Experiment with texture as another path to originality. Mix smooth yarns with boucle or fuzzy textures for tactile contrast, or incorporate tiny sculpted features like ears or noses that read clearly in photos. Don’t be afraid to adjust stitch density for emphasis—tighten stitches where you want sturdiness and loosen them for a fluffy feel. These choices build a character that not only looks distinct but also feels unique when you hold it.
As you finalize, test your design in a few colorway variations to see what strongest communicates your concept. A great trick is to create a mini color study: swap two colors and note how the character’s mood shifts. You’ll discover combinations that amplify personality in ways you hadn’t expected. Your goal is a design that looks deliberate in every small detail, from eye placement to the edge of a crown or scarf.
Originality checklist
- You have a clear, personal vibe that runs through shape, texture, and accessories.
- Your character features at least one distinctive trait (shape, texture, or accessory) that sets it apart.
- You tested color palettes and kept one bold, original element as a focal point.
- You documented your process and reasoning for future reference.
Finish, safety, and care for toys
You shape your toys to be both beautiful and safe, and that starts with thoughtful finish, solid safety checks, and careful care routines. Your designs deserve durable stitching, snug stuffing, and finishes that won’t irritate skin or wear down quickly. When you choose fabrics, threads, and eyes, you’re building confidence in every stitch. Think of each toy as a tiny partner: it should endure daily play, be easy to clean, and remain cheerful after countless hugs. By focusing on finish, safety, and care, you set a standard for your entire line that customers can trust.
Your finish isn’t just about looks; it’s about longevity. You’ll want clean seams, evenly pressed edges, and consistent color in your fabrics. If a small puckering or loose thread appears, fix it right away so it doesn’t become a bigger snag later. The more you invest in a solid finish, the less you’ll worry about wear and tear when real kids and pets handle your creations. Remember, a well-finished toy feels premium in your hands and in the hands of someone gifting it to a child.
Finally, safety and care go hand in hand with your design choices. Choose safety-tested components, avoid sharp edges, and consider eco-friendly materials that wash well. Your buyers will appreciate clear care instructions that help them keep the toy vibrant and safe for years. When you make finish, safety, and care deliberate parts of your design process, you’re building lasting trust that translates into repeat customers and positive word of mouth.
Secure stitching and stuffing tips
Your stitching should be sturdy enough to handle curious hands and enthusiastic hugs. Use a dense stitch pattern and a strong thread that won’t easily fray. Double-stitch at stress points, like arms, ears, and necks, so seams stay together even after rough play. If you notice any thinning or loose threads, re-stitch immediately to prevent gaps that could snag fabric or form uncomfortable lumps. When you test your toy, tug gently in multiple directions to simulate real use and verify the seams hold.
Stuffing is what gives your toy its shape and feel, so get the balance right. Too little stuffing and it collapses; too much and it becomes stiff and hard to squeeze. Aim for a uniform fill with no hard lumps. Use small amounts of stuffing at a time and compress to check firmness. If you sew in an internal lining or a squeaker, make sure it’s secure and doesn’t shift around. Don’t forget to close openings with a careful ladder stitch so the seam looks smooth from both sides.
If your toy has limbs or appendages, ensure they’re evenly weighted for a natural feel and balanced handling. Avoid over-stuffing near joints to prevent stiff movement or cracked seams. Test with light play first, then ramp up to more active use as you gain confidence in your build. The goal is a toy that feels cozy and dependable, not fragile or floppy.
Washing and toy safety guidelines
Your cleaning approach should protect the fabric, colors, and stuffing while preserving safety. Use mild detergents and cold water when washing plush toys, and test a hidden area first to confirm colors won’t bleed. Avoid harsh spot removers that could weaken fabric or irritate skin. For hand washing, dab gently and rinse thoroughly; for machine care, use a gentle cycle in a laundry bag to reduce friction and snagging. Always air-dry your creations away from direct heat to keep fibers steady and colors bright.
Keep safety in mind during cleaning. Remove or secure small parts like eyes or noses before washing if they aren’t firmly attached, and reattach them securely afterward. Check for loose threads or thinning fabric after washing and repair any issues before the toy goes back into circulation. Regular checks extend the life of your products and protect kids who play with them. If you’re unsure about care for a specific material, err on the side of gentleness and restore the toy by hand where possible.
Safety guidelines also cover age-appropriateness and choking hazards. Clearly label the recommended age range and avoid tiny parts that could come loose. Use durable components that survive repeated washing and rough handling. Your care instructions should be easy to follow and consistent with the materials you chose.
Care and safety notes
- Always do a quick post‑production safety check: seams, stuffing distribution, and any embellishments. A ten‑second scan now saves hours later.
- Include simple care tips in your product packaging or listing so buyers know how to keep your toy looking new.
- Use colorfast fabrics and test washes to prevent bleed, especially with bright colors or prints.
- Document your safety standards and updates so you can reference them when you design new toys.

Clara Fern — Crochet Artist & Amigurumi Designer
Clara Fern is a crochet artist and amigurumi designer based in Austin, Texas. With 9 years of experience working with yarn and hook, she transformed a lifelong passion for handcraft into a creative mission: making amigurumi accessible, fun, and deeply rewarding for crafters of all levels.
Clara discovered amigurumi during a trip to Japan in 2017, where she fell in love with the art of bringing tiny characters to life through crochet. Back home in Texas, she spent years studying color theory, design principles, and advanced crochet techniques — developing her own signature style that blends kawaii aesthetics with original character design.
Through maclafersa.com, Clara shares everything she has learned — from choosing the right yarn and reading your first pattern, to designing fully original amigurumi characters from scratch. Her writing is known for being clear, detailed, and genuinely helpful, with no steps skipped and no secrets kept.
When she’s not crocheting, Clara enjoys watercolor painting, visiting local yarn shops, and drinking way too much coffee while sketching new character ideas.


