
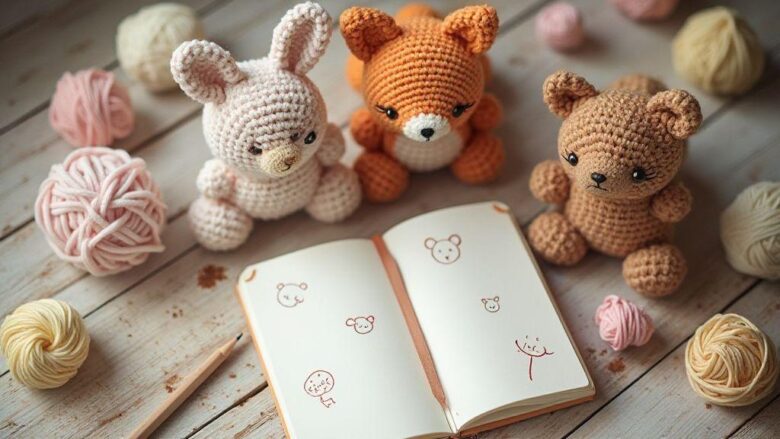
Amigurumi naming basics
Naming your amigurumi sets the tone for their personality and story. You want names that are easy to say, memorable, and fitting for the look you give each character. Start by considering the feel of your crochet piece: is it sweet and cuddly, bold and quirky, or shy and elegant? Matching the name to the vibe helps you connect with your creation every time you pick up your hook. You can also pull inspiration from colors, textures, or the tiny details you add—like a scarf, hat, or a distinctive stitch. Keep a short list of favorite names nearby so you can grab one when you finish a character.
Think about sound when you decide. Short names with crisp sounds, like Milo or Luna, are easy for kids to remember and for you to say aloud during a photoshoot or video share. If your piece has a lot of personality, mix in a quirky twist, like Pipkin or Zuzu. You don’t have to go far to find ideas—use family nicknames, favorite books, or a favorite color as a springboard. The goal is a name that sticks, not a long, complicated title you’ll stumble over.
Finally, test your name. Say it aloud, write it in your project notes, and imagine introducing your character to a friend. If it feels natural, you’re likely golden. If not, swap to something that flows off your tongue. Remember, you’re naming for you as well as your audience, so pick something you enjoy saying every day you craft.
Character naming tips for amigurumi
Your first step is to pick a sound that matches your character’s mood. If your amigurumi is playful, choose light, bouncy sounds like Bibi or Nico. If it’s a comforting, cozy piece, softer names like Mira or Hugo fit better. The easier it is to pronounce, the more approachable your character feels to others. You want names that people will repeat without stumbling.
Next, look at colors and textures for clues. A pink, fluffy bear might become Peony or Rosy. A forest-toned owl could be Twig or Sage. Names tied to visuals help people remember your character longer. You can also borrow from nature—think Clover, Nova, or Sunny. The trick is to keep it short enough to fit on a label or tag if you plan to sell your pieces.
Keep a naming notebook. Jot down quick ideas as they come and group them by vibe, color, or theme. Revisit them after you finish a project; a name might pop that perfectly fits a twist you added late in the process. Don’t overthink one piece—pick a name you feel good saying and move on to the next creation.
Naming crochet characters that stick
To make names memorable, pair them with a tiny backstory in your mind. Even a single sentence like Milo loves autumn leaves and hot cocoa makes the name feel alive. A simple backstory gives you hooks to reference in photos or captions, helping followers remember your character. It also makes the naming choice feel purposeful rather than random.
Use alliteration or rhythm to boost memorability. Names like Poppy Puff, Bella Beanie, or Tilly Twine are easy on the ears and fun to say. The rhythm helps people recall the character when you’re chatting about them online or during a craft show. Short, catchy, and consistent naming patterns across a collection create a cohesive feel that fans recognize.
If you’re selling or sharing online, check that the name isn’t already overused in your niche. A quick search helps you avoid duplicates and keeps your character distinct. When in doubt, tweak a letter or two to keep the sound intact but the identity unique. A fresh twist often makes a familiar name feel new again.
Quick naming checklist
- Ensure the name fits the character’s vibe and color.
- Prefer short, easy-to-pronounce sounds.
- Test the name aloud and in your project notes.
- Consider a tiny backstory to add depth.
- Use alliteration or rhythm for memorability.
- Keep a few backup options in case you need flexibility.
Create short backstories for your dolls
Your dolls come to life when you give them a tiny, vivid backstory. Start by naming what they love, what they fear, and one quirky habit they have. Keep it short so you can remember it while you sew or pose your doll. Think of a backstory as a recipe: a few bold ingredients tossed together to make a character feel real. Your goal is to give each doll a spark that makes you want to play with them, again and again. This is your chance to turn a simple amigurumi into a friend with opinions and dreams, even if those dreams are silly or small. When you write a backstory, you shape how your doll behaves in your imaginative world, and that makes your projects more satisfying.
To keep it useful, anchor each backstory in a tiny moment you can replay. Did your doll rescue a friend from a rainstorm? Did they collect buttons as a hobby? A single moment, told in a few lines, can power dozens of games. Use sensory clues: the smell of warm yarn, the sound of a kettle, a color that makes them feel brave. Your backstory should grow with you; add a new detail every few projects to keep things fresh. Remember, you’re crafting a character who will sit on your shelf, then leap into your next pretend adventure when you pick up your hook and yarn again.
When you finish, write down a quick, one-page character card for each doll. Put the name, a few love and fear notes, a favorite habit, and one goal. This keeps your doll’s voice consistent as you create more. Your card becomes a quick reference so you don’t forget the tiny things that make your doll unique. A strong backstory makes even simple stitches feel charged with personality. And if you ever feel stuck, reread your card and ask: What would this doll do in this moment? That question helps you stay true to your character.
Amigurumi backstory ideas you can use
Your ideas don’t have to be big to feel big. Start with a small setting: a village of cloud cotton, a seaside town, or a forest of old buttons. Each setting gives your doll a home base that guides how they act and what they collect. For example, a sea-loving doll might collect shells and wear a blue scarf that reminds them of waves. A forest dweller could keep a tiny lantern and always help lost plush friends find their way home. Keep a list of these ideas near your craft space so you can mix and match quickly when you start a new doll.
Lead with a clear motivation. Your doll wants one thing more than anything else, like finding a lost key, learning a new dance, or keeping a friend company. That goal shapes your choices: what colors you use, what patterns you stitch, and how they move on the shelf. Make the goal specific but approachable, so you can pull it into a story during play. If your goal changes, your doll’s actions will feel honest and real, not random.
Add a small flaw or quirk. Maybe your doll talks to plants, forgets where they put their yarn, or is secretly afraid of thunder. Flaws keep your character relatable and funny. They become the moments you turn into a play scene, like the stormy night rescue or the missing button mystery. A gentle flaw is enough to spark a scene without making the character too heavy. You’ll enjoy exploring that flaw in quick stories or pretend adventures.
Backstory prompts for amigurumi play
These prompts help you spark ideas without overthinking. Start with one prompt per new doll and let the story unfold as you crochet.
- Your doll wakes up with a new hobby they must learn in a day. What is it, and who helps them?
- A lost item arrives in your doll’s pocket. What is it, and what does it reveal about their history?
- A storm hits, and your doll must comfort a friend who feels small. How do they act, what do they say, and what do they learn?
- Your doll discovers a hidden map sewn into their scarf. Where does it lead, and who joins the quest?
- A favorite toy comes to life and asks for a secret favor. Do you help, and what does your doll learn about friendship?
Use these prompts to draft a mini-scene. You don’t need a full book—short scenes are perfect for amigurumi. Each scene adds texture to your character and makes your future projects richer.
One-line origin formula
Create a quick origin line you can read before you crochet. It helps you stay focused and set the tone. For example: “A curious forest wanderer who collects wind-kissed buttons to fix lost days.” Write your own line and keep it in your project notebook. This line should capture the core, the mood, and the tiny flare that makes your doll feel real. Use it when you’re stuck or testing color choices, so you stay on track.
Use visual traits to shape story
You can shape your character’s story by choosing how they look. Start with simple, bold traits you can see at a glance. Think about height, posture, and distinctive markings. When you pick these visuals, you’re already hinting at who they are and how they move through the world. Your goal is to make readers or viewers feel the character before you explain them. Use contrast: a tiny body with a big, bright yarn color, or a long scarf on a short figure. The visuals you pick should echo their feelings and what they care about. Remember, your audience will form first impressions in seconds, so choose features that tell a story at a glance.
Pair shapes with motion. If your character is fast and spunky, give them angular lines or a zigzag pattern that feels quick. If they’re calm and wise, use softer curves and muted tones. Consistency matters: let the visuals repeat across outfits or scenes so the character becomes familiar. Visual cues like a unique stitch pattern or a signature accessory can act as a visual payload for backstory moments you reveal later. When you design with intent, the visuals aren’t just pretty; they’re signaling devices that guide how your audience reads the character.
Test your visuals in small scenes. Place your amigurumi in a tiny world and note what the look communicates in action. A scarf fluttering in pretend wind might say adventurer, while a snug hat could imply someone who loves cozy, safe spaces. If something feels off, tweak the color or shape until the vibe matches the moment. Your goal is to create a quick, unspoken language between the character and the audience, so the story starts before any words are spoken.
Match yarn and color to personality
Choose colors that reflect how your character acts. Bright colors can signal energy, optimism, or mischief, while muted tones hint at calm, seriousness, or mystery. If your character is brave, use bold reds or cobalt blues that stand out. If they’re shy, soft pastels or neutral browns help them blend in until they choose to step forward. The yarn texture also matters: a smooth, even stitch feels tidy and reliable; a nubby or fluffy yarn can show quirkiness or warmth. Pick a palette that matches their choices and actions so every scene feels cohesive.
Pair patterns with mood. Stripes and chevrons can imply movement or playfulness, while solid blocks read as steady and dependable. A spatter of speckles might suggest curiosity or a love for collecting little wonders. If your character keeps a secret stash, a jacket with hidden pockets or mismatched buttons can be a tiny visual cue. Let color and pattern influence how each moment in your story lands, so readers sense the vibe even before the dialogue.
Tailor fabric weight to function. A sturdier yarn for a traveler, something breathable for a climber, or a soft, plush yarn for a healer all communicates role and intent. This keeps your character believable in more than one scene. If you plan to pose your amigurumi for photos, consider how the yarn weight will hold up in different angles. The physical feel of the yarn becomes part of the story you’re telling.
Amigurumi personality traits to pick
Think about traits you want your character to embody, and map them to simple, visible cues. If your character is curious, give them a tiny magnifier or a mismatched set of buttons. If they’re brave, a bold color pop on a hat or scarf can shout it aloud. For kindness, choose soft textures and warmer tones that feel welcoming. If you want a trickster vibe, add a playful, irregular stitch or a carelessly tied bow. Start with one or two standout traits and let the rest of the design enhance them.
Link traits to actions. Your amigurumi should act out personality through posture and pose. A confident character holds their head high; a cautious one curls in slightly. A character who loves stories might carry a little book or a flag with a tiny symbol. Make sure each accessory or detail has a clear purpose tied to who they are and what they do in your story. The more you connect, the easier it is for your audience to read the character’s arc without a long explanation.
Create a readable pivot. Your character should have room to grow, even in a small design. Start with a core trait and introduce a gentle shift—someone learning a new skill, or deciding to trust a friend. Show that shift through a simple accessory change, a new color, or a different stance. This keeps the character dynamic and interesting, while staying visually cohesive.
Craft short bios for listings
Your listings shine when you give a quick, vivid bio that tells buyers who your amigurumi is and why it matters. Start with a tight hook that mentions the character’s core trait, then add a sentence about its design and material choices. End with a personal touch that invites a connection—something a buyer can relate to or imagine themselves with. Keep sentences short and concrete, and bold the words that signal value, like soft yarn, hand-stitched, or collectible. When you write, picture the shopper scrolling quickly: your bold phrases should grab attention in a second or two.
Use the bio to set expectations: what makes this amigurumi unique, what it’s made from, and how it was made. If your character has a specific skill or vibe, say it plainly: This little fox loves quiet mornings and fits perfectly in a coffee cup. Mention care tips in a single line if relevant, such as spot clean only or removable scarf for easy washing. Finally, give a gentle call to action that nudges the reader toward adding it to their collection or gifting it to a friend. Your bio should feel friendly, honest, and easy to skim.
Remember to tie the bio back to your character’s story and design choices. If you chose bold colors, say why: bright blues and oranges help it stand out on shelves. If you used a unique stitch, note it so buyers appreciate the craft. The goal is a memorable, scannable paragraph or two that makes your amigurumi feel real and desirable.
Crafting character biographies amigurumi
Your amigurumi biography should read like a tiny life story. Start with the character’s name and a clear defining trait, then add a short backstory that explains how the design supports that trait. Use simple, concrete details: the texture of the yarn, the size, and any distinctive accessories. Highlight how those choices affect the feel—soft, huggable, or playful. Bold phrases that relate to emotion and purpose, like cozy, curious, or brave, so readers instantly catch the mood.
Next, explain what makes this character special to you and your process. Mention materials and techniques in plain terms, and keep it practical: hand-stitched seams for durability, polyfill for a squeezable finish, or safety eyes for child-friendly play. Tie the backstory to a potential buyer’s life: it could be a bedtime friend, a desk companion, or a weekend project saver. End with a one-sentence note on care or display to set expectations and reduce returns.
If you include a lore snippet, keep it short and vivid. One sentence can paint the scene: where the character lives, what it loves, and how it interacts with others. Always weave your design choices into the narrative so the reader can see the connection between story and craft. The resulting biography should feel like a tiny, inviting doorway into your character’s world.
Use story-driven product descriptions
Tell a tiny, compelling story in your product listing. Open with a scene that places the amigurumi in a relatable moment, then reveal its features as plot points in the tale. Use concrete details—size, materials, color palette, and any unique stitches—as practical clues that support the narrative. Highlight benefits clearly: soft yarn for comforting hugs, machine-washable scarf for easy care, or tiny paws with secure stitching for durability. Keep the mood aligned with the character: whimsical for playful figures, serene for calm companions, or bold for heroic designs.
Balance storytelling with clarity. After the scene, list the specs succinctly: dimensions, materials, safety features, and care instructions. If you created a character series, mention how this piece fits into the set and why someone would want to collect them all. End with a direct invitation: why this amigurumi would be a perfect gift or a cozy addition to their shelf. Use vivid but concise language so readers can picture the item in their space immediately.
Incorporate the user’s perspective: what problem does your character solve (comfort, decor, storytelling), and how will it fit into their life? Keep sentences varied in length, but always aim for concrete, actionable details. The goal is a memorable mini-story that doubles as a practical product description, helping buyers feel confident and excited.
Example bio template
This is a simple template you can adapt for any character: Meet [Name], a [trait] [animal/creature]. Born in [tiny setting], [Name] loves [hobby or feature]. Made with [materials], this [size] piece is [feel/benefit], with [special detail]. Perfect for [use], and easy to care for with [care tip].
Use this as a starting point and swap in your own specifics. Personalize the tone to match your brand, and bold the most important selling points, like hand-stitched, soft yarn, or collectible series. Keep it under a couple of sentences for listings that require quick reading, but add a longer paragraph in your shop page if you want to share more of the character’s story. Your goal is consistency and charm that makes buyers want to learn more about your amigurumi world.
Use prompts and templates daily
You should make prompts and templates a daily habit. When you start your day, pick a quick prompt: Describe your character’s mood in three words and the one object they never leave behind. This keeps your ideas flowing and stops you from stalling. Use a simple template to speed up the process: name, age, personality trait, one flaw, one goal, and one favorite color. By consistently following this structure, your characters will feel steady and believable. Keep a small notebook or digital file with fresh prompts you can pull from any time. The more you practice, the more automatic your decisions become, and you’ll waste fewer hours staring at a blank page.
A daily routine also helps you test ideas quickly. Try sketching a quick silhouette, then add a few details from your prompt template. If something doesn’t fit, you can drop it without losing momentum. Think of prompts as speed bumps that keep you on track. You’ll find your voice and your style emerge when you rely on these reliable shortcuts. The goal is to build a habit that makes character design feel effortless rather than a big, scary project.
Let prompts guide you through different angles: mood, backstory, accessory choices, and quirks. You can rotate through categories like origin, family, fear, and dream. This variety prevents your amigurumi from feeling one-note. When you finish a session, save the best lines and ideas in a master file. A quick vault of prompts keeps you from starting from scratch next time. With daily use, you’ll notice you answer common questions faster and with more confidence.
Backstory prompts for amigurumi sets
Your backstory prompts should help you anchor each character with a simple life thread. Start with a core moment that explains why your character acts a certain way. For example, ask: What event made them brave or cautious? Then add a small, tangible detail: a favorite toy, a worn scarf, or a lucky coin. Keep the prompts short so you can weave a backstory without getting lost in the details. A clear backstory makes your amigurumi sets feel like a family, not just dolls.
Use a few reliable questions to shape a cohesive world around your character. Ask about where they live, who they rely on, and what they fear. These questions help you decide colors, textures, and sizes that fit the story. If your character is a traveler, think about travel-stain on clothes or a sun-worn hat. If they’re shy, use soft yarns and muted tones. The trick is to keep the backstory small enough to be practical for crochet but rich enough to inspire design choices.
Always tie backstory to your design choices. A character who loves trees might wear leaf motifs, while a garden keeper might have a tiny apron with pockets. When you write a short note about their day-to-day life, you’ll naturally choose textures and accessories that feel true. Remember, your backstory isn’t a novella; it’s a sentence or two that makes your amigurumi feel real.
Crochet doll character development steps
First, pick a core trait and imagine how it shows up in their body language and stance. A bold character might stand with a wide base and a lifted chin, while a shy one keeps hands close and eyes lowered. Translate that into posture and pose when you crochet. Then choose materials that echo the trait: bright yarns for boldness, soft fibers for gentleness. These choices will guide your color palette and stitch patterns.
Next, map a simple arc for your character. Decide where they start, what obstacle they overcome, and what small growth shows up at the end. You don’t need a long story—just a clear beat or two that influences their look. Add signature accessories or motifs that signal their journey: a scarf that represents a place they long to visit, or a badge that marks a small victory. This helps you stay focused during the crochet process and gives collectors a clear hook to remember.
Then flesh out a few visual details. Choose one pattern or texture per character that makes them unique: crochet shells on the sweater, a crocheted hat with a tiny pom-pom, or embroidered eyes that convey emotion. Keep these touches simple so you don’t overcomplicate the build. Finally, write a one-sentence summary of who they are and what they want. This keeps your design aligned with the story as you finish the piece.
Prompt starter pack
Here is a quick starter pack you can pull from any time:
- Core trait, one goal, and one fear in three words; one accessory that hints at the goal.
- One small backstory moment that explains a trait; one object they carry daily.
- A color palette with three main colors and two accent tones; one texture you’ll emphasize.
Use these prompts to jump-start a new crochet character without digging for inspiration. You’ll find it’s easier to stay consistent when you have a concrete starter pack you can reference.
How to Name and Build a Backstory for Your Amigurumi Characters
When you name and build a backstory, you create a living character you can design around. Start with a simple name that fits the vibe of your doll. Then add a tiny origin story: where they came from, who they care about, and what they dream of. Keep the backstory short but meaningful so you can translate it into colors, textures, and accessories. This approach prevents you from overthinking and helps your design feel purposeful.
As you craft the backstory, think about how it shapes their appearance. A character from a coastal village might use sea blues and salty textures, while a forest wanderer could wear mossy greens with leaf motifs. Let the story guide your crochet choices, from stitch density to the weight of the yarn. The more your backstory resonates, the more tightly your design will align with your character’s personality and goals.
In practice, write a one-liner that captures the essence of your amigurumi character. For example: A curious, brave creature who collects tiny shells and wears a scarf knitted from night sky blue yarn. This line becomes your north star while you crochet. It helps you decide pose, expression, and accessories in a natural way, keeping the project focused and enjoyable.
Make characters memorable and sellable
You want characters that grab attention and stay in people’s minds. Start by giving them a clear, personal goal and a defining trait that shows up in every pose or accessory. Think of your amigurumi as a tiny friend with a purpose: they need to spark joy, tell a story, and invite a purchase. Use bright, cohesive color schemes and a small set of signature features—like a distinctive hat, a special scarf, or a scarf with a hidden pocket—that your audience can instantly recognize. When you present them, highlight what makes them unique in one sentence: your character’s name, passion, and a tiny flaw that makes them lovable. This consistency helps buyers remember them and want more from you.
Next, build a vibe around your character. Your amigurumi should feel like it belongs to a world, even if that world is simple. Create a tiny backstory you can reference in listings and photos—maybe they’re a retired lighthouse keeper, or a library cat who loves rainstorms. The story doesn’t have to be long; a few lines that capture mood, setting, and a goal are enough. When your listing feels like a chapter from a book, people connect more deeply and are more likely to buy. Pair your backstory with a snapshot of the character in action: a pose, a prop, and a line about what they dream to do next. This makes your character feel real and desirable.
Finally, show value clearly. Buyers want to know why this amigurumi is special and worth the price. Emphasize quality—tight stitching, durable safety eyes, and soft yarn—without overloading the reader with jargon. Use bold highlights for key features, like hand-stitched, safety eyes, and machine-washable. Include a brief note on care to remove doubt. Offer a few optional add-ons, such as a tiny tag with the character’s name or a custom outfit. When your listing feels confident and specific, you give buyers a reason to choose yours over generic plushies.
Creating memorable amigurumi characters
You start by choosing a strong silhouette. A memorable character reads well in a small photo, so keep shapes simple and iconic. Think round shapes for friendliness, tall slim lines for elegance, or a quirky hat that stands out. The silhouette should tell viewers something about who your character is before they even read a word. Add one or two signature features—like a bow, a badge, or a unique stitch—that survive close-up shots and unify your collection.
Next, attach a tiny personality through pose and prop. A character who sits with one leg tucked or waves with a stitched hand instantly feels alive. Props should be light and easy to see in photos: a mini book, a star pendant, or a tiny mug. These props reinforce the backstory and give buyers ideas for display or gifting. Keep the props aligned with your character’s story so everything feels deliberate, not random. Consistency in pose and prop across listings makes your collection feel cohesive.
Finally, reveal a simple backstory in your listings. Your story doesn’t need pages; a few lines will do. Name the character, describe their goal, and mention a tiny flaw that makes them endearing. Tie the backstory to the prop or color choices to create a cohesive theme. When buyers glimpse a narrative, they’re more likely to imagine a place for the character in their home and in their life.
Use amigurumi story-driven design in tags
Your tags should carry the story forward. Use one or two short tags that hint at the character’s world or mood, such as lighthouse soothed by rain or library cat and bookish charm. Tags help buyers find your pieces in search and reinforce the story you’re telling. Keep tags consistent across your listings so new viewers recognize your style instantly. This thread between listings helps your shop feel like a single, well-loved world rather than scattered items.
Apply descriptive, story-driven keywords in your title and first sentence. Lead with the character’s name and a hint of their role or vibe, then add a color cue or prop. For example, Misty the Lighthouse Keeper Amigurumi – Soft, Sea-Breeze Blue quickly conveys who she is and what she looks like. This approach makes your listing scannable and appealing while strengthening the character’s narrative.
Checklist for story-driven listings
- Define a clear name and short backstory for the character.
- Choose a signature color palette and one or two signature features.
- Include a relevant prop that reinforces the story.
- Show the character in a pose that matches its personality.
- Use 1–2 story-driven tags in addition to practical details.
- Write a concise, narrative-rich opening sentence for the listing.
- Ensure the listing title, description, and photos tell a cohesive story.

Clara Fern — Crochet Artist & Amigurumi Designer
Clara Fern is a crochet artist and amigurumi designer based in Austin, Texas. With 9 years of experience working with yarn and hook, she transformed a lifelong passion for handcraft into a creative mission: making amigurumi accessible, fun, and deeply rewarding for crafters of all levels.
Clara discovered amigurumi during a trip to Japan in 2017, where she fell in love with the art of bringing tiny characters to life through crochet. Back home in Texas, she spent years studying color theory, design principles, and advanced crochet techniques — developing her own signature style that blends kawaii aesthetics with original character design.
Through maclafersa.com, Clara shares everything she has learned — from choosing the right yarn and reading your first pattern, to designing fully original amigurumi characters from scratch. Her writing is known for being clear, detailed, and genuinely helpful, with no steps skipped and no secrets kept.
When she’s not crocheting, Clara enjoys watercolor painting, visiting local yarn shops, and drinking way too much coffee while sketching new character ideas.


