
Signs of too much stuffing
You want your project to stay safe and cuddly, not overstuffed and stiff. If pressing the outside fabric yields a hard lump, you’re likely overstuffing. The item should compress slightly; it shouldn’t feel rock solid. If the fabric resists or stuffing peeks through seams, you’ve gone past the mark. Too much stuffing can make buttons or safety eyes sit oddly, risking tears. Keep your hand in the midrange for a balanced feel.
If your piece wobbles or leans when set down, that’s a sign you’re overstuffed. A well-stuffed item should stand fairly evenly, not tip or sag on one side. The filling should not shift to one direction, leaving a flat side where it should be round. This drift comes from stuffing packed too tightly and can stress seams. You’re aiming for a balanced shape, not a frozen statue.
When you squeeze it, you should feel a gentle give. If it’s dense everywhere or the foam squeaks, you’ve got too much. Overpacked fabric looks stiff and plushness is lost. If the stuffing clumps into hard pockets, you’ll see an uneven texture that ruins the look and feel. Your goal is even, soft resistance, not a brick in a sack. How Much Stuffing is Too Much? Finding the Perfect Firmness is your guiding question.
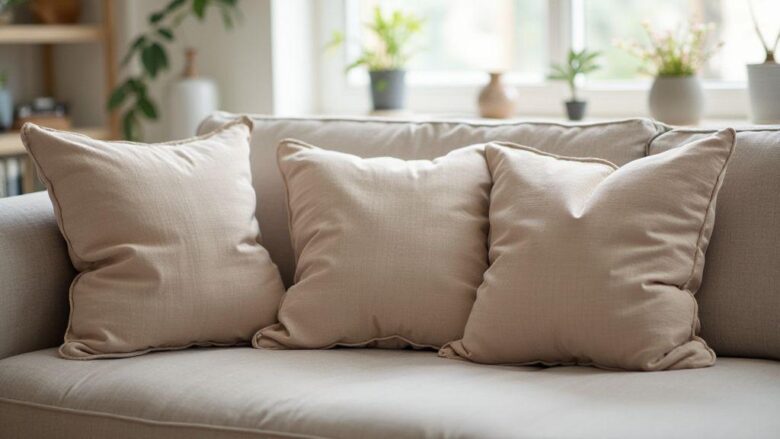
Too much pillow stuffing signs
If your pillow looks rounded and boxy at the same time, you might be overfilling. A pillow should sink a little when you press the center, not stay flat or bulge oddly. A sharp crease that won’t flatten signals too much stuffing. The fabric should spring back slightly, not stay stretched.
Seams should relax after pressing. Near the seam, a firm edge that won’t relax indicates too much stuffing near stitching. The seam line should ease with touch, not hold a rigid curve. If the fabric pulls or hides the seam, you’re overstuffed and risking taut stress on the thread.
If your pillow won’t compress in the middle, you’re overdoing it. A well-balanced pillow accepts a little squeeze and returns to shape. If it stays firm or leaves a dent after you release, you’ve pushed past the ideal fill. The pillow should feel soft but supportive, not stiff.
How seams and shape change
Overstuffing makes seams stretch and pucker. Tugging at the seam may reveal gaps or loose threads where the stuffing pushes out. Stress can weaken the seam and invite leaks or tears later. Visible gaps mean you’ve stuffed too much in that area.
The shape also distorts, with sharp angles where stuffing pushes fabric outward. The outline becomes uneven, and the item loses its intended form. You want curves and contours to stay clean, not jagged edges from excess fill.
If you can’t close an opening because fabric won’t stretch, you’ve got a shape problem from overpacking. You should be able to sew the last seam without forcing the fabric. A little space around the edge helps stitches sit neatly and keeps the surface smooth.
Check loft and feel
Gently press the surface with your fingers. You should feel a uniform loft with soft resistance, not hard pockets. Inconsistent loft means lumps from over stuffing in spots. Redistribute filling for even thickness across the surface.
Run your hands over edges and corners. Stuffed areas should blend into the shape without hard ridges. If you detect hard lines around corners, loosen or redistribute stuffing to soften the transition. Evenness is key for a safe, pleasant finish.
Remember the guiding question: How Much Stuffing is Too Much? Finding the Perfect Firmness. Keep it in mind as you work through each project.
Measure stuffing by weight and volume
Knowing exactly how much stuffing you’re using helps you stay consistent. Measuring by weight is precise, while a simple volume check keeps things practical if you lack a scale. Start by tucking a small amount into your project, then pause to weigh it. Different stuffing densities mean a cup of plush polyfill weighs differently from a cup of wool. Track both weight and volume to avoid overstuffing and to reuse a proven amount in future projects.
Write down the target weight and the corresponding volume (cups or liters) that you tested. This creates a quick rule of thumb you can repeat. For multiple toys or cushions, use the same measured amount for uniform feel across pieces. Consistency matters for safety eyes and detail work, since too-tight stuffing can strain fabric, while too-loose stuffing can make seams saggy.
As you work, check the feel of the surface. A well-measured amount should give a firm but squeeze-friendly result. If it rebounds slowly or stays indented, adjust next. Keeping a simple log of measurements helps you refine your method and answer How Much Stuffing is Too Much? Finding the Perfect Firmness for future projects.
Pillow stuffing amount guide
For pillows, aim for a balance between support and softness. Start with a moderate amount and test by pressing the surface. If it resists a bit and returns to shape, you’re on track. If you can press in easily and it stays, you’re under-stuffed; add gradually and test again.
Use a quick squeeze: press the center and see how it recovers. If you can fold the edges inward without pushing out the middle, you’ve likely found a good balance. For safety eyes or other details, keep the center firmer to hold structure, while the outer edges can be a touch softer for a comfy feel. Keep notes on how much stuffing you used and how it felt for future repetition.
If using polyester fiberfill, mid-range density is common. Wool or feather blends feel different, so adjust by feel rather than numbers alone. The goal is a pillow that holds its shape without feeling stiff. Your guiding phrase remains: How Much Stuffing is Too Much? Finding the Perfect Firmness depends on fabric, project size, and desired feel.
Cushion stuffing amount recommendations
Cushions need a firmer core with a forgiving edge. Start with a sturdier fill in the middle and leave room for the outer seam to shape the cover. Press the cushion to ensure it rebounds but doesn’t spring back instantly. If it feels bouncy or hollow in the center, add a touch more in the middle and test again. For edges around safety eyes and detail work, keep the outer layer a bit looser to avoid over-tightening stitches.
Use layered stuffing to maintain shape without lumps. A compact core with a softer outer shell provides a neat look and comfy feel. If you’re using foam beads or micro-beads, mix in lighter filling around the edges to prevent hard spots. Track how much you add and where so you can recreate the exact firmness for future cushions. Your notes will help you answer How Much Stuffing is Too Much? Finding the Perfect Firmness.
Use a kitchen scale test
Place a small amount of stuffing on a kitchen scale and record the weight. Fill a test fabric pocket to the same volume you plan for a full project. Compare the feel: does it compress nicely or stay firm? Tiny adjustments—just a pinch more or less—can shift firmness dramatically. This quick test helps you dial in the target for safety eyes, stuffing, and detail work. Keep a running chart of weight per project to guide future decisions.
Pick the right firmness for sleep
Choosing a firmness is choosing lasting comfort. It should support your neck and spine without poking or sinking too much. Think of firmness as a balance between soft and solid—enough structure to keep you aligned, but not so hard you wake with stiffness.
Your body weight and sleep position matter. Lighter sleepers often prefer softer options; heavier sleepers may need firmer support. If you share a bed, choose a setup that keeps your spine happy even with partner movement. The right firmness blends comfort with support, not just a cozy vibe.
You can test firmness without buying by pressing a pillow or DIY pillow under your head or shoulders. If you can’t hold a steady line and your neck aches later, you might be in the wrong range. Aim for a calm, steady line from head to hips.
Perfect firmness for pillow
A pillow with the perfect firmness supports the head without lifting it too high. Too soft, and necks bend forward; too firm, and you’ll feel pressure points. The ideal pillow fills the space under your head and stays in place as you move.
For side sleepers, a firmer fill helps fill the gap between ear and shoulder. For back sleepers, medium firmness keeps the head aligned. For stomach sleepers, a softer option is often best. Test by pressing to feel rebound; a good pillow springs back and maintains shape.
Optimal firmness mattress stuffing
Your mattress stuffing should feel firm yet forgiving. Too soft and hips dip; too hard and you’ll have pressure points. The right balance supports from head to toe and allows joints to rest. Press to see if the surface rebounds and contours to your shape. If sharing a bed, you want even weight distribution so partner movement doesn’t disrupt you.
Test by lying flat in the middle and rolling gently to gauge support. A well-balanced fill holds a straight line from head to toes and minimizes pinching or stiffness.
Match firmness to sleep position
- Side sleepers: a bit firmer to fill the gap between shoulder and head.
- Back sleepers: medium firmness for full-spine support.
- Stomach sleepers: softer options to avoid lifting the head.
If you change positions, a mid-range firmness can cover most scenarios, maintaining a natural spine line.
How to adjust firmness yourself
You can tune firmness safely with small, controlled steps. Start with a minor change and check after use. If you notice fabric tearing, shifting stuffing, or discomfort, reassess. Work gradually and keep tools clean.
How to adjust pillow firmness
Measure how firm you want it. If too soft, add stuffing or push toward the center to even out. If too firm, remove a small amount from the outer edge and reclose. Work in small increments and test after each change. If the pillow has a removable inner fill, adjust through that zipper to distribute stuffing evenly and avoid lumps. When you feel a steady, forgiving give, you’re close. If you detect a hollow center or stiff edges, redistribute stuffing and smooth the surface.
Remove or add stuffing safely
Locate the opening and reach the stuffing. Remove or add in small handfuls. Reclose and test after each adjustment. If you’re unsure, stop and reassess. If you feel resistance, don’t yank—gently reposition stuffing and test again. Ensure the closure is secure so stuffing doesn’t escape and the fabric stays intact. Check for even distribution by running your hands over the surface. If a stubborn area remains, turn the piece inside out or shift stuffing there.
Test in small steps
Test in small steps, starting with a tiny change. After each adjustment, press gently to check firmness. If it feels right, you’re done; if not, tweak again. Keep notes on grams added or removed and how it felt after use. The guiding question—How Much Stuffing is Too Much? Finding the Perfect Firmness—will guide future refinements.
Fill material and density matters
The material you choose and how densely you pack it affect every detail of the final piece. If you add safety eyes, the fill must support them. Density influences how it feels in hand and how it ages with use. Different projects need different densities, so adjust as you go. Start small to learn how weight and firmness alter appearance and safety.
- Fill material options include polyester fiberfill, cotton batting, and natural fibers. Polyester is light and fluffy but can flatten if packed too loose. Cotton stays firmer longer but feels stiffer initially. Your choice affects how well safety eyes stay secure and how the stuffing ages.
- Density isn’t just mass; it’s distribution. Uneven stuffing creates lumps and can threaten eye stability and shape. Stuff in sections, compress lightly, and check that eyes remain supported.
Stuffing density vs firmness
Density is how much fill is packed into a space; firmness is how hard the surface feels when pressed. A high-density fill can still feel soft if air pockets are left for bounce. Conversely, a dense fill can make the item stiff. Decide what the finished piece should do: cuddly toys need a softer feel, while decorative pieces may benefit from a firmer, more durable surface where eyes won’t shift.
As you test, some areas may need more firmness (around the eyes) to prevent distortion. If the head is too soft, add fill there; if a limb is overly firm, loosen slightly. Remember you can add, but removing is harder without reshaping.
Choose fill for loft and durability
Loft measures how much the project puffs up. Higher loft means lighter, airier feel; lower loft means denser and sturdier. For soft, huggable toys, opt for loftier fills but pack evenly to avoid sag around the eyes. For display or frequent handling, denser fills help the form hold. Balance loft with use to prevent eyes from loosening or stuffing from compressing over time.
Durability comes from steady density, not overfilling. Start moderate and increase gradually while checking eye security and surface smoothness. If shaping areas flatten or warp, adjust the fill to restore the silhouette.
Consider long term compression
Stuffed projects compress over time where pressure is applied repeatedly. Plan for this by using fill that resists permanent compression and remains stable after washing or heavy use. A mid-range density often works well for repeated handling. If a spot sags after weeks, reopen the seam, redistribute stuffing, and reseal. Quick checks after washing or play help catch issues early. The goal is to keep safety eyes secure and the body comfortable after lots of use.
Safety eyes and detail stuffing tips
Safety and durability are top priorities. Plan eye placement to prevent loss during play, and mix in small amounts of stuffing to shape details without creating hard spots. Balance firmness with flexibility for a toy that stays cute and holds up to hugs.
As you work, stuffing and detailing choices affect behavior. Heads stuffed too loosely flop; stuffing around eyes too much can pull and stress seams. Maintain a smooth silhouette with even density in each section, smoothing lumps before closing. Check the feel as you go to keep the toy comfortable and characterful after many hugs.
Secure safety eyes when stuffing toys
Secure safety eyes with washers and backings, pressing them into place before sealing seams. If skipped, eyes may come loose. Push a little stuffing behind the eye area to trap the eye, then sew around edges to lock it in.
When placing eyes, keep symmetry. Uneven eyes distract from the face. For plastic safety eyes, don’t stuff too close to them—leave space to anchor without distorting the fabric. If you need to adjust, insert more stuffing behind the eye area and resew.
If your pattern uses embroidery instead of eyes, anchor stitches firmly and avoid overstuff near the face to prevent puckering. A calm, measured pace helps avoid mistakes that would require ripping later.
Avoid overstuffing near small parts
Be especially careful around ears, noses, and hands. Too much stuffing here can cause fabric to split, stitches to pull, and small pieces to pop out. Start light, then add as needed to maintain shape.
Small parts should have a slim, crisp edge. If you see puckering or seam gaps near these areas, stop and re-flatten the seam before adding more stuffing. Test by gently pressing; if stuffing shows through, remove a bit and re-place. Adjust in small increments to avoid reworking a seam.
Check seams and attachments
Before finishing, check all seams and attachments. Look for loose threads, small gaps, or puckering near attachment points. Reinforce loose seams with extra tight stitches. When attaching small parts, go slowly and test their hold by gentle tugging. If anything shifts, add stitches or a dab of fabric glue and let dry before finishing the final inch of the body.
If you notice a corner case—like a tiny seam opening after stuffing—the best fix is to carefully reopen just the affected area and resew. A clean repair saves bigger issues later.

Clara Fern — Crochet Artist & Amigurumi Designer
Clara Fern is a crochet artist and amigurumi designer based in Austin, Texas. With 9 years of experience working with yarn and hook, she transformed a lifelong passion for handcraft into a creative mission: making amigurumi accessible, fun, and deeply rewarding for crafters of all levels.
Clara discovered amigurumi during a trip to Japan in 2017, where she fell in love with the art of bringing tiny characters to life through crochet. Back home in Texas, she spent years studying color theory, design principles, and advanced crochet techniques — developing her own signature style that blends kawaii aesthetics with original character design.
Through maclafersa.com, Clara shares everything she has learned — from choosing the right yarn and reading your first pattern, to designing fully original amigurumi characters from scratch. Her writing is known for being clear, detailed, and genuinely helpful, with no steps skipped and no secrets kept.
When she’s not crocheting, Clara enjoys watercolor painting, visiting local yarn shops, and drinking way too much coffee while sketching new character ideas.


