
Why you need a crochet character design template
You’ll gain a clear vision before you tug your yarn through a loop. A crochet character design template helps you map out proportions, colors, and details so you don’t guess as you go. With a template, you can see how your character will look from head to toe and tweak things before you start chaining. Having this plan saves time, reduces mistakes, and keeps your creativity focused on outfit and pose instead of reworking basic shapes. It’s like drawing a blueprint for a sculpture—you know where to add or remove yarn to get the look you want.
A template also keeps your projects consistent. If you’re making a series of characters, you’ll keep size, facial features, and accessories aligned across each piece. This consistency is especially helpful if you’re selling your designs or sharing them with a crochet group. When you return to a project after a break, you won’t have to relearn your own measurements—you’ll reunite quickly with your original plan and keep the style you love. Consistency makes your work recognizable and more professional.
Finally, a template boosts your confidence. You’ll see boundaries for what you can change and what you should keep intact. When you’re unsure how to design a certain feature, the template acts as a guide, not a cage. You can experiment in small, controlled steps, knowing you have a solid core to return to. That confidence helps you push your creativity further without feeling overwhelmed.
How to Create a Character Sheet Before Starting to Crochet
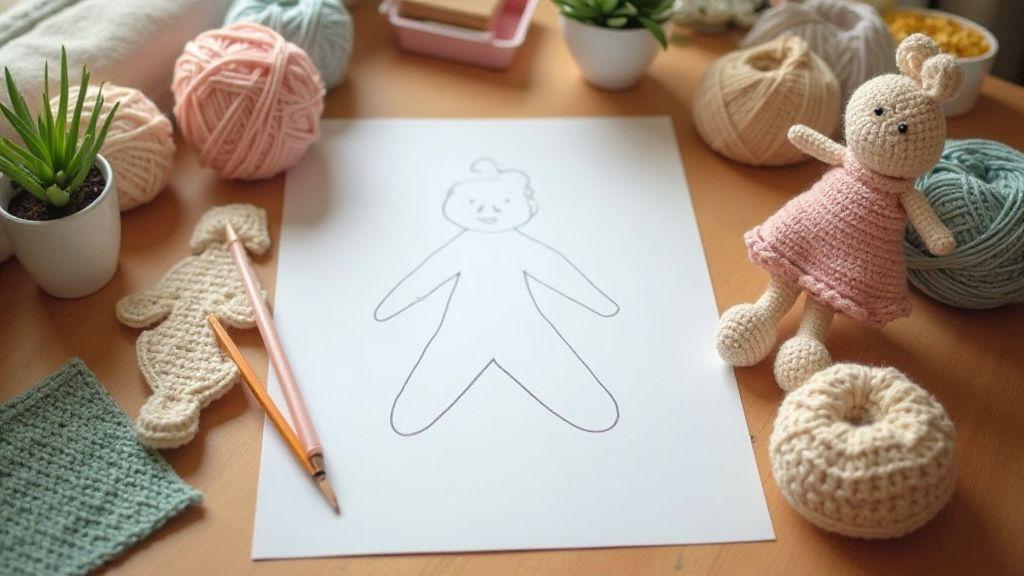
Before you pick up your hook, sketch a simple character sheet. Map the height, head size, torso length, limb proportions, and hand/foot size. Add key features—eyes, mouth, nose, hairline—and note distinctive details like ears, horns, or hats. When you write down color ideas, you’ll see harmony across clothes, skin tone, hair, and accessories. A quick drawing and color list can save hours of rework later.
Plan accessories, outfits, and poses. Decide what the character wears and how it’ll move. Jot down textures you want to imitate with yarn, like velvet stitches or chunky ribbing. The goal is to picture not just what your character looks like, but how they live in your story. This forward-thinking keeps your crochet faithful to the character’s personality.
Benefits for your size, shape, and style
Your size and shape aren’t obstacles when you use a template. It helps you adjust proportions so the character sits nicely on a shelf or in a child’s hands. You can scale up or down, keeping the same look while changing length, width, and limb details. This flexibility means you can tailor projects for kids, collectors, or gifting without starting from scratch.
Your style shines brighter with a template. It guides you to pick stitches and textures that match your vibe, whether you love smooth surfaces, bold textures, or a mix of both. You can test different color palettes and accessory ideas on paper first, then translate them to yarn. A clear style path keeps your creations cohesive and distinctly yours.
Top benefits to note
- Predictable results: you’ll know where to place eyes, nose, and mouth for the right expression.
- Time saver: you avoid repeated trial-and-error by planning your shapes and colors.
- Style consistency: your characters share a recognizable look across projects.
- Personalization ease: you tailor size, shape, and features to your audience and space.
- Creative freedom: you can experiment within a safe framework and push boundaries when you’re ready.
Character measurements for amigurumi
Amigurumi success starts with accurate measurements. You’ll feel the difference when your little crochet friend holds its pose instead of lying flat. Choose a target height and work around it, adjusting stitch counts as you go. Aim for consistency across limbs and features so your characters stay charming and proportional, whether you’re making a tiny critter or a big cuddly buddy.
Keep notes as you crochet. Jot down quick numbers after finishing each piece to build a personal reference that speeds up future projects. Your design becomes a repeatable process, not a one-off experiment.
Think about your audience. Gifting may call for slightly larger limbs or a bigger head for cuteness; display pieces may require precision and symmetry. Your choices shape how your character feels to those who meet it.
Which body parts you should measure
Focus on the head and torso first to anchor balance, then match arms and legs to the body’s scale. Check the neck and any ears, tails, or extra features that alter silhouette. Keep the measuring routine simple: measure circumference where a limb will sit, not the widest part. For height, measure crown to the base where the feet rest. If you add horns or ears, measure their height and width to avoid imbalance. Note target lengths, diameters, and widths in a consistent unit (cm or inches).
Record in cm or inches and gauge
Decide early on units and stick with them. If you’re more comfortable with inches, keep a clear conversion note handy. Your gauge matters too: a tighter gauge yields sturdier but shorter limbs; a looser gauge offers a softer feel but can skew measurements. Crochet a quick swatch, measure it, and use that gauge for your parts. Record the gauge next to measurements so you can reproduce it on future projects. If you change hook size or yarn weight, recheck the gauge and adjust accordingly.
Measurement quick chart
- Head height: 4–6 cm (1.5–2.5 in)
- Torso length: 6–9 cm (2.5–3.5 in)
- Arm length: 4–6 cm (1.5–2.5 in)
- Leg length: 5–7 cm (2–2.75 in)
- Neck circumference: 2–3 cm (0.75–1.25 in)
- Ear/feature height: 1–2 cm (0.5–0.75 in)
How to Create a Character Sheet Before Starting to Crochet
Your character sheet is your game plan. It keeps your design coherent from the first stitch to the final seam. List each measurement’s target and note how the pieces relate to each other. This roadmap ensures you can repeat the same look on future characters and catch balance issues before you crochet a loop.
Capture visuals too. A simple silhouette sketch and where each measurement lands help you spot balance issues at a glance. If you’re creating multiple characters in a theme, reuse core proportions and tweak only features to save time and keep your style recognizable. Your character sheet is your craft blueprint.
A well-prepared sheet gives you confidence. You’ll stitch with purpose, adjust with intention, and finish with a character that feels uniquely yours. How to Create a Character Sheet Before Starting to Crochet is your first big step toward consistent, charming amigurumi.
Yarn and hook selection guide
- Yarn weight tells you how thick the strand is and influences stitch appearance and project length. Choose a comfortable, reliable yarn—medium weight for quick, sturdy projects or bulky for soft, cozy pieces.
- Check the yarn label for a recommended hook size and test a small swatch. If fabric is tight, try a smaller hook; if loose, move up. Ergonomics matter for comfort during longer sessions.
How to pick yarn weight and fiber
- Start simple: worsted weight is forgiving and shows stitches clearly.
- Fiber matters: cotton feels crisp, wool has bounce, acrylic is easy to care for.
- Consider care and durability: select fibers and weights that hold up to washing and wear. Start with easier fibers and save fancy options for later.
Match hook size to your gauge
- Crochet a test swatch and compare to target size. If swatch is looser, use a smaller hook; if tighter, go bigger.
- Don’t rush the swatch—it saves headaches later. If your gauge is off, swap hooks or adjust tension.
Sample yarn and hook notes
- Beginner-friendly: medium-weight yarn with a smooth fiber; try worsted-weight wool blend and a 5 mm hook, crochet a small swatch to ensure even stitches and drape.
- For sturdier projects like bags, switch to a cotton blend and a tighter hook.
Stitch count tracker crochet
A stitch count tracker helps you stay consistent, spot mistakes early, and finish with a polished piece. Keep counts for rows and rounds, note where you changed stitches, and track any height or tension tweaks. A tracker makes you the designer of your project.
How to Create a Character Sheet Before Starting to Crochet for stitch tracking
Before you cast on, map out the stitches and counts you’ll use. Your character sheet should include project name, target gauge, key stitches, and color-change notes. A few lines capture adjustments you make as you crochet, helping you repeat or revise later. Keep notes short and scannable for quick reference during work. You’ll also want to save versions for repeat characters to quickly reproduce a look.
Row and round trackers you can use
- Row trackers label each row with stitch counts and notes about increases, decreases, or repeats.
- Round trackers help with circular pieces. Record round number, carried stitches, and where you added or skipped stitches.
- Choose a format you’ll actually use: grid, notebook, or a simple spreadsheet. Consistency is the key.
Stitch count template
A clean template keeps your data organized. Use lines for row/round, stitch count, and notes. If you swap colors, add a color-change note. This log helps you see progress and catch mistakes early.
Color palette planning for amigurumi
Plan colors to bring your character to life and highlight details. Use one main color with 2–3 accents to keep balance. Consider mood—bright and cheerful, muted for a gentle friend, or bold for a playful hero. Test combinations in scraps before committing. Think about the setting: greens and browns for a forest character, blues and sands for a coastal friend. Use one dominant shade and complementary colors to add depth. Keep practical notes on color interactions, dye lots, and washability.
How to pick colors for your character
- Start with the overall vibe and a focal point (usually the face or eyes).
- Choose supporting colors that enhance features without competing for attention.
- Test under expected lighting and note color names, main roles, and dye lot matches for consistency.
Record yarn brands and dye lots
Log Brand, Color Name, Dye Lot, and Start Date. Note any color variations in hand-dyed yarns and plan where they belong in your design. A dye-lot record helps you substitute or replace skeins without mismatches down the line.
Color swatch guide
Create small swatches to judge contrast, warmth, and balance in real light. Use swatches to decide edge seams and where to add accents. Keep them handy as a quick reference when changing colors mid-project.
Facial feature placement guide
Treat the face as a simple grid to tune expression. Place eyes, nose, and mouth with purpose to achieve natural mood shifts. Subtle asymmetry often reads more lively than perfect symmetry. Reference key placement and test with quick sketches to lock in the look.
Position eyes for the right expression
Eyes set the first impression. Center them at a matched height with consistent spacing. Tiny tweaks to eyelids and outer corners can convey curiosity, mischief, or determination. Gentle adjustments to brow lines can soften or sharpen the expression. A 1–2 mm shift can change readability dramatically; test with small sketches from the display distance.
Safety eyes vs embroidery: quick facts
- Safety eyes are sturdy and read as real eyes with a pupil and shine. They’re practical for durable pieces but require backing.
- Embroidery eyes preserve a handmade vibe and allow precise texture and color blending. They’re lighter but require careful stitching to avoid wobbly shapes.
Face placement notes
Align features along the head’s centerline and adjust for tilt to convey movement or attitude. Keep baseline placement and note two or three mood tweaks for future reuse.
Pattern modification notes crochet
Pattern modification is about tailoring fit, texture, and look to your hands and space. Document when to adjust, what changes to make, and how to record steps for later redo. Gauge and stitch counts matter more once you add your own flare. Keep notes practical and specific so you can reproduce or revert changes.
Modification record log
Maintain a dedicated log with project name, date, and changes made. Include starting and target gauge, hook or yarn swaps, and outcomes after washing or blocking. This living document keeps your patterns consistent across projects.
Crochet materials checklist
Prepare a practical, easy-to-reach toolkit. Start with a reliable yarn, a comfortable hook, and basic notions. As you crochet, you’ll discover which fibers and tools work best for your style.
List essential tools and notions you need
- Scissors, yarn needle, stitch markers, measuring tape
- A small row counter and a few hook sizes for pattern demands
- Ergonomic handles for comfort, coasters or a layout board to keep rows straight
Helpful extras
Stitch markers, extra-fine needles for weaving ends, a seam ripper for quick fixes, and a hook gauge for precise sizing. Keep a printable materials list handy to avoid buying duplicates.
Printable materials list
Have a one-page checklist of yarn weights, hook sizes, and tools to pin on your craft wall for quick reference.
Create character sheet crochet and amigurumi planning sheet
A character sheet keeps your ideas organized, guiding stitch choices, colors, and features before you pick up a hook. Use it as a blueprint for consistency, especially if you’re planning a series. Record size, scale, yarn weight, hook size, and tension, plus eye shape, color placements, and ear layout. The planning sheet should evolve as you test stitches and tweak colors, helping you repeat favorite looks with less stress.
You’ll notice clearer ideas as you build your sheet. Sketch rough outlines, list materials, and set milestones. Your sheet becomes a living document you update as you test and refine. Over time, you’ll see which stitches yield the square silhouette, which color pairings read best, and how stuffing affects plumpness.
How to Create a Character Sheet Before Starting to Crochet — step-by-step
- Define your character’s look with a simple description: size, color scheme, key features.
- Pick your yarn and hook, noting brand, weight, color codes, and exact hook size.
- Map proportions: overall height, limb lengths, and approximate stitch counts per part.
- Decide standout features: eye shapes, cheeks, nose, ears, or special accessories.
- Plan construction: order of assembly, stuffing level, and seam technique. Add any accessories to the sheet.
- Keep notes practical: short phrases like SC 2, DC 3, increase at 10th row and change to gray at row 15.
- Save versions for repeat characters to compare size, color, and texture quickly.
- Use a ready-to-use template to jump-start planning and replicate for similar characters.
How you approach the sheet anchors your project from the first stitch to the last seam. This reduces trial-and-error hours and gives you confidence that your crochet character will come out as pictured. If you’re new, start with a simple character and grow your sheet as you gain comfort. You’ll build momentum fast, and your future characters will thank you for the clarity.

Clara Fern — Crochet Artist & Amigurumi Designer
Clara Fern is a crochet artist and amigurumi designer based in Austin, Texas. With 9 years of experience working with yarn and hook, she transformed a lifelong passion for handcraft into a creative mission: making amigurumi accessible, fun, and deeply rewarding for crafters of all levels.
Clara discovered amigurumi during a trip to Japan in 2017, where she fell in love with the art of bringing tiny characters to life through crochet. Back home in Texas, she spent years studying color theory, design principles, and advanced crochet techniques — developing her own signature style that blends kawaii aesthetics with original character design.
Through maclafersa.com, Clara shares everything she has learned — from choosing the right yarn and reading your first pattern, to designing fully original amigurumi characters from scratch. Her writing is known for being clear, detailed, and genuinely helpful, with no steps skipped and no secrets kept.
When she’s not crocheting, Clara enjoys watercolor painting, visiting local yarn shops, and drinking way too much coffee while sketching new character ideas.


