
Determine toy scale and eye proportion
You start by picking a scale for your toy. Your choice influences every other part of the build, so lock it in before you sew or glue. Think of scale as the size language your toy speaks. If you choose a large scale, everything else should feel right at that size, including how big the eyes must be. If you’re unsure, test a few tiny stitches on scrap fabric to see how the character’s face reads up close. Your goal is to keep the facial features harmonious with the body so the toy feels balanced in real life, not forced or cartoonish. When you understand scale, you set a solid foundation for the eye work to come.
Now you translate scale into proportions. Eye size, head shape, and bodyLength all follow a logic you can apply again and again. You’ll notice smaller toys need smaller eyes, but not by math alone—tone matters too. A cheerful character might get rounder, bolder eyes, while a serious one stays more subtle. Keep a mental check that the eyes don’t dominate the face, but still read clearly when a hand holds your finished piece. Every scale decision you make nudges the viewer’s perception toward well made instead of cute project.
Finally, you plan for the finish. Your scale choice helps you decide how much shading, highlight, and texture to add. If your eyes are too large for the scale, the toy can look uncanny or overdone. If they’re too small, the face can read flat. You’ll want a consistent approach: measure the head, pick eye sizes that align with that measure, and then adjust with tiny details like sparkles or pupils to bring the character to life. Keep notes of what looked right in practice runs so you can repeat the success next time.
Match safety eye sizes by toy scale
When you match safety eye sizes to your scale, you create a believable, safe toy that folds into the hands of a child or collector without surprises. Start by noting the overall head diameter, then choose eye diameters that fit comfortably within the eye sockets without crowding the brow or cheek. If your head is roughly 2 inches across, you’ll usually want eyes in the 6–12 mm range, not giant or invisible. This keeps the face readable and friendly, which is what most projects want.
Next, you confirm clearance and safety. You want flush, snug fittings that won’t pop out with a light tug. If you use safety eyes, pick a larger diameter only if the backing is deep enough to stay locked in; otherwise, the eye might loosen over time. You can also consider embroidery or sewn-on eye options for very small scales, which reduces the risk of choking hazards and still gives you expressiveness. Your choice should balance safety and character, so your toy remains lovable and sturdy.
Finally, test with a quick mock-up. Place the eyes on a dummy head at your scale, then look at it from different distances. If the eyes feel overpowering or fade at arm’s length, adjust. The right size should read clearly from across a room and feel natural up close. By using the scale as your guide, you’ll keep your toy safe and expressive at the same time.
Use height-to-eye rules for balance
You can use a simple height-to-eye rule to keep your toy’s face balanced. Generally, eyes should sit around the upper third of the head, with the distance between them roughly the width of one eye. This gives you a natural, friendly look that isn’t too stern or too goofy. If your head is short and wide, you may want the eyes a touch closer together; if the head is tall, give them more space. Your eye placement is a quick, powerful signal about mood and personality.
Another tip is to aim for symmetry, but allow slight asymmetry for character. A tiny tilt of one eye can give your toy personality without breaking the overall balance. You’ll also check the vertical alignment from forehead to chin, ensuring the eyes sit evenly on both sides of the centerline. This rule helps your faces read instantly, even in quick photos or shelf displays, and it keeps your workmanship looking intentional.
Finally, you’ll keep testing as you build. Print a quick grid on paper and hold it behind your mock-up head to see how the eye line lines up from different angles. If you notice a wobble or a clue of imbalance, adjust early. A little tweak now saves you from reworking a whole piece later, and that’s money and time saved.
Proportion examples
Here are quick proportion examples you can copy or adapt. For a cute, small-scale bunny, use a head about 3 inches wide with eyes around 8–10 mm. The spacing should be about one eye width apart, so the face looks approachable and friendly. For a medium-scale bear, a head 4.5 inches across with 12–14 mm eyes keeps the gaze serious yet soft, which suits a more loyal, comforting character. For a large-scale fox, a 6-inch head with 16–20 mm eyes reads bold and expressive, perfect for a character with a sharp, clever vibe. These presets give you dependable starting points that you can tweak as your style grows.
If you’re working on a character with a dramatic expression, push the eyes slightly larger relative to the head, but not so much that the scale feels off. Conversely, for a quiet, thoughtful figure, go smaller and place the eyes a hair closer together to keep the face calm. The exact sizes aren’t sacred; what matters is how the proportions read to your eye. You’ll get better with practice, so jot down what worked and replicate it on future projects.
Use a safety eyes size chart
You’ll want a reliable safety eyes size chart to pick the right look and feel for your project. A chart keeps you from guessing and helps you plan for scale with your design. By checking the chart, you’ll know what size eye will sit nicely on plush, fabric, or a stuffed animal without sticking out or sinking in. Think of it like choosing the right button size for a shirt—size changes the final appearance and fit. With a chart, you can compare diameters side by side and see how a small change changes the overall look.
The chart becomes your quick reference during planning and sewing sessions. It helps you visualize the finished piece and avoid late surprises. When you’re shopping supplies, you’ll quickly spot which eyes match your pattern’s proportions. If you’re unsure, you can map your project’s scale on the chart and pick a few options to test. Your confidence grows when the numbers line up with your design goals.
Keep your notes handy. Mark your preferred sizes and the projects you used them on. A simple list saves time later and makes ordering easier. If you’re teaching someone else or collaborating, the chart gives you a shared language for size decisions. Your project benefits from clear, consistent sizing every time.
Read safety eyes size chart for diameter
Diameters are the core detail you need. When you read the chart, you’ll notice numbers like 6mm, 9mm, or 12mm. Those figures tell you how wide the eye is across. Your choice affects how the eye sits on the plush surface and how it reads from a distance. A larger diameter can give a bold, cartoonish look, while a smaller one keeps things subtle and cute. Read from left to right or top to bottom, depending on how your chart is laid out, and note how each size changes the overall silhouette.
If you’re unsure about fit, start with a mid-range size and compare to your pattern. You can model a quick mock-up by placing a circular decal or a cut-out circle on fabric to simulate the eye’s footprint. This helps you feel the scale before you commit to stitching or gluing. Remember, the diameter often interacts with the eye’s shield or backing, so check those measurements too.
When you’re finalizing a choice, confirm the diameter with your project notes. If your pattern calls for a specific look, your selected diameter should support that vibe. The right diameter makes your piece look intentional, not accidental.
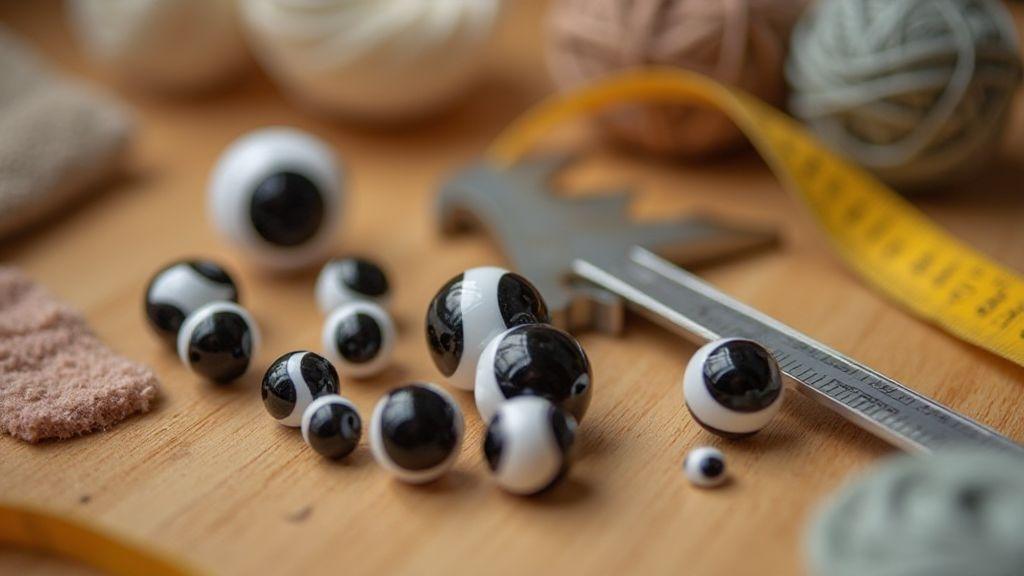
Find common sizes from 6mm to 24mm
You’ll find common sizes in the range from 6mm to 24mm. This spread covers small critters up to larger plush characters. For delicate creatures, 6mm to 9mm eyes read as tiny and gentle. For classic stuffed animals, 12mm to 14mm heads a balanced, friendly look. Larger projects, like oversized plush toys, often use 18mm or 20mm, or even 24mm for a bold, cartoonish stare. Use these general guides to quick-pick options when you’re building your selection list.
If you’re matching a pattern or a drawing, measure the face area where the eyes go and compare to the chart’s diameter. A quick rule: the eye should be roughly one-fifth to one-fourth the width of the face opening for a natural feel. But feel free to adjust for your style—sometimes a bigger eye reads as more expressive, sometimes smaller feels more cutely shy. Keep a few sizes on hand to test on scraps before you commit.
When you’re ordering, stock a small set in 6mm, 9mm, 12mm, 14mm, 18mm, and 24mm. That gives you flexible options for most patterns without overbuying. Your future projects will thank you for having a ready range.
Chart lookup tips
- Start with the facial width of your design and pick a diameter that fits within that space.
- Compare eye diameter to the face opening rather than the entire head for a balanced look.
- Keep a quick reference key in your project notebook: 6–9mm for tiny critters, 12–14mm for classic, 18–24mm for bold.
- Test fit on fabric scraps before finalizing—glue or sew in a loose mock-up to judge how it reads from typical distances.
Measure eye diameter correctly
You want a perfect fit for safety eyes, and that starts with measuring the eye diameter correctly. When you know the exact size, you avoid loose fittings or parts that won’t stay in place. Think of it like buying a hat: wrong size and it slides off, right size and it sits snug and comfortable. You’ll feel confident choosing the right size when you measure once and verify twice.
The exact diameter matters because different brands use slightly different standards. If you guess, you risk two problems: eyes that wobble and holes that look oversized. By getting the numbers right, you keep your project neat and professional. Your finished piece will look polished, not improvised, and your stitches won’t be the thing that gives first.
To keep your process clean, write down the measurements as soon as you take them. That way you can compare any eye you buy against your notes. It’s a small step, but it saves you from re-doing parts later. You’ll feel the relief of knowing you did it right the first time.
Use calipers or a ruler when measuring safety eyes diameter
Using the right tool makes the numbers trustworthy. If you have calipers, use them to get the exact diameter with a tight tolerance. If you don’t, a ruler works, but measure across the widest part of the eye and check twice. Your goal is consistency, not rough estimates. Consistency means your eyes fit every piece you’re making, not just one.
Calipers give you a precise reading down to fractions of an inch. A ruler helps if you’re just starting or if you’re measuring many eyes quickly. In either case, measure from edge to edge, not from the center, and record the measurement in the same unit every time. You’ll stay steady and avoid surprises when you shop for replacements later.
When you compare eyes, use the same unit and the same face you measured. If you measure in millimeters, keep all measurements in millimeters. Mixing units creates confusion and mistakes. You want clean, repeatable results so your project looks uniform.
Measure hole and face area for fit
The hole size must match the eye’s stem or post, and the face area needs to sit flush against your fabric or doll surface. If the hole is too small, the eye won’t fit; if it’s too big, the eye can pop out. The face area should be flat against the surface so there’s no gaps showing through your work.
Take a quick dry fit before you sew or glue. Insert the eye into the hole, press the face against the surface, and check for wobble. If it moves, you likely need a different size or a backing method to secure it. This step saves you from committing to a bad fit that requires rework.
Remember to account for the fabric’s stretch or thickness. A loose weave can swallow a larger eye, while a stiff fabric may push it out of place. Adjust by choosing a size that sits firmly and looks balanced with your piece. Your project will have a clean, professional finish.
Measurement steps
- Measure the eye diameter with a caliper or ruler, and note the number in your chosen unit.
- Measure the hole diameter or inner opening in your work area, ensuring it can accommodate the eye’s stem.
- Check the face area to ensure it sits flat against the surface without gaps.
- Do a dry fit to confirm the eye sits snugly and won’t rotate or pop out.
- Record all measurements and compare to your product specs before you glue or sew.
Select eyes for amigurumi
You want your amigurumi to look right, and that starts with the eyes. Eyes set the expression and bring your creation to life, so choosing the right type and size matters. Safety, scale, and ease of placement should guide your choice, not just how cute they look. You’ll notice that small details—like the distance between eyes or their depth—change the whole feel of your piece. When you pick eyes, think about how you’ll later pose or display your finished work, and pick a style that fits that plan.
As you work, keep in mind that safety eyes, felt balls, or embroidered eyes each have a job. Safety eyes stay secure and are great for kids’ toys, but you may prefer embroidered eyes for a softer, hand-made vibe. If you’re making a plush that will be handled a lot, you’ll want parts that stay on firmly and don’t snag or pull. Practically, gather a few options, place them on a swatch or practice head, and compare how they look from different angles before you commit. Your choice should feel balanced with your yarn weight and the head size.
If you’re unsure, test two eye styles on a practice head and photograph them. Seeing the eyes from a child’s eye level versus an adult’s helps you judge the expression. You’re aiming for a look that matches your character’s mood and your audience’s expectations. Remember, the eyes are a focal point, so your decision deserves a little time and experimentation.
Choose safety eye for amigurumi head size
Your head size dictates the eye size you can use. A larger head needs bigger eyes to avoid a googly, cartoonish effect, while a tiny head benefits from small, subtle eyes. When you know the head circumference, you can pick eyes that sit proportionally and don’t overpower the face. If you choose safety eyes, ensure the post length fits through your yarn and your stitches are tight enough to hold the backing securely.
If you’re using felt or embroidery instead of safety eyes, match the stitch count on the head to where you’ll place the eyes. Large eyes on a small head can look comical in a bad way; small eyes on a large head can feel distant or aloof. Your goal is harmony between head size, eye size, and the space between them. Don’t rush this—take a quick mock-up, place the eyes, and step back to see the overall balance.
Place eyes after stuffing for shape checks
Placing eyes after stuffing lets you see the final shape and facial expression before committing. You’ll be able to adjust the spacing, angle, and depth to get the exact look you want. While you stitch, keep the head light and avoid over-stuffing near the eye area, so you can push the stuffing away to check alignment later. Once you’re happy with the shape, add your eyes and secure them, then do a quick test squeeze to verify the expression holds up under touch.
If your project uses safety eyes, insert the backing while the head is still malleable, but don’t fully tighten until you’re satisfied with placement. For embroidered eyes, you can audition different stitches on a scrap piece before committing to the final face. This step is about control: you want the eyes to sit exactly where you expect, neither sunken nor glaring, and evenly spaced for a friendly, balanced face.
Stitch counts guide
Your stitch counts guide the proportions and the finish. Start with a round, even base and keep track of increases to form the head shape. A consistent stitch count ensures your facial features sit where you want them and that later pieces—like ears or noses—align neatly. If you’re new, use a simple increase pattern and write down the exact counts so you can replicate or adjust as needed.
When you adjust eye placement, you’ll refer back to your counts to keep symmetry. If you notice one side pulling or looking off, revisit your initial counts and compare the stitches per round. The counts aren’t just numbers—they’re your map for a clean, professional finish. Keep a small notebook or a digital note with your preferred head size, eye size, and the spacing between the eyes for future projects.
Choose eyes by age and safety rules
You want to pick the right eyes for your project, and you’ll see big differences once you match size and age. Start with the age of the person who will interact with the item. Younger kids need smaller, safer eyes that stay put and don’t pose a choke risk. If you’re building something for adults or older kids, you can use a wider range, but you still should respect safety guidelines. The goal is to keep your project looking polished while protecting users from potential hazards. When you choose eyes, you’re not just deciding on looks—you’re deciding safety, durability, and long-term use. Think about how the eye will be attached and how rough handling could affect the finish.
Next, consider the finish and how long the eyes will last. Durable, secure eyes reduce the need for repairs and keep your project looking clean. If you’re unsure about which size fits your fabric or stuffing, test with a scrap piece first. You’ll save time and avoid replacements down the line. Remember, the right eyes balance aesthetics with safety, so you don’t end up with a toy that looks great but isn’t safe to use. Your project should feel sturdy to the touch and visually aligned with the size of your creation.
Finally, confirm your choices by weighing practical use against appearance. Bigger eyes can dominate a face and look bold; smaller eyes read cute and subtle. Your decision comes down to how the eyes express personality while staying secure. If your design will get a lot of handling, go with secure backing and a reliable attachment. You want your finish to stay neat, not loose or torn. With the right balance of size, security, and style, your project will be both appealing and safe.
Follow CPSIA and EN71 for small parts
You must follow CPSIA and EN71 rules when your project has small parts. These standards help you keep tiny pieces from becoming choking hazards. Look for certified products and read the packaging to verify compliance. If you’re unsure, choose eyes labeled for toy safety and age-appropriate use. The right labels give you confidence that your project is safer for kids and compliant with laws.
Next, document your safety steps so you can show you did the basics. Save receipts or certificates, and note where and how the eyes will attach. This isn’t just paperwork; it’s proof you considered safety from the start. When you plan your build, map out the attachment method and the stress points where a part could loosen. Your preparation reduces risk and makes inspections easier later. Following these rules protects kids and protects your reputation as a maker.
Age recommendations for removable eyes
Removable eyes are popular for editable, display, or educational pieces, but they need careful use. For very young children, prefer non-removable, securely fixed eyes to minimize choking risk. If you must use removable eyes for instructional demos, ensure you provide supervision and clear age guidance. Always explain how to handle the piece safely and store it after use. Your goal is clear: keep curiosity without compromising safety.
For older kids and adults, removable eyes can be a fun feature, but you still want a strong hold. Use a locking mechanism or a safety backing that’s difficult to pull out. Document the recommended age range on your product or display, so buyers know how to use it properly. When you communicate these recommendations, you help buyers choose with confidence and reduce return costs.
Legal checklist
Your legal checklist should be short and specific. Confirm that all eyes used are labeled for toy safety and match the target age. Check that every attachment method is secure and tested for repeated handling. Keep records of CPSIA and EN71 conformance, plus any certificates for the materials. If you have questions about compliance, consult a safety expert before finalizing your design.
Secure backings and attachment methods
When you’re finishing a plush project, your first goal is to keep every piece safe and sturdy. You’ll want backings that stay put and attachments that resist tugging. Consider how the backings sit behind the fabric and how they distribute force when pulled. A solid backing helps you avoid loose eyes that can snag and pull free during play. You’ll find that choosing the right backing is a small detail with a big payoff for durability. The key is to pick options that match your fabric weight, stitching style, and how rough your project might get in everyday use.
Backings come in a few forms, and your choice changes how the piece feels to the touch and how strong it is. For soft fabrics, a simple washer with a tight fit can be enough. If your plush is going to see more rough play or washing, you might prefer a locking back or a sew-in method. Each option has a different impact on finish, comfort, and safety. You’ll notice the difference when you handle the finished toy: secure, smooth, and without little bumps under the fur.
Think about the final look as you choose. A clean, neat back side makes your project look professional, and that matters when you’re showing it off or gifting it. Your goal is a seamless finish where the backing stays hidden, yet remains strong enough to handle expected use. By planning your backing method before you sew, you save time and avoid last-minute fixes.
Compare washers, locking backs, and sew-ins
Washer backs are simple and fast. They sit behind the fabric and give you a flat, tidy look. They’re great for beginners or lighter plush that won’t be tugged hard. If you’re making a stuffed animal for a child, washers can be a sensible first choice because they’re easy to install and replace if needed. The downside is that they can loosen over time if the toy gets a lot of play or frequent washing.
Locking backs keep the eyes from turning or pulling out. They grip the post and lock in place, so you get more security without extra stitches. This method works well for mid-weight plush and projects expected to endure more handling. You’ll feel the difference when you test the toy: the backing stays centered and solid, with less wiggle.
Sew-ins attach the eye directly to the fabric with thread or a few tiny stitches. This method gives a very clean finish and is durable when done with tight, even stitches. It’s ideal for higher-end finishes or fabric that’s a bit slippery. The trade-off is that you commit the fabric to those stitches, so removal is harder if you need to adjust later. You’ll usually get the most seamless look with sew-ins, but they demand careful stitching.
Test pull strength for selecting safety eyes for plush
Pull strength testing helps you pick eyes that won’t pop out with normal use. You’ll want to simulate how a child or pet might tug on the toy and see where the weakest link is. Start by gently pulling on each eye with steady effort, then increase pressure until it feels like it might move. If the backing feels loose or the eye shifts noticeably, this is your cue to switch backing types or go with a stronger eye system.
Keep notes on how each method behaves for your exact fabric and stuffing. You’ll find that some combinations handle pulling better than others. The goal is a secure eye that stays put during play, washing, and rough handling, not something that’s tight and hard to move but easily breaks under pressure. If you’re unsure, lean toward a slightly stronger option and test again. Your choice should feel confident, not tentative.
Strength test steps
- Place the eye and backing in your chosen configuration.
- Apply a slow, steady pull from multiple directions to mimic real use.
- Increase force gradually until you reach a realistic maximum for your project.
- Check for movement, loosening, or fabric distortion.
- If any wobble appears, reassess backing choice or stitch density.
Match material and finish to design
You want a look that lasts as long as it looks good. Matching material and finish isn’t just about color or texture—it’s about performance, durability, and how your project will be used. Think about your environment first: will it face heat, moisture, or heavy handling? Your choices should align with those needs so your design remains consistent from first glance to long-term wear. When you pick a finish that fits the material, you reduce touch-up work and keep the visual impact intact. This approach saves you time and keeps your project aligned with your original design intent.
Next, consider how light interacts with your surface. A finish can either soften or sharpen the details you designed. If you want subtle, elegant details, go with a matte or satin that reduces glare. If you’re aiming for a bold, high-contrast statement, glossy finishes can make colors pop and edges feel crisper. The key is to pair the finish with the material’s inherent character so the design reads the way you imagined, not how the material inevitably behaves on its own.
Finally, test samples before committing. Print or prototype with your final materials and finishes in the actual setting where the piece will live. Compare how the finish ages, how fingerprints show, and how light plays on the surface at different times of day. By evaluating early, you avoid surprises and keep your project aligned with your design goals from day one.
Pick plastic, glass, or embroidered options
When you choose between plastic, glass, or embroidered options, you’re selecting a foundation for how your design communicates. Plastic is versatile and durable in everyday uses; it handles impact well and keeps costs reasonable. Glass brings a premium feel, clarity, and a sense of refinement that elevates simple designs into something more sophisticated. Embroidered options offer texture and a tactile quality you can’t replicate with hard materials, giving you a handcrafted vibe.
Your choice should reflect how visible you want the element to be and how you expect it to perform. If you need lightweight, shatter-resistant durability, plastic is your steady workhorse. If you crave a high-end, glass-like finish without the fragility, tempered glass or glass-look finishes give you that premium look with better resilience. Embroidered details shine in softer, textile-forward designs where texture adds depth. Remember, the material sets the baseline; the finish and application decide how far your design can go with that baseline.
Test your selections in the real world. Hold, wear, or use a sample and note how it feels in your hand and how it responds to touch. If you’re designing for a product that travels, plastic might survive the bumps better. For a luxury display piece, glass or glass-like finishes can be the differentiator. Your goal is to match the material to how you intend it to be touched and seen.
Use matte or glossy finishes for expression
Matte finishes soften edges and reduce glare, which helps your design feel approachable and calm. They’re your friend when you want a subdued, modern look that doesn’t demand attention but earns it through quality. Glossy finishes, on the other hand, grab attention, enhance color depth, and make surfaces feel crisp and energetic. Use gloss when you want your design to shout with presence, and matte when you want it to whisper with confidence.
Pairing the finish with your design’s intent matters. A matte finish can reveal textures and fine details at a human scale, while a gloss finish can intensify color contrasts and highlight sharp lines. If your project lives in a bright space, a gloss option can turn ordinary light into a striking highlight. If you’re in a dim area, matte reduces glare and makes the piece more legible at a glance. Pick the finish that amplifies your message without overpowering it.
Consider how fingerprints, smudges, or wear will show. Gloss can demand more frequent cleaning, while matte tends to hide minor marks better. Your decision should balance aesthetics, practicality, and the environment your item will inhabit.
Finish choices
Your finish choice is the final word on how your design reads in the wild. Choose a finish that matches your material, your environment, and your daily use. If you want lasting color and minimal upkeep, a durable, sealed finish in a medium gloss can strike the right balance. For a more premium, tactile feel, a satin or soft-touch finish adds depth without glare. If you need a hard-wearing surface that resists yellowing and fading, specify UV-resistant coatings and consistent color coverage.
Remember to document the finish in your specs so suppliers and installers stay aligned. A small note like matte silicone sealant with UV-resistant coating helps keep your team on the same page and protects your design intent from misinterpretation. The right finish makes your design feel complete and ready for the demands of daily life.
Visual placement and spacing tips
Your project looks clean when every element sits in its perfect spot. Start by gauging how the pieces sit in relation to each other and the overall frame. Think of your layout like a puzzle: the edges should feel balanced, not crowded. When you line things up, use real-world references—the nose line, brows, and the outer edges of your platform—to keep everything aligned. The goal is a visually pleasant rhythm where nothing fights for attention. If something feels off, step back and measure again; a tiny nudge can make a big difference.
Consistent spacing isn’t just neat—it’s essential for comfort and safety. You’ll notice that even small variances pull the eye and can throw off the whole look. Use markers or a soft pencil to sketch your spacing before you lock anything in. Once you see uniform gaps from feature to feature, you’ll get a sense for what reads as intentional rather than accidental. Remember, your eye will thank you for the crisp, predictable lines you create.
When you’re done, test with real-world cues: hold the piece up to a face or frame and check how the eye travels across the design. If your spacing feels sliding, you’ll want to correct it now. The more you practice this, the faster you’ll spot misalignments and fix them on the fly. This isn’t just artistry—it’s reliability you can count on every time.
Keep spacing consistent from nose and brow
Keeping a constant measure from the nose to the brow creates a natural, cohesive look. You want that vertical guide to run straight, so your entire layout feels anchored. Start by marking a central vertical line and draw parallels at steady intervals from the nose bridge up to the brow line. This establishes a predictable rhythm that your eyes will follow without effort.
As you adjust, check for any drift toward the temples or chin. A tiny tilt can look like a mistake even if the rest is perfect. If you use a template, lock it in place and compare each section against the nose-to-brow baseline. When you see uniform gaps, you know you’re on the right track. If it isn’t uniform, remeasure before you lock the final piece in.
Practice makes perfect here. The more you align from nose to brow, the less you second-guess yourself. Your final result will feel calm and intentional, not random.
Use pins to test symmetry before locking
Pins are your quick, low-commitment way to test symmetry. Place a few pins along the midline and at key reference points. Step back and look for mirrored reflections on both sides. If the right side feels heavier or lighter, adjust until both sides read the same at a glance. It’s easier to swap a pin than to peel everything back later.
Treat the pins as a temporary map. You’re not pretending to finish—you’re confirming that your plan works before you commit. Move them around until you see a clean balance. When you’re satisfied, you’ll gain confidence that the final lock-in will be precise and stable.
Keep your pins visible but not intrusive. They’re your safety net and your shortcut to a pro finish.
Spacing formula
Use a simple spacing formula to keep every measurement honest: measure from the central line to each feature, note the distance, and require all corresponding sides to match within a tight tolerance. If one side is off by more than a fraction of an inch, re-check your baseline and redo the alignment. Consistency in this math translates to consistency in appearance.
Your spacing should follow a clear, repeatable pattern. When you see a regular rhythm—like equal gaps between features—you’re halfway to a polished look. Sticking to the formula saves time and reduces guesswork.
Final checks: How to Choose the Right Safety Eye Size for Your Project
You want your project to be safe and polished, and the right safety eye size is a big part of that. The size you pick affects both the look and the safety of your finished piece. Start by knowing your project type and the age of the audience. For toys or plushies meant for children, you’ll need eyes that are securely attached and too large to swallow, but small enough to keep your design intact. If your project is decorative or adult, you still want eyes that sit firmly and don’t pop out with a tug. Your goal is a balanced finish that looks right and stays put.
When you choose the size, think about scale. A tiny stuffed animal should not wear oversized eyes; they’ll look off and feel heavy. Conversely, a large figure needs proportionally bigger eyes to keep the face expressive. If you’re unsure, compare with a reference image or a piece you’ve already finished. It’s better to test a few sizes on scrap fabric or a mockup before you commit. The right eye size makes your character come alive without overpowering the face or creating weak spots.
Finally, verify compatibility with your chosen attachment method. Eyes that snap in, sew on, or glue in place all have different strength levels. If you’re sewing, ensure the backing can handle pressure and won’t loosen with use. If it’s a glued option, confirm the adhesive is strong enough for normal handling but not so permanent that you can’t adjust later. Remember, the right safety eye size is not just about looks—it’s about durability and safety, especially for kids.
Use a safety eye size guide and inspection list to stay consistent. Note the diameter in millimeters and the recommended age range, map it to your pattern’s scale, and keep a quick reference sheet for common sizes. An inspection list helps you confirm secure attachment, clean backing, and no rough edges before you ship or display.
Use a safety eye size guide and inspection list
Using a safety eye size guide helps you stay consistent across projects. Start by noting the diameter in millimeters and the recommended age range. Match that to your pattern’s scale so the eyes sit correctly on the head. Keep a quick reference sheet handy with common sizes for your typical projects. This makes it easy to choose the right fit without guessing.
An inspection list keeps you honest. Check that the eyes are securely attached by giving a firm tug in multiple directions. Look for clear backing and secure pegs or washers. Inspect for any rough edges or loose fibers around the eye area. If you see gaps or wobble, pause to reattach with the proper method. Your goal is a clean, secure finish that you can trust.
Follow safety eye size recommendations for toys
When your project is a toy, you must follow size recommendations for safety. Toys designed for young children have stricter rules, so pick the smallest size that still looks right for the face but cannot be easily removed by a child. Always choose eyes with tamper-proof backing or a safety backing designed to resist pulling out. If your toy will be handled roughly, consider extra security measures like multiple attachment points or a stitch-over method to keep eyes in place.
For older kids, you still want a sturdy connection, but you may have a bit more flexibility in size. Use the safety eye size guide to pick a proportion that fits the toy’s smile and overall expression. If you’re unsure, test on a mock-up and ask a second pair of eyes to review—no pun intended. The key is safe eyes that stay put during play.
Pre-shipping checklist
Before you ship, confirm the eyes are securely installed and meet your project’s safety standards. Double-check the backing is fully engaged and that there are no loose threads near the eye area. Ensure the overall look matches your design intent, with eyes properly aligned and symmetrically placed. A quick final tug test and visual inspection save returns later and protect your reputation.
How to Choose the Right Safety Eye Size for Your Project: Quick Start Guide
- Define your project type and audience to guide safety considerations.
- Measure the head diameter and select an eye size that fits comfortably within the sockets.
- Choose an attachment method that matches your fabric and usage (washable, kid-friendly, etc.).
- Test several sizes on scraps or a mock-up before final assembly.
- Document measurements for consistency across future projects.

Clara Fern — Crochet Artist & Amigurumi Designer
Clara Fern is a crochet artist and amigurumi designer based in Austin, Texas. With 9 years of experience working with yarn and hook, she transformed a lifelong passion for handcraft into a creative mission: making amigurumi accessible, fun, and deeply rewarding for crafters of all levels.
Clara discovered amigurumi during a trip to Japan in 2017, where she fell in love with the art of bringing tiny characters to life through crochet. Back home in Texas, she spent years studying color theory, design principles, and advanced crochet techniques — developing her own signature style that blends kawaii aesthetics with original character design.
Through maclafersa.com, Clara shares everything she has learned — from choosing the right yarn and reading your first pattern, to designing fully original amigurumi characters from scratch. Her writing is known for being clear, detailed, and genuinely helpful, with no steps skipped and no secrets kept.
When she’s not crocheting, Clara enjoys watercolor painting, visiting local yarn shops, and drinking way too much coffee while sketching new character ideas.


