
Pick the right amigurumi safety eye sizes
You want eyes that fit your toy and stay secure. The right size makes the design look balanced and keeps it safe for kids or collectors. Start by considering your yarn weight and the final size of your amigurumi. A small toy needs small eyes; a larger piece needs bigger eyes to keep proportion. Choose a size that feels natural with your design, not forced. Eye size sets the tone for expressiveness—tiny eyes can read shy, while bold, larger eyes on a chunky face read differently.
If you’re unsure, test with a scrap piece first. You’ll see how the eye size changes expression and reading from a few steps away. Eye size can influence how light or playful your toy looks. Safety eyes aren’t decoration—they’re part of the structure that helps keep your piece sturdy over time. Choose a size that stays secure as you handle or wash your amigurumi. The goal is harmony: eye size that matches your craft, style, and safety needs. The Complete Guide to Safety Eyes for Amigurumi is a great reference to compare options.
Match eye size to toy scale and yarn
Eye size should balance the toy’s scale and yarn thickness. For a compact amigurumi, use smaller eyes that sit neatly without crowding the face. For a bigger toy, larger eyes frame the head and keep the look proportional. Bulkier yarn can obscure tiny safety eyes, so mid‑size eyes may be preferable—big enough to stand out, but not so large they upset balance.
Consider the expression you want. Tiny eyes suggest shyness; mid‑sized eyes read as friendly. If the piece is for kids, you might lean toward slightly larger eyes for easier recognition. When testing, hold the eye up to the face with yarn around it to see how it sits. This quick check can save you from redoing later.
If unsure, default to slightly smaller than your instinct. You can add shading or mouth stitches to shift expression without changing the eyes. Let your yarn choice guide you more than you expect; a poor pairing can throw off the whole look. The right match will feel intuitive as you sew.
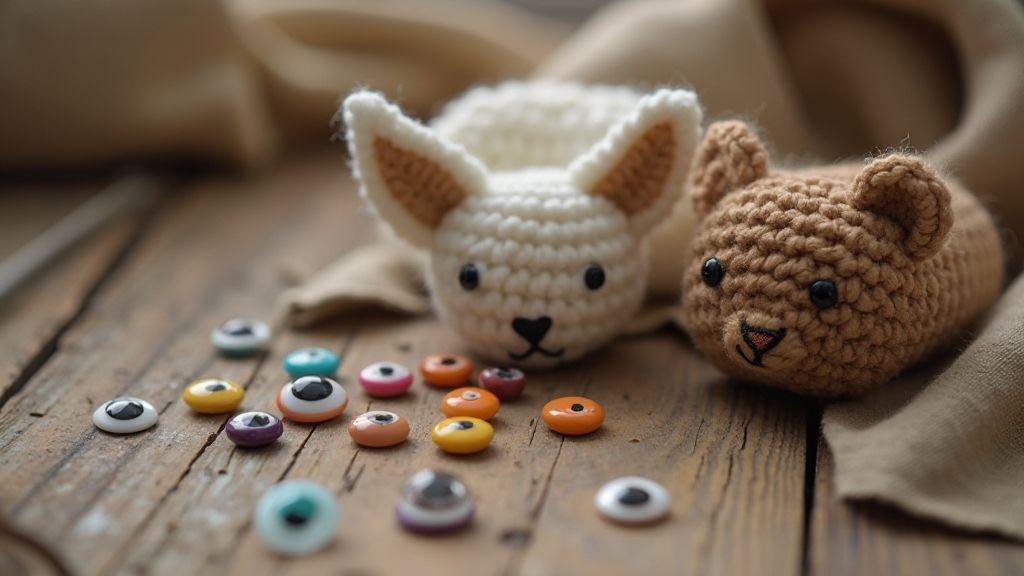
Common size ranges in millimeters
Safety eye sizes typically range from about 6 mm to 20 mm, with many crafters favoring 9–12 mm for standard plushes. Tiny amigurumi faces usually use 6–9 mm eyes, mid‑sized figures look best with 10–12 mm, and large creatures or bold characters can use 14–18 mm eyes. The exact choice depends on your toy’s diameter and how far the face sits from the surface.
Remember the feel changes with each size. Small eyes can look delicate and may disappear on dark yarns, while larger eyes read clearly but can dominate a small face. If you use shiny eyes, note how light catches them differently as you move from 6 mm to 20 mm. Pick a range that suits your piece’s personality and the space on the face for other features. Testing on a scrap face helps you quickly see what reads right from different distances.
Measure your piece before you buy
Before buying, measure the face area where the eyes will sit. Wrap the head’s diameter and note the distance from eye center to the face edge. Use a ruler or string to estimate. This measurement guides you to eye sizes that won’t crowd or overwhelm your design. It’s worth writing down so you don’t forget when shopping.
Also consider how much fabric sits around the eyes after embroidering other features. A little extra space is okay; it helps the eyes sit properly and stay secure. If in doubt, choose a middle-ground size within the common ranges and compare with your facial layout. Your measurements become a reliable shortcut to a balanced, professional look.
How to attach safety eyes securely
Eyes should stay put, not wobble or pop out. Start by choosing the right size eye and create a clean hole that fits snugly. When you push the eye through, the backing washer should sit firmly on the inside. A tight fit minimizes movement. If the fabric sags or the hole is too big, the eyes may loosen over time, especially with handling or washing. Keep the eye aligned as you insert the washer to avoid pinching or misalignment. A steady hand and a quick check from both sides save trouble later.
Locking washers are essential. They grip the post on the back of the eye and spread the load across the fabric. When installing, press the washer flat and snug against the inside surface. Don’t force it so hard you bend the post or distort the fabric. If you hear a pop or see a bend, stop. A clean, tight seat keeps the eye in place and avoids wiggling. Test by gently tugging on the eye from the outside; if the washer holds, you’re set.
Alignment matters. If an eye sits crooked, your piece looks off. Line up the eye with the fabric grain and the other eye. A marker or finger can guide the inside washer into place so it sits evenly. A straight eye improves the overall look and reduces stress on the surrounding yarn.
Step-by-step use of locking washers
- Start by selecting the correct size locking washer for your safety eye post.
- Insert the eye through the fabric hole and stop when the post is visible on the inside.
- Place the locking washer over the post from the inside, flat against the fabric.
- Press the washer down with even pressure until it sits tight without bending the post.
- Gently tug the eye from the outside to confirm it’s secured.
If the washer won’t sit flush, you may have a warped fabric or too-large hole. Re-check the hole size and adjust before redoing. Patience here saves reworking the piece. A consistent approach makes eyes look professional and ensures they stay put through play and washing.
Tips to keep the eye straight and tight
- Line up both eyes on the same horizontal line.
- Use a steady hand and bright light to spot tilt early.
- Check from multiple angles to confirm evenness.
- If unsure, remove and reseat the eye rather than forcing it.
Test the washer fit before finalizing
Before finishing, give each eye a final test. Gently pull on the eye from the outside and push from the inside. If the washer stays flat and the post doesn’t move, you’re ready to seal the seam. If there’s give, readjust the washer or re-drill the hole. This quick test saves potential returns or worn fabric.
Safety eyes placement guide for expression
Eye placement shapes mood. High and close placements create a surprised look; lower and farther apart give a softer, friendlier vibe. Consider the character you’re making—a brave kitten needs different placement than a shy panda. Use this guide to anchor expression so every toy’s face says what you want. The Complete Guide to Safety Eyes for Amigurumi is a handy reference as you practice, so you aren’t guess-and-redo.
For age and style, place eyes wider apart and nearer the center for a childlike look. For a more mature or mischievous character, push eyes higher and closer together to reveal the brow. A symmetrical design with a tiny tilt in one eye can add personality with subtlety.
Count rows and stitches for symmetry. Before committing, count the rows from the top of the head to where the eyes sit and the stitches between eyes. Mark the center and eye lines with pins or stitch markers to avoid shifts as you sew.
Mark placement with pins or stitch markers
- Mark each eye position with pins or markers.
- Place a marker between the eyes to maintain even distance.
- Use markers to guide while sewing on the eyes.
Choosing safety eyes for crochet toys you make
Safety eyes define the final look. Look for eyes that stay put, read right, and resist pulling. Treat them as the last brushstroke on your design. Compare options for sturdiness, backing systems, and colorfastness. This standard reference helps you align safety and design goals.
As you shop, note how the eyes sit in the fabric, how easy they are to install, and how they read on your project. If a product lacks a secure backing or shows looseness after use, try a different option. Your buying notes become a playbook for future projects, saving time and keeping designs consistent.
Plastic vs glossy vs flat eye styles
- Plastic safety eyes are standard: easy to attach, many sizes, reliable backing.
- Glossy eyes offer bright reflections that feel lively, especially in photos; they can stand out on light fabrics.
- flat eyes provide a subtle, painted-like look that works well for quieter or vintage designs.
Choose based on fabric, stitch tension, and safety needs. For kids, secure backs or internal washers matter. Read reviews for durability and ease of use. Your final choice should feel like a deliberate design decision, not an afterthought.
Use the keyword The Complete Guide to Safety Eyes for Amigurumi for buying notes
When shopping, rely on The Complete Guide to Safety Eyes for Amigurumi for quick buying notes. Look for a wide size range, secure backings, true color stability, and bulk options if needed. Compare safety features—backing types and locking mechanisms—and ensure the eyes are durable and safe for intended use. Your buying notes should cover how eyes sit in fabric, installation ease, and overall look on your current project. A well-kept guide helps you stay aligned with safety and design goals.
Pick styles that fit your design goal
Your design goal should drive eye choice. For bold, cartoonish characters, choose larger, glossy eyes that pop from across the room. For a cute, natural look, smaller plastic eyes with a flat back may be best. If you want a handmade vibe, flat eyes or embroidered eyes emphasize the craft. Consider how the eye interacts with facial shaping, stitching density, and silhouette. The right style anchors the character and communicates your intent.
Your final choice should feel intentional. A design goal centered on safety, playability, and expressiveness will guide you to the best eye style, backing, and size. The eyes aren’t just a detail; they’re the window to your character’s personality and your care for the finished piece.
Child-safe amigurumi eyes and rules
You want eyes that stay put and keep little kids safe. Child-safe eyes come in two main options: safety eyes with a backing and embroidered eyes. Each option has rules, and you’ll decide quickly and sew with peace of mind. The goal is durability and risk-free play, not just cute faces.
When selecting eyes, check safety standards and age labels. If a product says for ages 3 or baby-safe, that’s your cue for younger kids. For pieces that will see rough use, choose eyes with a snug post and a backing that locks firmly in place. Test by giving a gentle tug after sewing, not a full pull. Eye quality and a secure installation are the backbone of safe amigurumi.
When to use embroidered eyes for babies
Embroidered eyes are a smart move for infant projects. They avoid detachable parts while remaining expressive with the right stitches. Place eyes as you would with safety eyes, but replace the final plastic piece with two snug vertical stitches. If the embroidery looks flat, add subtle shading around the eyes for a gentle, sleepy expression.
For babies, aim for minimal contrast and soft features. A tiny curved mouth with backstitches softens the face without sharp edges. Practice on scrap yarn to ensure embroidery sits flat and dense. The finish should be smooth to avoid irritation on delicate skin. The goal is visible, charming features that stay safe.
Age guidance for secured safety eyes
If using safety eyes, check age guidance on the package. For babies under 3, avoid loose parts and choose eyes with secure, two-part backing and locking mechanisms. Test with a gentle tug after sewing. If other features share a seam with the eye, reinforce the surrounding fabric. For older children, you may use smaller backs with sturdier posts, but always err on the side of extra security—double backstitch and use strong backing.
Replace or reinforce for extra safety
If uncertain about the eyes, reinforce them. Add a second backing or stitch a fabric ring around the back to hold the post. A dot of fabric glue on the backing after securing, then clamp until dry, can help prevent loosening. Reinforce embroidered eyes with a second backstitch and a tiny halo of color around the eye to reduce stress on the surrounding yarn.
Locking washers for safety eyes explained
Locking washers are essential every time you install safety eyes. They act like tiny braces, improving security during play and washing. If a safety eye wobbles, the washer is usually the first fix. The goal is a sturdy, lasting attachment that resists movement.
For beginners, match washer size to the eye and bolt, tighten snugly, and test with light pulls. If it shifts, re-check the fit or swap for a different style. Aim for a clean finish that looks neat and performs reliably.
How washers lock and why they matter
Locking washers grip the post as you tighten, creating friction that prevents loosening from vibration or movement. They matter because small shifts can turn a cute project into a safety risk. The eye should stay put, not wander. Some washers bite into the material, others use a split edge that digs in as you tighten. If you’re using soft fabric, a curved underside on the washer can help seat it without creating a lump.
Balancing bite with fabric safety is key. If you feel resistance when tightening, stop and re-evaluate—the wrong washer can cause more trouble than it solves.
Washer types and material choices
- Split-lock washers bite into the mounting surface for a reliable hold.
- Lock washers with teeth grip thicker or tighter weaves.
- A smooth washer with a lock nut can provide a cleaner look.
Materials matter. Stainless steel is durable and corrosion-resistant; zinc-plated steel is lighter and cheaper but may wear sooner. In humid environments, choose corrosion-resistant finishes that won’t rub off onto fabric. Ensure the inner diameter matches the bolt and the outer diameter sits flush against the surface.
Clean washers before assembly
Always wipe washers clean before assembling. Dust or oil can prevent the lock from biting properly. A quick wipe with a lint-free cloth is usually enough. If you’re in a workshop, a light spray of brake cleaner (followed by a wipe) can help, but be careful with fabric fibers. A dry, clean surface helps the washer seat evenly and perform its job.
Alternatives to safety eyes for amigurumi
Beyond traditional safety eyes, you can choose alternatives that affect expression and safety.
- Embroidered eyes offer a soft, expressive face with no detachable parts. They blend into the fiber for a handmade charm.
- Felt eyes are easy to cut into shapes and sew on, providing a bold, graphic personality.
- Sewn-on buttons give a vintage, playful look, though you’ll want extra stitches to reduce wobble.
Emphasized embroidered eyes vs safety eyes
Embroidered eyes give control over shape and placement and avoid plastic pieces that could loosen. They add texture and a handmade charm. Safety eyes are beginner-friendly but can loosen with heavy tugging; embroidered eyes stay put but require more skill. You might start with embroidered eyes for beginner projects and reserve safety eyes for pieces that won’t endure heavy tugging.
Sewn-on buttons and felt as options
Buttons add dimension and whimsy but require secure stitching. Felt eyes are crisp and flat, easy for beginners, and read clearly from a distance. Felt is forgiving for group projects and lends a bold look.
Choose alternatives for child-safe toys
For child safety, embroidered or felt eyes minimize choking hazards. If you use buttons, choose small, flat ones with strong stitching or skip removable parts entirely. For very young ages, embroidery or felt is often safer and simpler.
Washing and care for amigurumi safety eyes
Careful washing helps eyes stay bright and secure. Some eyes are plastic and water-safe; others are best for dry cleaning or spot cleaning. Avoid full submersion when possible, especially if eyes are glued or sewn on tightly. Balance washing with preserving the eye hardware to extend the life of your amigurumi.
Balanced care means choosing the right method for the eyes you have. Store in a cool, dry place and handle gently to avoid loosening the eyes. Spot cleaning with mild detergent is preferred for frequent care.
Safe washing methods and temperatures
- Use a gentle cycle on cold water with mild detergent.
- Avoid harsh chemicals and bleach.
- For spot cleaning, use a soft cloth or cotton swab with mild soap.
- For full washing, place the amigurumi in a mesh bag and use low agitation.
After washing, reshape by hand and air dry away from direct heat.
Drying and storage tips to avoid rust
Pat dry with a soft towel and reshape before air drying. Keep out of direct sunlight to prevent color fading. If you need to speed up drying, use a hair dryer on low heat at a safe distance. Store in a dry, cool place with low humidity; a silica gel pack helps protect metal eyes from rust. Check periodically to ensure pieces stay dry.
Check washer tightness after wash
After washing, re-check eye snugness with a gentle tug. If an eye loosens, reseat or replace with rust-resistant eyes. This check helps avoid surprises after use.
Finishing and hiding backs for a neat look
Weave ends neatly and position washers flat to prevent back fabric from showing. Align washers with the fabric grain for a smooth surface. Weave ends back and forth to lock, then trim close to the weave. Cover backs with felt or yarn patches to hide stitches and tails. Secure patches with a dab of glue or a few stitches, then press to set. Inspect seams and trim any loose threads to ensure a clean back and professional finish.
Inspect seams and trim loose threads
Check for gaps, knots, or fraying. Fix any issues before they show on the front. Trim loose threads close to the fabric.
Weave ends and position washers flat
Weave ends steadily to hide them in the fabric. Position washers flat so they don’t tilt or catch light. Practice makes this natural, resulting in a clean finish from every angle.
Cover backs with felt or yarn patches
Cover the back with felt or patches to hide stitches and protect the work. Choose patches that match or complement your color scheme and attach with glue or small stitches.
This neat finish is a sign of care and durability in your amigurumi work.

Clara Fern — Crochet Artist & Amigurumi Designer
Clara Fern is a crochet artist and amigurumi designer based in Austin, Texas. With 9 years of experience working with yarn and hook, she transformed a lifelong passion for handcraft into a creative mission: making amigurumi accessible, fun, and deeply rewarding for crafters of all levels.
Clara discovered amigurumi during a trip to Japan in 2017, where she fell in love with the art of bringing tiny characters to life through crochet. Back home in Texas, she spent years studying color theory, design principles, and advanced crochet techniques — developing her own signature style that blends kawaii aesthetics with original character design.
Through maclafersa.com, Clara shares everything she has learned — from choosing the right yarn and reading your first pattern, to designing fully original amigurumi characters from scratch. Her writing is known for being clear, detailed, and genuinely helpful, with no steps skipped and no secrets kept.
When she’s not crocheting, Clara enjoys watercolor painting, visiting local yarn shops, and drinking way too much coffee while sketching new character ideas.


