
Why washers crack
Washers crack when you push them past their limits or when the surrounding material isn’t up to the task. Tiny hairline fractures or sudden chunks can appear after a rough impact or a long period of stress. Cracks aren’t random luck; they reflect how the washer is made, how it sits, and how you apply force. Paying attention to weak spots helps your setup stay safe and smooth.
Understanding crack patterns lets you spot trouble early. Cracks near the inner edge often come from high pressure where the bolt bears down. Center cracks indicate fatigue from repeated loading, and edge chips usually signal improper fit or misalignment. You can fix issues before they worsen and save on costly repairs later. Knowing what to watch for keeps your gear protected.
How you use your washer matters as much as its design. Mixing incompatible materials or tightening too quickly invites cracks. Slow, even loading and matching materials with the right hardness reduces risk. Careful handling and the right pairings go a long way toward a healthy setup. The goal is simple: avoid sudden shocks and keep the load steady.
Common material causes
Different materials crack in different ways; mismatches raise trouble. Metal washers can crack from hard impacts or over-tightening. If heated during use, they can become brittle. Plastic washers crack more easily under heavy loads or high temperatures, especially if they’re thin or soft. Check the spec sheet to match the washer to the job.
Hardness and ductility set the pace for crack formation. A washer too hard for the bolt or surface won’t absorb shocks well and may crack at stress points. If it’s too soft, it will deform around the bolt and crack from deformation. Align material choice with load, vibration, and temperature to minimize cracks.
Pressure and angle effects
Pressure concentrates force on a small area, potentially pushing a washer beyond its limits. Torque changes the contact patch, creating hotspots where cracks start. Tilted bolts or misalignment produce skewed loads that stress the washer unevenly. You’ll see hairline cracks along an edge or a curved fracture along the load line. Keeping the bolt square and evenly tightened helps.
Angle matters more than you might think. A slight misalignment changes the load path and creates bending moments that wear the washer down over time. Use guides, keep hardware clean, and tighten with steady, controlled force for a longer life.
Quick risk checklist
- Check fit: is the washer correctly sized for the bolt and surface?
- Inspect material: are you using the right material for temperature and load?
- Look for misalignment: is the bolt perpendicular to the surface?
- Apply steady torque: avoid rapid tightening that spikes pressure.
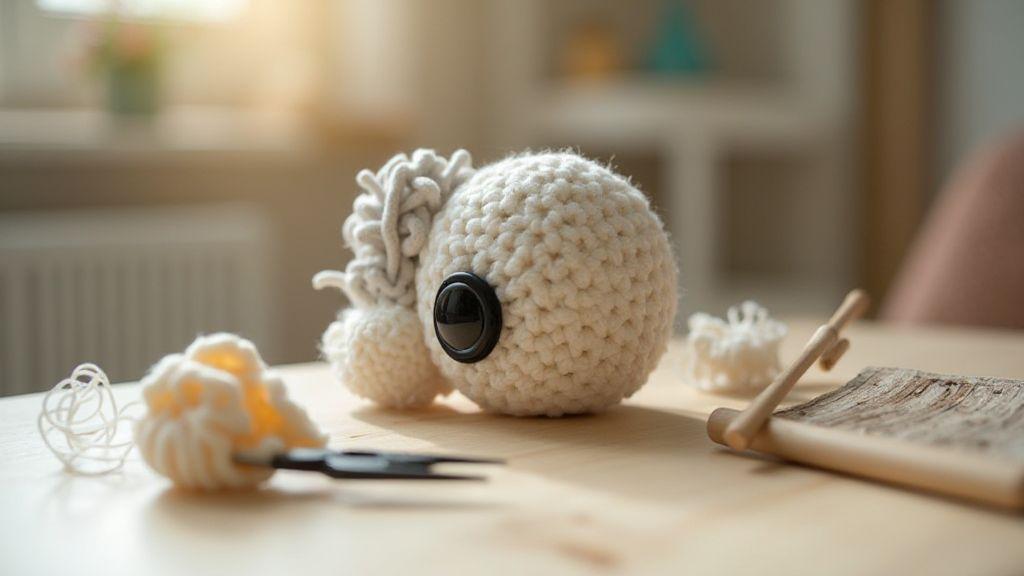
Tools for installing safety eyes
When you’re sewing or crafting, safety eyes need to be secure, precise, and non-slip. The right tools make cleaner results, better eye alignment, and a safer final piece.
A good pair of pliers helps you grab hardware firmly, and a proper hammer with a soft backing protects your surface. A soft base prevents dents around the eye site. A punch that matches the eye hole size gives you clean, even seats. Prepare a soft, stable work surface and spare eyebacks and washers within easy reach.
Best pliers and punches
Pliers should grip without marring; choose narrow jaws and non-slip handles for precise placement. A punch should fit the eye hole size for a clean seat. If you’re working with dense fabric, a tapered punch starts the hole cleanly without tearing.
Safe hammers and supports
Choose a cushioned hammer head and a light touch to avoid denting fabric. Pair it with a sturdy support—a thick cloth, rubber mat, or jeweler’s block—to keep the surface intact. Use a gentle, controlled strike to keep the eye flush and centered. Keep the hammer away from seams on delicate stuffing.
Tool prep checklist
- Inspect pliers for smooth jaws and comfortable grip.
- Check punches for size and clean edges; replace if nicked.
- Verify the hammer head is cushioned and there’s no wobble.
- Prepare a soft, stable work surface and protective mat.
- Have spare eyebacks and backing washers close at hand.
How to Install Safety Eyes Without Cracking the Washer
In this guide, you’ll learn to place safety eyes without stressing the washer or fabric. The trick is steady hands, a gentle touch, and the right sequence. This is how to Install Safety Eyes Without Cracking the Washer—the goal is a clean, secure finish that lasts.
The process: mark the spot on your fabric, choose the correct hole size for the eye, punch a neat opening, insert the eye from the front, and secure the back with its washer. If you’re worried about cracking, test on scrap first and adjust your grip to avoid pressing too hard. With practice, you’ll get a clean, safe result every time.
Make the result professional by keeping tools aligned and applying even pressure. A quick, light tap with a safe hammer seats the eye firmly, while pliers ensure the back washer sits snugly. If you feel resistance, stop, re-check alignment, and adjust. Your aim is a flat, even finish with no bulges or gaps—the eye should stay put during play.
Making a neat hole
Choose the correct drill or awl size for the safety eye. Mark the spot clearly so the hole stays centered. If the fabric shifts, lay it flat again and recheck alignment before continuing. A clean edge on the hole helps prevent snagging and cracking as you push in the eye. Apply light, steady pressure; if you feel resistance, wiggle slightly rather than forcing it. After the hole is through, inspect the edge for fraying and trim any loose threads so the eye sits evenly.
Attaching the washer without force
Slide the washer onto the post from the back slowly, keeping the thread and fabric aligned as the washer rests flat. If you hear creaking or feel resistance, stop and realign—the washer should glide, not grind. The washer should seat with minimal effort. If it won’t sit snug, recheck hole size and post length. Test the eye with a gentle twist; if it doesn’t move, you’re in good shape. The washer should seal the post, not distort the fabric.
Installation checklist
- Hole is clean, centered, and correctly sized.
- Post passes smoothly with minimal pressure.
- Washer seats flush against the fabric without distortion.
- Eye passes a gentle tug test without wobbling.
- No frayed threads or misaligned edges.
Preparing fabric and stuffing
Choose sturdy, smooth fabric and light, breathable stuffing. Test a small patch first to feel its shape retention. Leave generous seam allowances for clean sewing, and aim for even density when stuffing: firmer in the center, softer toward the edges. If unsure, practice on scrap rounds first. Keep the workspace tidy to avoid tangled threads and mistakes. The fabric should be smooth and ready for assembly.
Align eyes, nose, and mouth placements early to save rework. Mark key points lightly with washable chalk if you’re using a pattern. Test folds and relax the fabric before committing. Sew with stitches tight but not suffocating the cloth; a loose stitch invites stuffing to push through, a too-tight stitch can tear fabric. After sewing the main body, inspect inside for loose threads or gaps and tidy.
How to reinforce thin fabric
If fabric feels fragile, double up the layer or add a backing before sewing. Pin or clip pieces to prevent shifting, and sew with a slightly longer stitch length to avoid perforation. For tiny tears, reinforce with a second stitch. Consider a lightweight interlining or fusible backing for very thin fabrics. Sew along the line, keep seam allowances even, and avoid pulling tight to preserve integrity.
Positioning eyes for balance
Place eyes slightly off-center for a friendly look or centered for a classic expression. Check symmetry by testing both sides; temporarily tape the eyes in place to judge balance. Use a strong, short stitch anchored through the fabric and backing. Decide whether to insert safety eyes before stuffing or after, based on the design. After securing, rotate the piece to confirm eyes stay level.
Prep steps before insert
Reinforce seams, trim edges, and lay fabric flat. Pin along the seam line to keep alignment. Test stitch tension on scrap fabric and choose a thread that secures without puckering. Decide the order of inserting eyes or other fasteners ahead of time. Gather needles, thread, scissors, pins, and marking tools for a calm finish.
Step-by-step safety eye installation
You’re about to install safety eyes. Focus on making a neat hole, seating the washer with minimal force, and confirming stability with a quick checklist. The aim is to avoid cracks in the washer or misalignment, ensuring your project holds up.
Quick step cadence
- Keep the workspace steady and eyes aligned.
- Make a precise hole with a clean edge.
- Insert the eye, slide the washer on straight, and test for wobble.
- Pause and re-align if needed; finish with a controlled twist.
Two-hand insertion method
Hold the fabric steady with one hand while guiding the eye and washer with the other. Position the eye so the front faces you and the washer edge is flush with the surface. Press the post through, then slide the washer toward the surface until it sits snugly. If there’s any tilt, stop and adjust. Aim for a quiet click when the washer seats.
Use of spacers and guides
Spacers and guides help you keep eyes evenly spaced and aligned, especially on larger projects. Set guides to the required distance, and work row by row. Check alignment along the row to maintain straight lines and even spacing. A small investment in guides saves hours of touch-ups later.
Fast insertion tip
For speed without sacrificing security, align the eye, push the post through with a smooth motion, then seat the washer with a firm, steady press. If you feel resistance, pause, realign, and finish with control. Practice on scrap fabric to gain a confident rhythm.
Troubleshooting and finishing touches
Look for cracks, loose parts, or rough edges as you go. If a seam isn’t flat, re-seat it before continuing. Use a mirror or bright light to catch hidden spots. Talk through your steps aloud or in notes to keep memory fresh for next time.
Fixes if a washer cracks
If you spot a crack, clean the area, dry it completely, and apply a patch or adhesive rated for the washer material. For larger cracks, replacements or professional help may be required. Keep the joint watertight and safe.
Final cosmetic and safety checks
Check color matching, smooth edges, and remove glue spots. Tighten loose fasteners and test with a short cycle for leaks or unusual noises. Ensure safety features and labels are visible.
Final checklist
- Inspect for cracks and reseat misaligned parts.
- Dry and clean surfaces; repair as needed with the right adhesive.
- Recheck seams and fasteners; tighten where needed.
- Test with a short cycle; watch for leaks or unusual noises.
- Ensure cosmetic finish is even and free of rough spots.
- Confirm access to safety features and labels.
Choosing the right washer
Selecting the right washer saves time, money, and hassle. This quick guide helps you pick the best washer for any job.
Plastic vs metal backing washers
Plastic backing washers are light, resist rust, and are easy to handle, good for light to moderate tasks. They can deform under heavy loads or high pressure, so reserve them for lighter work.
Metal backing washers provide strength and durability under heavier loads. They’re less forgiving of overtightening, so use proper torque and check for flatness. Metal backs are ideal for furniture, machinery, or high-weight applications.
Picking the correct washer size
Measure the hole or bolt to choose a snug, even pad that distributes the load. Check the inside diameter (ID) to match the fastener shank and the outside diameter (OD) to cover enough surface area. The washer should sit flat and flush, not tilt, and must avoid catching on nearby edges.
Washer selection tip
When in doubt, choose a slightly larger, thicker washer. A bigger surface distributes force better and reduces indenting. For projects with vibration, consider locking or geared washers to minimize loosening. Check compatibility with coatings or paints, and do a quick test fit before sealing up.
How to Install Safety Eyes Without Cracking the Washer (recap)
This guide emphasizes a clean, snug fit that won’t crack the washer or disturb the fabric. The key is preparation, steady hands, and using the right aids. With practice, you’ll know How to Install Safety Eyes Without Cracking the Washer and keep your project looking polished.
Hints for inserting safety eyes
Aim for a clean, professional look that lasts. Use a steady rhythm and the right tools to avoid rushing. Preload the eye enough for the washer to sit flush, then finish with a controlled twist. A calm approach reduces wobble and helps eyes stay parallel to the surface. Practice makes the rhythm instinctive.
Troubleshooting and finishing touches (condensed)
- Plan the eye path: insert, align, then secure.
- Verify the washer sits flat and the thread isn’t exposed.
- Use spacers or guides to keep consistent spacing.
- Keep the workspace neat to avoid mistakes.
If you spot a damaged washer, replace it rather than risk a failure. The combination of careful technique, the right tools, and quality parts keeps your safety eyes secure and your project safe for play.

Clara Fern — Crochet Artist & Amigurumi Designer
Clara Fern is a crochet artist and amigurumi designer based in Austin, Texas. With 9 years of experience working with yarn and hook, she transformed a lifelong passion for handcraft into a creative mission: making amigurumi accessible, fun, and deeply rewarding for crafters of all levels.
Clara discovered amigurumi during a trip to Japan in 2017, where she fell in love with the art of bringing tiny characters to life through crochet. Back home in Texas, she spent years studying color theory, design principles, and advanced crochet techniques — developing her own signature style that blends kawaii aesthetics with original character design.
Through maclafersa.com, Clara shares everything she has learned — from choosing the right yarn and reading your first pattern, to designing fully original amigurumi characters from scratch. Her writing is known for being clear, detailed, and genuinely helpful, with no steps skipped and no secrets kept.
When she’s not crocheting, Clara enjoys watercolor painting, visiting local yarn shops, and drinking way too much coffee while sketching new character ideas.


