
How to Make Amigurumi Look Cute: The Science of Kawaii Proportions
You don’t have to guess what looks cute—this guide breaks down the science of kawaii proportions and how to turn that into your amigurumi. From head-to-body ratios to eye placement and stuffing, learn practical tweaks that make your characters instantly endearing.
Head-to-body ratio rules
Getting your amigurumi to feel alive starts with the head-to-body ratio. Shape the head to set the mood, then craft the body for stability and personality. Keep proportions consistent so every limb and feature reads as part of a single character. The aim is a design that looks pleasant in photos and in hand, not top-heavy or squat.
If you’re new, start with a simple rule: a larger head signals cuteness, but too large can read cartoonish. A slightly smaller body helps the head pop, while a longer torso smooths the silhouette. Step back and ask, Does this read as a single character? If yes, you’re on the right track. Consistency across the piece matters; a mismatched head can derail the charm.
As you practice, tiny adjustments shift the vibe. Raise or lower the head, widen the neck, or swap a plumper belly for a slim midsection to switch from chibi to a more natural yet cute look. Keep notes on what works for your style so you can repeat it later. The right head-to-body ratio isn’t just math; it’s a stylistic choice that frames mood.
Common head to body ratio amigurumi
Your first go-to for a crowd-pleasing look is the classic chibi ratio. Usually, the head is about as tall as the body from neck to feet, or a bit larger. Short arms and legs keep the silhouette compact and friendly, forgiving for beginners and charming in photos.
For a slightly more grounded version, make the head about half the overall height, with a longer torso and legs. It stays cute but reads as more versatile for storytelling. For a bold, decorative look, push the head a touch larger while keeping limbs compact—adjust features so the face remains the focal point. Whichever route you choose, consistency across the whole piece matters.
To stay practical, sketch quick silhouettes before you crochet. Compare the head-to-body footprint and adjust until they feel natural together. The goal is a cohesive character where the head invites the eye and the body supports posture.
How kawaii proportions change cuteness
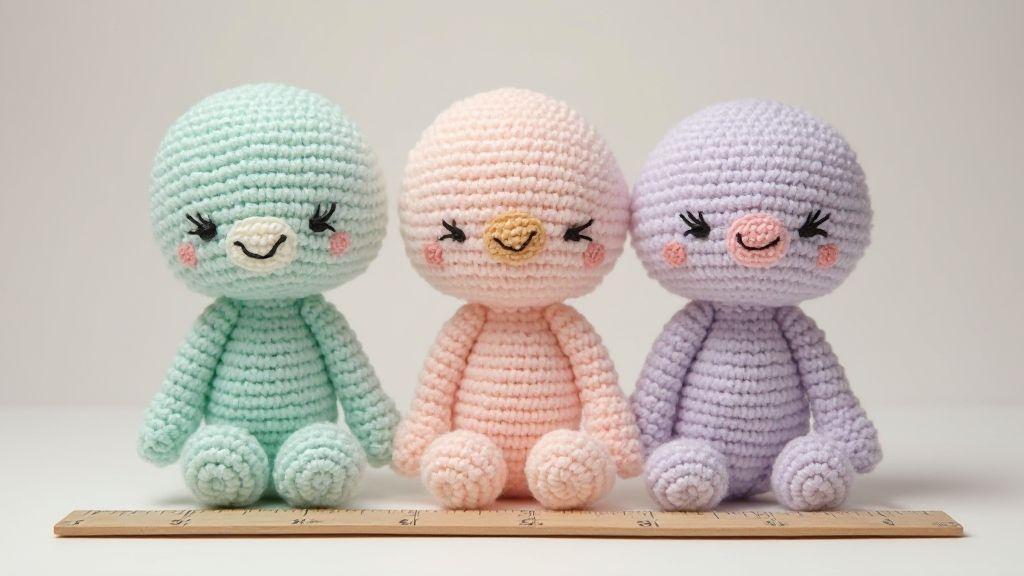
Kawaii magic hinges on generous heads and tiny bodies, with eyes placed high and a small nose and mouth. This signals innocence and approachability—the essence of the look. A big head communicates childlike charm, while a compact body keeps the silhouette round and cuddly.
If you shift away from extreme proportions, cuteness remains but with a different personality. A slightly smaller head and longer limbs can read sporty or adventurous, while a stout body with a big head reads cartoonish and playful. Eyes are a big lever: large, round eyes spaced apart amplify sweetness; smaller eyes convey mischief or steadiness. Tailor head size, eye placement, and limb length to the character you want to evoke, and keep it legible in photos and hands.
To apply this, set a mood for each piece (shy, bold, curious) and tailor head size, eye placement, and limb length to match. Practice variations on a single pattern to feel how small tweaks shift the overall feel. The science behind kawaii isn’t a mystery; it’s about how size and placement cue emotion.
Place the face low for cuteness
The sweetest amigurumi look comes from placing the face low on the head. When eyes sit closer to the lower third, the figure reads as friendly and playful, not stern. This arrangement also leaves more room on the upper head for tiny expressive details—a blush, a brow lift, or a surprised dot of color. The face anchors low and the silhouette stays soft, which fans of kawaii crave.
Decide early where the neck begins and mark the eye line before stuffing. A low face works best with ears and the top of the head kept rounded and simple. Testing with loose stitches or a gauge swatch helps you see how the eye line interacts with the head’s curve. Aim for a clean, inviting look that invites a hug.
amigurumi face placement basics
Start with the head’s centerline. Align the eyes along a horizontal line just above the halfway point, then place the mouth slightly lower. Keep this proportion to achieve that instantly friendly vibe. Mark placements with a contrasting color before sewing so you can adjust without ripping. Measure for multiples to maintain consistency across pieces. Symmetrical eyes read as calm and dependable, ideal for both beginners and seasoned makers.
Experiment with eye shapes and sizes to tweak the look. Large round eyes feel extra cute; smaller almond shapes read as curious or shy. For neoteny, keep features a touch larger relative to the head. Test a few options on scraps before committing.
Why low faces read as childlike (neoteny)
A low face taps into neoteny, the trait that makes kids look younger and more adorable. Eyes lower and mouth down create a soft, innocent look, boosting cuddliness. But avoid over-shifting—balance is key: eyes not too far down, mouth not too close to the chin.
Mark before you stitch
Marking is your safety net. Place tactile anchors (light yarn marks or removable pins) where the eyes will go, then check alignment against the head’s curve. Markings keep faces consistently low across pieces and help a batch read the same cute standard. When sewing, follow the marks so you can tweak without losing texture.
Use oversized eyes wisely
Oversized eyes set the mood. They can read as friendly or quirky but must be balanced with the rest of the head. If the body is in muted tones, bright eyes pop just enough; if the yarn is busy, darker eyes maintain readability. Eye placement changes the feel: closer together reads cuter; wider apart can look curious or surprised.
Practice with swatches: try big, medium, and small eyes on the same head shape. A slightly oversized eye with simple lashes often reads as cutest without shouting. If unsure, swap to smaller eyes later without reworking the whole piece.
oversized eyes amigurumi size tips
Eye size should relate to head scale. A head 40 mm wide with eyes around 10–13 mm is a good balance; up to 15 mm for more expressiveness with testing. Space eyes slightly wider than you think; eyes too close can feel moody, too far apart can read surprised. If you use safety eyes, pick sizes that sit neatly on the surface. For felted or embroidered eyes, fine-tune pupil size and white space for a softer look. Start a little smaller and adjust with blush or lashes later if needed.
Safe eye types and spacing
Safety eyes are durable and easy to place but fixed in appearance. Embroidered or felt eyes offer softer vibes and easy customization with highlights or freckles. For a classic kawaii feel, combine two-tone pupils with white highlights to give life without glare. The spacing rule: the distance between eye centers should be about the width of one eye. For example, with 12 mm eyes, aim for roughly 12 mm between centers, adjust by a millimeter or two for the head shape and expression.
If embedding smaller eyes on a round head, offset them slightly higher for a wide-eyed look that reads as cute. For larger eyes, keep the eye line lower so brows don’t overpower the face.
Eye spacing rule
Keep the space between eye centers roughly equal to the width of one eye. If eyes are 12 mm, target about 12 mm spacing. Test with a dry fit before final seaming and tweak for balance.
Simplify mouths and noses
Mouths and noses should read clearly without crowding the tiny face. Start with simple shapes: a small curved line for a smile or a tiny V for a nose. Bold, clean stitches read as features even when everything else is simplified. Keep mouths proportional to head size and test on scrap yarn first. Minimal shapes read as expressive without clutter.
For a cute, friendly look, use tiny, upturned mouths or soft closed-lip smiles. A single tiny stitch can define the line; a tiny cluster works for a nose. Position mouths and noses slightly below the center line to keep eyes as the focal point. If unsure, place practice stitches on scrap to see how they read.
crochet toy facial features that read small
Small features rely on tight, consistent stitches. Slight asymmetry (a hair off-center) can bring life. If using safety eyes, choose the smallest size for a soft face. For crocheted eyes, switch to finer yarn and a thinner hook for delicate lines. Place features with pins and check from multiple angles; a quick photo helps ensure the look is right.
Placement relative to eyes
Place mouths and noses in relation to the eyes to maintain cuteness. Align eyes at mid-face height; place the nose just below the eye line with a tiny gap. The mouth should sit about a third of the way from the nose toward the chin. If eyes are larger, drop the mouth a touch; if eyes are close, move the mouth slightly lower for a friendly read. Test placements with markers and photos to ensure harmony.
Short, rounded limb proportions
Short, rounded limbs read as friendly and welcoming. A compact silhouette signals safety and approachability. Keep limbs short relative to the torso and end with gentle curves rather than sharp angles. Short limbs reduce visual weight at the ends, helping balance the figure.
Test two versions: slightly longer limbs vs truly rounded limbs. The rounder option often yields a warmer vibe, especially for a cuddly look. Hold the toy in your hands and check for natural movement; trim and soften as needed.
Stylized limb proportions for appeal
Stylized limbs give your character personality. You might exaggerate a knee bend, shorten a forearm, or widen a lower leg for emphasis. Tiny, springy legs suggest energy; a chunky upper arm conveys soft strength. Maintain consistency in exaggeration across all limbs so the silhouette reads cohesively.
Test in different poses and angles to see how stylized limbs behave dynamically. Some exaggerations work best in profile; others look odd head-on. Fine-tune until the character keeps its charm from every angle.
Balance limbs with head size
To keep a cute, cohesive design, match limb proportions to head size. Start with a head-heavy ratio for approachability, then scale limbs to stay in harmony. If limbs pull attention away from the head, scale them down or soften their shapes. If the head looks overwhelmed, increase limb visibility carefully. Use quick sketches to compare head-to-limb ratios and aim for a silhouette that reads as cute and confident from a glance.
Joint placement tip
Place joints where they’re natural, but soften them to maintain the kawaii vibe. Elbows and knees should bend inward to suggest motion without stiffness. Position shoulder and hip joints slightly lower to create a tiny, endearing wobble in poses. Test joints in multiple poses to ensure expressive movement while keeping a rounded, friendly silhouette.
Chibi amigurumi design rules
Chibi amigurumi should look instantly lovable: big head, small body, tiny limbs. The goal is a cheerful, energetic pose with bold shapes that stay readable at small sizes. If you compare to a simple character—big eyes, small mouth, round oversized head—the design stays readable and irresistibly cute. Color should be limited to 2–3 main colors plus a couple of accents. Use contrast to highlight the face: lighter head skin, darker eyes, and bright accessories. Texture can add softness; balance smooth rounds with subtle bobbles or increases for plushness.
chibi amigurumi design exaggeration limits
Exaggeration works best with clear limits. Head size is the first lever: 40–60% of total height reads chibi. Eyes should be prominent but not oversized to distract. Limit body length to keep the figure compact. Subtly push limbs; short arms and legs with rounded ends read as friendly and playful. Save tiny features for accents to avoid crowding the face. Test two versions: bold exaggeration and modest exaggeration, then choose the simpler for maximum cuteness. Maintain consistent feature scaling for readability.
Kawaii proportion rules for heads and bodies
The classic kawaii look features a large head on a small body with soft, rounded shapes. Aim for a head-to-body ratio where the head feels 1.5 to 2 times taller than the torso, with an almost invisible neck and rounded shoulder line. Eyes sit high, about a third of the head width apart, with a tiny mouth under the nose and light blush on the cheeks. The body remains compact: short torso, small limbs, rounded ends. Accessories should be proportionate and low-profile so the face stays the hero.
Scale template method
Use a simple scale template to keep proportions consistent. Draw a head circle and add a smaller rounded torso with a fixed ratio (for example, head height equals 1.6 times the torso height). Print or sketch the template to compare with samples and adjust until the silhouette feels right from every angle. A template helps maintain uniformly adorable proportions.
Yarn, color, and texture choices
Yarn choice affects feel: aim for a smooth, cuddly texture with clean stitches. For beginners, a light cotton blend or soft acrylic is forgiving. For a plush, huggable vibe, try micro-fiber or plush yarns. Test swatches to see how shade reads in daylight versus indoor lighting. Texture matters: tight, even stitches read neat and adorable, while a touch of halo on the yarn adds plush warmth. Balance texture with color to keep the face readable and inviting.
Pair yarn with color thoughtfully. Soft, unsaturated hues feel gentle; high-contrast combos add personality without overwhelming the eye. Build palettes around a mood—cozy, playful, or magical—and place darker accents near the head to draw attention to the face. If unsure, use a single mood palette and reserve a bold accessory for contrast.
Low-contrast palette tip
A soft, lullaby look comes from a low-contrast palette. Colors that sit close on the wheel blend gently in photos, keeping features readable with a touch of softness. If base and secondary colors are too close, use a slightly darker shade for noses or eyes to maintain definition.
Shaping with increases and stuffing
Shaping brings your amigurumi to life. Use increases to add roundness where you want volume (cheeks, belly) without expanding the silhouette, and use decreases to keep edges tidy. Plan bulges so they blend into the body for a soft, cohesive look.
Maintain steady tension to avoid stiff edges or loose, floppy shapes. If the head looks oversized, add subtle decreases in the body to rebalance. If arms seem flat, adjust stitch counts to push them out slightly against the torso. The goal is a plump, friendly silhouette that invites touch.
Designing cute amigurumi patterns with shaping
Begin with a simple head shape and plan cheeks, ears, and belly placement. Use increases along curved lines to build roundness, and controlled decreases to keep edges neat. Place shaping to keep the face expressive and the body pleasantly plump. Compare silhouettes side by side to decide which proportions read as cute. Document shaping choices so others can reproduce your charm.
Stuffing to keep kawaii proportions
Stuffing matters as much as the stitches. Use small, clean pieces and distribute evenly to avoid lumps. Too much stuffing can create stiff, stretched yarn; too little can flatten the curves. Balance density across parts: firmer stuffing in the head helps keep a rounded, cheerful shape, while lighter fill in the limbs keeps them bendy and cute. Close openings tightly and check seams for neatness. If sagging occurs, re-tighten or add a touch more stuffing.
Even stuffing tip
Stuff in thin layers, then press and rotate the piece to maintain smooth curves. If you see a dip, add a little stuffing and press into place. Consistency is key—think of your amigurumi as a small sculpture you want to hold comfortably.
Prototype and test your pattern
Start with a simple prototype using inexpensive materials to test how the pattern flows. Note where proportions feel off or steps slow you down. If a section is clunky, rewrite that row. Testing early saves time and scraps, and builds confidence as your stitches behave the way you expect.
Compare the prototype to your reference or goals. Do limbs align with the intended pose? Does the head balance on the neck? If you spot a wobble, adjust scale or placement in a small test. Use friends or family as testers for quick feedback on the overall vibe. This iterative loop—test, note, adjust—keeps the project moving and prevents frustration later.
Document your results so you can start faster on future projects. Track what you changed and why, and how it affected the look. A clear pattern becomes your blueprint, not a mystery you solve anew each time.
Document cute amigurumi proportions and changes
Keep a record of the proportions that make your amigurumi read as cute. Note head-to-body ratios, limb lengths, and eye relative size. If a sweet spot emerges (for example, 1:1.6 head-to-body), write it down as your baseline. When you tweak features later, you’ll see how small moves shift the charm. Include what changed and why so future projects benefit from your notes.
Maintain a second section for changes that didn’t work. If a particular eye size reads too intense or too sleepy, note the result and the simplest fix next time. Small swaps—like adjusting eye spacing by a millimeter or softening cheek curves—often flip the character from quirky to irresistibly cute.
Tweak eyes, face placement, and limb scale
Eyes are the soul of cuteness, so start with placement. Slightly lower or wider-set eyes soften the expression and read as more approachable. For a spark of mischief, move them higher or closer together. Use face templates to compare outcomes quickly.
Limb scale determines the balance of the design. Longer arms feel playful; shorter limbs read as compact and cuddly. Test different scales for the same pattern to see how poses shift—sitting, standing, or reaching. Note weight distribution changes and aim for a pose that reads natural and stable. The goal is a harmonious silhouette where every feature complements the next.
Simple note-taking checklist
- Proportions used (head:body ratio, limb length)
- Eye size and placement (vertical and horizontal alignment)
- Face shape and cheek/muzzle adjustments
- Limb scale and positioning for desired pose
- Tested outcomes and which change fixed them
How to Make Amigurumi Look Cute: The Science of Kawaii Proportions ties together these practical steps so you can design with intention. By balancing head size, eye placement, limb proportions, and texture, your amigurumi will read as a cohesive, lovable character—ready to charm in photos and in person.

Clara Fern — Crochet Artist & Amigurumi Designer
Clara Fern is a crochet artist and amigurumi designer based in Austin, Texas. With 9 years of experience working with yarn and hook, she transformed a lifelong passion for handcraft into a creative mission: making amigurumi accessible, fun, and deeply rewarding for crafters of all levels.
Clara discovered amigurumi during a trip to Japan in 2017, where she fell in love with the art of bringing tiny characters to life through crochet. Back home in Texas, she spent years studying color theory, design principles, and advanced crochet techniques — developing her own signature style that blends kawaii aesthetics with original character design.
Through maclafersa.com, Clara shares everything she has learned — from choosing the right yarn and reading your first pattern, to designing fully original amigurumi characters from scratch. Her writing is known for being clear, detailed, and genuinely helpful, with no steps skipped and no secrets kept.
When she’s not crocheting, Clara enjoys watercolor painting, visiting local yarn shops, and drinking way too much coffee while sketching new character ideas.


