
Use an amigurumi proportions guide
You’re crafting a doll that feels right in your hands and on the page. An amigurumi proportions guide helps you keep magic in your design without guessing. Start with a simple frame: head, body, limbs. This guide isn’t a rulebook to cage your creativity, it’s a map you can bend when your character needs extra personality. When you use a clear proportion system, you save time and you get consistent results across multiple dolls. Your readers will notice the care you put into getting the shape feel just right, and they’ll trust your design process.
Think of proportion as a language you’re teaching your yarn. A clear ratio helps you explain decisions to others, from a maker friend to a curious shopper. If you’re aiming for a cute, baby-like vibe, you’ll lean toward a larger head and shorter limbs. If you want a sleek, action-hero look, you’ll push the body longer and the head relatively smaller. The guide gives you a starting point, and your style takes the lead from there. Your character’s personality will shine once you choose the proportions that communicate it clearly.
Practice with a quick sketch and a rough swatch. Write down your chosen head-to-body ratio and how long each limb will be. Use the numbers to guide your crochet counts, then test and adjust. The more you apply the guide, the faster you’ll spot when something looks off. Your final piece will feel deliberate, not accidental, and that confidence will show in every stitch.
Common crochet doll head to body ratio 1:1–1:3
Your first step is to pick where you sit on the scale from 1:1 to 1:3. A 1:1 head-to-body ratio means the head and body are about the same size, which gives a balanced, classic look. A 1:2 ratio makes the body notably longer than the head, giving a softer, chibi vibe that’s still sturdy. A 1:3 ratio pushes the body three times as long as the head, creating a more stylized, elongated silhouette that reads as intentional artistry. Use these anchors to decide how to express mood—cute, quirky, bold, or elegant. Your choice should echo the story you want your doll to tell.
If your character is friendly and approachable, a 1:1 or 1:2 ratio often lands well. For a mischievous or fairy-tantasy feel, you might stretch toward 1:2.5 or 1:3 to emphasize the torso and legs. Remember, ratios aren’t verdicts; they’re starting lines. You can nudge the numbers after a test head or a practice body to see how the silhouette lands in real yarn and scale. This is your moment to let the proportions reflect your character’s voice, not just crop them to a trend.
When you’re choosing, note how the head size changes the perception of cuteness or seriousness. A larger head (closer to 1:1) invites warmth and charm. A longer body (closer to 1:3) can give you elegance or whimsy, depending on pose and detailing. Your goal is to align the ratio with the story you want your doll to tell. Keep the math simple, but let your design breathe.
Match proportions to your character style
Your character’s style guides the exact numbers. If you’re designing a shy animal friend, opt for a softer silhouette with a gentle head-to-body balance around 1:1.5. If your character is bold and adventurous, push toward 1:2.6 to exaggerate the torso and give room for dynamic poses. The key is to pair the silhouette with personality cues—eye size, limb length, torso width, and neck length all echo that choice.
As you adjust, use visual checks: hold a swatch up to a tiny, neutral face and see if the proportions feel steady. Your goal isn’t a perfect rule; it’s a consistent vibe across your designs. If your style leans toward minimalism, you might keep the head a touch larger (near 1:1) for emphasis. If you love a lean, modern line, you’ll likely land closer to 1:2 or 1:2.5. Each shift teaches you how proportion changes expression, and that learning makes your future dolls more convincing.
When you finalize, lock in a quick worksheet: character vibe, desired ratio, head size, body length, limb proportions. That sheet becomes your go-to reference so every new design starts strong. Your readers will feel your confidence in your choices, and your dolls will start to carry a coherent, memorable look.
Quick proportions checklist
- Decide your character vibe: cute (1:1–1:2), bold/elegant (1:2–1:2.5), or whimsical (1:2.3–1:3).
- Set a base head size and translate it to body length.
- Determine limb lengths that balance the torso and head.
- Create a quick test head and body swatch to confirm the silhouette.
- Note tweaks needed for accessories or poses to preserve the look.
Place your amigurumi head correctly
You want your amigurumi to look polished, and that starts with a well-placed head. If the head sits crooked or too high, the whole doll loses balance and charm. Start by finding the natural center line of your body core, then align your head to sit just above that line. Think of it like centering a picture: a slight nudge can make a big difference in the final look. Use your hands to compare the head’s position from all sides, and aim for symmetry so that every angle reads balanced and friendly.
Next, secure the head with a stitch or two to keep it from sliding as you sew. Do not over-tension the yarn; you want a snug fit that holds shape without warping the head. If you’re unsure, test-fit by gently moving the head from side to side and lifting it to see how it sits. Your goal is a natural, perched look rather than one that sits flat or flops forward. Remember, the head should feel like it belongs there, not like it’s stuck on.
Finally, check proportions in relation to limbs and torso. A head that’s too large or too small will throw off the cuteness balance you’re aiming for. If you’ve already stitched the body, take a step back and visualize how the head pairs with the neck area. A well-placed head makes the whole design feel intentional and harmonious.
Mark stitch rows for amigurumi head placement
Mark your placement with a simple visual guide so you don’t lose track as you sew. Mark the row where the neck meets the head, then mark the row where the head should sit in relation to the body core. These marks act like road signs, guiding you to a centered, even look. Use a contrasting scrap of yarn to mark temporarily, then remove it after you’re done.
As you work, keep your placement marks visible but not intrusive. You want to be able to compare both sides, checking that the marks line up with the body’s centerline. If you notice one side sitting higher, adjust before finishing the seam. Small tweaks now save you from rebuilding later and help you hit that satisfying, balanced aesthetic you’re after.
When you’re satisfied, remove temporary markers gently so they don’t snag or pull on the yarn. A clean seam line keeps the head sitting exactly where you want it and preserves the neat look you’re aiming for.
Center the head on the body core
Centering the head on the body core is the secret to a cohesive amigurumi. Align the head’s center with the body’s center, and check from multiple angles—front, side, and back. A little off-center can throw the whole silhouette off, even if the face looks perfect. Take your time to adjust until the alignment feels natural and balanced. It’s worth the effort to get that perfect joint where neck meets torso.
If your body has a defined neck seam, use it as your anchor point. Line up the head’s center with that seam and then verify by rotating the piece to observe how it sits in motion. You want the head to feel anchored, not perched or wobbly. A centered placement gives you a sturdy base for the rest of the build and helps your final piece look intentional and well-made.
Tools to test head placement
- A mirror or phone camera to check symmetry from all sides
- A loose thread or pin to hold the head in provisional position
- A ruler or straight edge to verify alignment with the body core
Use these tools to confirm your head sits evenly before final sewing. A quick test snap or a real-life snapshot can reveal subtle misalignments you might miss with just your eyes. Once you’re confident, finish the stitches and secure the head into place.
Shape your amigurumi body for balance
When you shape the body, you create a stable figure that stands and sits nicely. Start by deciding where the torso should be widest and where the neck will rise. Keep your stitches even so the body sits flat, not wobbling on one side. If you want a chubbier belly or slimmer waist, adjust gradually with even increases or decreases, not big jumps. A balanced body feels right in your hand and in photos, and it helps your limbs attach neatly later.
Think about your yarn tension as a steering wheel. Too tight, and the form will puff oddly; too loose, and it sags. Practice a few rounds with small tweaks to your grip until the body sits evenly on a surface. A round, symmetric shape helps you avoid a lopsided amigurumi that tips over. Remember, you’re aiming for a friendly silhouette that looks intentional, not accidental.
Finally, plan the head, torso, and limbs layout before you finish the final rounds. If you envision a perched pose, add a tiny base or a flatter bottom. Your goal is a cohesive whole where each part supports the other. This forethought saves you from reworking later and makes your finished piece feel professional.
Use increases and decreases for body shaping
When you add increases, you widen your piece, and when you decrease, you narrow it. Use these tools to sculpt the torso into a natural shape. For a round belly, insert increases in a few spots per round rather than all at once. This creates a soft bulge without creating sharp edges. For a slimmer waist, sprinkle subtle decreases into the next rounds, keeping your stitches even so the curve looks smooth. Practicing small, spaced changes helps you master body shaping without wrecking the rhythm of your pattern.
Keep your increases and decreases predictable. Mark stitch counts or keep a quick tally so you don’t overshoot the shape you want. If you’re aiming for a pear-shaped body, start with a wider hip area and taper toward the top with consistent decreases. If you want a more cylindrical body, minimize wide changes and keep the rounds uniform. Your goal is a natural contour that feels intuitive when you hold it.
Use symmetrical shaping. If the left side grows with increases, mirror that growth on the right. Consistency is the secret to a clean look. If you ever notice a skew, pause, recheck your counts, and adjust. Small corrections now prevent big fixes later.
Build a stable base to help standing
A solid base makes your amigurumi stand tall and steady. Begin with a flat bottom if you want it to stand on its own; you can stuff lightly near the base to lock the shape. A wider base distributes weight evenly and prevents tipping. If you’re making a standing figure, consider a tiny stand or a felt disk under the base for extra stability. This is especially helpful for heavier heads or taller bodies.
Choose a bottom pattern that matches your design. A slight flare at the base can add contact area, while a sharp edge can make it tip more easily. If you prefer a seated pose, you don’t need a heavy base, but still give the bottom a bit of shape so it sits nicely without wobbling.
Test as you go. Stand your piece gently on a flat surface and look for wobbles. If you see a tilt, add a small amount of stuffing or reshape a corner to rebalance. A little patience here saves you from frustrating redo work later.
Simple body shaping patterns
To start, try a basic round torso with gentle increases around the middle in two or three rounds, followed by decreases to taper toward the top. This yields a simple, friendly shape you can build on. Keep your stitches even and use your marker to track rounds so your counts stay honest.
For a more defined waist, alternate a few rounds of slight decreases with a couple of rounds of even stitching, then resume increasing to shape the chest. This creates a gentle hourglass without harsh lines. If you want a chunky belly, introduce increases in multiple rows near the center, keeping the outer sides under control with steady even stitches.
If you’re unsure about proportions, start with a tested pattern and adapt. Use measurements from your reference toy or your own hand to guide how wide or tall the torso should be. Small, deliberate changes beat big, risky ones every time.
Secure limb attachment techniques for your toy
Your toy deserves limbs that stay put, even with a bit of cuddling and play. Start by choosing sturdy anchor points on the torso where the limbs will connect. Use a sharp needle to prevent fraying, and sew in a single direction to keep the thread path neat. When you pull tight, the seam should feel snug but not puckered. Practice on scrap fabric first so your real piece stays clean and strong. Remember, the goal is a secure bond that doesn’t look bulky on the outside. Keep your stitches evenly spaced and consistent, so your limb won’t wobble or loosen after a few handling sessions. As you sew, you’ll notice that steady hands and calm rhythm build the most reliable joints over time.
If you want extra insurance, add a couple of reinforcing stitches around the base of the limb attachment. Cross-stitching can help distribute stress more evenly, especially where the limb meets the body. Use a contrasting color thread for the reinforcement so you can see and adjust if needed. Don’t overdo it—too many stitches can make the seam bulky and stiff. After you finish, gently bend the limb to test mobility. If you feel any give, go back and tighten the thread a touch more. Your goal is a flexible yet firmly attached limb that can stand up to daily play.
When you’re done, trim threads close to the knot and secure with a tiny drop of clear craft glue on the knot’s underside. Let it dry completely before handling again. This gives a final seal against snagging or loosening. If you’re new to this, practice on a spare limb and body so you’re confident when you attach the real parts. With time, your attachments become second nature and your toy looks and moves just the way you want.
Sew-on limbs versus jointed limbs
Sew-on limbs give you a clean, simple look and are quick to attach. They’re great for beginners and for designs where you want a soft, seamless silhouette. The trade-off is that you’ll rely entirely on stitching for movement, so you’ll want extra careful reinforcement at the attachment point. If you go this route, plan your stitch pattern to spread stress and avoid thin spots. Use a sturdy thread and consider a small internal backing like fabric or felt to help hold the seams in place. This option is ideal when you’re aiming for a cuddly, plush feel with straightforward construction.
Jointed limbs offer mobility and a more dynamic pose for your toy. They’re a bit more complex to build, requiring hinges or knot-and-loop connections, but the payoff is lifelike movement. When you set up jointed limbs, you’ll want clean pivot points and smooth ranges of motion. Make sure the joints aren’t tight enough to restrict movement, but aren’t so loose that the limb droops. If you’re unsure, test early with a spare limb to dial in the right tension. Jointed limbs shine in projects where articulation makes the character feel alive.
Whichever method you choose, think about how the limb will be used. If your toy will be carried and posed, jointed limbs can add personality. If it’s a cuddle buddy, sew-on limbs might be simpler and safer. Your final decision should match the toy’s purpose and your comfort level with sewing techniques.
Reinforce with safety thread and glue if needed
Safety thread adds an extra layer of support where the limb meets the body. Use it as a secondary line of defense after your main stitching. Weave a few small reinforcing passes around the base and tie off securely. The idea is to create a small anchor net that stays strong through frequent handling. If you notice any loosening during use, you can tighten the reinforcement without undoing the main seam. This keeps your limb secure without a full redo.
A tiny amount of glue can help, but use it sparingly. Apply a dab only at the knot or the very base of the limb attachment where it won’t seep into delicate fabric. Let the glue dry completely before testing. Overgluing can stiffen the joint or create an obvious patch, which takes away from your toy’s clean look. When in doubt, test the glue on scrap material first to gauge how much strength you gain versus stiffness you lose. Your careful combination of thread and glue will pay off with sturdier, longer-lasting joints.
Best knots and anchor methods
For sew-on or jointed limbs, strong knots are your best friend. The square knot is a reliable, simple choice that stays secure under tension. Start with two square knots, then finish with a surgeon’s knot for extra hold. If you’re worried about slippage, add a drop of fabric-safe glue to the final knot and let it dry. This small trick can make a big difference in longevity. Practice the knot a few times on scrap fabric to get a feel for how tight you need to pull.
Anchor methods matter as much as knots. A hidden cross-stitch under the joint creates a second line of defense against tugging. If you’re sewing on a leg, for example, anchor the limb with an X pattern at the base before finishing the main seam. This distributes stress and keeps the limb from pulling away with playtime. Remember to keep the anchor stitches neat; a tidy base means a stronger hold and a nicer look.
Position your limbs for a natural pose
When you’re shaping your amigurumi, you want every limb to look effortless, like it could wave hello or tuck in for a nap. Start by picturing your character’s personality and how they’d sit or stand in real life. You’ll find that small tweaks to angle and placement make a big difference in how natural the model feels. Remember, your goal is balance: a limb that juts out awkwardly can throw off the whole pose, even if the stitch work is perfect.
Think about weight distribution as you position each limb. If your toy will stand, give the legs a slight bend and plant the feet with a little angle to suggest weight on the heels. If it’ll sit, angle the knees outward and tilt the hips a touch so the torso reads as relaxed, not stiff. You don’t need to overcomplicate it; a few thoughtful adjustments will create a convincing, life-like pose that looks ready to spring to life.
As you work, constantly compare the limb layout to your reference or the character’s mood. If the arms look stiff, try tilting one shoulder up a touch or bending the elbow a bit. If the legs feel off, swap the angle of the feet or slide a bit of stuffing to rebalance. These small shifts keep your creation from looking robotic and help your audience connect with it emotionally.
Angle limbs for sitting and standing positions
When you’re aiming for a sitting pose, bend the knees slightly and point the feet forward or outward a touch. This gives your amigurumi a grounded, comfortable vibe. For a standing pose, set the legs with a gentle bend at the knees and align the hips so the torso sits naturally over them. You’ll notice the difference in character—sitting feels cozy, standing feels ready for action.
Experiment with the arms as you switch between poses. For a relaxed sitting look, curve the arms softly at the elbows and rest the hands near the lap or sides. For a standing stance, position the arms with a bit of space between the torso and the hands, so the figure doesn’t feel cramped. Small rotations at the wrists can also convey personality without breaking the stitches or symmetry.
Adjust stuffing for correct amigurumi limb positioning
Stuffing is your secret weapon for convincing limb alignment. Lightly fill to keep shape without overly stiff edges, then adjust as you go to set the desired bend. If a limb keeps flopping or looks hollow, add a bit more stuffing at the joints and taper toward the ends to maintain a smooth line. Use scrunched fiberfill to nudge limbs into the exact curve you want, but avoid overstuffing which can snap the fabric or distort the stitch tension.
If you’re aiming for a natural, soft look, leave a touch of give in the tips of fingers and toes. You’ll create a more lifelike silhouette and prevent harsh corners that shout crafted. Regularly compare your limb curves to the other side to keep symmetry on point. A little trial and error now saves you headaches later when you stitch heads and bodies together.
Test poses before final stitching
Before you sew the final seams, test your poses by gently placing the limbs in their intended positions. This lets you confirm balance, range of motion, and how the overall silhouette reads from different angles. If something looks off, tweak the joints, adjust stuffing, or re-angle a limb until the pose feels right.
Take a moment to step back and look at your amigurumi in profile and straight on. You’ll catch issues you miss up close, like a limb that angles too high or a hip that sits too rigidly. Once you’re happy with the pose, you can proceed to final stitching with confidence, knowing the character will look natural in the real world.
Shape your amigurumi head with easy steps
You’ll love how simple it is to shape a cute amigurumi head when you break it into a few small, confident moves. Start with a firm magic circle, then work a consistent round count so your head stays even from the first stitch. As you go, pause to compare your work to your toy’s overall size; a notebook cutout or a quick finger press test helps you spot wobble early. Keep your tension steady and your increases evenly spaced; this balance makes the head naturally round rather than flat on top or dented at the sides. When you’re done, you’ll feel that satisfying, smooth dome that says series-ready instead of almost there.
Next, think about how many rounds you’ll need for the size you want. If you’re aiming for a small head, stop sooner and fix any flat spots with a few gentle increases around the crown. For a larger head, you’ll add more rounds, keeping your stitch count even as you go. If you notice a lump, it’s usually a sign your tension changed or your increases drifted off center. Correct it quickly by redistributing stitches and smoothing the surface with light, even pushes from the inside. Your head should feel round and sturdy, not hollow or bumpy, when you hold it in your hands.
Finally, seal the shape with a light finishing touch. Before you bind off, check the bottom edge; a neat, flat seam makes placement easier later. If you need a touch more rounding at the cheeks, add a couple of quick decreases evenly around the sides. Remember, the goal is a soft, friendly silhouette that your character will wear proudly.
Create roundness with even amigurumi head shaping techniques
Roundness comes from keeping your stitch count uniform around the circle. Start each round with a consistent slip stitch or chain, then immediately begin your increases in the same spots so the dome stays balanced. If you notice the head leaning to one side, you likely drifted your increases; slow down, recenter, and move your increases to keep symmetry. A round head feels natural and inviting, while unevenness shows up as lop-sided cheeks or a misshapen crown.
To lock in that perfect round, use a gentle, even tension throughout. Pull too tight, and the head becomes stiff; too loose, and it looks saggy. A light, even grip will keep your round shape intact without pinching the stitches. Regularly rotate your work as you crochet so you don’t accidentally tighten on one side. A little practice here pays off with a smooth, friendly face you can feel with your fingertips.
If you spot subtle flattening, add a few filler rounds with tiny increases at single points around the middle. This tiny adjustment fills out the roundness without changing the overall height. When you finish, compare the front, sides, and back—anything not perfectly curved is a cue to tweak the next few rounds. Your head should glow with even curvature that makes your amigurumi look ready for a photo shoot.
Add facial guides before attaching features
Mapping facial guides early gives you a clear roadmap for eyes, nose, and mouth. Lightly mark the center of the head with a removable stitch or a soft erasable pencil, then place your guiding points where you want each feature. This keeps the face symmetric and keeps your features aligned with the head’s natural shape. If you’re using safety eyes, position them so they sit at eye level with a comfortable distance; for embroidered features, use the marks as your stop points so your lines stay even.
As you add guides, think about the character’s expression. A gentle upward curve for a smile or a soft dot for a nose can change the whole mood. Keep your guides light so you can erase or adjust without damaging the stitches. Before you attach anything, double-check spacing by holding the face against the head to ensure balance and personality shine through.
When you’re ready to attach features, do it with deliberate, small stitches. Secure eyes and noses with a few tight passes to prevent wobbly moves. Let your guides guide the placement, not the other way around, and you’ll end up with a face that matches your character’s vibe perfectly.
Quick head shaping tips
- Keep your tension even and transitions smooth; it’s the fastest way to round, even heads.
- Rotate your work as you stitch to avoid leaning and flat spots.
- Test-fit against your body or a template to catch asymmetry early.
- Use facial guides to map features before attaching them for cleaner alignment.
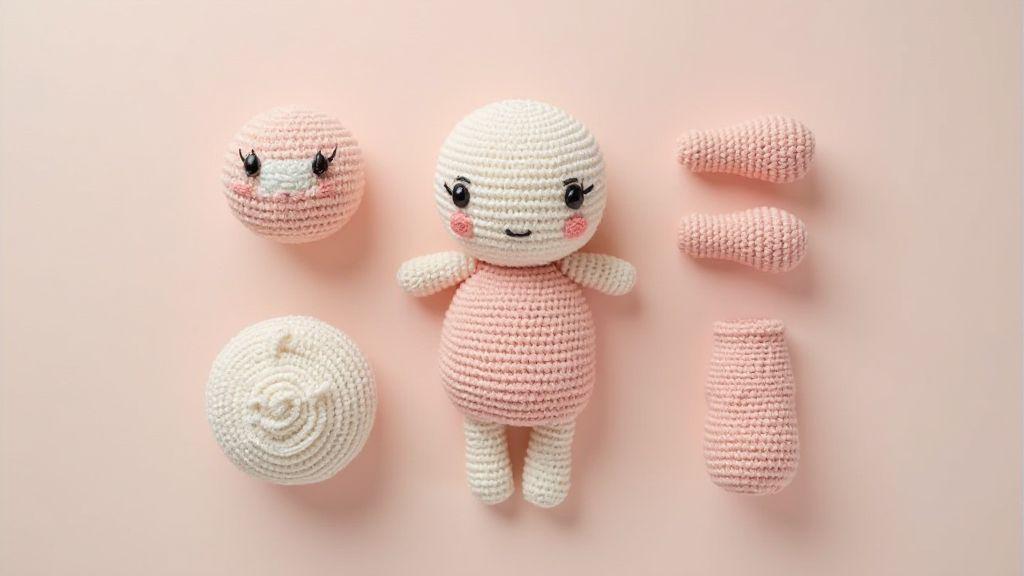
Read patterns to find basic amigurumi parts
When you pick up a pattern, you should scan for the core sections first. Look for words like head, body, and limbs to see where each part starts and ends. You’ll notice the designer often breaks the pattern into rounds or rows that map to these parts. By identifying these sections early, you can plan your yarn choice, hook size, and gauge before you start. This upfront step makes the whole project smoother and reduces surprises mid-project.
Next, you’ll want to check how the pattern introduces each part. Patterns usually begin with the head, then the body, and finally the limbs, but some creators mix sections or use interchangeable terms. Don’t assume—verify by tracing the instructions. If you see a section labeled Head but the instructions talk about shaping the top of the piece, you’re likely looking at the same part under a different name. Getting comfortable with how patterns label parts saves you time and keeps your stitches consistent.
Finally, note where the parts join. Many amigurumi patterns show how to sew the limbs to the body or how the head sits on the neck. Understanding these joining points helps you visualize the finished form. You’ll also learn potential changes, like how tight or loose to stuff to keep the proportions right. As you become familiar with these cues, you’ll read patterns faster and feel more confident adjusting if you want a bigger head or longer limbs.
Identify head, body, and limb sections in patterns
You’ll find the head section marked by phrases like Head or Round 1: MR, 6sc. The head usually has more shaping increases and decreases, which create the round, dome-like shape. If you see instructions about raising stitches or shaping near the top, that’s your cue you’re in the head. Use this to plan your stuffing amount so the head holds a soft, rounded look without flattening.
The body section often reads like a trunk of stitches that builds a solid middle. Look for longer sequences of rounds with steady stitch counts and fewer increases. The body is where you’ll decide on the torso’s length and width. This part anchors the figure and sets the proportion with the head. If you want a chubbier body, you’ll add extra rounds; if you want a skinnier one, you’ll shorten them.
Limb sections show up as arms, legs, or antennae, depending on the pattern. These parts typically have simpler shaping, with quicker increases and decreases to create hands, feet, or paws. Some patterns separate limbs into left and right pieces; others use mirrored instructions. When you spot the limb sections, think about how you’ll attach them later and how their size will balance the overall silhouette.
Note gauge, stitch counts, and amigurumi anatomy notes
Gauge tells you how tight your stitches should be to match the designer’s scale. If your gauge is looser, your parts grow bigger and may misalign with the pattern’s measurements. If you’re tight, your pieces stay small and compact. Always compare your swatch to the pattern’s gauge and adjust by changing the hook size. This keeps your amigurumi looking proportionate.
Stitch counts are your map. Round after round, counts tell you when to slow down or speed up shaping. When you see 12 sc or 24 sc, commit those numbers to memory as checkpoints. Missing one stitch here or there won’t ruin the piece, but keeping counts helps you maintain the intended proportions. Write them in a small notebook if you like tracking progress.
Anatomy notes in a pattern give little tips—like where to stuff lightly for a soft face or where to add a seam to hide a joint. These notes are your secret weapons for a polished finish. They save you time by guiding you on when to reinforce with stitching, where to place safety eyes, and how to blend sections so the amigurumi looks cohesive.
Pattern notation cheat sheet
You’ll learn a few common notations that keep you from guessing. MR or magic ring starts a circle; sc is single crochet; inc increases; dec decreases; and rounds (or rows) tell you how many times to repeat a stitch pattern. When a pattern says finish round, you stop there and move to the next instruction. This cheat sheet helps you read faster and stay on track without second-guessing.
Choose yarn and stuffing for your anatomy
You’re almost ready to shape your amigurumi, and the right yarn plus stuffing makes all the difference. Your choices will determine how sturdy your figure is and how it feels to touch. Start by thinking about what you want your character to express—soft and squishy, or firm and poseable. The yarn you pick sets the tone. For beginners, a medium-weight acrylic yarn is friendly and easy to control. It grips stitches well and comes in a huge range of colors, so you can keep your design’s personality intact. When you want a glossy finish or a more textured look, consider adding a strand of cotton for a subtle sheen or using a blend that balances softness with strength. Your aim is to find a balance between easy crochet, good stitch definition, and the feeling you want your final piece to have. For stuffing, go for a product labeled as hypoallergenic and washable. It should be fluffy enough to fill gaps but not so soft that it slides out of shape with the first tug. Don’t overstuff—your anatomy needs some give to maintain poses and to keep seams from straining. If you’re aiming for a specific pose, test a few bits of stuffing in your practice piece to see how it settles and how it affects the overall balance of your amigurumi.
When you start, you’ll notice yarn thickness and stuffing density change how your stitches sit. You want stitches that look even and tight enough to hold their shape without creating stiff, hard edges. Practice a few tight stitches on a scrap piece to understand tension. A common pitfall is choosing stuffing that’s too dense and yarn that’s too light; the result can be a floppy head with a sagging chest or a limb that won’t hold a pose. If you’re crafting for kids, pick a stuffing that’s safe to chew and won’t clump in ways that could irritate skin. Remember: your goal is a balanced anatomy where each part supports the next, not a pile of pretty pieces. That means test, adjust, and then commit to a yarn and stuffing combo you’re confident can handle the shaping you want.
Your final choice should align with how you plan to display or play with your amigurumi. If you want a plush, cuddly feel, heavier stuffing and a softer yarn can give you that warm, squeezable result. If you want a more durable character for frequent handling, lean toward a firmer stuffing and a yarn with good stitch definition. Your understanding of basic amigurumi anatomy comes into play here—head, body, limbs—because every part’s weight and texture influence the overall balance. Choose materials that let you tell your story through shape, pocket size, and poseability, while keeping the piece safe and enjoyable for your expected audience.
Pick yarn that holds shape for amigurumi body shaping
Your body needs a backbone of structure, and the yarn you choose is your first building block. Look for a yarn that has good stitch definition so curves and contours stay crisp, even after you stuff and sew. A slightly tighter tension helps the fabric hold its shape, which is essential when you’re forming a rounded head or a plump belly. If you’re unsure, test a few rows on a swatch to see how the fabric behaves when you pull and pinch. You want a balance: not so stiff that you can’t shape it, but not so loose that the piece looks flimsy or sags over time. Consider a yarn that returns to form after manipulation—this keeps your amigurumi looking solid even after lots of handling.
Your shaping also depends on how you crochet rounds and increases. Consistency in your stitch size matters, so mark your starting point and count your stitches as you go. If you notice your rounds aren’t closing evenly, you may be pulling too tight or too loose. Aim for uniform tension so the body curves stay smooth rather than lumpy. For extra control, you can switch to a slightly smaller hook for shaping areas like the neck or limbs; this tightens the fabric in just the right places. By choosing yarn with dependable memory, you’ll save time and frustration when you’re sculpting features that give your character character.
Use safe stuffing and child-safe eyes
Safety matters as much as design when you’re bringing your anatomy to life. Choose stuffing that is non-toxic, washable, and won’t crumble into dust over time. Fluffiness matters, but you don’t want a material that shifts around or leaves gaps in your seams. Lightly distribute stuffing as you go, checking for even density so the head, body, and limbs look balanced. If your project is for a child, double-check the stuffing’s safety rating and the yarn’s fiber content to avoid any irritation. When it comes to eyes, opt for safety eyes that snap securely or embroider eyes with thread instead of small plastic bits. If you do use safety eyes, make sure you follow the manufacturer’s safety guidelines and securely seal any openings to prevent them from loosening with play.
Keeping the materials simple at first helps you master the craft. You’ll get a cleaner finish if you push the stuffing into small sections—head, torso, arms—before final shaping. This minimizes visible seams and makes the anatomy look cohesive. Remember to test pose stability after you add eyes or other facial features; you don’t want the head to tilt awkwardly or the limbs to sag. By prioritizing safety and sturdiness, you’ll create an amigurumi that looks polished and feels safe to touch, keeping your design’s personality intact from head to toe.
Material choices and safety checks
Before you cut yarn or stuff a seam, list your materials and check for safety ratings. Confirm that the yarn is non-toxic, colorfast, and suitable for age your piece targets. Verify that the stuffing is hypoallergenic and machine washable if you expect it to get cheeks-and-nose smudges from play. Test the eyes and mouth accents on a scrap piece to ensure they won’t loosen with daily handling. Finally, don’t skip the small steps: wash hands before you start, check hooks and needles for burrs, and always sew openings closed with a sturdy stitch. Safety first keeps your project enjoyable from the first stitch to the last finish.
Finish seams and attaching limbs to amigurumi for durability
You want your amigurumi to stay cute and sturdy long after the first cuddle. Start by choosing strong, matching yarn for seams and limbs so the look stays cohesive. As you sew, use the mattress stitch or invisible single crochet seam to hide gaps and keep lines clean. When you attach limbs, sew through a few extra stitches and reinforce with a small amount of crochet slip stitching around the base. This helps prevent wobbly arms or legs from popping loose during play. For durability, double up on sewing: go around each joint twice, spacing stitches evenly, and pull snug but not taut. If you’re unsure, practice on a scrap piece first so your final piece keeps its shape under real-world rough handling.
When you sew, align edges neatly before stitching. Inside-out assembly gives you cleaner seams, and a blunt tapestry needle makes it easier to thread through tight spots without splitting the yarn. If your design has curved limbs, plan the stitch path so you don’t create bulky knots at the joints. After attaching, weave the yarn ends back into the body and trim close to the fabric to avoid snagging. Remember to test the limbs with gentle tugging to confirm they won’t slip or rotate. A well-secured limb is the difference between a keepsake and a toy that falls apart after a few squeezes.
Finish with a final check: ensure seams are flat, stitches evenly spaced, and there are no stray ends poking through. If you see small gaps, tighten the seam a bit more and cover with a light layer of embroidery floss to seal the area. For durability, apply a tiny drop of fabric glue on the very inside of the joint to lock stitches in place, but only where you know it won’t affect flexibility. Your goal is clean lines, strong joints, and a toy that survives years of hugs and adventures.
Hide seams for a clean, professional look
Invisible seams elevate your amigurumi from handmade to polished. Start with a yarn color that matches your main fabric so stitches disappear when finished. Use a sharp, fine needle and pull each stitch snugly to keep a flat surface. Mattress stitch or single crochet seam tends to vanish against rounded shapes. Press gently with a light steam to ease the fabric and reduce puckering, then re-stitch any areas that show a line after pressing.
Plan seam lines along natural curves where they’ll be least visible, like under arms or along the back edge of a torso. If you must cross a color change, switch to a less conspicuous seam technique and blend the change with tiny crochet stitches so the line stays hidden. When attaching tiny limbs, go through several stitches around the base, then weave the ends inside the limb itself so the final look remains seamless. If a seam glows under bright light, tighten surrounding stitches and re-weave the ends to smother the line. A blunt needle helps avoid snagging. For a truly clean finish, you can also cover visible seams with felt or a matching embroidery stitch. The result is a professional, gallery-ready amigurumi that feels crafted, not stitched.
Reinforce joints to withstand play
Your toy should stand up to kids, pets, and enthusiastic hugs. Start by anchoring the limb to the body with a snug, tight base stitch, then add a couple of reinforcing passes around the joint. Use a slightly thicker thread or a second color to emphasize the joint’s strength without looking bulky. If your design has multiple joints, plan reinforcing bars at the core and then cover with surface stitches to keep the look smooth. This approach gives you a durable joint without sacrificing flexibility or poseability.
When you attach arms or legs, thread through a few more internal stitches around the base and create a cross-stitch pattern at the base for extra grip. Avoid long yarn tails that can snag or loosen over time; weave them back into the body. For heavier limbs, consider adding a small interior structure like a pipe cleaner or wire core, then cover with yarn to maintain shape while keeping the surface soft. Always test with play: gently bend joints to check for stiffness or wobble, then adjust by adding another round of securing stitches if needed. Reinforce with an additional anchor stitch at the base and re-weave the ends if there’s any rotation.
Final durability and safety checklist
- Check all seams for gaps; resew and weave in ends.
- Reinforce every joint with multiple passes and secure ends.
- Hide seams along natural curves; ensure no exposed knots.
- Test limb stability with gentle tug tests and adjust as needed.
- Confirm there are no loose yarn ends that could snag.
Final note on the key concept
Understanding Basic Amigurumi Anatomy: Head, Body, Limbs is the backbone of your craft. It helps you explain decisions, teach others, and scale your designs with confidence. This knowledge makes your process transparent to editors, customers, and fellow makers, and it helps your overall workflow stay steady from first stitch to final pose.
If you’re new to the craft, revisit this concept often: head-to-body balance sets the tone for cuteness and character; body shaping provides stability; limbs bring poseability. Used well, Understanding Basic Amigurumi Anatomy: Head, Body, Limbs becomes a reliable compass that guides every project—from choosing yarn and stuffing to final seam finishing and pose testing.

Clara Fern — Crochet Artist & Amigurumi Designer
Clara Fern is a crochet artist and amigurumi designer based in Austin, Texas. With 9 years of experience working with yarn and hook, she transformed a lifelong passion for handcraft into a creative mission: making amigurumi accessible, fun, and deeply rewarding for crafters of all levels.
Clara discovered amigurumi during a trip to Japan in 2017, where she fell in love with the art of bringing tiny characters to life through crochet. Back home in Texas, she spent years studying color theory, design principles, and advanced crochet techniques — developing her own signature style that blends kawaii aesthetics with original character design.
Through maclafersa.com, Clara shares everything she has learned — from choosing the right yarn and reading your first pattern, to designing fully original amigurumi characters from scratch. Her writing is known for being clear, detailed, and genuinely helpful, with no steps skipped and no secrets kept.
When she’s not crocheting, Clara enjoys watercolor painting, visiting local yarn shops, and drinking way too much coffee while sketching new character ideas.


