
The Golden Ratio in Amigurumi: How Proportions Create Cuteness
You want amigurumi that looks natural and irresistibly cute. The Golden Ratio in Amigurumi guides your design by giving you a simple rule to place features and shapes, helping you balance head, body, and limbs so your toy feels harmonious. When you apply this idea, your creations glow with an understated charm that fans notice right away. By using a clear ratio, you can plan where the eyes sit, how big the head should be relative to the body, and where the limbs land. It’s not about chasing perfect math; it’s about using a natural proportion that people instinctively react to. Your pieces become more predictable to craft, and more pleasing to hold and look at, which means happier customers or friends.
As you experiment, you’ll see your process speed up. The Golden Ratio in Amigurumi: How Proportions Create Cuteness becomes your invisible designer, guiding every stitch you make with confidence and clarity.
The 1.618 Number Made Simple
Think of 1.618 as a gentle guide, not a hard rule. Start with the head as the main part, then size the rest using that number. Scaling by this ratio helps your toy feel balanced without looking toyish or squat. You don’t need math wizardry—begin with a head about 1.6 times bigger than the body you plan, then check eyes, ears, and limbs against that feel. The ratio becomes a quick reference, like a cooking rule: a pinch here, a splash there, all adding up to a tasty result.
Keep a simple note: head = 1.618 × body. It doesn’t have to be perfect every time, but it nudges you toward a natural silhouette. Before long, you’ll instinctively use that feel, and your toys will read as designed, not improvised.
Why Balanced Shapes Feel Right
Balanced shapes tap into our eyes’ love of rhythm. When parts align with a steady rhythm, amigurumi reads as friendly and approachable. Eyes sit at roughly the right distance, facial features land on gentle spots, and limbs flow with the body. Your creations feel stable, not top-heavy.
A well-balanced toy sits nicely in the hand, feels sturdy, and resists wobble. Small nudges—like adjusting an ear by a millimeter—matter when proportions follow a calm ratio. The result is care you can feel in the design, not just in the crochet.
Balance isn’t stiffness; it supports expression. With the ratio guiding shapes, your characters stay cute and readable, even as you push them to be quirky or bold. That harmony plus personality is what makes your amigurumi stand out.
Fast Ratio Check for Your Toy
Keep a simple checklist handy. Measure the major part (head to body) and see if it echoes the 1.618 feel. If the head seems too big or too small, adjust in tiny steps until balance clicks. It’s faster than redoing a project from scratch.
Use a quick visual cue: imagine a vertical line through the center of the head and body, then compare widths. If proportions look off, tweak the head, neck, or torso a bit. This fast check helps you catch problems before final assembly, saving time and scraps.
When you finish, compare with a familiar example. A friend’s toy can show what works and what doesn’t. Your own versions will improve with practice, and this quick ratio check becomes your trusted shortcut.
Set Your Head to Body Ratio for Cuteness
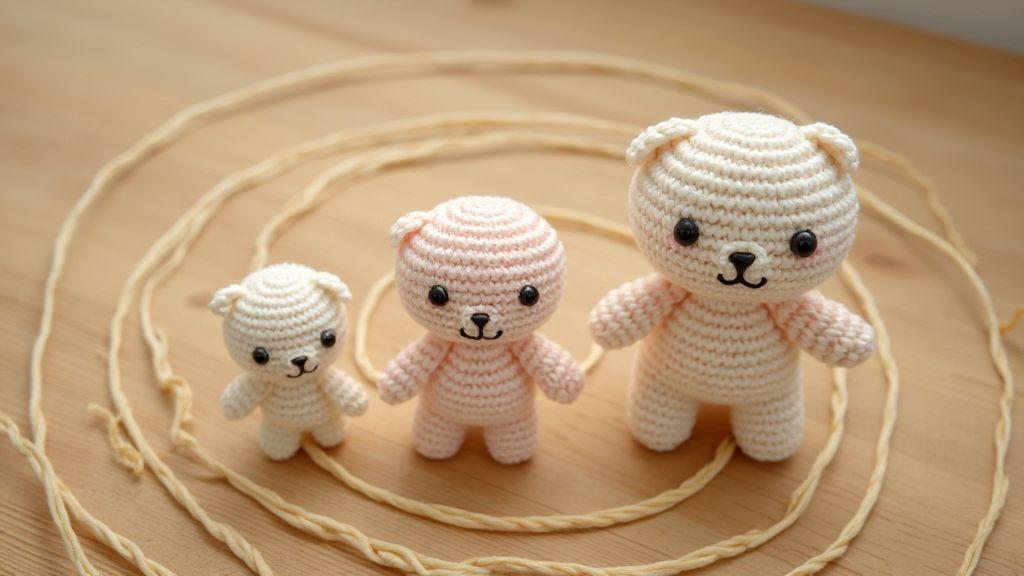
Charm that feels instantly endearing starts with how big the head looks relative to the body. A head that’s a touch larger reads as friendlier and more playful. It’s about balance: if the character looks top-heavy, it reads as affectionate and cuddly. Think of the head as the invitation to meet the character, and the body as the rest of the story told with pose, fabric, and color. Keep the head a touch oversized, but not wild—enough to spark warmth without tipping into odd.
Test proportions early. Cut out paper templates of the head and body to compare side by side. Move templates until the head leads the gaze but the body supports the stance. Aim for a ratio that says I’m cute and confident, not I’m top-heavy for no reason. If the head dominates, the character becomes cartoonish and less cuddly. If the head is too small, charm fades.
Remember that proportion affects more than looks: it influences how the toy sits in your hand, balances on a shelf, and photographs. A well-balanced head-to-body ratio invites a hug and a smile. That ratio is the foundation for every adorable detail.
Ideal Head to Body Ratio Amigurumi
When chasing a balanced look, let the head be noticeably larger than the body, but not overwhelming. A common target is a head diameter about one-third to one-half of the overall height, depending on the vibe you want. For a friendlier, baby-ish feel, lean toward the larger end; for a more nimble, character-driven look, keep the head a touch smaller. Run simple tests to discover your sweet spot, starting with a straightforward project.
Facial features matter: larger eyes and a smaller nose can amplify cuteness while keeping proportions in check. Don’t forget the neck—a short neck makes the head read as bigger and more charming. If the neck is too long, the head won’t read cuddly. Use a sturdy, neat neck.
Experiment with materials and stuffing levels too. Firmer stuffing raises the head’s silhouette, while softer filling softens proportions and adds warmth. The goal is consistent curvy lines guiding the eye from head to body.
Measure Head vs Body the Easy Way
The simplest method is a ruler or tape measure. Compare a vertical line from the top of the head to the bottom of the body. For vertical balance, the head should be roughly one-third to one-half of total height, depending on your preferred look.
Another easy check is the silhouette on a flat surface. If the head topples or the face tilts oddly, adjust the neck or stuffing. Compare to a reference you love, like a favorite character or a beach ball, for a visual cue of what feels cute and stable.
If you’re unsure, take quick front and side photos. A glance at the pictures reveals whether the head dominates too much or the body competes for attention. Use those notes to tweak the pattern before final yarn and stuffing. These quick checks save time and prevent later rework.
Quick Head Sizing Rule
Head height should be about 1/3 to 1/2 of total height for a cute look. Start with 1/3 for a balanced size, nudging toward 1/2 for more baby-like charm. Test with a quick sketch or mini sample.
Use Fibonacci Amigurumi Design in Patterns
You can turn a crochet project into playful science by weaving Fibonacci into amigurumi patterns. Plan where growing sections appear and map each part to a Fibonacci sequence: 1, 1, 2, 3, 5, 8. This makes shapes unfold naturally and balanced, giving your pieces a deliberate look even before readers know why it feels right. Apply Fibonacci to body parts, limbs, or decorative spirals on shells. By following the math, you guide the eye and create steady growth impressions.
Sketch a model: start with a small core, add rounds following 1, 1, 2, 3, 5, 8, and observe width and height changes. The rhythm helps you align eyes, ears, and limbs into a cohesive, cuddly whole. Your audience will notice the thoughtful detail.
Fibonacci Stitch Counts You Can Use
Using Fibonacci counts creates a natural rise and fall. Start with a tiny core and add stitches in the sequence. This works for animal and whimsical shapes, because increments feel organic. Keep a tally beside your pattern so you can see the rhythm and adjust colors or textures to emphasize growth.
Try using 1, 1, 2, 3, 5, 8 for head and body, and 13 or 21 for longer tails or limbs if needed. Document stitch counts clearly so others can follow your Fibonacci path. The same counts can guide facial features or decorative elements for a cohesive look.
As you practice, small changes in early rounds ripple into bigger, pleasing differences later. Mix yarn textures or stitch heights to highlight the growth pattern, providing a tactile cue that the numbers are guiding your design.
Spiral and Segment Ideas for Shapes
Spiral ideas work well for shells, tails, and whole bodies. Start tight at the center and unfurl into a gentle curve, creating a sense of life. For a snail, keep a tight spiral on the shell and loosen toward the center to add depth. A dragon’s tail can spiral longer as it exits the body for a windy look. Segments help build ridges or plates without losing the soft feel. Use color blocks at segment breaks to reinforce the spiral visually.
Consider seashells, pinecones, and other natural forms. Plan segment counts with Fibonacci, and color or texture-change at each boundary. Eyes or facial details can sit at segment intersections to anchor the face. Segmented bodies keep rounds readable and organized, blending math with whimsy.
As you try these ideas, small changes make big differences: shell curves soften, limb lengths echo body segments. These refinements set apart a good amigurumi from a great one. Spiral and segment planning yields patterns that are easy to describe and irresistibly crochet.
Simple Fibonacci Step Guide
1) Choose your core: start with 1 or 2 stitches.
2) Plan rounds in Fibonacci order: 1, 1, 2, 3, 5, 8, …
3) Apply increases at the Fibonacci numbers to shape the body.
4) Use a spiral or segment for texture, aligning color or yarn changes with segment breaks.
5) Compare your finished piece to the golden feel and adjust proportions if needed to keep that cute balance.
Tune Kawaii Proportions to Make It Cute
You’re aiming for an instantly lovable look with simple shapes and gentle curves. Balance is key: big appeal and readability. When you tune proportions, you guide the eye toward warmth and approachability. Use accessible shapes, keep lines soft, and let each choice reinforce the same friendly vibe. The trick is to make every part feel cooperative, not competing, so your character reads as approachable at a glance.
Small changes can shift tone dramatically. A slightly larger head softens features; a more compact body keeps energy high and cute. Think of it like seasoning a dish: a pinch changes the whole flavor. In amigurumi or illustration, those pinch points are the ears, eyes, limbs, and curves. Your aim is harmony, not perfection, so test one tweak at a time and measure warmth by how your eye lingers with a smile.
As you experiment, remember: The Golden Ratio in Amigurumi: How Proportions Create Cuteness isn’t a strict rulebook but a compass. Use it to check if your proportions feel natural and pleasant. If something feels off, you’re likely nudging away from cuteness. Keep iterating until your eye lingers on the piece with ease.
Bigger Eyes and Round Head Tips
Bigger eyes instantly communicate openness and friendliness. Center them and avoid sharp angles around the sockets. Round shapes soften the gaze and boost approachability. If you add eyelashes or highlights, place them to avoid harsh reflections; soft highlights read as playful, not intense.
A round head anchors the kawaii aesthetic. Aim for a near-spherical silhouette with soft cheeks and jaw. If you’re using fabric or felt, keep the head slightly oversized for the same effect without extra structure. Movement reads as friendlier when the head stays soft and balanced with the body.
Pair bigger eyes with a small nose and mouth to preserve innocence. A tiny mouth under a wide-eyed plane keeps a gentle smile. For expression, use eyebrows that curve upward at the outer ends. These small shifts carry big emotional weight without complicating the look.
Short Limbs and Soft Curves Explained
Short limbs convey compact, cuddly weight. Round them to echo the head’s curvature; avoid sharp corners. Larger, rounded joints read more approachable and resilient to touch.
Soft curves soften the silhouette. Replace straight lines with gentle arcs in the torso, limbs, and tail. Curves read as friendly; straight lines can feel serious. Let curves flow into each other to maintain the cuddly mood.
Balance is still key: even with short limbs, your character should look capable and lively. Leave small gaps between limbs and the body to suggest movement without losing cuteness. Test by stitching or modeling to see how it reads up close and from a distance.
Try a Kawaii Tweaks on One Part
Choose one element to tweak for a cute impact—like the ears. Make ears slightly rounded and proportionally larger, but keep them low and close to the head so they don’t dominate. This one change shifts the mood toward playful and approachable.
If you’re crafting, give ears a tiny inner highlight or soft pink gradient. If you’re drawing, add a subtle inner ear shade under the outer edge. The key is restraint: one well-chosen tweak beats several minor ones that cancel each other out. Your audience will feel the deliberate softness from the first glance.
Draft with Proportion Rules for Amigurumi
Proportion is your best friend when shaping tiny wonders. Start with the overall height, then guide every other part to that scale. Think of your project as a small sculpture: the head size sets the rhythm for body, limbs, and features. By keeping consistent proportions, your creature looks balanced and charming, not wonky. Begin with simple shapes, then add details once the silhouette feels right. The result should read as soft, friendly—the kind of aww that sticks.
When drafting, map ideas with quick notes on height, width, and where parts attach. Use placeholders for major parts and jot approximate sizes. This helps you avoid late surprises when stitching. The drafting notebook becomes your secret sauce for consistent cuteness.
Keep an open mind: if a prototype feels off, tweak slightly—perhaps the head is a touch smaller or the arms sit a bit higher. Small changes boost charm dramatically. Test with quick rounds before finalizing to protect your time and keep the project joyful.
Map Key Points Before You Crochet
Before you hook, pin essential measurements: overall height, head diameter, body length, arm and leg reach. Mark where eyes, ears, and limbs go, so color changes and facial features land consistently. A clear map keeps you aligned with your proportions and helps catch drift early. The map is your safety net—keep it handy and refer to it as you crochet.
Use visual cues: a central axis line, a head-to-body ratio, and a limb length ratio. If the head is 1 unit, aim for a body length of about 0.9 units and arms around 0.4 units. These rules of thumb keep you grounded, especially with different character ideas. The map helps you stay in control.
Scale Parts Using the Golden Ratio
The Golden Ratio can be simple in practice. When you set a main measurement, scale the next part to 1.618 times smaller or larger, depending on what fits. For example, if the head is dominant, set the body length to about 0.62 of the head’s height, and make limbs even smaller. This maintains natural harmony without guesswork, helping the finished piece feel designed rather than random.
Keep it practical: choose fractions that align with your yarn gauge and hook size. The Golden Ratio doesn’t need to be perfect in every stitch; it’s a guide to overall harmony. If your draft feels off, adjust by a few millimeters, not a full change.
Pattern Drafting Checklist
- Define total height and head size.
- Mark placement zones for eyes, ears, limbs.
- Set body-to-head ratio and limb lengths.
- Apply the Golden Ratio to scale secondary parts.
- Create a quick prototype to test balance.
- Note where color changes occur and ensure clean joins.
Pattern Drafting Checklist (continued)
You should have a clear, repeatable process for every design. Start with a simple silhouette and verify it with a quick mock-up. If something feels off, adjust the scale before stitching seriously. Your checklist keeps you on track, so you finish with a polished result that looks intentional and cute.
Adjust Crochet Toy Proportions and Scaling
Plan which parts to emphasize and how big the final piece should be. A slightly bigger head with shorter limbs often reads as cuddly and approachable. Proportion knowledge helps you fix problems early, saving time. When you adjust scale, aim for consistent stitches and proportions.
Change Hook or Yarn to Resize
Resize by changing tools: a larger hook or thicker yarn creates chunkier shapes; a smaller hook or finer yarn yields delicate shapes. If you want a bigger head, use bulkier yarn for the head and keep body on a finer yarn. Test with a small swatch to see how the change feels. If the head becomes too large, dial back by one hook size or thinner yarn. Measure head diameter, torso width, and limb lengths as you go to keep proportions intentional.
Keep Stitch Gauge Consistent
Stitch gauge ensures predictable results. Crochet a gauge swatch before starting. If your gauge differs from the pattern, adjust hook size or tension to match target gauge. When resizing, keep the same stitch counts per measurement, just scaled with yarn and hook. Note gauge changes so you can replicate the look later.
Resize Without Losing Shape
Identify key shaping points and scale proportionally to preserve curves and neck position. If head growth is two extra rounds, mirror that growth in head-to-body transitions and limb lengths. Use proportional math: multiply round counts, not just overall size. Compare scaled pieces to the original; adjust placements if needed to keep balance.
Place Eyes and Features Using Cuteness Proportions
The eyes anchor the face; align nose and mouth on a gentle vertical line. Test a few sketches with eyes slightly larger than usual, spaced a bit wider, and a small mouth placed low for a friendly look. Keep the head soft and rounded to maintain invitation. Use consistent spacing and scale to make faces instantly readable and endearing.
The face is like a musical cue: eyes set the rhythm, nose and mouth complete the melody. A tiny smile with soft curves preserves warmth. When you lock a layout, apply it to other characters so your style stays recognizable. The Golden Ratio in Amigurumi: How Proportions Create Cuteness shows up when spacing and scale are consistent, making designs feel deliberate and charming.
Eye Placement and Spacing Guide
Place eyes on a horizontal line just above center, with spacing about one eye width. Larger, round eyes read as friendly; a soft highlight adds life without glare. Place eyes evenly and symmetrically. If your character wears glasses, adjust spacing visually by the frame shape. Practice with three quick sketches: classic spacing, slightly closer, and wider. You’ll quickly sense which reads sweetest.
Test with different eye sizes on the same face to keep nose and mouth in proportion. Lighting affects perception—highlights add life, but too many reflections can look shiny. Choose a spacing rule you love and stick with it.
Nose and Mouth Location Rules
Place the nose on the vertical center line, slightly below halfway between eyes and chin. A small button nose with a soft bridge and rounded tip works best. The mouth sits just below the nose with a shallow upward curve. A tiny smile conveys friendliness; tilt the mouth slightly for a sleepy or shy look if desired.
Keep features in their own quiet zone; avoid crowding the eyes. Gentle curves read as warm. If you want a surprised look, raise brows and widen the eyes slightly, then restore the calm mouth to maintain cuteness.
Fast Face Layout Method
Plot two equal eye circles on the horizontal line, place a tiny rounded nose between them, and draw a small curved mouth beneath. Slightly larger eyes with a dot or highlight read as friendly. Keep all features in gentle curves and apply proportional rules across designs for consistency.
This fast baseline lets you tweak later and apply to full designs, adjusting minor details to fit each character’s personality without losing core proportions.
Troubleshoot Common Amigurumi Proportion Errors
If your proportions go off, check the silhouette: is the torso the same length as the head? Do limbs balance with the body? Tiny tweaks can fix the issue, so measure as you go and compare to a reference. If the stance wobbles, it’s usually a proportion issue.
- If arms or legs are too long, shorten them a bit.
- If the head seems too big, trim a few rounds.
- Check symmetry; adjust stuffing density and mirror it on both sides.
- Ensure neck length creates a smooth head-to-body transition.
Fixing Too-Long Limbs and Tails
Trim limb length in small steps and resew with even tension. Add a small cap at the end to keep shape without bulk. Shorter tails should support the pose without stealing attention from the head or body. Compare to your centered character and adjust until it feels right.
When the Head Looks Off — Quick Fixes
If the head dominates, remove a few initial rounds or tighten early circumference. If the head is too small, add rounds to crown and widen the jaw for a rounder face. Recheck with the body after each tweak to avoid over-correction. Adjust the neck to smooth the transition.
Test Prototypes and Refine with Feedback
prototypes save time by revealing what works before final details. Show designs to real eyes and ask specific questions: Is the shape friendly? Is the mood warm or off? Use feedback to guide quick tweaks focusing on silhouette, readability, and usability. Organize feedback into big problems first and test revised versions that address them. If feedback contradicts, choose the stronger direction and test again. Finished designs should feel clear, communicated, and true to your vision.
Make Small Samples for Proportion Checks
Small samples test major shapes and scale relationships quickly. Use the same materials as the final piece to feel weight, balance, and how the design sits in three dimensions. If a proportion looks off from one angle, test another. Keep notes: what works, what doesn’t, exact measurements, and observations. Your future self will thank you for a ready-made guide you can reuse.
Use Photos and Friends to Judge Cuteness
Photos give an honest mirror for your design. Take shots from multiple angles and lighting. Compare to the target vibe and ask if the cuteness reads clearly in a flat image. Friends provide quick sanity checks: ask which version invites a hug or feels friendliest. Use their feedback to tweak expression, pose, and proportion. Balance objective checks with your own taste to bridge the gap between what looks good in a photo and what resonates in real life.
Iterate Using Clear Proportion Goals
Set measurable proportion goals, such as keeping the face as the focal point and maintaining limb-to-torso ratios. Each iteration should move toward those targets while preserving the design’s character. Check from every major angle; if not, identify the smallest change that fixes it. You’re pursuing consistency with your chosen style, not perfection. Clear goals keep your work cohesive and appealing.
The Golden Ratio in Amigurumi: How Proportions Create Cuteness is more than a rulebook—it’s a compass. Use these guidelines to build patterns that feel designed, not guessed, and to craft characters that resonate with readers and crafters alike.

Clara Fern — Crochet Artist & Amigurumi Designer
Clara Fern is a crochet artist and amigurumi designer based in Austin, Texas. With 9 years of experience working with yarn and hook, she transformed a lifelong passion for handcraft into a creative mission: making amigurumi accessible, fun, and deeply rewarding for crafters of all levels.
Clara discovered amigurumi during a trip to Japan in 2017, where she fell in love with the art of bringing tiny characters to life through crochet. Back home in Texas, she spent years studying color theory, design principles, and advanced crochet techniques — developing her own signature style that blends kawaii aesthetics with original character design.
Through maclafersa.com, Clara shares everything she has learned — from choosing the right yarn and reading your first pattern, to designing fully original amigurumi characters from scratch. Her writing is known for being clear, detailed, and genuinely helpful, with no steps skipped and no secrets kept.
When she’s not crocheting, Clara enjoys watercolor painting, visiting local yarn shops, and drinking way too much coffee while sketching new character ideas.


