
Why hook size changes amigurumi shape
You’ll notice amigurumi shape shifts when you switch hook sizes. A larger hook makes stitches looser, giving a softer, bulgier form, while a smaller hook tightens loops for a firmer, more compact figure. Think of it as choosing how your fabric behaves—breathe and hold shape differently with each size. When you pick a hook size, you’re deciding how the fabric will drape and where you’ll end with crisper edges or rounder curves. Your final look often reflects your personal style as you tailor the balance of looseness and tightness.
Consider the fabric your stitches create. For a cuddly toy, a slightly larger hook can loosen the fabric; for a neat, crisp critter, a smaller hook helps color work and shaping stay neat. Yarn choice also matters: fluffy yarns balloon with a big hook, while smooth, solid yarns behave differently with the same hook. Small changes in hook size can shift head shape, limb length, and proportions. Try a few tiny samples to learn quickly before committing to a full project.
Your final shape depends on tension, stitch count, and stuffing. A too-big hook with looseness can let stuffing peek through; a too-tight fabric with a tiny hook can make closing the amigurumi difficult. Practice a simple round with your yarn and hook, compare fabric behavior when stuffed, and adjust tension accordingly. This quick test reveals how your final piece will behave.
How stitch tightness keeps stuffing inside
Tight stitches act like a seal, keeping stuffing contained. If you pull too hard, you distort the form; looseness can create gaps. Aim for consistent tension so every round locks the stuffing in place. Even stitches yield a mattress-like surface that holds shape during stuffing and after completion, forming a sturdy barrier that preserves texture and shaping.
You control wall thickness by how you wrap yarn around the hook. Inconsistent tension creates hills and valleys that affect roundness. Maintain a steady rhythm and avoid over-tightening. This consistency helps you close the last gap confidently and set your amigurumi into its final pose.
Check as you go. If stuffing shows after you stuff, stitches may be too loose. If the surface is stretched or won’t close neatly, stitches are too tight. Test by starting a new row with consistent tension to keep stuffing contained and the form you want.
How hook size affects size and drape
Hook size changes influence not just stiffness but overall size and drape. A larger hook creates looser fabric and a touch more stuffing spread, slightly increasing finished size. A smaller hook yields denser fabric that sits closer to the body, reducing stretch and giving a tighter silhouette. For a plump, cuddly look, try a hook a touch larger than the pattern calls for; for a sleek, compact look, stay with or go smaller.
Drape—the way the piece hangs and folds—depends on stitch height and fabric weight. Larger hooks yield a softer, flowing surface, with limbs and ears curving gently. Smaller hooks produce crisper lines and defined edges, helping limbs hold shape better. This matters when shaping features like tails or tiny ears, where you want definition rather than floppy parts.
When tweaking a pattern, adjust the hook size to match yarn thickness and desired final look. Do a quick swatch: measure, lightly stuff, and compare. You’ll learn how size and drape change with hook choice and know what to apply to your main project.
Hook size vs yarn weight for amigurumi
Start by understanding how hook size and yarn weight interact. Labels like worsted weight are starting points, but the fabric’s stiffness and final look depend on your tension and technique. If stitches are too loose, stuffing may show; if too tight, the fabric can feel stiff. Learn by making swatches to gauge how the fabric behaves against the pattern. The aim is a firm enough fabric to hold shape, yet plush enough to be cuddly. Adjust your hook until you achieve a consistent, compact fabric.
Remember: the yarn label is a guideline, not a rule. Different hands crochet with different tensions. If stitches look airy or stuffing shows through, use a smaller hook; if fabric feels stiff, use a larger one. Test with a small square to compare gauge and fabric density to the pattern.
As you gain experience, you’ll read the yarn’s fiber and texture beyond the label. A slippery acrylic may need a slightly smaller hook to lock in stitches; a furry yarn may benefit from a larger hook to reduce snagging. The goal is a cheerful, well-shaped toy that’s comfortable to hold and durable for play.
Use yarn labels to start choosing a hook
Begin with the yarn label’s suggested hook range and test the middle of that range. If stitches look too loose, move toward the smaller end; if they’re stiff or tight, move toward the larger end. Crochet a quick 1×1 inch swatch to confirm. Your aim is a uniform fabric with tight, even stitches and hidden stuffing.
If fabric curls or edges aren’t neat, adjust again. Small tweaks—like using a smaller hook for a denser yarn or a larger one for fluffier yarn—often yield the best results. Practice helps you learn what works for your hands and style.
When to pick a smaller hook than the label
Choose a smaller hook when stitches feel loose or gaps appear. Tighter fabric helps stuffing stay in place and supports clear shaping. If yarn is multi-ply or loosely twisted, a smaller hook reduces splitting and tightens rounds. If yarn is thick or very fuzzy, a slightly larger hook can help maintain a soft, rounded look without over-stretching.
For crisper, defined shapes with minimal stuffing show-through, a smaller hook is often preferred—but avoid overly tight fabric that squeezes stuffing or creates stiff seams. Use small samples to learn quickly.
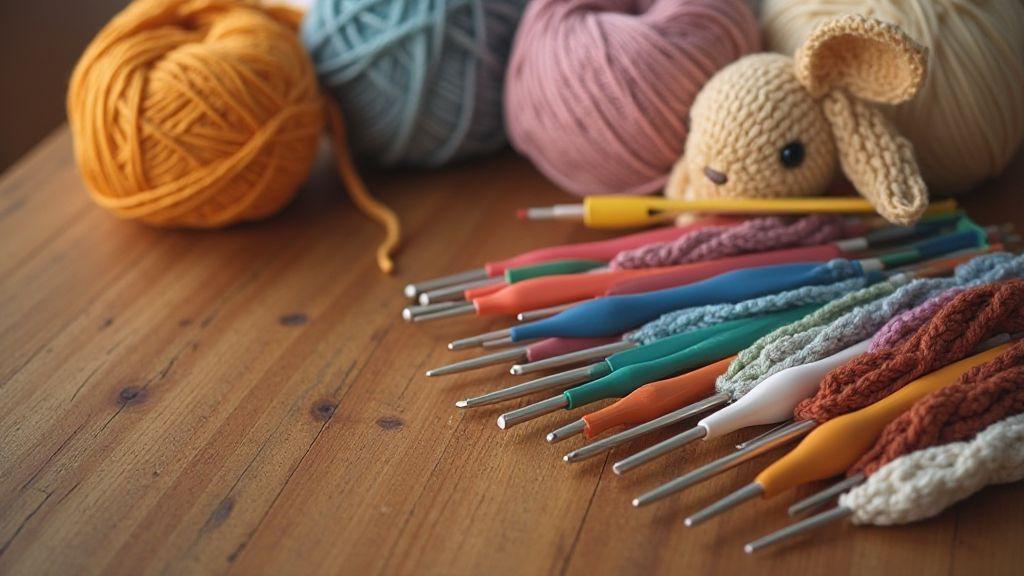
Crochet hook size chart for amigurumi
Hook sizes for amigurumi vary by yarn weight and fiber, but a practical starting point is: for light thins, use a smaller hook; for standard worsted, start in the middle of the label’s range; for chunky yarn, move toward the larger end. Validate with a small swatch to confirm fabric density and finalize your choice. Keep this chart handy as you design or follow a pattern.
Best crochet hook size for amigurumi
The best hook size for amigurumi depends on your yarn, but a common starting point is 3.5–4.0 mm for fingering to DK, and 5.0–6.0 mm for worsted to bulky yarns. You want a hook that closes stitches tightly enough to eliminate holes while keeping the fabric soft enough to cuddle. If you’re learning, choose a comfortable grip and tune using swatches. In short, How to Choose the Right Crochet Hook Size for Amigurumi means starting with the yarn label’s gauge and adjusting to your tension. If fabric looks loose, go down a size; if stiff, go up. Your final goal is a tight, smooth fabric that holds stuffing without stressing your hands.
Crochet hook size conversion for amigurumi
Hook size matters when brands or fibers change. Understand conversion to keep shape and texture steady across projects. Begin with your current hook, yarn weight, and the fabric you like—tight and sturdy, or soft and bouncy. If stitches look loose, try a smaller hook; if tight, switch to a bigger one. Map the label to how your fabric behaves using quick swatch tests: crochet a small square, measure loops, and compare to target gauge. If the swatch is too loose, move to a smaller hook; if too tight, go up a size. Create a simple chart: for a given yarn weight and desired feel, note a recommended hook range. When you switch brands, start in the middle of that range and adjust based on swatches.
Keep notes on yarn weight, hook size, and achieved gauge to simplify future projects. The idea—How to Choose the Right Crochet Hook Size for Amigurumi—becomes a repeatable method you can rely on, not guesswork.
Metric, US and UK size basics
Hook sizing can feel like a maze. In metric, hooks are millimeters; in US/UK, they’re numbers or letters (e.g., 2.0 mm or B-1, C-2). Your goal is to translate quickly so you pair the right hook with your yarn, with quick swatch checks to confirm gauge. A 2.75 mm in one brand may feel different from another, so test with a swatch and adjust by a size step or two. A simple cheat sheet—yarn weight, target stitch gauge, and hook in mm—speeds choosing the right hook.
Also note that US and UK sizes can map oddly to metric. A G hook in US may be close to 4.0 mm in metric; confirm with a swatch. Over time, your memory becomes a map of brands that run small or large, helping you adjust before starting a big project.
Picking the same feel across brands
Consistency matters. Zero in on your preferred hook size and yarn, then work with a couple of brands that give predictable results. When you switch brands, crochet a test swatch at your usual size and compare gauge and fabric density. If the new brand yields a looser result, step down a size.
Use gauge checks often during a project. If you notice drift—ears growing larger or limbs looking lanky—revisit your hook choice and tension. The goal is uniform feel: same tightness, same drape, same cuteness. It’s less about chasing a perfect number and more about consistent results across tools and brands.
Crochet hook size conversion for amigurumi
To convert, start with your target hook size in millimeters. If unsure, pick a size in the middle of your usual range and test with a swatch. Move one size up or down per brand difference if swatches don’t align. Keep notes: exact hook size, yarn weight, and gauge achieved. This makes How to Choose the Right Crochet Hook Size for Amigurumi easier to repeat in future projects.
How to choose crochet hook for amigurumi: swatch test
A clean, tight fabric starts with the hook. A quick swatch helps you feel the hook and see how the yarn behaves. If the swatch shows loose holes, your hook is likely too big; if stitches tuck in too much, it’s too small. Use the swatch to decide whether to go up or down before starting the full project. The goal is neat, even stitches and a fabric that holds shape with minimal gaps.
Test also how your grip, tension, and movement influence the fabric. Your swatch is a mini version of your amigurumi project. If it doesn’t feel right, adjust now to avoid wasted hours. Keep notes on yarn, hook size, tension, and stitches used—the notes become your go-to for future projects. This makes How to Choose the Right Crochet Hook Size for Amigurumi a dependable method.
Make a small amigurumi swatch to check holes
Start with a tiny square swatch and compare hole size. Crochet a few rounds in single crochet, then test with a light object to see gaps. If you can see light, holes are too large; if you can barely see gaps, they’re too tight. Change one variable at a time—slightly smaller or larger hook—and record what you observe. Aim for evenly tight stitches with just enough openness to keep stuffing from bulging.
Count stitches and compare to pattern needs
Count stitches per inch on the swatch and compare to the pattern’s gauge. If you’re off, adjust the hook size and retest until you match. Record your final gauge and hook size for consistent results on future projects. Try swatching for each yarn you use, since fiber content shifts gauge.
Amigurumi hook size guide
Choose a hook size that yields a tight, uniform fabric with minimal holes. Start with the pattern’s suggestion, then test with a swatch. If holes are too big, go down; if they’re too tight, go up. The final fabric should be even and able to hold stuffing neatly.
Tight stitches tips to prevent stuffing show-through
Dense, even stitches hide stuffing well. Anchor yarn well and maintain consistent tension. If gaps appear, adjust your grip to avoid over-tugging. Slow down and tighten a touch every few rounds to keep a smooth surface. Dense areas—belly, nose, limbs—help prevent stuffing from shifting and keep shape true.
Hold yarn and tighten tension for smaller gaps
Maintain a steady hold on the yarn without pinching or over-tightening. Use a gentle between the fingers pull to keep loop size consistent. If hands tire, take a short break to preserve tension. Regular breaks help keep stitches uniform and gaps minimal.
Use single crochet and smaller hooks for dense fabric
Single crochet naturally creates fewer spaces, yielding a denser fabric. For beginners, it’s forgiving yet produces a tight finish when tension is consistent. If fabric seems loose, drop a hook size slightly. A denser fabric helps small parts stay defined and stuffing stay in place.
Tight stitches amigurumi hook selection
Choose hooks labeled for tight stitches or with a snug throat. Aluminum hooks with a smooth finish reduce snagging and help stitches stay uniform. For very small pieces, a micro-head hook can help control loop size precisely. Treat the hook as a shaping tool—when used correctly, it yields tight, clean surfaces without gaps.
Tools that help you pick the right hook
Use tools to simplify hook selection: a reliable hook size chart, a gauge ruler, stitch markers, and trial hooks for testing ideas without committing to a full project. Together, these tools keep tension steady and shapes accurate, helping you achieve the intended amigurumi look.
With practice, you’ll see yarn, hook, and stitch interact in patterns. The hook size chart provides a quick reference for most yarns; the gauge ruler gives feedback on tension; and a trial hook lets you explore slight feel changes before committing. These tools become essential even for seasoned crocheters, enabling consistent results across patterns and brands. How to Choose the Right Crochet Hook Size for Amigurumi becomes a natural workflow you can rely on.
Use a hook size chart and gauge ruler
Begin with a hook size chart to establish a baseline and use a gauge ruler to verify while you work. If your gauge matches the chart, you’re on track. If not, adjust by changing your hook size or tension. Regular gauge checks catch issues early and keep your amigurumi from turning out too large or too small.
Keep both tools handy. A quick glance mid-row can prevent major rip-outs later. Over time, you’ll trust your gauge and hook choices instinctively, delivering consistent results.
Try hook sets and stitch markers for trials
Hook sets let you test a size before committing. Compare how different hooks feel and how the yarn behaves. Do a small swatch to judge control, stitch definition, and ease of movement. Stitch markers help you track rounds and turning points during trials. Together, they let you experiment safely and choose the best tool for your amigurumi.
After a trial, note the tolerated yarn, feel, and whether the shape matches your goal. This log becomes your guide for future projects, making How to Choose the Right Crochet Hook Size for Amigurumi a repeatable method you can rely on.
Choosing the right hook for amigurumi
Choose a hook that feels comfortable and gives you smooth control. If the yarn is slippery, a slightly smaller hook can help you grab fibers and keep stitches tidy. If you’re new, start with a medium size that matches the yarn label and the hook chart. Your goal is even stitches and a steady pace.

Clara Fern — Crochet Artist & Amigurumi Designer
Clara Fern is a crochet artist and amigurumi designer based in Austin, Texas. With 9 years of experience working with yarn and hook, she transformed a lifelong passion for handcraft into a creative mission: making amigurumi accessible, fun, and deeply rewarding for crafters of all levels.
Clara discovered amigurumi during a trip to Japan in 2017, where she fell in love with the art of bringing tiny characters to life through crochet. Back home in Texas, she spent years studying color theory, design principles, and advanced crochet techniques — developing her own signature style that blends kawaii aesthetics with original character design.
Through maclafersa.com, Clara shares everything she has learned — from choosing the right yarn and reading your first pattern, to designing fully original amigurumi characters from scratch. Her writing is known for being clear, detailed, and genuinely helpful, with no steps skipped and no secrets kept.
When she’s not crocheting, Clara enjoys watercolor painting, visiting local yarn shops, and drinking way too much coffee while sketching new character ideas.


