
Essential tools and thread choices
You’ll start with a solid kit and the right threads to make your embroidery look alive. Your goal is smooth stitches that mimic real texture, so choose tools that give you control and consistency. Keep a small, clean workspace and organize threads by color family. When you select threads, think in terms of realism: blends that layer and catch light like real iris and sclera. Practice with a few swatches before a full eye.
Your setup should include a good hoop or frame, sharp needles, a stable stabilizer, and a familiar set of thread colors. Start with a basic starter set if you’re unsure, then add specialty threads as you grow. You’ll notice the difference between a thread that behaves and one that fights you. The right tools save time and make your eyes look more lifelike from the first pass. Jot down what helps each piece—stabilizer choices for dense areas, needle sizes for clean lines—so your quick-start guide improves with every project.
best thread colors for realistic eyes
Realistic eyes rely on subtle color shifts. Start with a core iris color that matches your subject, then layer lighter and darker tones to create depth. Use threads that blend well—blues, greens, greens-browns, or hazels—so you can build a natural gradient. Keep a few core neutrals for the whites and tiny vessels around the edges. Small variations beat a single flat color.
Have a selection of pale highlights to mimic light catching the eye. Light stitches create the glint you see in real eyes. Pair this with fine, darker edges near the pupil to suggest depth. The most lifelike eyes come from careful, strategic touches rather than heavy hand. Practice blending on scrap fabric to learn how your threads interact under your machine. Label your colors and keep a quick-reference palette. When you mix shades, blend two or more threads to get a unique hue rather than forcing one color. The goal is a natural, multi-tone iris with soft edges that feel real.
choosing needles and stabilizer
Needle choice matters as much as color. Use sharp needles for tight, clean stitches and ballpoint or nickel-plated needles for delicate fabrics. Start with a medium size (e.g., 75/11 or 80/12) and adjust as needed. You want stitches that sit neatly without holes or fraying. If you see skipped stitches, switch to a sharper point or a different needle type.
Stabilizer keeps results clean. Use tear-away or cut-away stabilizers that match your fabric’s weight. Delicate fabrics need lighter stabilizers to avoid stiffness; dense fabrics benefit from heavier stabilizers to prevent puckering. Test on a scrap to balance stability with stitch freedom. Balance tension on your machine—too tight and you crush details, too loose and stitches float. A quick test run helps you dial in tension for a clean, professional look.
recommended thread weights and brands
For realistic eyes, choose light to mid-weight embroidery thread so stitches stay precise without bulk. Use a cotton or rayon thread for base shading, then switch to a thinner or differently shaded thread for fine highlights or veins. Start with reliable brands offering consistent color and sheen; avoid novelty or highly textured threads that distract from realism. Try a couple of brands to find what you prefer for ease of use and color stability. The right brand makes the process smoother and less frustrating.
Preparing fabric and hoop for needlepainting
Clean prep matters. Choose a stable fabric that won’t stretch (smooth cotton or evenweave) and secure it in a hoop with even tension. If the fabric has a nap or pattern, press and align the grain so the needle painting sits true. Ensure the hoop is snug to keep threads glide-friendly and to avoid puckers.
Check placement and tension before you stitch. Center the eye area in the hoop and test the fabric’s tautness with a light press. If the fabric sags, loosen and re-tension. A stable base keeps stitches uniform and color blends smooth, crucial for realistic shading.
Backings help. A soft backing reduces show-through and protects threads. For heavier work, consider a light interfacing or tear-away stabilizer on the back, then remove or trim after finishing. This keeps your needle painting crisp from front to back.
hoop size and fabric type
Match your hoop to your project scale. For detailed eye work, use a medium to small hoop for access to every corner. If you’re on fine embroidery fabric, choose a tight weft and an even weave so stitches sit neatly and colors layer evenly. A loose weave can cause halos and wobble shading. Always test a tiny sample to confirm the fabric holds its shape when tightened.
Balance fabric type with your technique. Layering many threads works best on cotton or linen with a smooth surface. Synthetic blends can slip, so keep tension steady and check frequently. Your goal is clean, dense coverage without puckering. When you find the right combo, eyes—bold or soft—come alive with color and light.
marking eye placement accurately
Accuracy sets the portrait’s mood. Lightly mark the center of each eye and the lash line with a water-soluble pencil or chalk. Align marks with your reference photo and check symmetry by comparing sides. Tiny errors compound as you shade, so measure carefully. Use a ruler or grid to keep eye distance consistent and align with the nose and brow.
Map the iris and pupil first, then add a small white highlight to guide final shading. Subtle marks are easy to remove if you stray. When satisfied, remove chalk dust to keep threads clean and visible color work intact. This precise start helps your needle painting feel alive rather than flat.
tension control and backing tips
Keep tension steady from start to finish. A slight shift can distort the eye’s shape or lid arc. If you notice any pull, re-tighten evenly around the hoop or re-tension the fabric. Consistency is your best tool for realism.
Backings help your project stay neat after finishing. Use a soft backing that won’t shadow stitches, and trim stabilizer away from the back so it doesn’t poke through. For thick threads or many layers, a light stabilizer prevents sunken areas where colors don’t sit flush. Handle the hoop with clean hands to avoid oils that could darken or bloom threads.
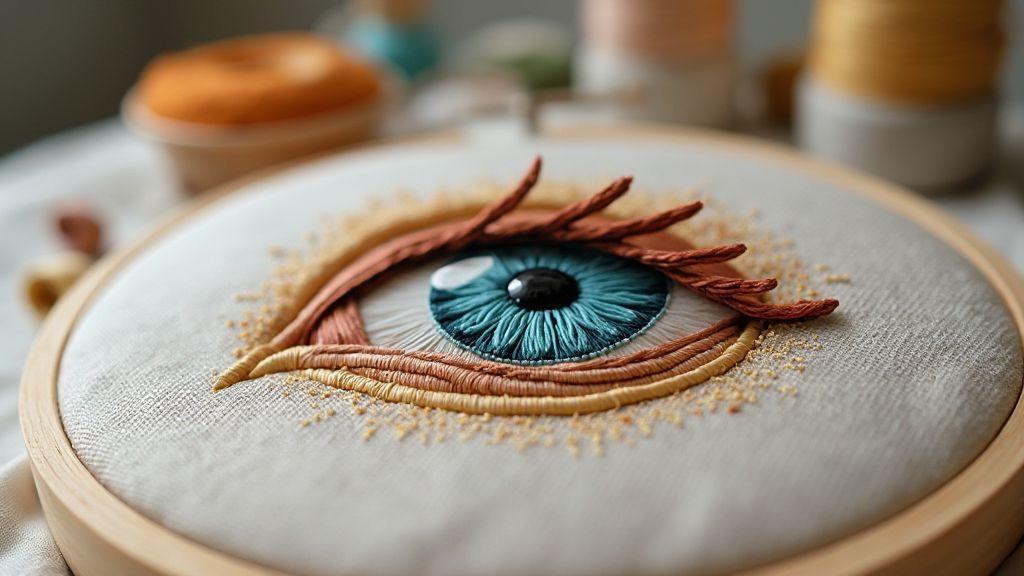
How to Create Realistic Eyes With Embroidery Thread
The core idea is layering color and light with deliberate, small stitches. Start with a pale underlayer to define the sclera edge, then build iris tones in concentric, varied strokes to suggest depth. Add a dark pupil last, leaving a small highlight untouched. Blend edges softly to avoid harsh lines. Use short, controlled stitches and vary thread thickness to suggest texture. Practice on a sample to guide shade and placement for the final piece.
Needle painting eyes is about depth and life. Choose a smooth, glossy thread and a fine needle. Layer subtle color to mimic how light sits on the eye. Keep fabric taut and hands relaxed; steady technique makes the difference between flat color and a living gaze. Step back often to judge shine and color blend. Don’t rush—patience preserves the eye’s glow. Map the iris with careful stitches, starting base color, then add darker tones at the edges. The pupil should be near black with a soft edge where it meets the iris. The white of the eye has gentle shadows and a touch of blue from reflected light. Add a tiny highlight for life. Maintain uniform stitch length and tension; blend uneven edges with lighter colors as needed. Finish with a delicate highlight to imply a natural glint.
Consistency is key. If edges look rough, blend with lighter shades. Add a thin line of darker thread at the top of the iris for a natural shadow. The iris gains depth when stitches curve with the light. When you finish shading, evaluate from multiple distances. If the iris is too bright or too flat, tweak with cooler or warmer shades. Use a clean needle to pull threads taut but not tight, avoiding puckering. With practice, shading becomes second nature and helps your eyes read as realistic.
long and short stitch basics
Begin with a mix of long and short stitches for smooth color transitions. Use long stitches in base areas, switch to short stitches for edges and details. Keep threads flat against the fabric to avoid bulky patches. Practice on scrap fabric until your hand finds a natural rhythm. Combine these stitches to shape the iris, add shading, and give the eye a rounded look.
Pair a slightly vibrant base with darker rim accents, then layer pale highlights to suggest light catching the surface. Real eyes show subtle color shifts, so reflect those with careful long and short stitches. If a line feels harsh, soften with a few floating stitches to bridge color gaps. The goal is a seamless blend that reads as real under varied lighting.
stroke direction for lifelike fur and iris
Stroke direction matters for texture. For fur, follow the natural grain with short, directional lines. For the iris, use curved strokes that follow its round form. Let threads move with the shape rather than forcing flat coverage. Switch from fur to eye with tighter, shorter strokes around the iris edge and longer strokes toward the center to build volume. The pupil remains dense and smooth to keep focus.
Your goal is to convey fur-like softness around the eye while keeping the iris crisp and lifelike.
layering color for smooth blends
Layer color in thin, transparent passes. Start light, add mid-tones, then deepen shadows in narrow bands. Let each layer dry enough to prevent muddiness. If transitions feel harsh, blend with adjacent shades. For the iris, build a gradient: light near the inner edge, richer toward the outer rim. In the sclera, a touch of blue or gray prevents glare and adds realism. Place the final highlight on top of all layers for a small, crisp sparkle. If you make a tiny mistake, re-stitch carefully. The result should be a soft, glassy shine that makes the eye pop without looking plastic.
shading and blending embroidered eyes
Shape depth by layering dark to light colors with steady tension. Start with a base that matches skin or the sclera, then add a slightly darker edge around the iris. Short, even stitches keep colors flush. Work tiny gradients rather than abrupt changes. Build the iris in thirds: a top highlight, a middle tone, and a bottom shadow. If transitions read harsh, soften with lighter shades to blend. Step back to judge balance from different distances, ensuring the iris breathes and the eye doesn’t read flat.
creating color gradients in the iris
Use at least three related thread colors: a light base, a mid tone, and a darker edge. Keep stitches short and even, letting transitions occur gradually. If lines feel harsh, blend by stitching over them with the adjacent shade. Consider light direction: light from above makes the top slightly lighter and the bottom darker. Rotate fabric to maintain the best stitching angle. Aim for a center with a bright glint and a darker outer ring, softening edges with wispy stitches as needed.
using split strands to soften edges
Split strands are your secret for feathered iris borders. Split a strand into two or three finer filaments and stitch with them to soften borders where the iris meets the sclera. Practice light passes to avoid gaps. If a thread frays, re-split and re-stitch. Use split strands along multiple edges to unify shading and soften the overall look. Pair split strands with gradients for natural transitions: keep inner edges crisp while outer edges stay soft.
smooth transition techniques
Blend transitions in increments: base color, then a touch of a neighboring shade, and repeat. Use short, controlled stitches and let layers dry between passes to prevent muddiness. Use a circular motion around the iris to help color settle evenly. If you see unwanted gloss, adjust with cooler or warmer tones. Smooth transitions require patience and precision; they make the eye read as natural rather than painted.
Stitching lifelike iris and pupil
Stitch the iris with intention: tight base, layered colors, and small stitches to avoid jagged edges. As you add light to catch, the gaze gains life. Keep the pupil dense and the surrounding limbal ring defined but not harsh. If edges look harsh, rework with lighter threads to soften. Subtle color variations and directional stitching create a realistic iris texture that reads alive from a distance.
building the pupil and limbal ring
Create a centered, dense pupil with near-black thread and consistent tension for a crisp edge. Add a thin limbal ring just outside the iris edge, using a slightly lighter shade to avoid a stark cutoff. Refine the transition with micro-stitches that bridge pupil and iris, blending across 1–2 thread widths. The combination of a solid pupil and a delicate limbal ring gives a finished, professional look.
radial stitches for iris texture
Radial stitches from the pupil outward create iris texture. Use matching colors with slight shade variation for a filamented look. Keep stitches short to avoid pooling and to preserve depth. Alternate directions to mimic natural iris grain. If you overwork a spot, lift and re-seat the thread for a softer line. The result is sunlit texture that makes the eye pop without shouting.
concentric placement for realism
Place concentric stitches in gentle rings around the pupil, starting with a narrow inner ring and broadening outward. Choose colors that transition smoothly from dark to mid tones. This creates velvet depth and a realistic glow under light. Keep spacing even but allow slight irregularities to mimic real eyes.
adding highlights and sparkle to embroidered eyes
Highlight placement is key. Plan where the light hits, where the pupil reflects, and where tiny sparkles can live without overpowering the stitch work. Use a light touch at first; you can add more later. Catchlights near the top inside the iris, with a secondary smaller reflection opposite for depth, read as natural if they follow the iris color. Tiny beads or glossy threads can add specks and a single clear bead can simulate a crisp glint. Keep stitches small and secure, and test on scrap before committing.
placement of catchlights and reflections
- main catchlight near the top inside the iris, aligned with the light source
- secondary, smaller reflection opposite the main for depth
- follow the iris color for smooth, integrated reflections
- shift the catchlight slightly if the eye turns to read natural
using tiny beads and glossy threads
- use tiny beads sparingly around the iris to mimic natural flecks
- place one clear bead for a crisp glint where light bounces
- choose a glossy thread for a delicate outer-ring highlight, then seal with a final stitch
- always test on a scrap first to avoid overpowering the eye with shine
Safe ways to add sparkle
Sparkle should be a nuanced whisper, not a glare. Layer matte underlayers for depth, then add a controlled glossy element for a glint. Use short stitches to maintain realism and adjust quickly if something looks off. If beads are used, anchor them well and keep the amount small. Lightly seal the area to prevent loose threads from catching.
3d texture techniques for embroidered eyes
Eyes read as alive when you push realism with texture. Choose stitches that build volume, then layer to create three-dimensional depth. Test on scraps before applying to your piece.
- Core texture with satin stitches and short fills to mimic the eyeball’s curve
- Boldly contrast light and shadow, placing lighter threads where light hits and darker tones where it recedes
- Keep stitches dense near the pupil and looser toward the iris edge to suggest depth
- Test under daylight and lamp light to ensure texture holds up from different angles
padded satin and raised stitches
Padded satin creates a rounded eye by layering a base with a thinner, padded top. Raised stitches add emphasis at areas like the tear duct or upper lid. Work gradually, adding small amounts and assessing how light hits the shape. Keep a cohesive color family across raised areas to maintain believability.
stumpwork lifts and underlay knots
Stumpwork lifts define the eyelid curve or lash line above the surface, anchored with a light underlay knot. Underlay knots control texture under raised areas and prevent puckering. Place knots close to lid-sclera transitions to maintain a clean boundary. Light direction should let raised lines catch light in line with iris curvature, not against it.
creating eyelid depth and shadow
Lid depth comes from careful layering. Start with a mid-tone base for the lid contour, then add a slightly darker edge where the lid folds. A cool shadow beneath the crease helps the eye sit in its socket. Blend with close-toned shades and feather the transition to keep the lid visually separate from the eyeball. Check your effect from multiple distances to balance texture up close with overall depth.
Step by step embroidered eye tutorial
Plan first with a reference photo and a color map that includes base, mid tones, shading, and highlights. Map iris boundary and pupil with light thread, then build color layers from light to dark. Add veins sparingly for realism. Finish with a tiny white dot where light would catch.
Build the iris with careful, directional stitches, blending toward the edge. Keep the pupil solid and clean, and place a small highlight for a believable glint. Secure and trim threads, backing as needed for stability.
plan with a color map and photo
Choose a clear eye reference and create a color map with at least four tones. Block out sclera color, then translate the plan to stitches from light to dark. Use a thread swatch to judge how colors blend on fabric. A reference photo beside your work helps position highlights and shadows accurately.
how to embroider realistic eyes, step order
Start with a clean sclera base, lay the iris with a mid tone and a light edge, then add shading above the iris. Place the pupil last. Add highlights to create a glossy, believable gaze. Layer color and texture from light to dark, blending toward the edge, and optionally add subtle veins.
a simple 5-step workflow
1) Plan your color map and reference.
2) Lay a light sclera base.
3) Build the iris with mid tones and a gentle edge.
4) Add shading and veins, then insert the pupil.
5) Place highlights and finalize the edges.
Test on scraps, compare to your reference, and adjust as needed. End with a precise highlight for a glossy gaze.
Tips for realistic embroidered eyes and finishing
Choose colors to match your subject and light. Use several sclera shades, then add a tiny white or pale blue highlight. Layer stitches for depth—iris with tight satin stitches, lid shading with feathered texture. Keep the pupil sharp and blend the outer edge to erase harsh borders. Practice on scraps to judge thread behavior with your fabric. Stitch eyes in focus, allowing thread to settle naturally for a lifelike glint. Subtle shading around the eye adds depth without crowding the eye itself. Tilt the iris to match brow direction for expressive detail. Check from multiple angles and adjust as needed. If whites feel too stark, soften with light gray; smooth jagged iris edges with a fine stroke. Secure threads well and let the piece rest flat after finishing.
secure knots, trimming, and cleanup
Always start with a secure knot at the back. Use a square knot and reinforce if needed. Trim close but leave a tiny tail to prevent unraveling. Trim in small snips to avoid pulling delicate eye stitches. Sweep away loose threads with a brush. If a thread snags, lift gently and re-tack. Recheck from different angles and lightly steam (if fabric allows) to set stitches. Let everything dry flat.
washing, pressing, and framing safely
For washable projects, use a mild detergent and cool water. Turn inside out and place in a mesh bag. Hand-wash gently or use a delicate cycle; avoid rubbing over the eyes. Dry flat away from direct heat, and press with a low heat setting and pressing cloth if needed. When framing, use a mat to keep glass away from stitches and prevent moisture buildup. This helps keep eyes crisp and the piece lasting longer.
sealing and storage for longevity
Seal the area around the eyes with a light fabric seal or clear protective spray if you’re comfortable. Store in a cool, dry place away from direct sun. Keep the piece flat or gently rolled in a clean container to avoid creases. If stacking projects, place a soft liner between items. Label storage sleeves or boxes so you know which pieces need special care. Proper care helps your realistic embroidered eyes stay vibrant for longer.
How to Create Realistic Eyes With Embroidery Thread: Quick Reference
- Plan with a reference photo and a four-tone color map (base, mid, shade, highlight).
- Use a tight base for the sclera, build the iris in layers, and place the pupil last.
- Add subtle veins and delicate highlights to create life, not flat color.
- Blend edges softly, rotate fabric for comfort, and test on scraps.
- Finish with a precise catchlight and a tiny glow to keep the eye believable.
If you’re aiming to master How to Create Realistic Eyes With Embroidery Thread, practice on scraps, then apply the technique to your final piece. With deliberate layering, careful stitching, and mindful finishing, your embroidered eyes will read as alive and expressive.

Clara Fern — Crochet Artist & Amigurumi Designer
Clara Fern is a crochet artist and amigurumi designer based in Austin, Texas. With 9 years of experience working with yarn and hook, she transformed a lifelong passion for handcraft into a creative mission: making amigurumi accessible, fun, and deeply rewarding for crafters of all levels.
Clara discovered amigurumi during a trip to Japan in 2017, where she fell in love with the art of bringing tiny characters to life through crochet. Back home in Texas, she spent years studying color theory, design principles, and advanced crochet techniques — developing her own signature style that blends kawaii aesthetics with original character design.
Through maclafersa.com, Clara shares everything she has learned — from choosing the right yarn and reading your first pattern, to designing fully original amigurumi characters from scratch. Her writing is known for being clear, detailed, and genuinely helpful, with no steps skipped and no secrets kept.
When she’s not crocheting, Clara enjoys watercolor painting, visiting local yarn shops, and drinking way too much coffee while sketching new character ideas.


