
How to crochet realistic amigurumi faces
You’ll want amigurumi faces that look alive, not cartoonish. Start with yarn that suits skin tones and subtle shading. Match your yarn texture to the scale you’re aiming for so tiny features don’t get lost in fuzz, and heavier yarns don’t flatten your expression. Keep tension consistent; loose stitches sag, while tight stitches look harsh. Practice on a small swatch to find your sweet spot before the head. As you crochet, small color and stitch-size changes will shift the mood, so stay curious and adjust as needed.
Realism comes from more than color. Study how light wraps around cheeks, noses, and brows. Gather face charts and high-contrast reference photos to compare shape, placement, and shading as you go. Build a mini library of expressions—soft smiles, pensive looks, curious brows—because your patterns will bend with tiny facial details. Your goal is to capture the character’s soul in yarn, not a flat circle with stitches.
Use basic stitch maps to blueprint eyes, nose, and mouth. Think of it as a tiny plan: eyes sit slightly above midline, the nose rests a bit lower, and the mouth follows the chin’s curve. Plan where to embroider or sew features before stuffing to avoid shifting shapes. With each map you gain confidence in placing features consistently across heads of the same scale, making faces repeatable and expressive.
Pick yarn, hook, and tension that match scale
Your first choice sets the tone. Choose fingering or DK weight in skin tones that blend under lighting. For small projects, finer yarn prevents eyes and mouths from vanishing. For larger faces, you can go a touch thicker, but keep stitches neat and not puffy. Align hook size with yarn to keep stitches even and surface smooth. If stitches look cloudy, tighten a notch or switch to a smaller hook. A balanced combination keeps facial features readable under bright light or soft shadows.
Texture matters as color. Smooth cotton gives clean lines; wool blends offer soft shading for realistic cheeks. Consider how yarn shows when embroidered—some shed a little and blur edges. Test a tiny face patch first, compare to your chart and head, then scale up. The right mix keeps every line crisp and expression readable.
Read face charts and reference photos
Face charts map lines: eyes, brows, and mouth curves. Charts provide symmetry, but photos reveal shading and nuance. Use both: let the chart guide the grid, and let the photo teach subtle shading and expression. If you spot a difference, adjust before you stitch further—this saves redoing later.
Practice with a few expressions to learn how tiny changes shift mood. A raised eyebrow can change the vibe; a lip curl can soften or sharpen a smile. Jot notes on your charts—the location of a subtle shadow or a dimple helps you repeat the look. Read a chart at a glance and tweak stitches to obtain the exact emotion you want. Your accuracy grows as you compare features to reference, not just the pattern.
Start with basic stitch maps
Open your map and mark landmarks before crocheting. Place eyes at a precise distance apart, then map the nose and mouth relative to the eyes. Use simple base stitches and switch to embroidery for fine lines. A steady hand keeps the mouth from drifting if you anchor it in the right spots. Make your map repeatable so you can create several faces with the same proportions.
Keep scales consistent as you layer. Start with a light base, then add darker shading where light would fall. Embroider small details last, like eyelashes or tiny freckles, after stuffing so features stay centered. A clear stitch map makes each face easier to replicate, turning the process into a predictable art rather than a guessing game.
Amigurumi facial feature techniques you should master
Faces need to pop, not look flat. Master three core tools: increases, decreases, and surface stitches. Increases widen tiny head areas for cheeks or brows; decreases taper noses and chins so the face stays proportional. Practice quick, tight increases and nearly invisible decreases so features read smoothly. Then bring texture to life with surface stitches for subtle brows, cheek highlights, or a stitched smile. Combined, these techniques shape expressions that read clearly from a distance and up close.
Mix crochet with embroidery to lift detail. For small eyes, mouths, or freckles, a few strands of embroidery thread stitched on top still reads yarny and warm. Use backstitch or split stitch to outline eye sockets or add a tiny eyebrow arc. Start light, layer gradually, and ensure embroidery enhances—not overshadows—the crocheted base.
Practice stitch placement on scrap heads before committing to your main amigurumi. Map where eyes, noses, and mouths go, then test different angles—slightly tilted eyes read shy, wide-set eyes read surprised. Note cheek highlights, brow lines, or tiny freckles. With time you’ll read a chart at a glance and know which stitches to tweak for the exact emotion you want. Compare every feature to reference, not just to the pattern.
Use increases, decreases, and surface stitches
Balance shape and expression. Start with a few rows of increases to widen the cheek area, then taper toward the nose with decreases to keep a soft contour. Add surface stitches to sketch a tiny eyebrow or lip line. Practice to blend seamlessly; small tweaks, like a tight increase under an eye, can change the look.
As you gain confidence, vary surface-stitch density to create shadows and highlights. A darker line can imply a crease; a lighter one hints at light catching a brow edge. Keep thread tension consistent to avoid lumps. If unsure, slow down and rework a small area until it sits right in the face’s overall balance.
Combine crochet and embroidery for fine detail
This combo gives personality that pops. Crochet creates the base shapes; embroidery adds fine features read at a glance. Try a tiny satin stitch for a glossy eye highlight or a short backstitch for a delicate mouth line. Thread color can be slightly lighter or darker than your yarn to create depth without shouting. Let crochet define form and embroidery define expression.
When adding embroidery, hold the head firmly and stitch in short passes. If a line feels bold, soften with nearby stitches in the same color. Embroidery should enhance, not overpower, the crocheted base. Start light and layer until the expression feels right.
Practice stitch placement
Test placement on scrap fabric or a spare swatch before sewing final eyes or mouth. Mark spots and try several alignments. One eye slightly higher or a mouth curved differently can change the vibe. Use practice to decide cheek highlights, brow lines, or tiny freckles. The more you test, the more confident you’ll be when you work on the real head.
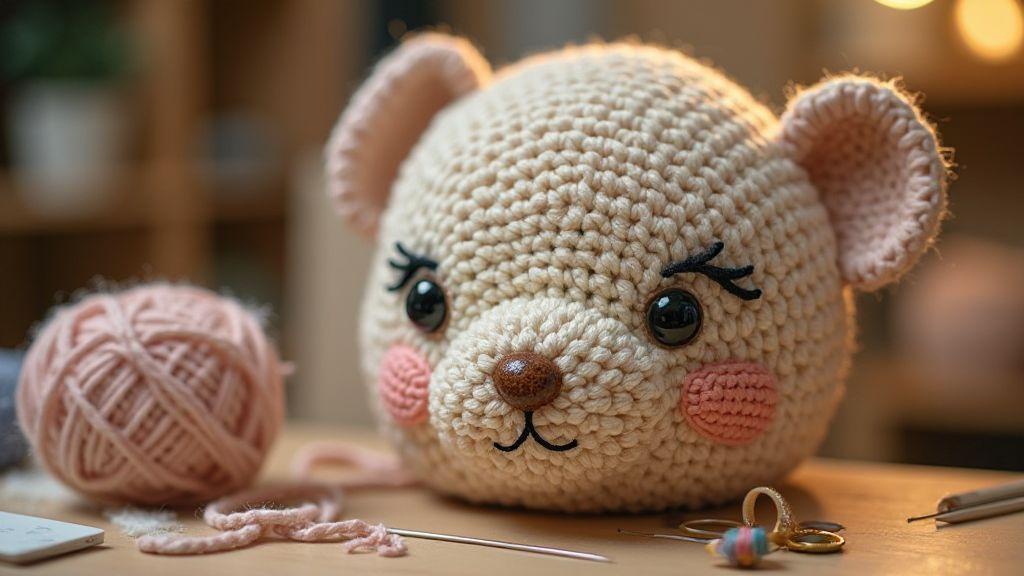
Crochet expressive eyes for your amigurumi
Expressive eyes are the spark that brings amigurumi to life. The right size, color, and placement set the character’s mood and story. A tiny white highlight or bold safety eye can shift the expression in seconds. Keep eyes playful and intentional, and your amigurumi will invite hugs and compliments.
Practice makes this easier. Start with scraps to decide pupil width and whether you want a wide-eyed or shy look. Tension matters: too tight warps eyes; too loose wobbles them. Treat it like painting with tiny dots—adjust as needed. If a pair doesn’t look right, swap color or size and learn for the next project.
As you grow bolder, blend expressions by tweaking pupil shape or adding tiny brows. Map out three or four eye options before attaching. This is where your design starts to speak.
crocheting expressive eyes for amigurumi
Choose yarn, hook, and method. Start with a tight stitch for a solid pupil, then switch to a looser stitch for surrounding white or skin. Aim for clean edges and a solid center; crochet a small black pupil first, then add iris color. If using safety eyes, crochet a decorative surround and back securely. Test sizes on scrap to see what reads best for your project’s scale.
Finishing touches: a tiny white highlight can be stitched or felted for light reflection. Consider lashes or brow arcs to convey mood. Ensure both eyes read the same; if one eye seems heavier, adjust tint, size, or add a highlight to balance.
A reliable method is to crochet a small round for the pupil, add iris color around it, then finish with a white highlight. This works for many styles—from kawaii to realistic. Place eyes symmetrically or give one eye a slight tilt for character. Your confidence grows with every pair.
add highlights with white thread or felt
Highlights make eyes pop. Use white thread or felt to create a gleam, usually toward the top-right of each eye. A single crisp highlight can transform an expression from sleepy to curious.
With thread, keep stitches tiny and consistent so the gleam reads as a dot. If using felt, secure well with multiple thread passes behind the eye so nothing loosens during stuffing. Avoid too many highlights; one crisp dot per eye is often enough. Some designers add a second, smaller highlight for depth—test on scrap first to ensure it enhances, not overwhelms.
Secure eyes before stuffing
Securing eyes before stuffing is essential. Mark the spot with pins or removable stitches, then gently stuff around them to prevent shifting. If using safety eyes, follow backing instructions and ensure everything stays tight and centered.
Reinforce the area around each eye with a few stitches to prevent loosening as yarn compresses. Test placement by pressing from different angles. If an eye looks uneven, adjust before closing up. Close the project once you’re satisfied and admire the preserved expression.
Shape noses and mouths in your amigurumi
Shape noses and mouths with careful stitches to add character. Place a tiny nose between the eyes with a small knot and a subtle ridge. Plan the mouth curve on the face—a gentle smile or a straight line can change the expression significantly. Practice on scrap first to see how each stitch shifts the look. Aim for features that match the face’s proportions without crowding the head.
For noses, a short line of stitches tucks into the fabric rather than protruding. For mouths, embroider or crochet the line, depending on your pattern. A soft, friendly expression keeps the line curved and ends upturned; a stern look comes from a straighter line with a slight downward bend. Test different stitches on a swatch to find what suits your character. Keep the face expressive without overloading with texture.
If new, start with a simple plan: nose a finger width below the eyes, small mouth a little lower. Use skin-tone or slightly darker contrast to help features pop without shouting. Pull gently as you sew to avoid distortion; check from multiple angles. Subtle changes—one fewer stitch here, a rounding there—make the character feel alive.
shaping noses and mouths in amigurumi
Noses are tiny anchors for expression. Use a few tight stitches to create a small bump, then anchor with a knot. For a hollow look, stitch the nose over a tiny fabric impression. For mouths, choose backstitch for a crisp line or satin stitch for a soft edge. Practice on scrap to match yarn weight and hook size. The key is control—steady hands, small threads, and steady pressure.
Backstitch and satin stitch are go-tos for mouths. Backstitch provides a clean line readable from a distance; satin fills with smooth color. For a soft smile, outline with backstitch and lightly fill with satin at the corners. Keep stitches small to avoid puckering; practice to keep the mouth readable on a small head.
Use backstitch and satin stitch for mouths
Backstitch creates crisp mouths; anchor at edges and stitch toward center, stopping short of the center to avoid bulky corners. Satin stitch fills with even color but don’t overfill. Alternate: outline with backstitch then a light satin fill. If yarn is fuzzy, slightly longer stitches may help keep the line clean.
Keep stitches small and even for a neat look. Short, uniform stitches reduce puckering and keep features legible. When you pull, do so gently to maintain a flat surface. If you see a small gap, add a single stitch rather than ripping back. Your finished mouth reads clearly, even on a tiny head.
Keep stitches small and even
Small, even stitches are your secret weapon for clean, expressive features. Use a light touch and pause to check alignment. If you see a wobble, reset stitch spacing. The goal is a deliberate line that reads with intention. A tidy mouth makes a big difference in how your amigurumi communicates emotion.
Add embroidered facial details to your amigurumi
You’ll give your amigurumi personality with embroidered details. Start with a plan: sketch where eyes, nose, and mouth sit, then choose thread colors to suit your yarn. Embroidery controls expression—tiny changes in stitch direction or spacing can shift a smile from coy to goofy. Tie a small knot and pull snug, but not tight; test on scrap to see how stitches sit. Bold blush or subtle eyebrow can transform your character, so experiment.
Plan placement so features read clearly from short distance. Use a light pencil to mark features, then double-check symmetry. If you’re new, start with a simple two-stroke eye and tiny mouth. Keep tension steady—too tight puckers fabric, too loose makes features fuzzy. A thicker needle can give control or a finer one for delicate lines. Consistency—even spacing and evenly sized stitches—creates a cohesive, professional look that makes your amigurumi feel alive.
As you practice, you’ll learn how stitches behave with your yarn. Embroidery on amigurumi is forgiving, so adjust as you go—layer darker highlights over lighter skin tones, or add a blush with a tiny satin stitch. If a line looks crooked, redo it or weave the thread back into the head. Over time you’ll build a toolkit of colors and stitches for maximum expression. You’ll discover how these details sit on the head changes the whole character, and you’ll see growth in your craft.
embroidered facial details for amigurumi
Stitches should be clean and durable since tiny faces get a lot of handling. Eyes can be satin stitch or French knot with a tiny white highlight; a simple mouth can be backstitch or curved satin line. For cheeks, a soft blush with a French knot or satin fill adds warmth without overpowering the face. Practice on a test swatch first. Contrast carries emotion: dark mouth on a light face reads mischievous or confident; pale lip with a tiny corner lift reads shy or sweet. Keep eyes proportional and aligned; if threads show through, switch to longer knots behind the head or weave ends neatly.
Renowned techniques include French knots for pupils, satin stitch for lips, and backstitch for outlines. Mix stitches to add depth: French knot highlights with a satin mouth read lifelike. If a stitch doesn’t sit right, pull it out and retry with a lighter hand. Your patience pays off when features sit neatly and your amigurumi can tell a story with its face.
Hide knots inside the head
Hide knots inside the head. Tie off securely, trim close, and weave ends through inner fabric to vanish. If multiple colors, tuck knot ends under their corresponding areas so they don’t show. A neat finish makes your head smooth and comfortable to handle.
Sculpt cheeks and jaw for your character
Sculpt cheeks and jaw with gentle curves and soft shadows to bring your character to life. Use light increases and decreases near the cheekbone to push the fabric outward, then pull toward the jaw for a natural taper. Pair stuffing with careful placement to maintain shape without hardness. The goal is a subtle lift that makes the face pop.
Cheek contours can change the entire expression. A tiny bump at the apples adds warmth; a smooth jaw keeps the profile clean. If the pattern calls for a smile or dimples, shape the cheeks first, then define the smile line with stitching. Maintain consistent tension so the face doesn’t pucker or sag. Check from different angles to see how light hits and shadows fall. With practice, you’ll tune the contour so it reads naturally from all viewpoints.
sculpting cheeks and jaw for amigurumi
Cheek shaping starts with stitch placement along the cheekbone to push the fabric outward, then tapers toward the temple. Transitions should be smooth so the contour reads as a natural curve. Lightly press to test the volume and ensure it holds with stuffing rather than collapsing.
For the jaw, consider profile: a forward jaw edge can read friendly; a defined jaw creates a sculpted feel. Use small increases along the jawline to emphasize the feature, then blend back into the neck with single stitches. Keep the head balanced to avoid top-heaviness. Cheeks and jaw should read as a cohesive unit that supports the expression.
If extra depth is needed, add a little stuffing behind the cheeks before finishing the seam. Be conservative—overstuffing can push the surface out. After sewing, refine the shape with surface stitches to lock contours without flattening volume.
Use stuffing and stitch contours for shape
Stuffing holds cheek and jaw contours. Use light stuffing and poke gently to avoid lumps. A bit of stuffing behind the cheek area emphasizes lift, and a touch near the jaw supports the line you’ve created. Let stuffing do the heavy lifting while stitches carve final lines.
Stitch contours act like topographic lines. Use tight stitches along the cheekbone to catch the shape, then loosen toward the jaw to prevent overdefinition. Surface stitches can fade the line gradually for a natural transition. If you see a ridge, adjust with nearby stitches. Subtlety wins—don’t rush this step.
Blend contour so surface stitches and stuffing work in harmony. Light catches the high points and shadows fall into grooves for a believable face. This is the part that differentiates real from cartoonish.
Blend shaping with surface crochet
Surface crochet softens lines into a living contour. Light, short stitches along edges smooth the transition between cheek and neck and soften the jaw angle without losing definition. Think of surface crochet as a glaze over a sculpture—adds depth without bulk.
Keep yarn tension even and move slowly. Small, even stitches preserve shape; quick, loose stitches can erase contours. If you see a ridge, pick up a nearby stitch and ease it back. The result should be seamless, with light catching the cheeks and jaw just right.
If you have a specific look—like a brighter cheek highlight or a more angular jaw—adjust surface stitches accordingly. With practice you’ll find your rhythm and know how to tweak the surface for your character’s personality.
Add eyelashes and eyebrows to your amigurumi
Plan where each feature sits and choose a technique that fits your style and yarn color. The right placement frames the eyes and conveys emotion without bulk. Consider how visible you want the features to be; a thin contrasting color pops, the same color reads subtler. If symmetry worries you, practice on scrap first. Eyelashes can curve up for shy looks or down for sleepy vibes; brows can be gentle arches or straight lines for surprise. Match feature size to face scale for consistency.
Be mindful of scale: petite heads need delicate stitches; larger heads can carry thicker lashes or brows. Trial and error helps you land the balance between detail and charm. The goal is to enhance personality with simple, deliberate stitches.
adding eyelashes and eyebrows to amigurumi
Keep stitches intentional. Use thin yarn or embroidery floss for precise lines, and steady hands with small movements. For lashes, loop at the lash line or stitch with tiny curves. Eyebrows can be arched or straight above the eye line. Practice on a sample to dial in length and curvature for your character.
Weave lashes in with a few backstitches for a quick method, or anchor ends well and trim excess for durability. Place brows slightly above the eye; softer looks use fewer stitches and blend color into skin with tiny stitches. The tilt of the brows shifts mood.
Use yarn loops or short embroidery strokes
Yarn loops create bold outlines; secure from inside to keep surface flat. Short embroidery strokes give delicate, precise finishes. For yarn loops, keep loops small and near the face to avoid bulk. For embroidery, start light and build color gradually to avoid oversaturation. Whichever method you pick, stitches should lie flat and not pull the fabric. The final look should feel organic, not forced.
Match size to face scale
Match lashes and brows to face size. Tiny characters need fine lines; larger heads can carry thicker brows or longer lashes. Adjust for a friendly round face or a trendier sharper brow. Compare feature size with other facial details for consistency before finishing.
Use safety eye placement tips for your amigurumi
You’ll want your amigurumi to be adorable and safe, so plan eye placement carefully. Decide on safety eyes, embroidery, or a combination, and map features relative to the head’s centerline. Consider expression—children’s toys often benefit from wider-set eyes for friendship, while mischievous faces may use closer eyes. Lightly mark positions to adjust before sewing.
Head size and neck length matter for balance. Larger heads may need eyes a touch lower; shorter heads may need eyes up to avoid top heaviness. Maintain symmetry by measuring from the centerline to each eye. It’s easier to tweak now than redo after stuffing.
Safety isn’t just appearance; it’s durability. If using safety eyes, ensure washers stay secure. If embroidering eyes, use tight, even stitches and test fabric tension so eyes don’t loosen. Take time with placement and rehearsals before stitching.
safety eye placement tips for amigurumi
Do a visual dry-fit before attaching. Place eyes on the head without sewing and adjust alignment and spacing. Use a ruler to verify distance between eyes and from centerline. A few options may reveal the best look.
For safety eyes, choose the right size for the head. Smaller heads need smaller eyes to avoid overpowering the face. Check back washers and test with a gentle tug to ensure a firm hold. When attaching, sew or insert with steady moves; if embroidering, use multiple short stitches to avoid snagging. From a kid’s-eye view, would the eye stay in place if the toy is hugged or dropped? If not, adjust.
Measure spacing and symmetry before attaching
Mark the head center and axes to line up eyes perfectly. Use a cross mark to see level and spacing equality. Spacing can influence expression, so test a few options.
Use a ruler to set eye distance; a common starting point is about 1.5 to 2.5 eye widths apart, then adjust for your design. After marking, verify distances from each eye to centerline and mouth if present. Tiny differences are noticeable when complete, so take care.
Do a final dry-fit with eyes held by pins or removable stitches. View from three-quarter angles to catch asymmetries you might miss up close. Only proceed to attach when everything looks balanced.
Test washer security and pull strength
After washers are in place, gently tug on each eye to confirm security. If you can wiggle the eye, re-secure before continuing. A sturdy eye is essential for safety and longevity. If unsure, reinforce with extra stitches behind or a drop of fabric glue per manufacturer guidance.
Remember: gentle but thorough tug tests matter. A toy will endure hugs and play, so ensure a secure hold. For safety eyes, keep knot paths tight and buried within the seam allowance. The goal is durable, safe eyes that stay put.
Advanced face construction patterns for complex looks
Unlock facial detail that takes amigurumi from cute to wow. Plan proportions to fit character size, then layer features for readability from distance and up close. Sketch big shapes first, then add curves and shading to suggest depth. Choose colors that blend smoothly—avoid harsh jumps that shout too done. Your goal is a believable face that still reads handmade, with personality to carry the look.
Break the pattern into pieces: separate rounds for eyes, nose, and mouth, with small anchor points for easy adjustments. For a delicate or expressive vibe, lean toward lighter stuffing and gentler shaping around the cheeks and brows. For bold or mischievous looks, emphasize stronger brow curves and a wider mouth with tighter stitch tension. Tiny changes control mood more than big leaps.
Test progress frequently by comparing with a reference face or photo. Don’t fear frogging or redoing sections. The best complex looks come from iteration—each pass adds clarity and life. Keep hands steady, stitches consistent, and patience ready. The result: faces that feel alive, not flat or stiff.
advanced face construction patterns amigurumi
Begin with bold feature placement: mark eye line, brow line, and mouth baseline. Place eyes symmetrically and set the mouth’s curve to match expression. When shaping cheeks, puff about a third of the way into the round for a gentle contour that catches light.
Layer features with small, precise increases and decreases. For noses, a shallow ridge or tiny bump works without bulk. Eyelids can be suggested with a color change or a few decorative stitches at the top edge of each eye. Keep the jawline clean and avoid overstuffing near the ears to prevent top-heaviness. The aim is a harmonious balance where features coordinate rather than compete.
Color shading is your quiet hero. Use a slightly darker shade for shadows under the brow and along the nose sides, and a lighter tone for highlights on the forehead and cheeks. Don’t overdo it—depth, not drama. Practice on swatches to nail contrast before committing to the main piece.
Use blushing shading techniques for amigurumi faces to finish
Blushing adds warmth. Apply a tiny amount of dye or pink yarn to the cheeks with a light touch, layering gradually to create a soft gradient. If using embroidery, a few short curved stitches in a circular pattern mimic natural flush. Scale matters: on small heads, read as barely-there; on larger heads, go slightly bolder but stay realistic. Blend blush edges into base skin color; add a faint shadow below the cheekbone for depth. Aim for a livelier face, not a cartoon bloom.
Adjust patterns to your character size
When character size shifts, adjust proportions so features read believably. If the head grows, scale eye size and mouth width; for smaller heads, reduce eyelid height and eye distance to preserve expression without crowding. Adjust neckline and jaw for a sturdy neck and natural head placement. You’ll keep expressions even as you resize.
Tighten or loosen stitch tension to control the overall look. If mixing yarn weights, test swatches to keep feature details legible. You want a cohesive character where each part fits its size without wobble or lopsidedness.
How to Crochet Complex Facial Features for Amigurumi Characters
In this section, you’ll apply the core ideas to practical examples. Start small: practice placing eyes and mouth before tackling harder expressions. Trace patterns on a fabric guide or lightbox to adjust in real time, building a repeatable process you carry into every project. How to Crochet Complex Facial Features for Amigurumi Characters isn’t about one perfect pattern but mastering small, reliable adjustments that yield big personality.
The key is consistency. Use the same stitch counts, increases, and decreases across characters, then tweak shading and blush for mood. You’ll discover that How to Crochet Complex Facial Features for Amigurumi Characters works best when you iterate—refining tiny details that bring each face to life. Keep practicing, and your amigurumi will express more character with every project.

Clara Fern — Crochet Artist & Amigurumi Designer
Clara Fern is a crochet artist and amigurumi designer based in Austin, Texas. With 9 years of experience working with yarn and hook, she transformed a lifelong passion for handcraft into a creative mission: making amigurumi accessible, fun, and deeply rewarding for crafters of all levels.
Clara discovered amigurumi during a trip to Japan in 2017, where she fell in love with the art of bringing tiny characters to life through crochet. Back home in Texas, she spent years studying color theory, design principles, and advanced crochet techniques — developing her own signature style that blends kawaii aesthetics with original character design.
Through maclafersa.com, Clara shares everything she has learned — from choosing the right yarn and reading your first pattern, to designing fully original amigurumi characters from scratch. Her writing is known for being clear, detailed, and genuinely helpful, with no steps skipped and no secrets kept.
When she’s not crocheting, Clara enjoys watercolor painting, visiting local yarn shops, and drinking way too much coffee while sketching new character ideas.


