
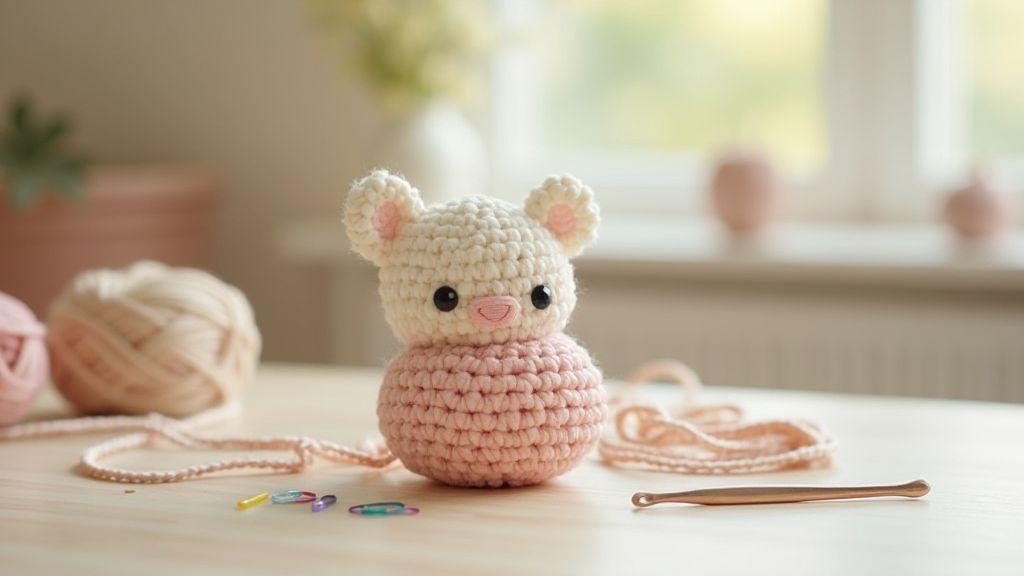
How to Crochet a Simple Amigurumi Ball: The Perfect First Project
You’re about to start a fun journey into amigurumi. This amigurumi ball is small, quick, and satisfying—the ideal first project. You’ll learn basic stitches, how to keep your tension even, and how to finish cleanly so your ball looks neat. This beginner-friendly guide, How to Crochet a Simple Amigurumi Ball: The Perfect First Project, helps you build momentum without feeling overwhelmed.
You’ll use simple stitches like single crochet and increases, and you’ll practice keeping your stuffing even so your ball doesn’t look lumpy. You’ll also learn to close the hole securely, a tiny step that makes a big difference in the final look. By the end, you’ll have a cute, squeezable toy you can gift or keep for yourself. The pattern is forgiving, and your first try will teach you what to adjust next time.
As you crochet, your hands grow steadier. The rhythm of rounds, counting stitches, and weaving in ends start to feel natural. When you finish, you’ll have a small, finished piece you can proudly show off. You’ll likely be thinking about the next shape you want to make, but for now, enjoy your successful first project.
Why this is the best first amigurumi project
This project builds a solid foundation without overwhelming detail. You’ll practice core techniques that reappear in more complex pieces—consistent tension and seamless joining. The ball shape is forgiving and easy to correct, yet still adorable to treasure or gift. The math is simple: a few rounds here, a couple of increases there, and you’re done. A single, well-made ball proves you can finish something sturdy.
You’ll get quick wins that keep you motivated. Each completed round feels like progress, with immediate tactile rewards: soft yarn, snug stitches, and a satisfying round shape. It’s a confidence booster that translates to more ambitious patterns later. Since it’s small, you can practice anywhere you have a moment, turning spare time into something productive and enjoyable.
Finally, the project is versatile. You can make a single ball or several in different colors to form a mini bouquet or a set of gift ornaments. This flexibility keeps the process fresh and lets you experiment with color changes and stuffing density. If you’re ever unsure, this simple ball is a reliable reference point for practice.
What you learn in a beginner crochet amigurumi tutorial
You’ll learn to make a tight, even fabric that stays neat. Master the basic single crochet stitch and practice increasing to shape a smooth sphere. You’ll join rounds so your ball looks continuous, not snapped. When you stuff, distribute fiberfill evenly to keep the ball round and soft. Finishing is key: weave in ends securely and choose a yarn and hook that work together for a sturdy finish.
These basics become your toolkit for future projects, from cute animals to tiny pincushions. You’ll also gain a feel for tension, stitch count, and how density affects shape. If you’re aiming for a clear path, this tutorial shows how small steps lead to a neat, cuddly result—the heart of How to Crochet a Simple Amigurumi Ball: The Perfect First Project.
Set a small, clear goal for your first toy
Set a goal you can reach in one sitting, like finishing a small ball with a clean seam and no loose ends. Decide how many rounds you’ll crochet before you start, and keep your stuffing amount in mind. If you’re unsure, aim for a ball around golf-ball size. Having a target helps you stay focused and gives you a clear point to celebrate when you finish.
Keep this goal realistic: you want a neat surface, a secure closing, and no visible gaps. As you work, pause to check your tension, count your stitches, and adjust as needed. Meeting your goal provides a small victory that motivates you to tackle more complex shapes with confidence.
Tools and yarn you’ll need for a simple amigurumi ball
You’ll keep your project smooth if you gather the right tools and yarn before you start. Your set should be simple but reliable: a comfy hook, good yarn, a yarn needle, and a few small extras. With these in hand, you’ll glide through the rounds without hunting for supplies.
Choose a hook and yarn that suit an easy pattern. For most beginner patterns, a medium-weight yarn (like #4 worsted) with a hook around 4.0 mm to 4.5 mm works well. You want stitches that are easy to see and not too tight, so your ball rounds nicely. The hook should feel comfortable in your hand. If you’re using thicker yarn, use a larger hook; if thinner, go smaller.
Keep a few handy tools: small scissors, a stitch marker to mark rounds, and a simple yarn needle to weave in ends. These basics help you maintain steady tension and finish cleanly.
Pick hook size and yarn weight for easy amigurumi
For beginner ease, use a medium-weight yarn and a mid-range hook. This pairing provides visible stitches and forgiving tension, helping your ball form round rather than flat. If you’re unsure about gauge, practice a small swatch first. A classic setup—worsted weight yarn with a 4.0 mm hook—works well for many patterns beyond the ball. If stitches feel tight, loosen your grip or switch to a larger hook; if loose, try a smaller hook.
Stuffing, stitch markers, and a yarn needle you should have
For a neat amigurumi ball, use soft but not mushy stuffing. Polyester fiberfill or cotton batting works well—add gradually to avoid lumps. A stitch marker helps you track where rounds begin. Keep a couple of spare markers in your bag.
A blunt-tipped yarn needle with a flexible eye weaves in ends smoothly. With these tools, you’ll finish faster and keep your work tidy as you close the final opening.
Basic amigurumi techniques: magic ring and single crochet
You’ll master two core skills that make amigurumi pop: the magic ring and the single crochet. These form the foundation of every ball-shaped amigurumi and keep your work tight. Pull the yarn snugly so the center stays smooth. Practicing will make these moves second nature, ensuring your fabric stays uniform as you add rounds.
The magic ring closes the center so you don’t see a hole, while the single crochet builds a sturdy, compact fabric. When combined, they keep your ball round and predictable as you shape it.
The magic ring starts with a slipknot, then you chain the required number, join to form the ring, and crochet around. If you see a gap, tighten the loop and snug the stitches. Count your stitches as you go to maintain accuracy and avoid early misalignment.
How the magic ring starts a smooth center
A smooth center comes from a tight initial ring. Start with a slipknot, chain the pattern’s required stitches, then join to form the ring. Crochet around, keeping tension even and avoiding yanking. If you see gaps, tighten the loop and snug the stitches. With practice, the center becomes a seamless foundation for the rounds.
Counting helps keep your rounds accurate. If you miscount, your ball can go off-center early. Count aloud or tap a finger to stay on track, and re-check as you go. When the first round finishes, gently squeeze the center. A well-formed magic ring makes the rest of the ball easier to shape.
Why single crochet is the main stitch for your ball
Single crochet provides dense fabric that keeps the ball from flopping or gaping. It yields even stitches that nestle together, helping rounds stack neatly. It’s forgiving and simple, which saves time and reduces mistakes as you learn increases and shaping. Keep your yarn close, your hook steady, and your loop size even for the best results.
Practice both stitches until they feel natural
Use a small practice swatch to explore the magic ring and single crochet. Start with the ring, close it snugly, then crochet a few rounds inside. Focus on tension: too tight distorts the center; too loose creates gaps. Find the middle ground where the fabric feels sturdy yet flexible. Repeat this combo until it becomes a natural rhythm.
When ready, try a mini ball with a small amount of stuffing. Check for wobble and adjust tension or stitch placement as needed. The goal is to crochet a complete ball with minimal adjustments, turning practice into muscle memory for future projects.
Crochet increase decrease tutorial for amigurumi
You’ll learn how to grow your ball in rounds with increases and then close it with decreases for a smooth top. This beginner-friendly approach helps you shape a cuddly form with even curves. Count, adjust, and watch the work grow evenly.
As you practice, your fingers learn the motion. The more you crochet, the steadier your increases and decreases become. With patience, simple stitches become a round, symmetrical shape you can be proud of.
If you ever feel stuck, remember: consistency and calm pace beat rushing. Now, let’s look at the specifics that keep your work even and lovely.
How increases shape a round sphere
Smart increases push the work outward to form a round sphere. Increase by two stitches in one or as your pattern directs, spacing increases to avoid bulges. Early rounds set a rounded base; later rounds maintain a dome-like curve. Consistent tension and even stitch height help the sphere stay balanced.
Starting with a base round and adding increases gradually to taper the top keeps the shape balanced. Compare early rounds with later ones to feel the sphere forming in your hands.
How decreases close the top without gaps
Decreases pull the top together, reducing circumference evenly to a neat apex. Crochet two stitches together and continue with the same stitch count until you near the top. Space decreases evenly to avoid a pinched or lumpy top. Keep tension firm but not tight enough to distort the shape. Pause a round before the final close to ensure a smooth top, and consider a slip stitch or finishing round to hide any minor gaps.
The result is a compact top that matches the body, with no telltale holes. For added security, you can add a few extra stitches around the closing point or weave the final ends to hide any visible seam.
Count stitches each round to stay on track
Counting stitches each round is your north star for accuracy. Mark the round start, count to the end, and note any increases or decreases. If counts drift, adjust in the next round. The pattern’s stitch count becomes your roadmap toward the perfect sphere.
If you’re new to counting, treat it as a simple checklist: round number, stitches, and any changes. Recheck after each round, and fix discrepancies before closing the round to prevent bulges. With practice, round counts stay true and your ball remains even.
Easy amigurumi ball step by step pattern for beginners
You’re about to learn a simple, beginner-friendly amigurumi ball that builds confidence. Start tight and round, end small and soft, and use a few stitches to complete a cuddly toy or ornament. Each step reinforces tension, counting, and subtle shaping so you can tackle larger patterns later.
Mark completed rounds with a stitch marker to stay on track. When you finish, you can add a face, tail, or a loop for hanging. This pattern scales: once you’ve mastered the tiny ball, you can make bigger ones by adding rounds.
Typical round stitch counts for a small ball
Begin with a magic ring and continuous rounds: 6 single crochets in the ring, then increase every stitch for the next round, followed by rounds of maintaining stitch count and increasing as directed. By roughly 12–16 rounds total (depends on yarn and hook), you’ll have a rounded ball. If you want a softer ball, use thinner yarn or a larger hook and add rounds before closing.
Count aloud or use a stitch marker to keep the first stitch of each round. It’s normal for counts to feel off at first, but you’ll learn to slow down and tighten grip as needed. Plan for about 42–72 stitches in mid-rounds for a standard small ball, but variations are normal and part of your unique ball’s character.
When to add stuffing in an easy amigurumi ball step by step
Add stuffing after a few rounds when the ball begins to round. Stop before the final rounds, insert a small amount and pat to even the fill. Check symmetry as you go and adjust if needed. If you’re adding safety eyes or a small face, do so before closing the last round to avoid distortion.
Follow short rounds and stop to check shape
Short rounds let you pause to check shape often. After a few rounds, hold the ball up and rotate it to spot flat spots or uneven filling. Short rounds help you catch mistakes early and keep the process calm, especially for beginners.
Stuffing and shaping amigurumi ball tips
A smooth, round ball comes from light, consistent filling. Add tiny amounts and test the roundness by rolling in your hands. The right stuffing creates a clean seam where ball meets surface—overfill leads to stretched stitches, underfill results in wobble.
Keep a small bag of fiberfill nearby, and use a chopstick or poking tool to nudge stuffing into tight corners. A mirror helps you inspect from all angles. When density feels right, close the piece with a neat seam and continue shaping with steady hands.
Best stuffing types and tools to get a smooth ball
Aairy synthetic fiberfill is ideal for a smooth ball, as it compresses evenly without clumping. For texture, a tiny pinch of cotton can be mixed in, but start light. A chopstick or poking tool helps spread fill into corners and along the seam. Use light, slow motions to avoid creating air pockets. Good lighting and a mirror let you inspect from all angles as you fill, then you’ll close with a neat seam and shape with confident hands.
How to stuff gradually for even shaping
Fill gradually, starting with a small amount and testing the roundness as you go. If you see flat spots, add more fill there. Keep the surface taut but not stretched, pinching and smoothing toward the seam to eliminate cavities. Roll the ball between your palms to verify even density before closing.
Use a chopstick or poking tool to spread fill
Spread stuffing evenly inside the ball with a thin tool. Probing the interior helps you push fill toward the edges, avoiding air pockets and ridges. Smooth the surface as you go for a professional finish.
Amigurumi finishing and sewing tips
Finish smartly by planning final steps while stitching the body. Weave in ends gently so knots stay hidden. If a strand sits up, press it flat to keep surface even. For fuzzy yarns, smooth with the crochet hook tip. If you used multiple colors, note where ends hide to ease future repairs. A clean, professional look comes from careful finishing.
Establish a finishing routine for multiple toys to maintain consistency across projects. Repetition helps your amigurumi look like it came from the same maker, even with color changes. Finishing now ensures your projects stay delightful long after they come off the hook.
Weaving in ends and closing the final hole neatly
Weaving in ends takes planning. Start at the last stitch and snip the tail, leaving a short end for weaving. Thread the needle and weave ends inside stitches for about an inch, keeping the surface smooth. Trim close and hide the end by tucking it securely into the fabric. For the final hole, pull the last loop tight and secure with a knot inside. Weave the end away to hide it and add a tiny bit of glue if needed, then smooth the surface.
If you’re adding safety eyes or embroidery, weave those ends as well, maintaining a uniform texture. Practice weaves to keep ends invisible and the surface even. The more you weave, the steadier your hand becomes.
Safe ways to attach eyes or embroidery for toys
Safety comes first with eyes and embroidery. For child toys, use safety eyes with locking washers or felt patches. Position eyes before facial stitches for symmetry. Use tight but not overly tight embroidery stitches so the surface stays smooth and readable.
If you prefer inner attachment, sew eyes or noses from the inside and reinforce with extra stitches. An interior stitch keeps deterrents from loosening and maintains a neat exterior. Proportion matters: smaller features read friendlier, while larger ones can look cartoonish. Practice on a swatch to build steady embroidery skills.
Secure all seams and trims before giving it away
Before gifting, tug each seam and trim to ensure nothing loosens. Reinforce any slightly loose seam from the inside. Trim ends cleanly and reweave them into the body so they stay hidden. A secure toy passes the toss-test and remains durable during gentle play.
Inspect trims like ribbons or appliques to ensure they’re firmly attached. If you used a pom-pom or raised embellishments, anchor them with extra stitches. A care note for the receiver—gentle hand wash or spot cleaning—adds a helpful touch and shows you care about longevity.
Common beginner mistakes when you crochet an amigurumi ball
Common mistakes include uneven tension, skipped increases, and drifted stitch counts. If your ball wobbles, you’re probably not counting rounds or your grip is too tight. Pay attention to yarn feel and tension, not speed, to keep fabric snug and round.
Ignoring round progression is another pitfall. Finish a round and find you’re off by a stitch or two, which creates bulges or flat spots. Pause to count every few rounds and compare against markers. Small corrections early save you from a patchy final product. Your amigurumi ball deserves steady practice, not shortcuts.
Over-tightening early also plagues beginners, stiffening fabric and causing flat spots. Relax your grip a notch and let the yarn glide. A gentler touch preserves roundness and makes stitching easier as you add rounds.
How to fix uneven tension and bulges
Uneven tension shows as ridges or soft spots. If you spot a bulge, loosen the previous rounds and re-center. For inconsistent tension, lightly pull the working loop to align with the previous stitches. If a bulge forms, pick up the surrounding stitches and flatten the band. Use a consistent medium tension for a whole round, then compare with the next. If the yarn slips, briefly switch to a smaller hook to draw the fabric in, then return to normal size.
Easy ways to correct stitch count or round errors
Count carefully before closing each round. If you’re short or over by a stitch, undo only the last few stitches. If you lose a stitch, insert a slip stitch or a strategic increase in the next round to regain the correct count without creating a bump. If you’re consistently off by one, mark rounds and count from the marker to prevent drift.
Check your work after every few rounds
Pause every few rounds to inspect height, spacing, and flatness. A tilt or flat edge signals drift; adjust in the next rounds. Regular checks help you catch issues early and keep the amigurumi ball round.
How to Crochet a Simple Amigurumi Ball: The Perfect First Project
If you’re just starting, this project teaches tension and roundness with a handful of techniques. You’ll practice steady stitches, mindful counting, and subtle shaping for a balanced ball. You’ll feel progress with every careful round you complete. When you finish, you’ll see the accomplishment in the ball’s roundness and firmness. This foundational project sets you up for more complex amigurumi shapes with confidence. If you want a clear path to start, follow How to Crochet a Simple Amigurumi Ball: The Perfect First Project, and you’ll see how small steps add up to a neat, cuddly result.
Simple variations and next projects after your first amigurumi ball
Your first amigurumi ball teaches the basics, and now you can level up. Change size or color to create new toy styles, or turn the ball into practical items and follow with a tiny follow-up project to maintain momentum.
Varying size or color is a quick win: make a few balls in different diameters using the same stitches, just with more or fewer rounds. A color band or two contrasting hues refreshes the look without extra fuss. Switch to soft or variegated yarns for texture and interest. Check your gauge so the ball stays tight and not floppy.
Turn your ball into a keychain, rattle, or small toy by adding a loop for a ring or inserting a small rattle beforehand. To create a tiny toy, add ears, eyes, or a mouth with a few stitches. Finishing—neat embroidery, secure tails, and clean ends—gives your project a professional finish and opens up new uses for your amigurumi ball.
Change size or color to make new toy styles
Adjust how many rounds you crochet to change size, keeping a round shape by monitoring tension and stuffing. A bold color swap or a middle color band creates a fresh look without extra work. Reusing the same pattern with different colors expands your catalog quickly.
Try softer or variegated yarns to add texture without extra stitches. Always check gauge to keep the ball tight and not floppy. With practice, color shifts can convey different characters or moods in your creations.
Turn your ball into a keychain, rattle, or small toy
A simple loop and a sturdy ring turn your ball into a keychain in minutes. For a rattle, place a few tiny pellets inside before closing, ensuring the fill remains light enough to move. To create a tiny toy, add ears, a face, or limbs with extra stitches. Finishing—neat embroidery, secure tails, and clean ends—keeps your piece adorable and durable. Small changes yield delightful, gift-ready items.

Clara Fern — Crochet Artist & Amigurumi Designer
Clara Fern is a crochet artist and amigurumi designer based in Austin, Texas. With 9 years of experience working with yarn and hook, she transformed a lifelong passion for handcraft into a creative mission: making amigurumi accessible, fun, and deeply rewarding for crafters of all levels.
Clara discovered amigurumi during a trip to Japan in 2017, where she fell in love with the art of bringing tiny characters to life through crochet. Back home in Texas, she spent years studying color theory, design principles, and advanced crochet techniques — developing her own signature style that blends kawaii aesthetics with original character design.
Through maclafersa.com, Clara shares everything she has learned — from choosing the right yarn and reading your first pattern, to designing fully original amigurumi characters from scratch. Her writing is known for being clear, detailed, and genuinely helpful, with no steps skipped and no secrets kept.
When she’s not crocheting, Clara enjoys watercolor painting, visiting local yarn shops, and drinking way too much coffee while sketching new character ideas.


