
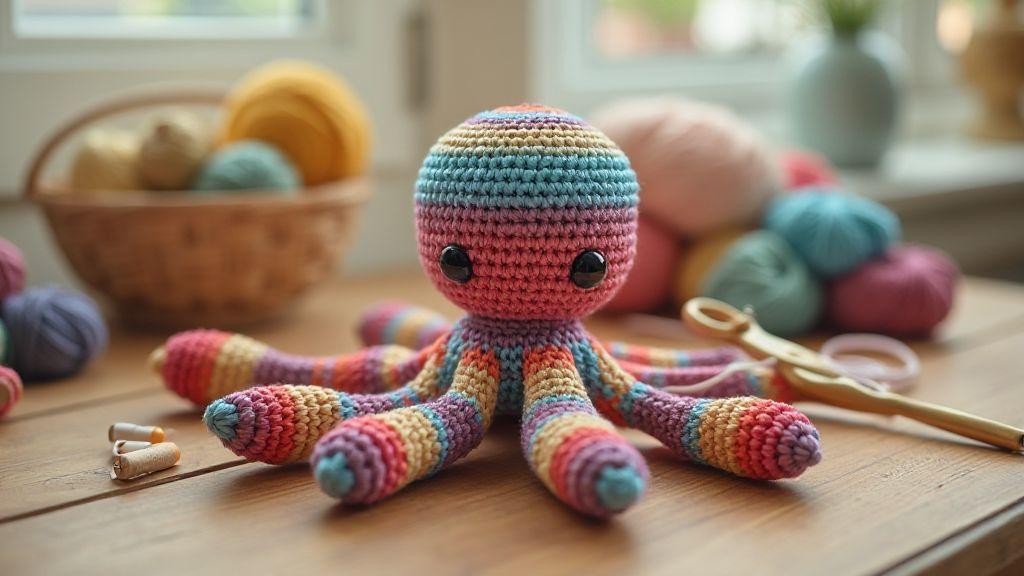
How to Make an Amigurumi with Multiple Colors and No Mess: Essential Yarn Management Tips
If you’re learning How to Make an Amigurumi with Multiple Colors and No Mess, these yarn management tips will help you keep color changes clean and ends tucked. Plan from the start, carry yarn, weave tails, and finish with tidy joins for a polished amigurumi.
Yarn management tips amigurumi for minimal ends
You’ll keep your project neat by planning where ends live from the start. Treat each color as a tiny thread you’ll tuck away, not a loose end you’ll chase later. By deciding your method ahead of time, you prevent extra tails and keep the amigurumi smooth. Quick checks after a few rounds: start a new color near a seam or under a stitch to hide the join. This mindset helps you stay organized while you crochet.
Your tension matters for ending yarns cleanly. If you pull too tight you’ll see lumps; too loose and ends stick out. Aim for comfortable, consistent tension. When you finish a color, assess whether the tail can be woven in within the next few stitches or carried forward. A small routine now saves a big trim later. Think of each tail as a puzzle piece to tuck into place.
Finally, keep a simple system for tracking tails. A note in your pattern or a color badge on your workspace helps you remember where each tail hides. Finish with a clean look and fewer stray ends, making your amigurumi polished even if you’re learning.
Carry yarn inside amigurumi as you work
Carrying yarn inside hides ends without extra knots or weaving. Let the new color travel along the inside, under stitches, to keep changes invisible from the outside and reduce the need for later weaving. Keep carries tight but not stretched; pause at seams to tuck under a nearby stitch, then resume. For many color changes, plan the carry path to avoid backtracking. With practice, this becomes second nature and you’ll see the ends disappear as you crochet.
Weave in tails to avoid yarn ends amigurumi
Weaving in tails is your best friend for a clean look. Weave through a few stitches in the same color, then snip close to the fabric. Start with a short tail so you can catch it early, but long enough to secure. Back-and-forth a few tiny stitches near the color end creates a tidy finish that holds up to play. Vary the needle direction to avoid a visible line. When you pull snug, check the outside—if you can’t see the tail, you’ve done it right. If a hint remains, shift the needle a millimeter and try again.
Simple carry-and-hide method
Carry yarn inside for one color and weave it in a few stitches before you switch colors. When you switch colors, thread the new color through the base of the previous stitches and pull gently. This keeps the transition smooth and the ends tucked away. You’ll get fast at this with practice; your hands will remember the path of least resistance. Keep carried yarns tight enough to stay hidden but not so tight that they distort your stitches. This method shines with lots of color changes on small amigurumi.
Invisible color change methods for tidy joins
Plan your color changes before you stitch. Let the working yarn sit along the back so the change sits under the stitches. When you switch colors, pull the new color snug but not tight, then weave the end under a few stitches to lock it in. This keeps the surface flat and avoids knots peeking through.
Choose your method based on how visible you want the change. Carrying the unused color along the back works well for flat pieces, while cutting and tying off at the end of a color block reduces bulk in small rounds. If you carry, tuck the carried strand under the previous color’s stitches every few stitches to hide its path. Place color transitions where the fabric naturally folds or where joins occur on the back for a cleaner edge.
Test tension as you switch colors. If you pull too tight you’ll get puckering; too loose and the change gaps. A quick tug and continue helps the seam disappear. Practice with a small swatch to see how your stitches lie and how the color change behaves.
Use invisible color change amigurumi to hide knots
When you switch colors in amigurumi, knots can ruin the smooth look. Use invisible color changes by weaving tail ends into adjacent stitches. After finishing a color, leave a short tail and weave it under the back of the next few stitches before cutting. This anchors the color change without creating a bump.
Another option is to tie off the old color at a convenient back stitch, then start the new color in the next stitch with a magic circle or slip knot so the knot sits inside. If you’re working in rounds, align color changes to seam lines so knots land where they’re least noticeable.
For tougher yarns or dense stitches, split the ending yarn into two strands and weave each strand in opposite directions under the same stitches. This double weave locks the color change securely and keeps the surface smooth, especially on small pieces.
Amigurumi color change techniques for smooth joins
Choose a technique that keeps the surface flat. A common method is to switch colors at the top of a stitch, then work the next stitch with the new color, keeping the joining spot on the back. This creates an almost invisible line at the join.
Another technique is to crochet the last half of a stitch in the old color and the first half in the new color to spread the change and reduce any front-facing line. For tight stitches, a slip stitch join in the back loop of the previous round can keep the front clean.
If you’re combining multiple colors in a row, plan the color order so each change lands in a natural valley of the stitch pattern, where the texture hides the transition. Practice with a small piece to see which method looks best for your yarn and gauge.
Finish color joins cleanly
Finish each color join by weaving the tail ends under several stitches on the back, then snipping close to the fabric without cutting the yarn too near the weave. If you’re worried about fraying, overlap the end with the starting tail and secure with a few extra stitches.
Return to the front and gently coax the stitches so the surface lies flat. A quick run of the hook through the back loops helps flatten any raised spots. When you’re done, give your work a light press (as allowed by yarn care) to set the weave. The color joins disappear into the fabric, almost unnoticeable.
Join as you go to cut sewing and bulk
Join as you go to reduce bulk and speed up your amigurumi work. When you join as you go, your fabric stays tidy and seams stay neat and strong. Start with a simple base method, then add steps that allow extra color or shape without a pile of loose ends. With practice, pieces sit flatter and yarn travels less, meaning fewer fixes later. Think of it like tying a bow as you stitch rather than tying a loose knot at the end.
Plan color changes so they occur naturally as you sew. Carry yarns strategically and weave ends as you go to avoid post-work. Keep tension steady to see seamless connections, especially on small pieces. If unsure, practice on scraps first to lock in your rhythm.
Finally, adjust stitches to maintain uniform density. Consistent stitch size keeps join lines nearly invisible. Practice joining as you go on scraps before tackling the real pieces to gain speed, control, and a reduction in bulk at every seam. With time, you’ll sew more efficiently and enjoy the flow of your project.
Join as you go color change for attached pieces
When switching colors while joining pieces, keep the work compact and neat. Use a quick color-change technique that brings the new color into position without leaving a loose end. As you stitch, align edges so the color boundary sits where you want and pull tight to lock the transition. With consistent tension, the color change looks smooth, almost invisible.
Carry yarns across joints to avoid extra knots. Carrying keeps the unused yarn along the seam, then weave it in later where it won’t show. If you need a sharper edge, switch to a tighter stitch for that line so the color change stays crisp. Test on a tiny sample before applying to the main body.
Check the color-change joints from both sides. A quick look reveals any pulling or gaps, so you can adjust before the piece is closed. Maintaining even tension gives you a seamless transition and a polished amigurumi from every angle.
Use minimal sew multicolor amigurumi for limbs
For limbs, keep seams minimal with multicolor techniques that reduce extra stitching. Start with a simple limb shape, then add color blocks to cut bulk at joints. Plan color order so finishing colors land at natural seam lines for a clean look.
Work with short color runs to keep changes tidy. Weave ends right away and trim close. You’ll notice the limb sits and reads as a single piece, not stringy. If you need a color accent, place it where a seam would naturally hide so the limb reads as one smooth piece.
Finally, test limb strength and flexibility. Squeeze gently to feel joins and adjust tension if you notice stiffness. Tight but not tense joins help the limb move with the body without bulky seams. With practice, you’ll create colorful, clean-looking limbs.
Secure joins with slip-stitch seams
Slip-stitch seams give a nearly invisible finish. Use a fine needle and matching thread or yarn to weave the seam smoothly. Start at the edge and slip the needle under a stitch, then pull through to secure the seam without creating a lump. This works well for small amigurumi where heavy sewing shows.
Align pieces along a natural boundary, keep stitches evenly spaced, and use a small, tight motion to prevent gaps. The seam should disappear as you work, making the piece look like one solid entity rather than stitched blocks. Practice on a scrap if you’re worried about visibility.
Finish with a tiny weave-in of the final thread end. Tuck into the seam and give a gentle tug to set it. Trim close and check from multiple angles. A well-executed slip-stitch seam stays hidden while keeping the join steady through play or display.
Intarsia crochet amigurumi for blocks of color
Intarsia crochet lets you work color blocks for bold, clean shapes without carrying yarn across the entire project. Map each color to a specific area for crisp edges and a patchwork look—great for facial features, clothing details, or patterns. Plan which areas will be which color and keep yarns organized to avoid mid-row mix-ups. Twist yarns lightly before starting each new color block to smooth transitions. With practice, color blocks look intentional and your amigurumi gains a polished two-tone or multi-tone look.
To master intarsia, keep a clear plan and steady hands. Use separate yarn strands for each color and weave in unused color tails later to keep the surface tidy. For a face, map the eyes and mouth first, then add surrounding color. Keep color changes near the fabric edge to prevent gaps. Count stitches and maintain even tension so blocks sit flat and the piece remains round where it should.
As you gain confidence, tweak your approach to fit your style. Combine bold color blocks with shading by selecting adjacent hues carefully. If a boundary gap appears, adjust your grip and re-tension before continuing. Trim ends neatly to avoid poking through the surface. With practice, intarsia becomes a reliable step in your amigurumi process, enabling unique creatures with clear colorwork.
Plan intarsia crochet amigurumi to map shapes
Before you crochet, map your shapes clearly. Sketch where each color lands, then translate that onto your crochet plan. Decide which areas will be solid and which will require multiple shades. Assign a block size to each color to balance the overall look and avoid crowding. Start with small shapes like a nose or stripe and gradually add larger areas. Keep the plan visible as you work to maintain control over color placement.
Prepare yarns with ends long enough to weave in later. Use labeled mini-baggies or separate bobbins. Decide whether to crochet with separate color blocks around the piece or switch colors more often as you go. If you’re making a face, map the eyes and mouth first, then add surrounding head color. Include how you’ll join color blocks at the edges to avoid bulky seams. A clear map lets you crochet with confidence, knowing where each color goes.
Keep tension steady for seamless colorwork amigurumi
Steady tension is essential for clean color blocks. Keep the yarn relaxed enough to move but taut enough to hold shape. When switching colors, twist slightly to prevent a hole or gap at the boundary. If fabric pulls, ease up on the last stitches and re-adjust. Your goal is a smooth surface where colors meet, without puckers or pulled edges. Practice with a small swatch to learn the right grip before you commit to the full piece.
As you gain experience, adjust tension per color. Heavier yarns or thicker color changes may require slight grip adjustments. Keep your wrist relaxed and switch hands if needed to maintain even tension across the piece. Consistency in tension creates a professional, polished look even with complex color schemes.
Plan patterns to learn How to Make an Amigurumi with Multiple Colors and No Mess
You’ll get the flow of color changes and tidy ends by planning ahead. Start by listing the main colors and the order of switches. Think of this like a recipe: smooth transitions, not a jumble of ends. Planning sets up clean, professional results. Start simple and add complexity as you gain confidence. If you’re aiming for a specific look, map the color chart for each piece so you can follow it while you crochet. This planning stage saves you from rearranging yarns mid-project and reduces loose ends.
Next, map your stitches to color areas. Break the design into blocks: head, body, limbs, and accessories. Assign a color to each block and note where you’ll switch. Write it down or keep a small chart handy as you work. This helps you avoid missed color changes or extra strands in stitches. A clear plan lets you focus on tension and shaping while colors line up neatly. A map also helps decide whether you need longer color runs or quick, short changes for detail.
Finally, practice color changes with a lightweight piece. Test tidy transitions and prevent messy joins. If you see a wobble or visible end, adjust your technique now. The goal is clean color changes without pulling or bunching. Practicing with a small swatch gives you confidence before tackling the full amigurumi. You’ll notice the difference—colors sit close together and ends tuck neatly.
Read charts and map colors before you start
Read your color chart like a map. Look for where colors meet and plan joins to avoid a string trail across the surface. A long, continuous color block can keep texture smooth, while a quick switch sharpens patterns. This step speeds up a tidier finish. If something looks off on the chart, adjust your plan now rather than scrambling later.
Translate the chart into a practical plan you can follow by touch. Write the color order for each part and keep a chart handy as you crochet. You’ll crochet with more confidence because color shifts are intentional, not accidental. The chart is your compass for clean, deliberate color work.
Choose yarn contrast and hook size for tidy color transitions crochet
Aim for clear separation between colors by picking distinct contrast. High contrast makes each color pop and hides minor tension differences. A medium contrast can work for a softer look, but avoid colors that blur into each other. Your hook size should match yarn weight and your tension; too tight can pull color changes, too loose can create gaps. When chosen wisely, color blocks sit neatly and transitions stay crisp.
Test on a small sample. Try color switches and check edges. If transitions feel muddy, switch to higher contrast or adjust tension. You’re building muscle memory, so note what works. With the right yarn contrast and hook size, your amigurumi will have clean lines and tidy color boundaries.
Test a small swatch first
Do a quick swatch to preview color changes. It’s your sandbox to spot problems before the main project. Check how colors meet and how ends behave at joins. If tails show, adjust your method—carry less yarn or tuck ends tighter. The swatch builds confidence for the main piece.
Troubleshooting messy colorwork and final cleanup
You’re not alone if color changes look tangled or uneven. Identify where the mess begins: securing carried yarns correctly, or stopping cleanly at color change. Gaps often come from loose stitches around changes; weave edges more deliberately. Keep tension even as you switch colors to stay neat and legible.
If floats ride on the back and create a wrinkled surface, catch carried yarn on the wrong side every few stitches across longer runs. Slow, deliberate transitions help you see where yarns pile up. When you finish a color area, smooth the surface with a finger before continuing. A small habit now saves big frustration later.
Finally, check final cleanup as you go. Trim ends on the wrong side, then weave them in with a blunt needle. A light handy to see end positions helps you tuck ends neatly. If you’re consistent about trimming and tucking at each color change, your amigurumi will look professional and sturdy.
Fix loose floats to match invisible color change amigurumi
When a float appears too long, thread a fine needle under carries at the back to catch them every few stitches. This quiet support helps the color change stay invisible from the front. Use similar tension as the main fabric so the back doesn’t bulge. If you’re using a tight gauge, you may need to anchor floats more often—every 3–4 stitches.
Practice filling gaps with a tiny stitch along the color border. A quick slip stitch or single crochet over the back can lock the float in place. Don’t pull too hard; you want the surface to stay even. As you gain experience, you’ll anticipate floats and adjust your technique before you start the color change. Your invisible color change will look seamless.
Trim and tuck to avoid yarn ends amigurumi
Trim yarn ends close to the fabric, but leave a tiny tail to weave back in. This reduces bulk and prevents gaps where ends could pop out. Weave at different angles so the end won’t loosen with use. If possible, bury ends into the row above the color change so they’re less likely to show on the front. Smooth the area after weaving with a gentle roll of the finger.
For longer color runs, place ends strategically to avoid chasing loose tails across many stitches. Tuck ends under nearby stitches and secure with a touch of tension. A little patience here yields a clean, crisp surface.
Final tidy-up checklist
- Weave in all loose ends on the wrong side with a blunt needle.
- Check every color change for a clean, flat front.
- Trim tails close to the fabric, then weave once more.
- Inspect for visible floats and fix as needed.
- Run fingers over the surface to feel for lumps or pulled stitches.
- Give the piece a final light steam or gentle wash if yarn allows, then lay flat to dry.

Clara Fern — Crochet Artist & Amigurumi Designer
Clara Fern is a crochet artist and amigurumi designer based in Austin, Texas. With 9 years of experience working with yarn and hook, she transformed a lifelong passion for handcraft into a creative mission: making amigurumi accessible, fun, and deeply rewarding for crafters of all levels.
Clara discovered amigurumi during a trip to Japan in 2017, where she fell in love with the art of bringing tiny characters to life through crochet. Back home in Texas, she spent years studying color theory, design principles, and advanced crochet techniques — developing her own signature style that blends kawaii aesthetics with original character design.
Through maclafersa.com, Clara shares everything she has learned — from choosing the right yarn and reading your first pattern, to designing fully original amigurumi characters from scratch. Her writing is known for being clear, detailed, and genuinely helpful, with no steps skipped and no secrets kept.
When she’s not crocheting, Clara enjoys watercolor painting, visiting local yarn shops, and drinking way too much coffee while sketching new character ideas.


