
Why From Sketch to Stitch helps you design amigurumi
Starting with a sketch gives you a map of proportions, shapes, and how parts fit together. It helps you avoid guessing later and keeps your project focused. You can quickly test expressions and features, then pick the best look before you touch yarn. This shift turns vague ideas into a concrete plan you can follow stitch by stitch.
With a sketch base, you gain confidence to explore details. You can mark where seams go, where to reinforce joints, and how big each piece needs to be. This makes your final amigurumi sturdier and more polished. You’re not guessing when to adjust scale or add features; you’re following a clear guide that aligns shape and function. That clarity saves time and reduces mistakes during the actual crochet.
Sketching also helps you communicate your idea to others. If you’re collaborating with a maker friend or a client, your drawing becomes a shared language. They see exactly what you want and can give feedback early. Better communication means fewer revisions later and faster delivery of your custom toy.
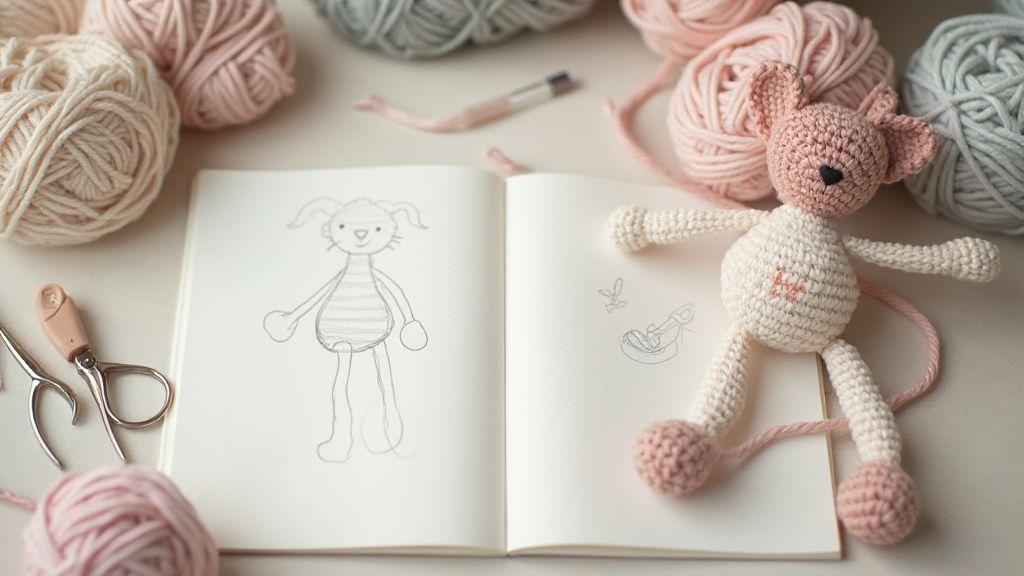
From Sketch to Stitch: Designing Amigurumi From a Drawing helps you design amigurumi by turning a drawing into a workable plan. This journey starts with your sketch and ends with a character you can crochet stitch by stitch.
How you gain control with amigurumi design from sketch
When you start from a sketch, you control the whole build. You decide the size, the number of pieces, and where each stitch will live. This control keeps your project balanced and prevents lopsided shapes. You can scale the design up or down while keeping the same character and charm. This is your chance to tailor the toy to a specific kid’s needs or a quirky theme you love.
A good sketch also guides your yarn selection and tension. You can note fiber thickness, stitch type, and color changes right next to parts. That means when you begin crocheting, you’re not experimenting blindly. Your hands follow a plan that respects the design’s proportions, so the final piece looks like your drawing. It’s a simple, steady path from idea to finished toy.
Sketching helps you anticipate construction challenges. You can plan where stuffing goes for solid structure, where to add safety features, and how to hide joins. Seeing these issues on paper lets you fix them before you start hooking. You’ll finish with a pattern that not only looks right but feels sturdy in real life.
Real benefits of sketch to amigurumi pattern for custom toys
- Your pattern becomes a repeatable guide. Once you’ve turned a drawing into a pattern, you can recreate the same character with different yarn colors or sizes.
- A sketch-based pattern improves accuracy. The plan shows where to place limbs, how many stitches to crochet for each piece, and how much stuffing is enough.
- Using a sketch also boosts your creativity. When you see your idea lined up as a pattern, you can swap pieces or test ears, eyes, or tails without starting over.
Prepare your sketch for amigurumi pattern
Treat your sketch like a blueprint. Look at the big shapes and ask what will be a cube, cylinder, or sphere in yarn. Keep core forms bold and easy to read. Imagine depth—the head might be rounder, the body slimmer, and limbs shorter. Map the silhouette so your amigurumi stays recognizable as you crochet. Think about the vibe you want: friendly, goofy, or elegant, and let that tone guide shaping choices from sketch to stitch.
Choose a simple color plan and mark where color changes will happen. If your sketch has stripes, spots, or blocks, mark those sections clearly so you can plan yarn transitions early. Don’t overcomplicate it; the goal is a clean path from a flat drawing to a 3D crochet piece. Call out main features now—eyes, mouth, ears, or distinctive marks.
Keep symmetry in mind. Amigurumi thrives on evenly spaced pieces and balanced proportions. If your sketch shows an offbeat pose, decide whether you’ll keep that stance or straighten it for easier crochet. Your plan should be doable with a hook, yarn, and a little patience.
How you simplify shapes for sketch to amigurumi pattern
Turn complex lines into simple blocks. Break the drawing into basic shapes—spheres for heads, cylinders for limbs, and ovals for paws. If a shape looks tricky, sketch a more basic version first and test it with a quick swatch.
Decide where joints will go. Practical anchor points like head to neck and limbs to torso keep patterns workable. Mark these on your simplified shapes so you know how many rounds or pieces you’ll need.
Keep scale in mind. If your sketch features big ears or long tails, adjust those parts to fit the amigurumi medium. Exaggerate a feature a bit, but test it on paper first to avoid bulky results. Your goal is a cozy reflection of your drawing, not a perfect replica.
Mark measurements to help crochet pattern drafting from sketch
Put real numbers on the page. Note approximate diameters for heads and bodies, and circumference ideas for necks and limbs. If you know your yarn and hook size, jot down expected gauges. Add a measurement plan for each part and indicate where increases, decreases, and color changes will occur. A quick mockup helps you check proportions before committing to the full pattern.
Label each section with simple notes. Write how many rounds or inches each part should be, where to place increases or decreases, and where color changes happen. Clear notes help you sew pieces together without second-guessing.
Translate your flat sketch to 3D crochet
Imagine your 2D drawing stepping off the page into your hook. Your sketch becomes curves and volume as you model in three dimensions. Use the sketch as a map, not a prison; keep essential details while letting texture and shape grow. Check proportions often and let the yarn dictate stitch rhythm. From Sketch to Stitch: Designing Amigurumi From a Drawing becomes practical when you translate lines into rounded forms, then test the balance by comparing to a real object of the same size. Your silhouette should read clearly from all angles and invite touch.
Decide on core proportions. A sketch may show long limbs or a big head, but 3D crochet needs balance. Think in blocks: head, body, limbs, and accessories. Map the sketch to a quick multi-view silhouette, then translate those blocks into foundations and fills. This keeps your amigurumi sturdy and expressive, so the finished piece stands on its own.
Plan how to add personality without losing structure. Decide which features are essential—ears, eyes, a unique tail or hat—and which can be suggested with texture and color. Determine where extra shaping will occur: increases, decreases, and color changes should support the character, not complicate the build.
How you map proportions when translating sketches to 3D crochet
Break your sketch into key measurements: head width, body length, limb thickness. Set a scale so longer stitches or fewer increases maintain the intended look. Treat the head as a circle, the torso as a rectangle, and the limbs as cylinders. Create a small test piece to check proportions before the full design. If the head seems large, adjust the body or neck. Keep the character recognizable and cozy.
Create a mini version to check proportions in real life. If arms look short, lengthen them a notch and recheck the pose. Maintain the character’s recognition while making it cuddly to hold. Your readers will notice the care in the design when pieces fit together neatly.
Use basic shapes for designing amigurumi from drawing
Start with simple shapes: spheres for heads, ovals for bodies, cylinders for limbs. For a round faced character, map the head as a sphere with a small neck to connect to the torso. For a taller figure, extend the cylinders and taper as needed. Layer details with texture rather than new shapes. Eyes, mouths, and decorative spots can be added with surface embroidery or color changes. This preserves core shapes and makes the piece forgiving—slight imperfections still read as the intended character.
Surface texture adds personality. Use embroidery or shaping stitches to highlight features like brows, lashes, or freckles. Keep texture consistent with the chosen style—bold for cartoonish looks, subtle for soft, dreamy looks.
Visualize volume before you start crocheting
Visualize the full form in your head before you hook. Picture where each piece sits in space, how the limbs bend, and how the head tilts. This helps you choose stitch counts, increases, and decreases with purpose. Anticipate where the character needs support—flat feet or a hidden stand might be needed. Sketch those volumes on your drawing to save mid-build head-scratching and keep momentum steady.
When volume feels clear, label seams and color placements on your original sketch. This pre-visualization saves time and helps your finished amigurumi look polished.
Pick yarn, hook, and stuffing wisely for your design
Choosing materials starts with your vision. Your yarn sets the look, feel, and size, so pick a weight and texture that matches your sketch. For cuddly, soft toys, sport or DK weight yarn in plush fiber can help; for tighter detail, worsted weight works well. The right hook size affects stitch definition, while stuffing matters for shape and durability. Polyester fiberfill is a reliable choice for resilience and ease of cleaning.
Your material choices aren’t just supplies; they’re the bones of your design, helping your art stay true to the dream you sketched.
How you match yarn weight to control size in amigurumi design from sketch
A compact drawing benefits from lighter yarn and tighter stitches; heavier yarn will bulk the toy and blur small features. If between weights, test a swatch. For larger characters, you can move up a weight while adjusting stitch counts to maintain shape. Gauge matters—keep stitches neat and rounds tight for a clean silhouette.
Choose hook size to shape pieces and keep stitch definition
Hook size changes curves and edge crispness. A smaller hook tightens stitches for sharp lines; a larger hook softens edges for a plush look. Try a couple of sizes on a small swatch. The hook also affects how yarn sits, so balance between sketch and finished look.
Select materials that make your toy safe and durable
Safety and durability matter. Use hypoallergenic stuffing and secure any small parts. For younger kids, securely stitch safety eyes or embroider eyes. Durable toys hold their character through play, wash, and display.
From Sketch to Stitch: Designing Amigurumi From a Drawing. This journey starts with your tools and ends with a little character that feels alive. Your material choices—yarn, hook, and stuffing—are the bones of your design, helping your art stay true to the dream you sketched.
Draft a simple crochet pattern from your sketch
Turn your sketch into a working pattern you can crochet right away. Start with a clear, simple shape—like a ball, teddy head, or small animal snout—and map those shapes to crochet rounds and stitches. Think in terms of basic pieces you can assemble later: head, body, and a few limbs or features. The goal is to keep it approachable so you can test and tweak without overwhelming yourself.
Translate lines and curves into simple crochet notes. If your drawing shows a round head, note essential measurements and stitch counts to keep it spherical. Decide sizes and where to attach ears or a snout. Use bold terms to mark key actions—like increases, decreases, and color changes—so you can quickly scan your draft during crochet.
Test the rough idea by imagining the finished toy in your hands. Compare each piece for fit and balance, and refine notes before writing the final stitch counts. Your aim is a clear, actionable blueprint you can follow stitch by stitch.
How you break the drawing into parts for sketch to amigurumi pattern
Break the drawing into approachable parts: core head and torso first, then add limbs and ears as separate pieces. Label each part and its role to stay organized. Decide how pieces connect—seams or seamless joins—and mark connection points on your sketch. This saves you from puzzling later when adjusting sizes.
Capture everything into a concise list of parts with quick notes. A clean breakdown makes drafting stitch counts easy.
Write stitch counts and increases for crochet pattern drafting from sketch
Start with a base like a magic circle, then move into rounds with clear increase patterns. Write counts in a simple sequence and emphasize numbers and actions.
When adding features, decide stitch counts for each addition and where it appears. Tackle increases and decreases in separate sections to avoid confusion. For longer limbs, plan their length in rounds before shaping.
Define joins and color changes clearly. Note where color switches occur and where seams exist for a clean, repeatable rhythm.
Build a testable first draft of your pattern
Create a compact first draft you can crochet without constantly rereading notes. Include a short test: make one head, one body, and two limbs to check proportions. Compare the live crochet to your sketch, and adjust as needed. Keep the first draft practical: simple stitches, standard yarn, and a moderate hook size.
This is your learning step, not the final pattern. A solid first draft gets you halfway there.
Sculpt and shape features to match your drawing
Outline where each feature lives on the form. Use your drawing as a map and translate it into stuffed curves, using yarn tension to push volume where needed. If a nose or cheek line sits high, add stuffing to stand it up. Small adjustments here make a big difference in the character’s liveliness. Surface texture adds personality with fur direction or patterns via embroidery or shaping stitches. Keep texture consistent with the character style you chose.
Add surface detail with embroidery and shaping stitches
Embroidery brings your drawing to life on the surface. Use bold threads for clear lines and lighter threads for subtle hints. Practice on scrap first, then apply with confident stitches. Let key lines guide embroidery to read as your sketch in 3D. Shaping stitches—backstitches, couching, or whip stitches—help carve lines and add depth without bulk.
Fine tune expression and posture with small changes
Tiny adjustments can shift expression and posture. If a drawing shows a tilted head, tweak the neck seam or stuffing to tilt the face. Micro-adjustments to stitch tension can alter smiles or eyebrows. Compare with the reference often and refine in small steps to keep the character faithful.
Choose colors and textures that match your sketch
A palette that mirrors your sketch helps your amigurumi feel true to the idea. List dominant colors, then select yarns that match closely. Use color blocking to mirror large color fields with clean boundaries. If shading is needed, use gradual color changes to maintain blocks and structure.
Texture matters too: fur, fabric, or smooth skin. Swatch to judge how color, texture, and stitch interact at the intended size. Use swatches to guide tension and color order for a faithful final piece.
How you use color blocking to mirror your drawing in amigurumi design from sketch
Color blocking splits the design into bold sections that map to the drawing’s structure. Plan the color order in advance and label each block to keep the flow natural. Use solid yarns for crisp blocks, and switch colors smoothly for faces or features. Keep seams tidy or let them contribute to the design.
Map color blocks to the body’s curves; color changes can accent shape and balance. If shading is needed, replicate it with careful, small color changes rather than large transitions. Keep edge clarity; hidden seams support readability of the drawing.
Pick yarn texture to suggest fur, fabric, or smooth skin
Texture cues the viewer about the material. Fur can use a fluffy or haloed yarn; smooth skin benefits from a tighter, slightly glossy yarn. When mixing textures, balance to avoid overwhelming the form. Test swatches for combined textures to ensure the gauge remains consistent and the final piece reads as a cohesive character.
Test yarn swatches so your final piece looks like the sketch
Swatches are a reality check. Crochet small samples of each color and texture, compare to your drawing, and adjust shade, texture, or stitch if needed. Keep notes on hook size, tension, and color order for future projects. When swatches align with the sketch, move to the final piece.
Scale and size your amigurumi from your drawing
Your drawing’s linework provides a blueprint for scale. Translate that into stitches that keep proportions while accommodating yarn, hook size, and tension. Plan scale early to avoid weak necks or wobbly limbs, and predict where extra stuffing or structural support is needed.
Group major masses first, then add details. If the head is large, balance with a heavier body; if limbs are long, adjust accordingly. Scale isn’t just size—it’s how parts relate. Test-scale with a quick scrap swatch to catch mismatches early.
Keep notes on scaling decisions directly on your drawing so you can repeat or adjust later. For a cuter version, shrink the head a bit; for a bolder version, enlarge the head. Your changes should read as intentional design choices.
How you calculate gauge to scale your sketch to amigurumi pattern
Gauge is your compass. Measure swatches to match the drawing’s balance at final size. If your swatch is too dense, adjust stitch counts or tension so the shapes stay rounded. Lock in a gauge early, then tailor the rest of the pattern around it.
Convert drawing to stitch counts by essential shapes: head circumference, torso width, limb lengths. Use a simple formula (stitches per inch times inches) but adjust as needed for texture. Test proportions with a practice piece before the full project.
Validate with a scale mock-up. Crochet a mini version to see if the silhouette matches your drawing. If the head dominates or limbs look stiff, tweak counts or technique in small steps. Gauge helps you faithfully reproduce your art in yarn.
Adjust proportions for different sizes in custom amigurumi creation workflow
When scaling, adjust proportions to keep character recognition. For smaller versions, shrink the head and tweak limb lengths. For larger figures, add torso length or adjust joins to maintain balance. Re-check the silhouette after each size change.
Recalculate proportions for each size using your gauge. A bigger piece may need taller stitches or more rows, or a wider torso to keep the pose natural. Maintain a reference set of notes for each size to ensure consistency across orders or projects.
Plan size changes to keep balance and shape
Balance is the soul of your design. Before changing sizes, map how weight and volume shift. Add stuffing to the torso when increasing height, or adjust arm and leg connections to keep joints sturdy. A quick silhouette sketch helps you anticipate wobble or top-heaviness.
Document the exact changes for future use—new needle or hook size, yarn substitutions, and revised stitch counts. This makes it easy to reproduce the same character in other sizes for gifts or shop listings. From Sketch to Stitch: Designing Amigurumi From a Drawing, you now have a reliable path for scaling with balance and shape intact.
Test, refine, and finish your amigurumi design
Testing turns drawings into a holdable toy. Recreate key shapes with simple stitches and check how pieces fit together, noting weak spots where stuffing could show or seams might pucker. Keep a quick record of what works and what doesn’t to speed improvements.
Refining your pattern involves tweaking sizes, seam placement, or tension. A small change can dramatically improve balance and pose. Keep notes clear: stitches used, where you increased or decreased, and how you stuffed each part.
Finishing with care seals the deal. Weave in ends securely, and block if needed to set curves and angles. Blocking helps ears point forward, hats tilt, and smiles read true. A polished finish is ready for photos, display, or gifting.
How you prototype and fix issues when transforming drawings into amigurumi
Your prototype mirrors the drawing and reveals where the idea clashes with yarn. Translate each section into simple blocks, stitch them together, and check scale and proportion. If the head seems too big or limbs stiff, adjust the height or stitch counts accordingly.
Fix issues with small, practical changes. Change stuffing for smoother bodies, adjust tension or seam placement, and note exactly what needs altering. Prototyping speeds up iteration and keeps your next amigurumi closer to the drawing with less guesswork.
Prototype testing includes checking poses by gently manipulating limbs to ensure joints hold. If rotation is off, reinforce seams or adjust construction. Small tweaks turn a shaky model into a poseable, lovable figure.
Add seams, safety eyes, and blocking for a clean finish
Seams form the quiet backbone of a neat amigurumi. Place seams where puckering is minimal and sew with tight stitches. Weave in ends neatly to avoid loose threads. For a professional look, use safety eyes with secure backings or embroider eyes for kid-friendly versions. Blocking helps eyes sit correctly and the face read clearly, subtly shaping curves and angles for a deliberate finish.
Final checks to make your design gift or sale ready
Before finishing, run a quick checklist: ends woven in securely, stitches tight, fabric neat, and the piece can be gently handled. If selling, photograph under good light and maintain a polished, consistent finish across pieces. Verify safety and durability for intended use—secure eyes, safe stuffing, and sturdy joints for toys. When these checks pass, you’re ready to share your work with friends, family, or customers.
From Sketch to Stitch: Designing Amigurumi From a Drawing, you now have a clear path for turning a drawing into a tangible cuddle buddy.

Clara Fern — Crochet Artist & Amigurumi Designer
Clara Fern is a crochet artist and amigurumi designer based in Austin, Texas. With 9 years of experience working with yarn and hook, she transformed a lifelong passion for handcraft into a creative mission: making amigurumi accessible, fun, and deeply rewarding for crafters of all levels.
Clara discovered amigurumi during a trip to Japan in 2017, where she fell in love with the art of bringing tiny characters to life through crochet. Back home in Texas, she spent years studying color theory, design principles, and advanced crochet techniques — developing her own signature style that blends kawaii aesthetics with original character design.
Through maclafersa.com, Clara shares everything she has learned — from choosing the right yarn and reading your first pattern, to designing fully original amigurumi characters from scratch. Her writing is known for being clear, detailed, and genuinely helpful, with no steps skipped and no secrets kept.
When she’s not crocheting, Clara enjoys watercolor painting, visiting local yarn shops, and drinking way too much coffee while sketching new character ideas.


