
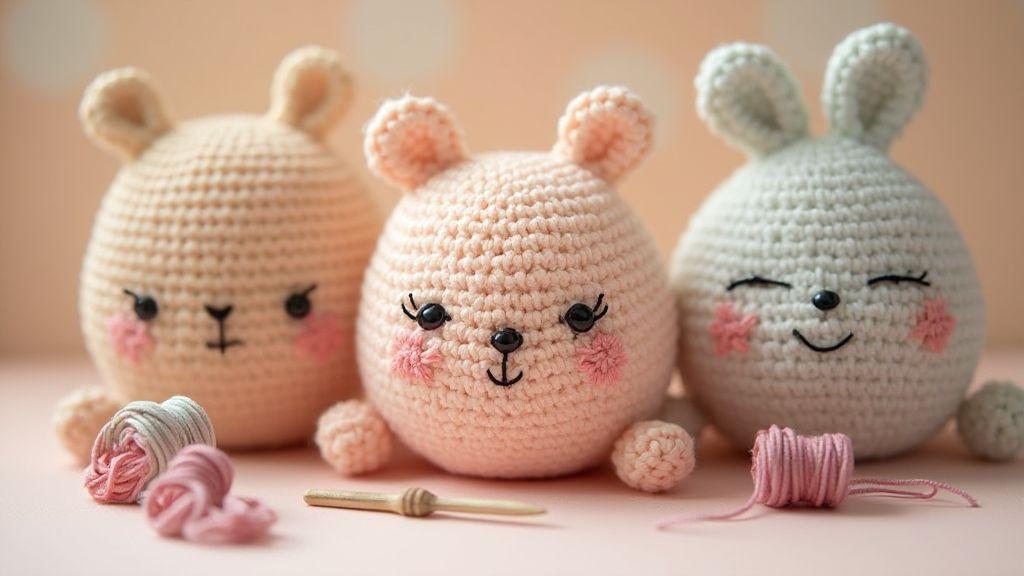
Tools for your amigurumi embroidery
Embroidery on Amigurumi: Basic Stitches for Beautiful Faces guides you to bring faces to life with the right tools. Start with a compact setup that keeps your hands steady and your work neat. A small kit—sharp scissors, thimbles for grip, and microfiber cloths to clean yarn before stitching—will do. A pin cushion keeps needles safe, so you never poke yourself or misplace a tool. The goal is clean lines and smooth curves, not a cluttered workspace.
Next, use a glare-free light. A daylight-balanced lamp helps you see tiny stitches clearly, even on dark or variegated yarns. A compact ruler or measuring tape saves you from guessing stitch placement, essential for precise eyes and noses. A small tray for spare buttons, beads, or safety eyes keeps your materials organized. When tools are within reach, you’ll stitch faster and maintain consistency.
Finally, set up comfortably. A padded wrist rest or ergonomic chair helps you avoid fatigue, and label hook sizes and needle sizes to prevent mix-ups. An organized setup makes embroidery sessions smoother and more enjoyable, shaping a cleaner amigurumi face. Embroidery on Amigurumi: Basic Stitches for Beautiful Faces becomes easier when your workspace supports steady hands.
Pick the right needles and thread
Choosing the right needles and thread changes how your stitches look and feel. For beginners, a smaller embroidery needle or a chenille needle works well for tight outlines around eyes and mouths. Nylon or polyester embroidery floss gives a bright, clean line, while cotton threads yield a softer, matte finish. If you’re working with plush yarn, a blunt or tapestry needle helps you weave without splitting the yarn. Always test a tiny patch on scrap yarn to see how the needle bites and how the thread sits.
Color choice matters. Pick thread colors that complement your base yarn or provide enough contrast for details. Thread the needle with a doubled end for strength and secure the knot at the back so nothing peeks through. The goal is faces that look alive, not stitched on. With the right needles and thread, embroidery on amigurumi will be crisp and professional.
Choose yarn and stuffing for clean stitches
You’ll want yarn that behaves well with small stitches. A smooth, non-splitting yarn keeps lines neat; splitting yarn can make features jagged. For stuffing, choose polymer or fiberfill that’s firm but soft enough to keep facial features clear. Stuff lightly for cheeks and eyes so expressions stay readable. A steady hand matters—overstuffing can cause puckering around embroidery.
Test consistency by stitching a small sample face on scrap fabric or an extra amigurumi. If the texture feels right and the stitches sit flat, you’re ready. A balanced yarn and stuffing will give a polished look to every feature.
Prep your tools before you stitch
Before you stitch, lay out tools in an organized setup. Thread a needle with a length of thread that’s easy to control—shorter threads reduce knots. Keep a few spare needles in the pin cushion, so replacements are ready. Brush the yarn to remove lint that can snag stitches. Clear stray threads so each stitch sits clean and precise.
Plan placement of features with a simple guide. Lightly mark where eyes and mouth will go so you don’t guess mid-stitch. A clear map helps you follow the design and maintain symmetry. With solid prep, you can focus on tiny details and craft faces true to your character. Your preparation sets the stage for steady, confident stitching.
Master basic embroidery stitches for your plush faces
You’ll gain confidence quickly by learning backbone stitches first: backstitch and satin stitch. Backstitch draws clean outlines for sharp features, while satin stitch fills curves with a smooth, glossy surface. Alternate these stitches to create crisp edges and solid fills, giving your plush faces depth and polish.
Next, add texture with French knots and lazy daisies. French knots provide tiny, round accents for eyes or details, while lazy daisies create petal-like hints that bring life without overpowering the design. These stitches are forgiving and quick to master, helping you add personality with ease. As you practice, you’ll discover angles and spacing that make features feel alive, like they’re telling a story.
Together, these stitches work in harmony: backstitch outlines with satin-filled areas, plus French knots for eyes and lazy daisies for cheeks. The result is balanced, with clear shapes, soft textures, and just the right amount of sparkle. Embroidery on Amigurumi: Basic Stitches for Beautiful Faces becomes a natural part of your crafting routine.
Learn backstitch and satin stitch basics
Backstitch delivers clean, continuous lines. Start with a running stitch as a guide, then reinforce with short, even stitches. Keep threads snug but not puckered. Satin stitch sits on the fabric to fill areas with a smooth, shiny surface. Use short thread lengths and even tension to avoid lumps, making eyes and lips pop. These two stitches are the core you’ll rely on again and again.
When combined, outlines and fills interact: backstitch edges around the mouth or brow, then satin fill nearby for a tidy look. If tangling occurs, switch to shorter thread lengths and consistent tension. With practice, planning a path that keeps stitches neat becomes easier, helping your plush face read clearly rather than looking busy. The goal is clarity and polish, not speed.
Practice French knot and lazy daisy techniques
French knots are tiny anchors for eyes or small accents. Wrap the thread once or twice, insert near the starting point, and pull through to form the knot. Keep the wraps tight but not pinched, and don’t pull the fabric taut—let it breathe so the knot sits neatly. Lazy daisies provide soft, petal-like texture for cheeks, tiny petals, or soft highlights. Anchor each loop back into the fabric with a few extra stitches. These stitches add personality without overwhelming the design.
As you incorporate these stitches, you’ll see how a well-placed French knot becomes a bright eye and how lazy daisies soften a corner or create a blush. Practice on a small sampler with varying thread widths and colors. You’ll learn when a single knot suffices versus when a line or fill is better, developing a signature texture for your work.
Start with small practice swatches
Begin with tiny swatches that mimic the curves of plush faces: an eye, a mouth, and a cheek. Switch stitches to compare results. Keep stitches consistent in size and tension to mimic a miniature version of your final piece. A light touch helps prevent puckering, and contrasting colors help you see stitches clearly. As you fill the swatch, you’ll build muscle memory for where each stitch shines.
When you’re ready, transfer your favorite swatch ideas to actual plush faces. Practice builds steadier hands and faster workflows, and you’ll feel more confident tackling more complex shapes as your skill grows. Your future projects will benefit from the quiet confidence you gain in these small tests.
Use French knot for your amigurumi eyes
You’ll get tiny, round eyes that look like beads with French knots. Start with a small, clean knot and pull snug against the fabric so the eye sits firmly. If the knot slips, you’ll see gaps that break the face’s balance, so maintain steady tension from knot to knot. Vary the size by using more wraps, but keep it consistent so both eyes match. For realism, use a darker shade for the pupil and a lighter highlight for a tiny gleam.
Select the right floss: a medium weight that lays flat and holds its shape. If the thread splits, untangle strands before tying knots to avoid fuzzy edges. Practice a few knots on scrap yarn to dial in tension and wraps. The goal is crisp, round eyes that don’t overpower the face.
For a crisper edge, you can switch to a single strand of floss after the knot is secured. Anchor each knot with a tiny needle and trim tails close to the fabric. Tuck ends beneath nearby stitches to keep eyes neat and eyes sit flush with the surface. This finish keeps the face friendly and clean.
Select needle and floss for tight knots
Choose a fine needle that passes easily through the amigurumi fabric without creating large holes. A size 7 or 8 quilting needle works well for most acrylic yarns. Thread floss as a single strand for compact, dense knots, especially around the eyes. If the floss splits, separate strands first to avoid snagging later knots. A medium-weight floss provides a reliable edge; two plies can offer extra thickness for small knots when needed. Practice on scraps to see how your needle and floss behave together.
Thread smoothly to avoid fraying. A steady, relaxed grip prevents knots from becoming misshapen. If a knot bulges, rewrap with a lighter touch. Consistency—same wraps and tightening pressure for each eye—builds symmetry your viewers notice immediately.
Keep tension consistent for round knots
Tension makes round knots look right. Too tight, and the eye flattens; too loose, and it wobbles. Create a golden grip: just enough to hold the knot without squashing fabric. Practice a few knots on scrap pieces, then apply the same pressure to both eyes. A quick trick is to wrap three times per knot and tighten evenly. If a knot drifts, loosen and rewrap. Steady hands and a focused eye yield uniform, charming eyes.
For hard-to-reach spots, use a longer, slimmer needle to guide floss without tugging other stitches. Pause between knots to check the eye’s circle and adjust as needed. Patience here yields a smoother, professional finish.
Secure and hide tails after each knot
After finishing a knot, pull the thread snug and trim the tail close to the fabric. Tuck the end under nearby stitches with a thin needle or pinhead to keep it hidden. If a knot might loosen, add a tiny securing stitch at the base. Ensure the knot sits flush with the surface before trimming, and hide stray fibers for a neat look. A polished finish like this makes the eyes read clearly in Embroidery on Amigurumi: Basic Stitches for Beautiful Faces.
Shape smiles with backstitch for your amigurumi
Backstitch creates clean mouths and subtle expressions. Anchor with a small knot, then bring the needle up ahead of the line before looping back. This keeps lines continuous and helps them follow curves on rounded faces. Build the mouth in short segments that match the face contour. For a gentle smile, curve slightly with fewer stitches; for a grin, extend the line and dip a little at the center. Maintain even tension to keep the line from bunching, and practice on scrap fabric first to avoid pulling too tight on the final piece.
Backstitch also works for outlines of blush or the corner of an eye. Because these stitches lie flat, you get a crisp line that stays in place after stuffing. Secure thread ends well so nothing migrates over time.
Keep short even stitches for neat mouths
Short, even stitches yield a neat mouth with uniform width. Start with an anchor, advance a stitch or two, then go back down to where you started. Repeat until you reach the desired length. Consistent stitch length prevents jagged or wavy lines, especially on rounded faces.
If you notice slight shifts, adjust your grip and keep a relaxed, steady hand. Use a contrasting thread only for guiding, then switch back to your final color. Treat stitching like knitting in rows: even tension equals even results.
Dry-run the mouth shape before final stitching. Compare both sides and tweak the curve. Shorten stitches for a small mouth and lengthen for a bigger smile. Let your eye gauge the shape.
Curve lines smoothly on rounded surfaces
Curved lines on a rounded face require a light touch. Start with a curve that follows the cheek or lip’s arc, bending gently rather than at sharp angles. Map the curve with a light guide first if needed, then sew over it with your main thread. Keep stitches aligned with the curve by watching the distance to the previous stitch. If the line stiffens, ease the fabric and let the needle glide—don’t yank.
For small features like eyebrows, break the line into two or three gentle segments. The result should feel natural, as if the face paused in a moment of emotion rather than being forced into shape.
Make cheeks with satin stitch for your amigurumi
Satin stitch in cheeks gives a soft, lifelike blush. Start with a small knot at the back, then work in tight, even stitches, keeping them flat against the fabric to avoid ridges. If gaps appear, fill them with tiny passes without overfilling, which can muddy the color. Test on a scrap piece first and choose a pink that suits your character.
Maintain steady tension so the cheek area remains smooth. Satin stitch yields a glossy, watercolor-like finish on plush surfaces. For a sun-kissed look, blend in peach softly toward the edge of the cheek. The aim is gentle color that enhances expression, not a bold patch of color.
Practice on a scrap project first, then apply to your amigurumi with confidence. If a stitch looks off, ease the yarn back through the fabric and reseat. The key is even coverage and smooth edges so cheeks glow from within. When satisfied, seal lightly with the same shade to lock in the sheen.
Use short parallel stitches for smooth fill
Keep stitches short and parallel for a single, smooth fill. Short stitches sit flat, reducing bulk and puckering along the cheek curve. Work in small passes, aligning each stitch with the face’s contour for even density. If you spot a gap, add a tiny stitch beside it rather than pulling the entire line to maintain a clean edge.
Hold the fabric taut, but don’t overstretch; too-tight tension can distort the shaping. If adjustments are needed, unthread the last few stitches and reseat them. After finishing, check from multiple angles to ensure even color reads. A quick brush can blend any bright spots. Remember, consistency in stitch length and alignment makes the fill read natural and professional.
Layer colors for soft shading
Layer color to create depth and soft transitions on the cheeks. Start with the lightest pink as a base, then add a tiny amount of a deeper shade toward the center or edge for subtle contour. Build in thin passes; let each layer set before the next to avoid muddiness.
Softly feather edges toward the seam line. If you want warmth, dab a touch of peach or coral near the cheek crease, blending inward for a friendly look. The key is restraint—too many layers can flatten the glow you’re aiming for.
If shading becomes too dark, rebalance by a light pass of the base pink. Practice makes shading easier, helping you master cheeks that read as lively rather than loud.
Avoid puckering with steady tension
Maintain steady, even tension to prevent puckering. If you notice pulling, loosen slightly and re-seat stitches with a gentle touch. Rework troublesome areas first and recheck the face after each adjustment. A relaxed hand helps satin stitch sit evenly and keeps color true across the arc of the cheek.
Add lashes and petals with lazy daisy on your amigurumi
Elevate your amigurumi with tiny lashes and delicate petals using the lazy daisy. Start with a few simple petals on the head and a couple of lashes near the eyes to test how the stitches behave. Keep tension steady and the needle small so loops don’t flare or loosen over time. Treat each stitch as a small, deliberate gesture—checked from the front to confirm placement.
As you add petals, the lazy daisy stitches can curve with the face’s shape, making your creature look alive rather than stiff. Anchor every loop back into the fabric after tightening. Lashes should be evenly spaced and slightly tapered toward the outer edges so the eyes read gentle, not bold. The goal is accents that enhance features without overwhelming them. This is where Embroidery on Amigurumi: Basic Stitches for Beautiful Faces can serve as a quick reference for placement and consistency.
Balance is key. Too many petals or overly bold lashes can crowd the face. Start small, then step back to evaluate. If needed, remove and redo a loop instead of forcing it into place. A harmonious finish yields a tiny portrait with readable expressions. Lazy daisies offer flexible accents—add just a touch for charm or go a little more for whimsy, while keeping stitches secure and neat.
Form secure looped petals and lashes
First ensure a secure base so each petal and lash stays put. When forming a loop, pass through a spot a little thicker than needed, then pull tight to anchor. Keep the loop flat against the fabric and re-align if twists appear. A steady rhythm helps petals sit evenly and lashes fan out in a natural arc. The confidence from secure loops translates into cleaner stitches and a more professional finish.
After finishing a petal or lash, tug gently from the back to test for looseness. If there’s give, reinsert the needle, weave back a stitch or two, and re-anchor. Keeping loops anchored preserves shape even under gentle handling. The goal is for loops to feel almost permanent, so they won’t shift as you work further.
Pair lazy daisy with French knot accents
Contrast soft petals with a tiny dot by adding French knots at centers of petals or near lashes. Wrap the thread once or twice, then insert near the center and pull through to form a tight knot. A few knots provide focal points that balance the delicate loops. Maintain gentle tension so the knot sits flush against the fabric. Place knots thoughtfully—one per petal center or small clusters—to create a cohesive look that reads well from distance and up close.
When combining lazy daisies with French knots, you’ll notice rhythm in your work. If a knot sits too high or too low, readjust by sliding surrounding stitches and reseating the knot. Practice on scrap fabric to internalize the scale and tension needed for your amigurumi.
Anchor loops so they don’t loosen
Anchor each loop by weaving the thread back into surrounding stitches several times before finishing. This hidden reinforcement keeps petals and lashes secure as you continue. After completing a loop, pass the needle through nearby stitches to secure the tail, then trim close to the fabric edge. If a loop loosens later, re-anchor at the base. A quick check after clusters helps your finished amigurumi feel professionally finished.
Mark and place features for your amigurumi face embroidery
Plan the eyes, nose, and mouth carefully based on your head shape and size. Use light guides so you can erase or adjust later without marks. A careful layout ensures smooth stitching and symmetry, making the face read balanced. Small spacing shifts can change the expression, so compare lines on both sides as you work.
Choose a reference style—cute, realistic, or cartoonish—and keep it consistent across features. For a gentle smile, place the mouth higher and wider; for a shy look, lower and smaller. Clear guides help you stay on track, especially when working around curved cheeks and tiny noses.
Consider scale: oversized eyes can dominate, while tiny eyes may read as sleepy or cute. Mark each feature twice if unsure, then step back to view overall balance. Use the same stitch length and pressure on both sides to preserve harmony. With careful planning, Embroidery on Amigurumi: Basic Stitches for Beautiful Faces feels natural and steady rather than rushed.
Use washable markers or pins for guides
Washable markers and pins help you place guides without permanent marks. Use a fine-tip marker for inner eye corners or the smile curve, and pin reference circles for eye placement to adjust before stitching. The marks wash away cleanly, so your yarn texture stays intact.
Pins provide a tactile guide you can feel as you work around curves. Place pins at the eye corners and connect with light dashed lines. If you spot misalignment, correct it before you stitch. Your aim is clean, repeatable placement so both sides match when you finish. Guides keep you confident as you move from plan to stitch.
Stitch over guides with a light hand. Markers should fade or wash out after a gentle clean, not smear onto fibers. Test on a scrap piece first if unsure how it reacts with your yarn. When you’re done, you’ll see the face take shape exactly as pictured, with guides barely noticeable.
Measure and mirror for good symmetry
Measure twice, stitch once. Find the head’s center and mark it clearly. Use the same measurements on both sides for eyes, brows, cheeks, and mouth. Compare left and right in a mirror or from a distance to ensure balance. If one eye sits higher or a brow arches oddly, adjust to match the feel, not just the numbers. Consistency shines in the finished face.
Keep scale in mind: a tiny head needs tighter placement than a larger one. Use the same stitch length and pressure on both sides to preserve harmony. With careful measuring and deliberate mirroring, your Embroidery on Amigurumi: Basic Stitches for Beautiful Faces reads as deliberate design, not luck.
Transfer patterns carefully before stitching
Transferring patterns is your final checkpoint before stitch time. Align the pattern with the head and secure if needed. Transfer only what you need to keep lines crisp and the needles moving smoothly. Use a light touch to avoid ghosting marks; water-soluble pens or light graphite work well for many yarns. Double-check placement after every transfer and compare with guides to ensure precise lines you can follow without hesitation.
Erase or wash away excess marks when you’re done so the surface stays clean for stitching. With careful transfer, you prevent misalignment and let your stitches sing true to your plan.
Manage tension and yarn choice for your amigurumi stitches
You’ll notice the difference when you manage tension and choose the right yarn. If stitches pull or look crowded, the shape loses its clean finish. Relax your grip to keep stitches even. If you spot tight spots, loosen slightly. Your yarn choice matters: the wrong yarn can exaggerate tension, while the right one smooths it out. Practice with a scrap to feel how tight or loose the stitches should be. Check progress against a ruler to catch height variations early.
Dial in your hook size to fit your yarn type; an ill-fitting hook can distort tension. Try softer aluminum or coated hooks if stiffness is an issue. Re-test on a short sample to confirm the sweet spot. Fine-tuning tools and technique keeps stitches consistent, giving your amigurumi a polished look. You’ll notice improvements accumulate over time.
Match thread weight to yarn. If you mix a fine thread with bulky yarn, stitches won’t sit evenly. Pair lighter thread with thin yarn, and a medium thread with medium-weight yarn for balance. Quick test: crochet a small circle with your chosen thread and yarn. If it lies flat, you’re on track; if it curls, adjust until you see a smooth edge. With practice, you’ll know your go-to combos by feel, and Embroidery on Amigurumi: Basic Stitches for Beautiful Faces will look sharper and more polished.
Test tension on a stuffed scrap before working on your main piece. This saves you from missteps on curved surfaces. If the test piece forms craters or rings, soften tension; if it balloons, tighten slightly. Use the same yarn, hook, and method for the main piece to translate the test results accurately.
Adjust tools until stitches look smooth. If a few stitches stand out, switch hooks or adjust your grip slightly. A small change—like rotating the hook angle or starting with a lighter touch—can make a big difference. When your tools and technique align, your amigurumi’s face stays crisp and friendly.
Fix mistakes and finish like a pro in your amigurumi facial embroidery
Your amigurumi deserves a face that speaks softly. When correcting, fix small sections at a time to preserve surrounding stitches. Gentle re-stitching yields cleaner lines and a more natural expression. Patience here saves bigger issues later, and your finished face will look polished and professional, as in Embroidery on Amigurumi: Basic Stitches for Beautiful Faces.
Check symmetry with a quiet eye. Compare left and right features and adjust one thread at a time. If eyes misalign, nudge rather than prune. Keep threads smooth; avoid tight knots or puckering. With careful tweaks, you’ll achieve a balanced, expressive face rather than a rushed patchwork look.
Don’t fear small reruns. A quick, deliberate pass over a stray stitch with a matching color keeps the face cohesive. If correcting a line, work in short, overlapping stitches to blend the change. The final face will read clearly and hold up under play or display, reflecting the professional finish of Embroidery on Amigurumi: Basic Stitches for Beautiful Faces.
Unpick safely without snagging yarn
When removing stitches, work gently in small bites. Slip the hook under the stitch and draw the loop up slowly, watching the surrounding yarn. If you yank, you risk snagging or making a hole. Back off a stitch or two and ease the loop out with patience. This preserves yarn integrity and keeps your face clean. This careful approach fits within Embroidery on Amigurumi: Basic Stitches for Beautiful Faces, where clean lines matter for expression.
If you need to remove several stitches, work from the back gradually to loosen threads. If a thread resists, switch to a smaller hook to reduce tension and prevent new snags. Taking your time ensures clean unpicking and a fresh start for precise stitching on your facial features.
Add blush, sealant, and final trims
Blush adds warmth. Use a soft pink in tiny, dabbed circles on the cheeks. Start light and build gradually. If you overdo it, blend with a clean dry brush. A light sealant matched to your yarn protects embroidery while keeping fabric softness intact. Final trims finish the piece: snip stray tails close to the fabric and tuck them beneath nearby stitches. Check for loose threads and secure with a tiny backstitch. A neat edge mirrors the care you put into the face, finishing like a pro.
Secure loose threads and trim neatly
Keep every loose thread tucked and secured. Weave tails under neighboring stitches, then trim close but leave a short tail to prevent re-fraying. A tidy finish reinforces the professional look of your Embroidery on Amigurumi: Basic Stitches for Beautiful Faces.

Clara Fern — Crochet Artist & Amigurumi Designer
Clara Fern is a crochet artist and amigurumi designer based in Austin, Texas. With 9 years of experience working with yarn and hook, she transformed a lifelong passion for handcraft into a creative mission: making amigurumi accessible, fun, and deeply rewarding for crafters of all levels.
Clara discovered amigurumi during a trip to Japan in 2017, where she fell in love with the art of bringing tiny characters to life through crochet. Back home in Texas, she spent years studying color theory, design principles, and advanced crochet techniques — developing her own signature style that blends kawaii aesthetics with original character design.
Through maclafersa.com, Clara shares everything she has learned — from choosing the right yarn and reading your first pattern, to designing fully original amigurumi characters from scratch. Her writing is known for being clear, detailed, and genuinely helpful, with no steps skipped and no secrets kept.
When she’s not crocheting, Clara enjoys watercolor painting, visiting local yarn shops, and drinking way too much coffee while sketching new character ideas.


