
Pick the best stuffing for amigurumi for your shape
Amigurumi projects come to life with the right stuffing. You want your toy to hold its shape, feel soft, and be safe for your audience. When you choose stuffing, think about how dense you need the core to be and how the outer fabric will hug the form. You’ll learn how different materials affect your finished piece and how to tailor your choice to your shape. The goal is a plush that stays posed while remaining cuddly.
For most shapes, a mix works best. Start with a light, fluffy base like fiberfill to add volume without stiffness, then add pellets or a denser core in strategic spots to prevent sagging. If your design has long limbs, firm spots at joints help maintain structure without flattening the surface. The right blend gives you easy molding with steady support for posing.
If you’re unsure, test with small samples. Stuff a mini version of your shape to gauge feel and durability before committing to the full project. Consider the toy’s purpose—kids’ toys may need a softer, forgiving feel, while display pieces can tolerate more structure. With practice, you’ll instinctively find a blend that fits your style and shape. Best Stuffing Materials for Amigurumi: Fiberfill, Pellets and More are your toolkit to experiment with.
Compare firmness and loft for your design
Firmness and loft describe how much air your stuffed form traps and how solid the feel is. A firmer, denser stuffing keeps a shape from collapsing and sharpens features, which suits characters with defined noses or limbs. Loftier stuffing yields a springy, cloud-like feel and smoother curves, ideal for round cheeks or chunky torsos. Tiny details benefit from a firmer core to keep edges crisp.
Mixing materials lets you control both factors. Fiberfill adds volume and softness, while pellets add weight and shape. Pellets, whether plastic or glass, provide a sturdy base in the torso or base. For a head that sits upright, a firmer core helps. Child-friendly toys may benefit from more loft and a softer finish to reduce hard spots. Your aim is a balanced feel that matches your design’s look.
Experiment by trying a lofted approach first, then compress a section to see how it responds. If it over- stiffens, remove some stuffing and re-test. If it sags, add a touch more fiberfill. Small adjustments add up to a big difference in how your amigurumi reads to the eye and touch.
Match stuffing to your toy size
Size dictates how much stuffing you need and how dense it should be. Tiny amigurumi require less stuffing and a lighter touch to avoid bulges, while larger pieces risk losing shape if under-stuffed. For small toys, a soft, fine-fiber approach fills gaps without overpromising volume. Larger designs often need a denser core in the limbs and torso to prevent floppy joints.
Shape as you go to ensure even curves and smooth transitions. If you notice hollows or wobble points, add stuffing there or switch to a firmer material in that zone. For a specific weight, like a heftier handheld toy, place a small amount of heavier pellets in the middle to achieve balance without hardening the entire form.
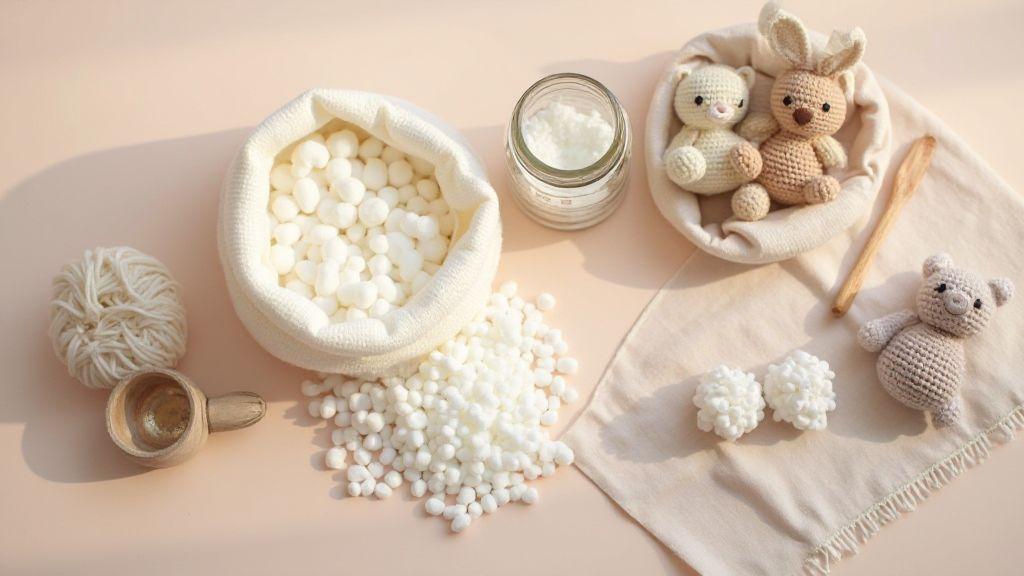
Best Stuffing Materials for Amigurumi: Fiberfill, Pellets and More
This guide collates the best stuffing materials to help you achieve the look and feel you want. Fiberfill, pellets and more each bring distinct qualities to amigurumi, from fluffy loft to weighted stability.
Use fiberfill for amigurumi to get soft filling
Fiberfill keeps amigurumi fluffy, resists hard packing over time, and is easy to shape. Aim for a light, airy fill that lets stitches show gently. Smooth the surface as you go and avoid overpacking delicate areas like ears or fingers. Stuff in small amounts to maintain an even, plush feel and correct any hard spots by redistributing.
To finish, pat and adjust the surface to minimize lines or dimples, so stitches peek through just enough. You can always add more later, but you can’t easily remove excess once packed in. A plush, enduring piece is within reach with careful fiberfill use.
Know fiberfill types you can buy
Common options include standard polyester fiberfill—lightweight, affordable, and forgiving for beginners. For tiny details or heavily detailed figures, finer, more resilient options that resist flattening over time can be preferable. Look for polyester toy stuffing or polyfill labeled products for toy safety.
Micro fiberfill creates a smoother surface with less visible stuffing lines, great for tight details and small limbs. Washable fillers are helpful if the project will be cleaned often, and recycled polyester fills offer a greener alternative. Test a small amount first to see how it behaves with your stitch tension and hook size.
When comparing packs, choose dust-free packaging and a consistent texture. A fill that compresses slightly under pressure but rebounds well creates a cuddly, responsive toy.
Stuff in small amounts for an even fill
Begin with a tiny amount and add gradually to avoid overstuffing. Pinch and smooth the fiberfill into curves and edges to fill evenly. For limbs, tuck some filler into the tip first, then work toward the joint for balance.
If you feel a hollow, compress slightly and add more as needed. Layering yields more dimension than chunky stuffing. Avoid slick finishes that exaggerate minor errors—take your time to keep the surface even. Small, thoughtful additions produce an even fill that holds its shape when posed or washed.
Fluff and compress fiberfill for best fit
Fluff the fiberfill before placing it inside to break up clumps and help it settle evenly. Lightly compress around areas that need firmness, like the torso or legs, while keeping other areas springy. Check the toy from multiple angles to ensure a uniform silhouette. If you notice a too-firm spot, remove a bit and redistribute. A final squeeze confirms the piece feels balanced and ready for posing.
Add poly pellets for amigurumi weight and balance
Pellets provide precise weight and balance so your amigurumi sits naturally. Choose small, uniform pellets and fill to achieve your desired center of gravity. Plan pellet placement in the torso, legs, and possibly the head to tune the heft. A fiberfill base with a pellet core often yields a stable, well-balanced toy.
Keep pellets dry and sealed to prevent moisture or crumbling. Use a fiberfill pocket first if you want to contain the pellets and maintain even distribution. If unsure, balance the toy by testing it on a finger and adjusting until stability feels right.
Use weighted stuffing amigurumi methods for stability
Weighted stuffing blends texture with balance. Fill sections with a fiberfill-pellet mix, starting small and testing as you go for a cushiony exterior and sturdy core. Create pellet pockets with fabric pouches to contain pellets and prevent shifting, especially in larger or highly movable figures. Seal the pockets with reinforced seams for long-lasting durability.
Combine poly pellets with fiberfill safely
Layer pellets inside a fiberfill base to cushion the weight and maintain a soft exterior. Ensure pockets stay dry and sealed to prevent moisture buildup. Keep stuffing consistent across similar toys to maintain a cohesive feel.
Eco-friendly stuffing amigurumi to be greener
Eco-friendly stuffing blends safety with a soft, durable feel. Recycled fibers and plant-based fills often offer good loft and resilience, with the benefit of lower environmental impact. They also tend to rebound well after washing, which helps maintain shape through many hugs.
Pick recycled fibers and plant-based fills
Recycled polyester fibers reduce waste while remaining plush, and plant-based fills like cotton or bamboo blends provide a natural touch. Start with a middle-ground fill and adjust in your next project to suit your design. Avoid low-cost fillers that shed or clump—test a small scrap first to assess behavior with your yarn.
Check washability and long-term durability
Durability matters if your amigurumi is played with or washed. Look for machine-washable or easy-to-spot-clean fills that resist flattening after washing. Some eco-friendly options keep loft for many cycles; others compress a little but stay soft. Follow care instructions to preserve shape and safety.
Verify certifications before you buy
Look for certifications like Oeko-Tex or GRS to ensure safer, more sustainable materials. Clear labeling gives confidence that the stuffing meets safety and environmental standards.
Try wool stuffing amigurumi for natural loft and warmth
Wool stuffing adds natural loft and warmth, producing a plush that stands up to cuddles and holds its shape longer. Its springy feel helps light a cozy mood, and wool often shifts slightly to keep seams neat without bunching. For small parts like ears or tiny limbs, light wool clumps provide natural heft and a smooth silhouette.
Note lanolin and allergy tips for your toy
Lanolin can cause sensitivity for some crafters. If handling wool, look for lanolin-free or eco-processed options, and test a patch first. Washing hands before sewing and wearing thin gloves can help you work comfortably. After finishing, a quick wipe-down helps remove residue and keeps the toy kid-friendly. Choose suppliers who disclose processing details and offer allergy-friendly options.
Use wool in small, shaped parts
Stuff ears, noses, and tails in thin, even layers for clean curves. Build up pointed features with short wool segments to avoid bulk. Wool gives a natural surface that makes stitches sit neatly and reduces visible lumps. For limbs, layer wool to support pose without overfilling, then test balance before closing.
Consider cotton stuffing for amigurumi for firm fill
Cotton stuffing delivers a firmer, longer-lasting fill that holds shape well as you add details. It compresses gradually with handling and washing, which is normal. Cotton tends to resist lumping in tight spaces, helping you maintain crisp lines on dense designs.
Watch how cotton compresses over time
Expect a gradual drop in fluffiness as fibers settle. Plan for this by starting slightly firmer so the final silhouette remains true after use. Cotton can stay firmer longer in some shapes, providing a steady edge for pieces that need a defined look.
Use cotton in dense or firm toys you make
Pack cotton into dense parts last, after seams are secured, to maintain the final shape. It supports heavy heads or chunky bodies and keeps surfaces smooth without creating hard clumps.
Prewash cotton to prevent shrinkage
Prewash cotton to train fibers to respond consistently to moisture and handling, helping your amigurumi preserve dimensions after finishing and potential washing.
Use silicone bead stuffing amigurumi for fine shaping and weight
Silicone beads offer precise shaping and weight, helping tiny limbs and heads sit exactly where you want. They compress gently, allowing careful balance adjustments before final seaming. Because beads are smooth and consistent, you won’t see bulges or dips after finishing.
Mix silicone beads for even heft in your toy
Mix bead sizes to fill curves smoothly and avoid hard corners. Use a base of mid-size beads, then add smaller ones to gaps for even, natural heft. A small funnel or soft bag helps you control distribution. Keep notes on bead sizes and amounts for future projects.
Secure bead-filled sections with extra stitches
Anchor beads with extra stitches to prevent shifting and keep shape through play. Use a color-matching thread to minimize visibility and reinforce seams around bead pockets. If you hear a rattle, add more tiny stitches to secure weight.
Choose medical-grade beads for safety
Medical-grade beads are non-toxic and durable, reducing chipping and shedding risks. Look for labeling that confirms safety standards and ask for documentation if needed.
Follow stuffing tips for amigurumi to finish neatly
Plan your stuffing approach to avoid guessing. Layer as you go to build clean curves and minimize lumps. Stuff evenly and avoid rushing, which can cause seams to bulge. Regularly check from different angles and adjust as needed to keep a smooth surface.
Stuff gradually and shape as you go, using small additions to refine balance. Use blunt tools to push filling into small parts without distorting fabric, and reinforce seams around pellet or bead areas. Trim excess stuffing and close seams cleanly for a professional finish.
Secure amigurumi stuffing materials and care for your toys
Choose stuffing that won’t shift over time and seal seams with strong stitches. A mix of materials often yields the right firmness without bulk. If gifting or selling, ensure the finished piece looks neat from all angles, with no loose ends.
Test compatibility with your yarn or fabric to feel how the fill behaves. Plan features like noses or cheeks carefully, since stuffing affects their appearance. Maintain a consistent approach to stuffing across projects for a cohesive, high-quality line.
Test wash and drying before you gift or sell
Before gifting or selling, test wash your amigurumi with warm water and gentle detergent. Check colorfastness, loose threads, and seams after washing to ensure durability. Air-dry or lay flat to observe shape retention and any shifting. Document wash instructions for listings and tags to guide buyers.
Keep stuffing away from small children and pets
Store stuffing materials in sealed containers and label them clearly. Warn buyers about potential choking hazards and secure small parts. Consider safety in every step, including samples or display pieces, to keep your amigurumi a cherished keepsake rather than a hazard.
Label care instructions clearly for your buyers
Attach clear care instructions to every piece, including washing methods and temperature guidance. Note any special materials that require extra care. Easy-to-read labels minimize mishaps and protect your reputation. Place tags where they won’t fray or distract from the toy’s look.
If you’re aiming to rank for Best Stuffing Materials for Amigurumi: Fiberfill, Pellets and More, this streamlined guide keeps the core details intact while trimming redundancy. It emphasizes practical stuffing choices, weight and balance strategies, eco-friendly options, safety considerations, and care instructions—helpful for both beginners and seasoned crafters.

Clara Fern — Crochet Artist & Amigurumi Designer
Clara Fern is a crochet artist and amigurumi designer based in Austin, Texas. With 9 years of experience working with yarn and hook, she transformed a lifelong passion for handcraft into a creative mission: making amigurumi accessible, fun, and deeply rewarding for crafters of all levels.
Clara discovered amigurumi during a trip to Japan in 2017, where she fell in love with the art of bringing tiny characters to life through crochet. Back home in Texas, she spent years studying color theory, design principles, and advanced crochet techniques — developing her own signature style that blends kawaii aesthetics with original character design.
Through maclafersa.com, Clara shares everything she has learned — from choosing the right yarn and reading your first pattern, to designing fully original amigurumi characters from scratch. Her writing is known for being clear, detailed, and genuinely helpful, with no steps skipped and no secrets kept.
When she’s not crocheting, Clara enjoys watercolor painting, visiting local yarn shops, and drinking way too much coffee while sketching new character ideas.


