
Quick comparison of safety eyes vs embroidered eyes
In this quick overview, you’ll see how safety eyes and embroidered eyes differ in look, feel, and use. Safety eyes lock in place with a backing for a bold, sturdy eye that’s hard to pull out. Embroidered eyes are stitched on, letting you fine-tune size, shape, and expression, but they can wear with heavy use. Your choice depends on how you’ll use the item, how durable you need it to be, and how clean you want the finish to look. Think of it like choosing between a ready-made screw-in light and a custom-painted wooden lantern—both light the room, but one suits rough, everyday use and the other suits a crafted, softer feel.
Safety eyes look uniform and polished right away. They’re fast to attach, with a secure backing that stays put through play or handling. Embroidered eyes offer flexibility: you can change tiny details, add shading, or adjust expressions on the fly. For toys a child will handle a lot, safety eyes reduce the risk of loosening eyes, but embroidery shines for a handcrafted vibe or a specific character look. Consider washability and how the eyes will survive repeated cleaning and play.
Bottom line: if you need speed, durability, and a consistent look, Safety Eyes vs Embroidered Eyes: Pros, Cons and Best Uses will lean toward safety eyes. If you crave customization, expression, and a softer, handmade feel, embroidery fits best. Your project’s audience, care expectations, and finish preference will guide you.
Main differences you should know
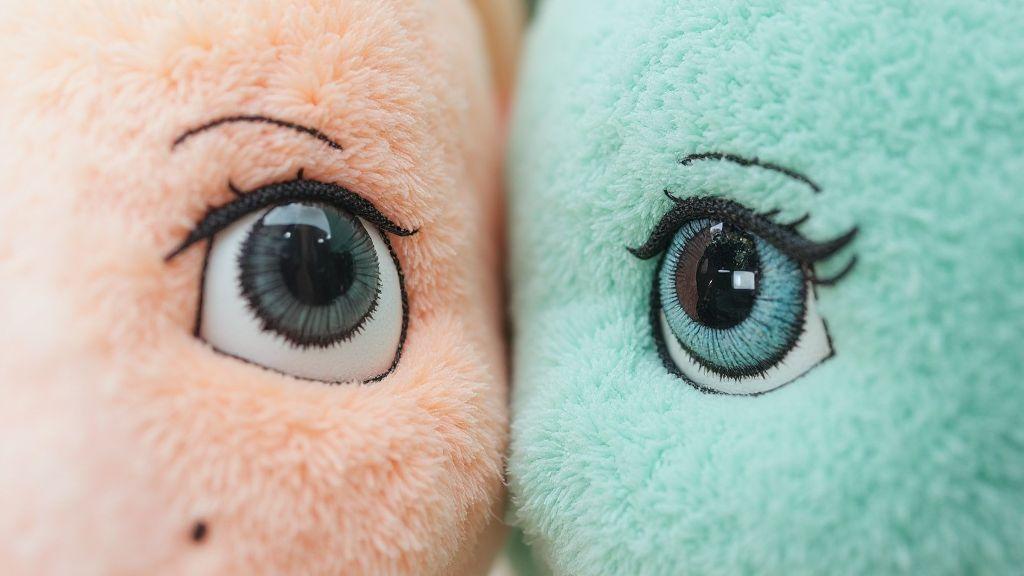
- Attachment, durability, and final appearance: Safety eyes have a plastic post and secure backing that snaps in, making them resistant to being pulled out and keeping eyes centered. Embroidered eyes are stitched onto the fabric, offering a seamless, expressive look with the surrounding material. Tiny details like eyelids or highlights are easier with embroidery.
- Wash and wear: Safety eyes resist smudging during washing, but backs can require care to avoid snagging. Embroidered eyes stay on the surface and won’t detach, but fabric pilling or fraying can snag them. Safety eyes provide a fixed look; embroidery lets you adjust shape and size for varied expressions. Safety eyes are inexpensive in bulk; embroidery needs more skilled time but uses the same fabric, keeping a cohesive palette.
- Finish: Safety eyes provide a crisp, professional look suitable for mass production. Embroidery offers a handcrafted charm ideal for boutique pieces.
- Production and care: Safety eyes speed up production; embroidery takes more sewing finesse but affords customization.
When you should pick one over the other
- Choose safety eyes for speed, consistency, and resilience. Ideal for projects handled by kids, bulk items, school crafts, or stock dolls with a uniform appearance. They’re also great for a modern, glossy look and are beginner-friendly.
- Choose embroidered eyes for customization and a softer, handmade feel. If you want a character with a unique gaze or to match eyes to fabric tone, embroidery lets you dial in tiny details. It’s perfect for limited runs, artisanal pieces, or projects avoiding rigid plastics.
- Consider mixing: use safety eyes for some pieces and embroidery for accents to balance reliability with personality.
- For baby or infant toys, embroidery often provides a safer, cleaner finish, but choose what best fits your project and safety standards.
Fast guide to choose
- If you need durability and a quick, uniform finish, go with Safety Eyes. Find a size that fits your pattern and a sturdy backing.
- If you want customization and a soft, handmade vibe, go with Embroidered Eyes. Plan your stitch path, test tension, and pick thread colors that blend with your fabric.
- For toys that will be washed often, safety eyes are usually safer long-term, but follow the fabric care instructions.
- For bespoke characters with subtle expressions, embroidered eyes let you shape the gaze precisely.
- Consider your audience: mass-produced items favor safety eyes; limited runs or gift pieces favor embroidery.
Infant safety — are safety eyes safe for infants?
You’ll want to know if Safety Eyes are safe for your infant. Loose buttons or detachable eyes pose choking risks. If using Safety Eyes, choose securely fastened ones used on items your baby won’t mouth. Look for eyes with secure backs and proper sizing. If the item could come apart, consider safer alternatives.
Choking standards and age recommendations
Choking standards aren’t a guessing game. For babies under 12 months, any small part can be dangerous. If an eye could fit through a standard bottle cap opening, it’s a red flag for that age. Many makers recommend avoiding detachable parts under about 2.25 cm (roughly 0.9 inches). Read product specs and choose sizes that clearly exceed typical baby mouth reach.
Age recommendations matter because development varies. Always supervise play and inspect regularly for wear. When in doubt, choose permanently attached features that can’t detach during normal use.
Why embroidered eyes are often safer for babies
Embroidered eyes sit flush with the fabric, so there’s nothing small to pull off. They hold up well to washing and rough handling, and you can still convey expression with shading and stitched details. Embroidery offers a clean, permanent look that won’t detach, providing peace of mind for baby toys.
Infant safety checklist
- Ensure every eye option is securely attached and cannot be pulled off by a baby.
- Prefer embroidered or fixed eyes over detachable ones for infants.
- Check product age recommendations and size guidance before starting.
- Test the final item by gently tugging on the eyes and seams.
- Avoid loose threads or stuffing near the eye area.
Durability comparison: safety eyes and embroidered eyes
Safety eyes are real pieces that lock in place with a post and nut, making them hard to loosen and resistant to snagging. Embroidered eyes are stitched into the fabric, offering a seamless surface but potentially loosening if stitching isn’t tight enough or fabric pills. For toys washed frequently or played with by kids, safety eyes often win for strength; embroidery shines for a minimal, hardware-free surface.
Materials split the difference: safety eyes rely on plastic parts and backs that can crack if dropped; embroidery relies on thread and fabric that can fray if stitching isn’t sturdy. If you’re unsure, test a sample with your fabric and thread.
How each holds up to wear and washing
- Safety eyes: Stay put with proper backing and insertion. They usually survive regular washing, but backs can loosen or hardware crack if the toy is jammed in a small washer. Use a gentle cycle and consider a mesh bag for protection.
- Embroidered eyes: Sit flush and resist snagging; however, repeated washing or vigorous agitation can loosen stitches or cause thread fraying. Stabilizers can help, and reinforcing with extra passes increases durability.
- A hybrid approach (pre-wash fabrics, use stabilizers for embroidery, ensure snug backing for safety eyes) offers a balanced solution.
Repair and longevity tips you can use
- Safety eyes: Re-secure with the original backing or replace with a new one. Check that the post isn’t bent and the backing isn’t cracked. If needed, a small washer behind the backing can help, but only for non-toy-use scenarios.
- Embroidered eyes: Re-stitch with a tighter edge, adding extra passes and a matching thread. Consider light interfacing behind the area for extra support. Repair surrounding fabric if worn.
- Longevity mindset: test a sample with your fabric and thread to see how it holds up to washing and play. Pre-wash fabrics and use stabilizers for embroidery; double-check backings and posts for safety eyes.
Simple durability test steps
- Test a small sample: wash a tiny swatch, then check eyes and backing.
- Pull test: gently tug the eyes to simulate play. Tighten or replace backing for safety eyes; re-stitch with more passes for embroidered eyes.
- Inspect after washing: look for fraying or cracks and reinforce or replace as needed.
How to attach safety eyes securely
- Choose the right back and washer to fit your piece. A proper back should have a tight grip; washers should be flat against the fabric.
- Backs come in split, screw, and locking cap styles. Locking washers resist tugging and stay put.
- Steps: insert eye from outside, add washer and back in the correct order, ensure the eye sits flush, and press around the edge to settle.
- If the fabric is stubborn, you can use a tiny amount of fabric stiffener or foam under the area to improve grip. Always test by gently tugging.
How to embroider eyes on plush toys
- Start with a simple eye shape and practice on scrap fabric. Transfer the shape to the toy and keep stitches tight and even.
- Use a single color per eye for crisp lines; if fabric is dark, use a contrasting thread for visibility.
- Finish with secure knots and trim close. Tiny backstitches around the edge help lock the eye in place and prevent rotation.
- Align both eyes by measuring from a central point (like the nose) to ensure symmetry.
Easy stitches that create neat eyes
- Satin stitch or tight running stitch for a solid fill.
- French knot for a round pupil.
- Split stitch around the edge for a neat highlight.
- One row of backstitches around the outer line adds stability.
Thread and needle choices that last
- Use polyester or cotton-poly threads for durability and colorfastness. Match or slightly contrast to fabric.
- Weave ends under several stitches and secure with a knot to avoid loose threads.
- A sharp needle helps prevent fabric splitting and keeps eyes aligned.
- For plush with nap or pile, a needle with a larger eye helps the thread glide through.
- If using Safety Eyes vs Embroidered Eyes: embroidered eyes eliminate detachable parts; safety eyes offer bold, consistent looks. Choose based on age of the child and the toy’s use.
- For baby toys, embroidery provides a safer, cleaner finish.
Stitch pattern quick list
- Outline with running stitch, fill with satin or tight backstitch.
- Add a French knot for a round pupil.
- Use split stitch for a soft edge highlight.
- Finish with a small backstitch to hold shape.
Best uses for safety eyes in amigurumi
Safety eyes are a strong choice for amigurumi you want to last. They provide a crisp, professional look and stay in place after sewing. They’re especially handy for small to medium plush toys where the head is a focal point. Beginners benefit from the reliability and speed, achieving a bold look without delicate embroidery.
When safety eyes improve your amigurumi look
Safety eyes can give a sharper, more graphic expression and a consistent look across multiple pieces. They stay aligned and are easy to source in bulk, helping with production speed and uniformity. However, they can limit expression subtlety, so weigh the balance between polish and nuanced features.
Size and placement tips for small crocheted toys
- Eye size should fit scale: 6–8 mm for tiny heads, 9–12 mm for mid-sized heads, 14 mm for larger heads.
- Place eyes symmetrically about one eye-width apart, adjusting for head shape. Use a mirror view or guide to ensure balance.
- Mount safety eyes by pushing through the fabric and locking with the washer. For young children, consider a protective backing or small amount of fabric glue for extra security. Test on a spare piece first.
Amigurumi eye sizing guide
- Tiny heads: 6–8 mm eyes
- Medium heads: 9–12 mm eyes
- Large heads: 14 mm or larger eyes
Best uses for embroidered eyes in baby toys
Embroidered eyes stay safe and snug during rough play or tugging. They’re attached to the fabric, with no detachable parts, making them ideal for babies. They support a consistent, cohesive look across a collection and allow you to tailor alignment, density, and placement for different ages.
Designs that keep baby play safe
- Tight, dense satin stitches around the eye area prevent loose threads.
- Eyes sit flush with fabric; avoid raised elements that snag.
- Gentle expressions, small shapes, and minimal embellishment for newborns and toddlers.
Fabric and thread picks for washable toys
- Use tightly woven fabrics and stabilizers to hold embroidery steady during washing.
- Choose polyester embroidery floss or polyester machine embroidery thread for durability.
- Secure thread ends with backstitches or knots; avoid fraying.
- For baby-safe embroidery, keep color palettes simple and high-contrast enough for visibility but gentle in overall impact.
Baby-safe embroidery rules
- Use small, tight stitches and avoid loose elements.
- Dense satin or felt-filled outlines help prevent snagging.
- Check thread tension to prevent puckers at the eye.
- Tug-test the finished toy to ensure eyes stay put.
Pros and cons quick recap
- Safety eyes: Pros — durable, quick to attach, consistent sizing; Cons — requires proper backing, limited to certain sizes, potential safety concerns if not correctly installed.
- Embroidered eyes: Pros — highly customizable, seamless finish, excellent for baby toys; Cons — more time-consuming, requires sewing precision, potential for distortion with stretching fabrics.
Decision prompts for your project
If you want a baby-safe, long-lasting finish with a soft, integrated look, go with embroidery. If you need a quick turnaround or plan a single prop, safety eyes or other inserts might be faster. Consider fabric stability, your skill level, and wash expectations. For baby toys, embroidery edges the safety and washability advantage, while for display pieces, safety eyes can offer bold character with speed.
If you’re weighing Safety Eyes vs Embroidered Eyes: Pros, Cons and Best Uses, weigh safety, appearance, and how your audience will interact with the piece. The right choice aligns with your pattern, care expectations, and whether you prioritize durability, customization, or speed.

Clara Fern — Crochet Artist & Amigurumi Designer
Clara Fern is a crochet artist and amigurumi designer based in Austin, Texas. With 9 years of experience working with yarn and hook, she transformed a lifelong passion for handcraft into a creative mission: making amigurumi accessible, fun, and deeply rewarding for crafters of all levels.
Clara discovered amigurumi during a trip to Japan in 2017, where she fell in love with the art of bringing tiny characters to life through crochet. Back home in Texas, she spent years studying color theory, design principles, and advanced crochet techniques — developing her own signature style that blends kawaii aesthetics with original character design.
Through maclafersa.com, Clara shares everything she has learned — from choosing the right yarn and reading your first pattern, to designing fully original amigurumi characters from scratch. Her writing is known for being clear, detailed, and genuinely helpful, with no steps skipped and no secrets kept.
When she’s not crocheting, Clara enjoys watercolor painting, visiting local yarn shops, and drinking way too much coffee while sketching new character ideas.


