
Supplies and tools you need
You’ll move fast from idea to finished heart with a simple kit: hooks, yarn, and needles you likely already own, plus stuffing and safety pieces. Keep everything in a small basket so you don’t hunt in ten places. A few stitch markers, a small pair of scissors, and a tapestry needle help you manage rounds and finish cleanly. Add a tiny bead, a soft felt star, or a cute charm for extra character. A well-organized tool box makes your crochet calm and fun.
Your stuffing should be plush but not overpacked, shaping a soft, round heart. A dab of fabric glue can seal gaps if needed. Choose a filling that holds shape without being stiff. With these items, you’re ready to turn yarn into a sweet Valentine.
Yarn weight, hook, and needle sizes
Your yarn sets the mood. Lightweight worsted yarn gives a cuddly, compact shape; DK weight adds gentle springiness. Pick colors you love—red, pink, or blush all work beautifully. Match your hook size to the yarn label, ensuring stitches are snug but not stiff. A small tapestry needle helps weave in ends; a needle of crochet-hook size can help close gaps cleanly. Practice a quick swatch to test tension; aim for even loops and a neat finish.
Stuffing, safety eyes, and markers
Stuffing should be just enough to keep the heart plush without flattening. For tiny hearts, start light and add as you go. If you use safety eyes, leave the holes for them before closing the final seam. Markers help you track rounds, color changes, and symmetry, which matters in a heart shape.
Valentine amigurumi heart pattern sources
Choose sources that explain stitches clearly, show step-by-step photos, and note the finished size. Beginner-friendly notes and helpful tips from the designer build confidence and ensure your heart looks right for gifting.
Crochet stitches for a heart shape
Stitches come together to form a neat heart. Start tight to prevent flopping, then ease slightly on the top rounds for a balanced silhouette. Practice on scrap yarn to keep your final heart tidy in your chosen color. Use a small hook with lightweight yarn for a crisp outline. If the heart seems flat, switch from single crochet to half-double for height, then return to single crochet. Weave in ends snugly for a clean edge.
Count stitches as you go for consistency. You can add a soft edge with one row of slip stitches if you like. The result is a heart ready to attach to a keychain, ornament, or be stuffed with a tiny bean for weight.
Single crochet, inc, dec basics
Master single crochet, increases, and decreases for a crisp heart. Start with a tight foundation chain, single crochet in each stitch, and use increases to widen. For shaping, use a single crochet decrease over two stitches to taper. Mark the first stitch of each round to stay symmetrical. Consistent tension keeps curves even and the point sharp.
Magic ring and invisible decrease tips
A magic ring starts with a clean, closed center. Pull tight to close the middle and keep the center flat as you work. Practice a few times on scrap to lock in the motion.
Invisible decreases keep the fabric smooth. Slip the hook under the front loops of two stitches, yarn over, and pull through both. Use near the point to maintain a compact shape. If a bump appears, adjust tension briefly and continue.
Finish by gently pressing stuffing as you go to maintain a round top and balanced lobes. Align color changes with shaping to minimize visible seams.
Beginner project plan and timing
Plan your week with a simple, doable project like a cozy Valentine heart you can finish in a few sessions. Break it into steps: gather yarn, grab a hook, learn basic stitches, and practice shaping. Create a comfortable, distraction-free workspace and celebrate each milestone, even small rounds you complete.
Your final aim is a finished Valentine’s heart you’re proud to gift or keep. The process should feel steady, not rushed.
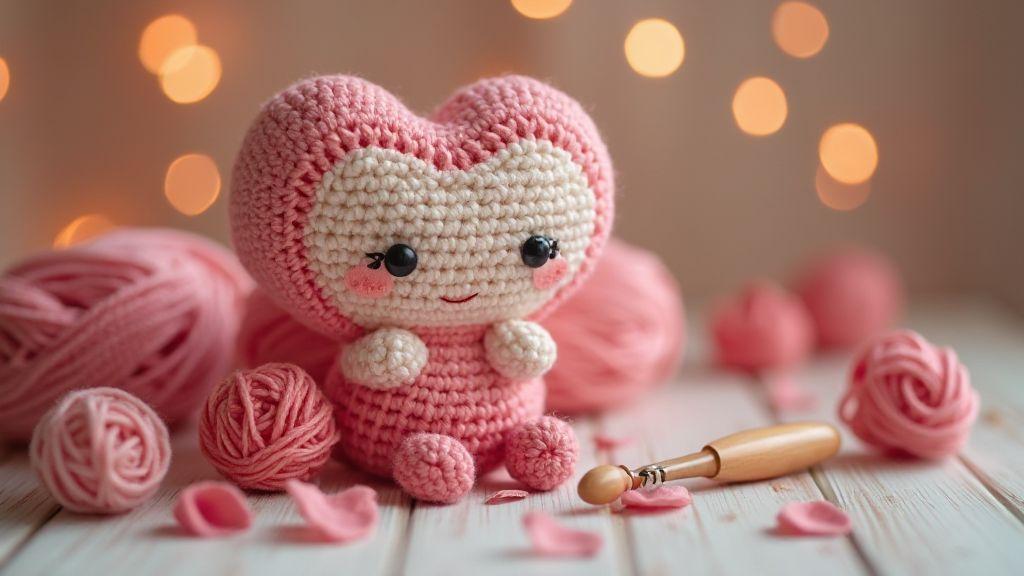
How to Crochet a Valentine’s Day Amigurumi Heart Doll
If you’re new, start with a small magic circle and build a rounded body with simple increases. Add a face later and a tiny bow or scarf for charm. Keep stitches consistent to avoid gaps. Take it slow for the first rounds, then find your rhythm.
As you progress, you’ll learn to attach arms and finish with a neat tail end. Embroider a smile or sew on eyes for a living, breathing little heart doll. By the end, you’ll have a sweet heart doll ready to share.
Time estimate for a simple heart doll
Plan about 2–4 hours for a basic heart doll, depending on familiarity with tension. The first hour covers the snug ring and even rounds; the second builds the body and arms; the last part adds the face and finishing touches. If you’re new, add 30–60 minutes for practice rounds. Don’t rush the shaping—steady, small progress yields the best results.
If you set aside two focused sessions, you’ll finish comfortably and stay motivated for your next pattern.
Quick amigurumi heart pattern ideas
Add a tiny bow on top, or embroidered cheeks for charm. Change colors mid-project for a two-tone heart. Crochet a matching mini heart for a pair, keeping practice lively without adding heavy complexity.
Follow a heart amigurumi step by step
Break the project into tiny, doable pieces: magic ring, base rounds, lobes, join, and point. This keeps you in control and shows progress one round at a time.
Start with the magic ring and base rounds
Crochet a snug magic ring and start with even rounds. The base rounds should sit flat and compact, forming a stable core for the lobes and point.
Shape the lobes, join, and close the point
Build outward on both sides to form the classic heart curve. Join at the top with neat seams, then close the bottom tip with precise stitches. The lobes should be even and the point crisp.
Heart amigurumi step by step
Review the essential steps: magic ring, base rounds, lobes, join, and point. You can customize with a surface stitch or a tiny top knot for a unique heart.
Stuffing, shaping, and firmness tips
Aim for a plush, pillow-like feel that stays rounded. Stuff in small amounts and check symmetry as you go. Avoid overpacking the tip to prevent blunt points. If one side sinks, add fill and re-fluff. Ensure the seam line is smooth and the surface is continuous without peeking stuffing.
How much polyester fill to use
Start with a light amount and add gradually until the center has a gentle give while the edges stay firm. For multiple hearts, keep the fill consistent for a cohesive set.
Tools to help smooth and shape the heart
Use a small crochet hook or blunt-tipped needle to guide fill into corners. Scissors trim loose threads. A blunt tool helps press fill evenly and eliminate air pockets. Roll and pat the heart to settle the fill.
Crochet stuffed heart toy instructions
Begin with a tight slipknot and single crochet rounds, leaving a small opening for stuffing. Fill gradually and close with careful stitching. Fluff and adjust any lumps before weaving in ends.
Sewing, closing, and finishing touches
Take time with pinning and basting before stitching. Use straight stitches for seams and backstitch at the ends to prevent unraveling. Add neat topstitching for a polished look. Clip threads close but not too close, and press seams flat with a warm iron. If you add appliques, finish edges with a quick zigzag stitch to prevent fraying. Present your finished piece with a simple background photo to let the details pop.
Neat seams and hidden joins
Pins help align edges for smooth seams. Clip curves to lie flat and backstitch to lock threads. For decorative pieces, a ladder stitch hides the opening. Match thread color to fabric and work from the inside. A ballpoint needle and narrow zigzag can help with stretchy fabrics.
Add bows, blush, or tags for a gift
A neat bow adds charm without bulk. Choose a satin ribbon that matches or contrasts just enough. A blush or small tag personalizes the gift. Wrap in tissue and include a care note for machine washing or spot cleaning.
Valentine’s Day crochet gift ideas and safety
A mini amigurumi heart doll makes a thoughtful, pocket-sized gift. A tiny loop at the top lets you hang it as a charm. Consider embroidery for safe eyes and features, avoiding small parts. Use hypoallergenic stuffing and secure seams to keep the heart cuddly and durable.
Amigurumi heart doll pattern free
Look for beginner-friendly, clearly explained patterns with photos. Use kid-friendly colors and consistent hook size. The result should be cute and huggable, finished in a day or two.
Variations: sizes, faces, and outfits
Adjust colors, sizes, and expressions to fit the recipient. Changing yarn weight and hook size scales the heart from tiny to plush. Try different facial details—smiles, dots, or stitched expressions—and outfit it with a scarf, sweater, or bow.
Scale the pattern for mini or large hearts
Switch to thinner yarn and a smaller hook for mini hearts; use thicker yarn and a larger hook for large hearts, adding extra rows to balance the silhouette. Note your hook size, yarn weight, and stitch counts to reproduce or adapt later.
Add simple outfits and facial expressions
Quick outfits like a scarf or small dress transform the heart’s look. Face details can be crocheted or embroidered before stuffing. Experiment with different eyes and smiles to create a range of personalities.
Troubleshooting and care instructions
If tension is off, loosen or tighten gradually and test with a quick row. Check for skipped stitches and maintain a steady pace. Inspect yarn for splits and frays; cut away damaged fibers. Block lightly if possible, and store pieces in a dry, cool place away from direct sunlight. Label bags for different colors and hook sizes to stay organized.
Care and storage tips
Washing depends on yarn: machine wash on gentle cold if permitted, or hand wash and lay flat to dry. Store in breathable containers and recheck for loose ends. A little fabric shaver can refresh the surface of a kept heart doll without changing its shape.
Crochet heart doll tutorial
Begin with a basic heart shape, then add a head, body, and tiny arms using simple stitches. Stuff gently, shape evenly, and finish with minimal facial features or a yarn bow to give your heart doll personality. It’s a cozy, cuddly project you can finish in an afternoon or two and gift with confidence.

Clara Fern — Crochet Artist & Amigurumi Designer
Clara Fern is a crochet artist and amigurumi designer based in Austin, Texas. With 9 years of experience working with yarn and hook, she transformed a lifelong passion for handcraft into a creative mission: making amigurumi accessible, fun, and deeply rewarding for crafters of all levels.
Clara discovered amigurumi during a trip to Japan in 2017, where she fell in love with the art of bringing tiny characters to life through crochet. Back home in Texas, she spent years studying color theory, design principles, and advanced crochet techniques — developing her own signature style that blends kawaii aesthetics with original character design.
Through maclafersa.com, Clara shares everything she has learned — from choosing the right yarn and reading your first pattern, to designing fully original amigurumi characters from scratch. Her writing is known for being clear, detailed, and genuinely helpful, with no steps skipped and no secrets kept.
When she’s not crocheting, Clara enjoys watercolor painting, visiting local yarn shops, and drinking way too much coffee while sketching new character ideas.


