
How to Use Variegated Yarn Creatively in Amigurumi Projects
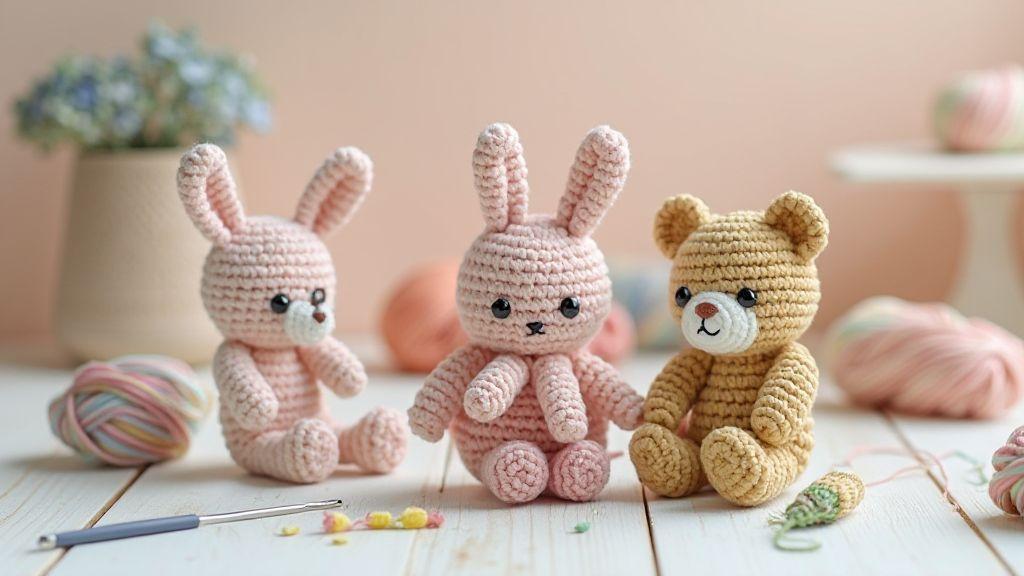
Variegated yarn adds instant personality to amigurumi, letting color do the work. The yarn itself creates soft rainbow bands that feel playful and cozy, giving your toys depth with less effort. This approach helps you finish more projects and makes each creature feel distinct with minimal fuss.
You’ll save decision fatigue too: pick a skein and let the color repeats guide you. Variegated yarn often hides small tension mistakes, so your amigurumi stays charming even while you’re learning the rhythm of crochet.
Beyond ease, variegated yarn lets you experiment with mood and theme. Soft pastels can morph into sleepy woodland creatures, while high-contrast skeins yield cheeky characters. The surprise of how colors travel as you work is part of the fun of design and creativity.
Benefits for color and texture
Variegated yarn provides color variation without planning, creating patterns that look intentional even with simple stitches. You’ll gain depth in skin tones, fur, or leaves just by letting the yarn do the work. Color changes add visual texture on the surface, producing bands and swirls that keep the piece interesting without extra steps. It’s like a built-in brushstroke from the yarn itself.
Variegated yarn also offers versatility. It pairs well with basic shapes, so you can make animals, flowers, or mini dolls without reinventing the wheel. The color shifts can suggest shading and contours, making your pieces feel dimensional with minimal effort.
Variegated yarn amigurumi techniques you can try
Begin with a simple pattern and a skein with gentle color spread to see how transitions blend naturally. For bolder color blocks, choose yarns with sharper repeats and crochet with slightly larger stitches to let the bands show. Try changing the color order by moving from a single color to a gradient within the same skein. You can work in the round with a hollow body and use a small contrast color for tiny features. Let the variegation guide you to color stories for each creature.
Add a solid color accent after the main body, such as a pocket, nose, or ear tip, to anchor the piece and prevent chaos. This keeps the amigurumi readable while letting the variegated yarn shine.
Fiber facts and color repeat lengths
Know your yarn’s color repeats. Longer repeats yield broader color bands for a calmer look; short repeats create snappier stripes. Match the pattern’s scale to the color repeat for a deliberate design. Test a swatch to see how color bands align with stitches. Different fibers affect color behavior—cotton variegated yarns stay crisp and sturdy, while wool blends can be softer and fuzzier. Check the yarn label for repeat length and fiber content to plan your design.
How to pick variegated yarn and colors
When starting with variegated yarn, aim for shapes you can recognize in your toy. Choose skeins with calm color cycles and gentle transitions, avoiding random splotches that muddy the design. Preview the colors on a small swatch to see how they read on your pattern. Think about the toy’s mood and audience: softer tones for a cute animal, more contrast for a playful character. Look for a dominant color with supporting hues, and watch color-change speed—slower changes reveal clear shapes, faster changes read busy.
Choose your base yarn weight to match the project. For amigurumi, a medium/DK weight is typically ideal for consistent stitching and sharp details. If you want more sturdiness, you can opt for worsted weight but test a few rows to ensure color shifts don’t overpower the form.
Read yarn labels for fiber and weight
Read the label before buying to predict how colors behave after washing and how they read on your piece. Look for fiber types you know you like (e.g., cotton for washable toys, acrylic for durability). Weight matters: the wrong weight can stretch or bunch stitches and muddy color bands. Note color repeat length and whether the pattern is steady or sporadic. Feel the yarn as well—soft yarns don’t always mean predictable color cycles. Buy a small skein and crochet a mini square to preview color behavior.
Choose contrast and value for clear toy shapes
Contrast helps features read clearly from a distance. Use colors with good value differences (light vs. dark) to outline eyes, ears, and paws. Plan where to place solid or semi-solid colors to anchor the design. A small, darker patch around an eye can make that feature pop, while a lighter stripe on the cheek adds character without blending into the yarn. Balance matters: if your variegated yarn already has high contrast, avoid adding another strong contrast in the same area. Pair it with a calmer coordinating solid for details.
Pattern selection and creative stitch choices
Variegated yarn should shine without becoming chaotic. Start with patterns that welcome color changes; simple shapes let the yarn lead, while bold shapes create striking contrast. Consider the project mood: a cozy blanket benefits from gentle stripes or blocks, while a playful amigurumi can use bold motifs to highlight color pops. The goal is to let the yarn glow without the stitching overpowering the color story.
Texture and gauge matter. Texture adds depth without obscuring color changes; you can alternate stitches like single and half-double crochet for subtle ribbing. For more drama, try Tunisian simple stitch or shell rows, but keep rows short so color shifts remain visible. Variegated yarn loves rhythm—steady row sequences help colors flow smoothly and avoid abrupt, unintended color blocks.
Practice by swatching different stitches to see how colors travel across your fabric. Note which stitches let the colors sing and which drown them out, then choose patterns that respect the yarn’s natural shifts. For amigurumi-focused work, use tight stitches and minimal increases to keep shapes clean; place color shifts to highlight sculpture rather than obscure it.
Make swatches to compare stitches
Swatching is essential with variegated yarn. Create a few small swatches in different stitches, lay them out side by side, and compare color transitions, texture, and readability. Keep notes on each swatch (stitch name, rows, color behavior, impression) so you can reference them later. Label and archive swatches to develop a go-to set of patterns that work well with variegated yarn.
Prevent and control color pooling in amigurumi
Color pooling occurs when repeats align to form large patches, which can look accidental or deliberate. Learn to spot pooling early and adjust. Plan to reduce pooling in areas where you want smooth color transitions, such as the face or hands, by changing fabric density and stitch choices. With row shifts, you can guide color transitions rather than letting the yarn decide.
What causes color pooling and how to spot it
Pooling shows as blocks of color that don’t match the rest of the flow, often near rounds or color changes. It’s not always negative; sometimes it adds charm. If you want steadier color, identify pooling early so you can adapt.
Preventing color pooling in amigurumi with row shifts and stitch changes
Disrupt color alignment by shifting the starting point of a round by a stitch or two, or by varying stitch height in color-rich zones. Looser tension helps colors move with the fabric. Reposition increases and decreases to steer color flow around curves. The goal is smooth transitions where you want them and design features where you want them.
When planned pooling can be a design tool
Planned pooling can create a dappled or marbled effect. Test swatches to map how many stitches create a color block, then apply that to your project. You can guide pooling to emphasize features or create bold patches while keeping the overall piece coherent.
Combine solid and variegated yarn for strong contrast
Mixing solid with variegated yarn yields bold, eye-catching results. Use a dominant solid color to anchor the design and layer in variegated yarn for texture and movement. Keep variegated yarns to medium contrasts so the pattern reveals itself rather than getting lost in color chaos. A solid base with a variegated accent can draw attention to features like a sleeve or ear.
Test a quick swatch: crochet a small square with solid yarn, then add a variegated strip to see how they play. Remember that contrast isn’t only color; it’s texture, scale, and how yarns lie together after sewing. Place variegated yarn where you want the eye to rest—like a chest stripe or tail tip—and use solid colors for details to keep your design readable and cute.
Use solids to frame variegated sections and emphasize features
Solid colors act as a frame that makes variegated areas pop. Start with a calm base color, then add solid highlights around eyes, mouth, or paws to guide attention. Use color temperatures that work well together to create pleasing tension without clashes. A darker solid outline around shapes after sewing can define edges. Mock up placements to preview framing and adjust until the silhouette reads clearly, even at a glance.
Color transition strategies for amigurumi and neat blends
Work in chunks rather than a single gradient. Use short color runs and let natural changes form gentle stripes. For a seamless blend, crochet the same section twice—once in solid, once in variegated—and splice for deliberate transitions. Offset color changes to create a natural look, then pair transitions with a solid edge to keep the overall shape tidy.
If you want a neat fade, work several rounds with the solid color before switching to variegated, then return to solid at the end for a framed fade that reads as intentional artistry.
Simple join and seam tips
Keep joins clean with hidden seams when possible. Weave ends inside seam lines and use the same color as the main piece for sturdier finishes. Align pieces by matching stitch counts so seams lay flat. If a seam puckers, switch to a smaller hook for the final rounds near the seam to tighten the fabric. A thin border of solid color around joins can hide small gaps and add a designer touch.
Design ideas and plan color placement for toys
Plan your colors to keep the design cohesive. Start with one main color and 2–3 accents, then map mood and color placement. Let variegation tell part of the story, but anchor with solids to avoid clashes. Sketch a color map to guide placement and flow, noting repeats and color-change points to land attention on features like the face or paws. Test lighting in advance if you’ll photograph the toy.
For design ideas, use variegated yarn for the main body and add solid-color accents for eyes, nose, and paws to preserve readability. Choose a variegated yarn with a predictable arc for easier planning, or balance it with short solid-color bands around the neck or tail for a charming silhouette.
Test swatches before committing to a full toy, and keep notes on how each color appears under your lighting. A successful piece reads as the character you planned.
Variegated yarn toy design ideas that work well
Variegated yarn can be your ally or your challenge. Use it for the main body with solid accents for features to keep the toy cohesive. Prefer variegated yarns with predictable color arcs for planning, or pair with short solid breaks to create a striped silhouette. For a softer look, choose gentle transitions and plush stuffing to maintain fluff.
Test a small swatch first to see how color blocks align with facial features, then decide whether to adjust the pattern or switch to coordinating solids. Keep notes on color behavior under your lighting to stay true to your vision.
Planning color placement in amigurumi with maps and notes
Create a color map to stay consistent from start to finish. Sketch the toy, mark where each color appears, and note color-change points. Add a repeat plan for rounds to keep colors landing predictably. Maintain a separate tweaks list so you can reproduce or adjust projects later.
Sketch, mark repeats, and test on a swatch to confirm your plan.
Sketch, mark repeats, and test on a swatch
Begin with a quick silhouette sketch and mark where colors reappear. A swatch preview helps you see how variegated yarn shifts interact with stitch count and texture. If sections become too busy, switch to solid colors for faces or paws. Keep notes with the sketch to recreate or adjust later, building a reliable color map for future projects. End with a confident plan based on your swatch results to finish faster with better control over color landing and feel.

Clara Fern — Crochet Artist & Amigurumi Designer
Clara Fern is a crochet artist and amigurumi designer based in Austin, Texas. With 9 years of experience working with yarn and hook, she transformed a lifelong passion for handcraft into a creative mission: making amigurumi accessible, fun, and deeply rewarding for crafters of all levels.
Clara discovered amigurumi during a trip to Japan in 2017, where she fell in love with the art of bringing tiny characters to life through crochet. Back home in Texas, she spent years studying color theory, design principles, and advanced crochet techniques — developing her own signature style that blends kawaii aesthetics with original character design.
Through maclafersa.com, Clara shares everything she has learned — from choosing the right yarn and reading your first pattern, to designing fully original amigurumi characters from scratch. Her writing is known for being clear, detailed, and genuinely helpful, with no steps skipped and no secrets kept.
When she’s not crocheting, Clara enjoys watercolor painting, visiting local yarn shops, and drinking way too much coffee while sketching new character ideas.


