
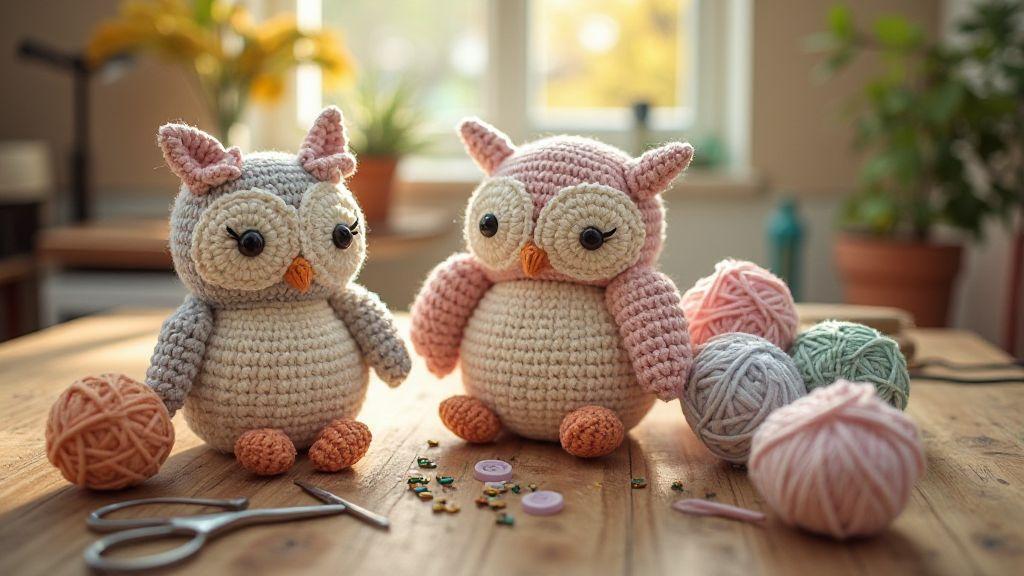
Why you’ll love this Free Amigurumi Owl Pattern with Step-by-Step Instructions
This Free Amigurumi Owl Pattern with Step-by-Step Instructions gives you a complete, easy-to-follow guide through every tight stitch and color change. Designed for progress, it helps you finish a cute owl quickly, even if you’re new to crochet. The clear steps keep frustration at bay and show steady progress with each round. You can personalize your finished owl by choosing eye colors and beak style, and the step-by-step format makes it easy to recreate or tweak later, building your confidence with every project.
If you’re short on time but crave a handmade piece, this pattern fits perfectly. The process is broken into small, doable chunks, so you know exactly what to do next and stay motivated. The approachable instructions make crochet feel simple and enjoyable.
Small size makes it a quick project
This tiny owl is ideal for a weekend craft sprint. Concise rounds and simple stitches help you whip it up fast. Its compact size means less yarn, less time, and less frustration, keeping you motivated from start to finish. You can make several owls in different colors, testing new combos without committing to a larger project. The quick turnaround is a huge motivator and makes crochet feel like a hobby you can fit into a busy week.
Perfect handmade gift and decor
This owl translates into a thoughtful present you can wrap with a ribbon and a note. The finished piece adds handmade charm to a desk or shelf and invites compliments. As decor, it brings warmth and whimsy to any room. You can customize it for the recipient—eye colors to match their favorite shade or a tiny scarf for a seasonal twist. The pattern is flexible, so your gift feels unique and thoughtful.
Great practice for basic crochet skills
The pattern reinforces essential stitches you’ll use again and again. Work with simple rounds, increases, and color changes, all within a friendly project. The clear instructions help you build solid technique. You’ll gain confidence shaping a small amigurumi piece—the owl’s round body and tiny wings are perfect for practicing even tension and tidy finishes. By the end, your overall crochet skills feel steadier and more comfortable.
Materials and tools for your Free Amigurumi Owl Pattern with Step-by-Step Instructions
Gather what you need before you start to crochet smoothly. Having everything at hand, labeled and ready, helps you finish faster and with better results. The exact yarn and hook you choose will affect texture and size, so start with medium-weight yarn and a comfortable hook size, then adjust if the owl looks too big or too small. You can swap colors later to change the vibe.
When you finish, you’ll have a tidy, well-stocked craft space that makes future amigurumi feel easy. Keep pattern pages handy, label stuffing and eyes, and store tools in a small project bag. You’ll notice the rhythm and pleasure as you crochet, stitch by stitch, turning your Free Amigurumi Owl Pattern with Step-by-Step Instructions into a tiny, charming creature you created.
Yarn weight, fiber choices and color suggestions
Your yarn weight sets the owl’s size and feel. Worsted-weight gives a plump, cuddly look; sport-weight yields crisper stitches. Choose yarn that’s comfortable to grip and doesn’t split easily. Acrylic is affordable and easy to care for; cotton offers neat stitch definition. Blends with a touch of nylon or wool provide a cozy vibe.
Color choices shape personality. Classic browns or grays feel traditional, while bright accents add charm. Use a main body color plus one or two accents for beak, feet, or eyes. If you’re unsure, start with natural tones and add pops later. The pattern shines with intentional color choices that match your style.
Check yarn labels for care details to ensure your owl lasts as a cuddly companion. Consider texture: smoother yarn shows stitches clearly, while fuzzy yarn adds charm. Trust your hands’ feel to pick what suits your owl’s personality.
Hook sizes, stuffing, safety eyes and needles
Choose a hook that matches your yarn weight so stitches stay even. If a gauge is specified, follow it to keep the owl the right size. A comfortable hook reduces hand fatigue. Use soft, hypoallergenic stuffing so the owl stays cuddly and safe for kids. Shaping with stuffing is part of the charm—puff evenly.
Safety eyes add expression, but embroidery eyes are a good alternative. If you use safety eyes, center them carefully and secure the backings. A gauged needle helps sew tiny features without snagging yarn. Have scissors and a tapestry needle handy for finishing touches.
Assemble parts with a loose, hidden stitch for a neat owl. If you miss a stitch, fix it early. The goal is a clean, friendly look that invites a smile.
Common hook sizes and yarn weights
- Worst-weight yarn: 4.0 mm to 4.5 mm hook for sturdy, even stitches.
- Sport-weight yarn: 3.25 mm to 3.75 mm hook for finer, delicate stitches.
- Bulky yarn: 5.0 mm hook for chunkier, plush results.
Think about how you want the owl to feel—cuddly or neat. Keep a small hook gauge in your box to choose confidently next time.
How the Free Amigurumi Owl Pattern with Step-by-Step Instructions is structured
This guide shows how the Free Amigurumi Owl Pattern with Step-by-Step Instructions is laid out so you can follow along without getting lost. Start with basics, then build the body, wings, beak, and finally join all pieces. Clear steps and simple stitches keep the project fun and doable from start to finish.
The pattern breaks work into tiny chunks you can check off as you go, making it easy to spot mistakes early. It also helps you plan materials so you know what you need before picking up your hook. If you love a clear map, this format delivers: magic ring, body pieces, wings and beak, then join for a finished owl you’ll be proud of.
- Start with a magic ring to create a tight center.
- Work rounds in the round to keep the shape smooth.
- Crochet the body first, then add wings and beak, finishing with joining pieces for a lifelike owl.
Simple stitches: sc, inc, dec and slip stitch
Four basic stitches form the foundation: single crochet (sc), increase (inc), decrease (dec), and slip stitch. These keep your fabric tight and neat. Use sc for a compact surface, inc to grow shapes, and dec to taper edges. Slip stitches help with joining parts or closing openings for a polished finish.
As you practice, you’ll notice that tension matters. Too tight and the fabric stiffens; too loose and shapes wobble. If a move is tricky, slow down and recheck your rounds. Precision now saves frustration later.
Beginner tips for the easy amigurumi owl pattern for beginners
Begin slowly and keep tension steady to maintain a round, cute owl. Start with a simple worsted-weight yarn and a size G hook to build confidence, then adjust as needed. Practice small rounds first, then tackle more complex parts. Take breaks to keep hands and mind focused.
Plan your rounds before you start to avoid surprises. Keep the pattern visible and double-check numbers before pulling through a loop. A miscount can throw off an entire round, so slow and steady wins the race. Celebrate small wins along the way to build confidence for the next section.
Read abbreviations and count your stitches
Abbreviations may feel like a secret code. Translate them first so you can stay on track. Keep a quick note of stitch counts after each round to ensure you’re progressing correctly. If you spot a mistake, you can undo to the last correct round and fix it. Consistent tension and counts keep your owl balanced from beak to tail.
Use stitch markers to keep even rounds
Stitch markers help you track rounds. Place one at the first stitch of each round and another at the end. If you don’t have markers, use a scrap of yarn. Markers prevent losing track and help keep symmetry, especially around the head and belly.
Troubleshooting tension and hole fixes
If stitches feel loose, tighten slightly on the next round. If you see a hole at a seam, adjust your insertions and pull snug before closing. For bigger holes, return to the last solid round, reinsert the hook where the stitch should be, and rework that section. After finishing, give the owl a gentle once-over and add a few stitches to fill any flat spots.
Variations and scaling for a small amigurumi owl pattern free
You can brighten or enlarge your owl by changing yarn colors and textures. Start with a basic palette and vary lighter or darker shades. Plush, fuzzy yarn adds coziness; smooth cotton looks crisp. Keep the same stitch count when changing colors to preserve shape. Test a quick swatch to compare feel before committing. You can switch back if you don’t love the result.
Mix textures for personality. Eyelash yarn adds fur-like hints without changing size. Try one contrasting color for the beak or eyes to make them pop. For a whimsical look, add tiny beads for eyes or shiny thread highlights. Note how texture shifts affect overall vibe and keep notes on what you try.
For gifts, coordinate colors with the recipient’s space. A soft gray owl with pale yellow eyes works on a bookshelf; a teal owl with white accents brightens a desk. Brighter primary colors can give a friendly feel for kids. Ensure yarn choices stay compatible with the pattern’s gauge to keep the final size consistent.
Change colors and yarn textures for style
Two main colors and one accent are usually enough to define the look. If you want a vintage vibe, use muted earth tones with matte yarn. For playful looks, go bold with bright contrasts and a shiny finish. Texture changes are a secret weapon for personality—combine smooth cotton with fluffy eyelash yarn for depth without altering size. Start by changing accents and notes how they change the character.
Add keyring, pocket, or weighted base options
Turn your owl into a handy accessory by adding a keyring or a small pocket. Attach a metal ring near the top or back to hang on keys or a bag. Sew on a tiny flat pocket for small notes or treasures. A lightweight weighted base helps it stand on a shelf, adding presence without bulk.
If you add a keyring, color-match or contrast for visibility. A pocket is a charming surprise, and a weighted base suits desks. These tweaks keep the pattern practical and gift-ready.
Scale size by adjusting hook and yarn weight
To scale the owl, adjust hook size and yarn weight together. Move one size up or down from your current hook to start. If you switch from DK to worsted, go one hook size larger and check gauge. Quick swatches confirm sizes before crocheting the entire body. For a tiny desk mate, try sport weight with a 3.25 mm hook and reduce stitch counts slightly. For a larger shelf friend, use bulky yarn with a 5.0 mm hook while keeping shaping consistent. Checking gauge early saves rework later.
Where to download amigurumi owl pattern pdf and picture tutorials
You’ll find plenty of options to grab a free Amigurumi Owl Pattern with Step-by-Step Instructions as a downloadable PDF. Look for clean PDFs with large diagrams and a photo tutorial alongside the pattern. A good download includes a materials list, stitch guide, and labeled images for each step. If you’re new, choose a pattern with clear yarn, hook sizes, and any extra pieces like eyes or wings so you don’t guess later. Ensure the file is a PDF for easy access on any device.
Check that the PDF includes a short glossary of stitches and a row-by-row or bullet-style guide. Photos or diagrams should annotate tricky spots like shaping the head or attaching eyes. A finishing and assembly guide, plus care instructions, helps your owl last. A troubleshooting page or tips for common mistakes is also valuable.
Trusted sites for a free crochet owl tutorial
Seek trustworthy sites that publish clear, correct instructions. Start with well-known craft platforms hosting user patterns, which often have clean layouts and direct downloads. Look for patterns with written guides plus step-by-step images, not just text. A site with responsive comments or an FAQ signals reliability for beginners.
Avoid pages overloaded with ads or paid memberships. A direct download without long forms respects your time. A clean, reputable space increases your odds of consistent, satisfying results.
What a downloadable amigurumi owl pattern pdf should include
A good PDF starts with an introduction and materials list (yarn type and color, hook size, stuffing, needle, and safety eyes). A gauge section helps you match the owl to the pattern, especially if you’re making a set as gifts. The stitches used should be defined with concise explanations or links to tutorials.
The pattern should be broken into sections like head, body, wings, ears, and beak, with row-by-row or round-by-round guidance and stitch counts. Photos or diagrams annotate tricky spots such as shaping the head or attaching eyes. A finishing and assembly guide walks you through stuffing, closing seams, and attaching accessories, plus care instructions.
A good pattern includes troubleshooting notes for common mistakes and tips for yarn substitutions, with guidance on adjusting hook size or stitches to preserve proportions. These details save frustration and help you finish with a polished look.

Clara Fern — Crochet Artist & Amigurumi Designer
Clara Fern is a crochet artist and amigurumi designer based in Austin, Texas. With 9 years of experience working with yarn and hook, she transformed a lifelong passion for handcraft into a creative mission: making amigurumi accessible, fun, and deeply rewarding for crafters of all levels.
Clara discovered amigurumi during a trip to Japan in 2017, where she fell in love with the art of bringing tiny characters to life through crochet. Back home in Texas, she spent years studying color theory, design principles, and advanced crochet techniques — developing her own signature style that blends kawaii aesthetics with original character design.
Through maclafersa.com, Clara shares everything she has learned — from choosing the right yarn and reading your first pattern, to designing fully original amigurumi characters from scratch. Her writing is known for being clear, detailed, and genuinely helpful, with no steps skipped and no secrets kept.
When she’s not crocheting, Clara enjoys watercolor painting, visiting local yarn shops, and drinking way too much coffee while sketching new character ideas.


