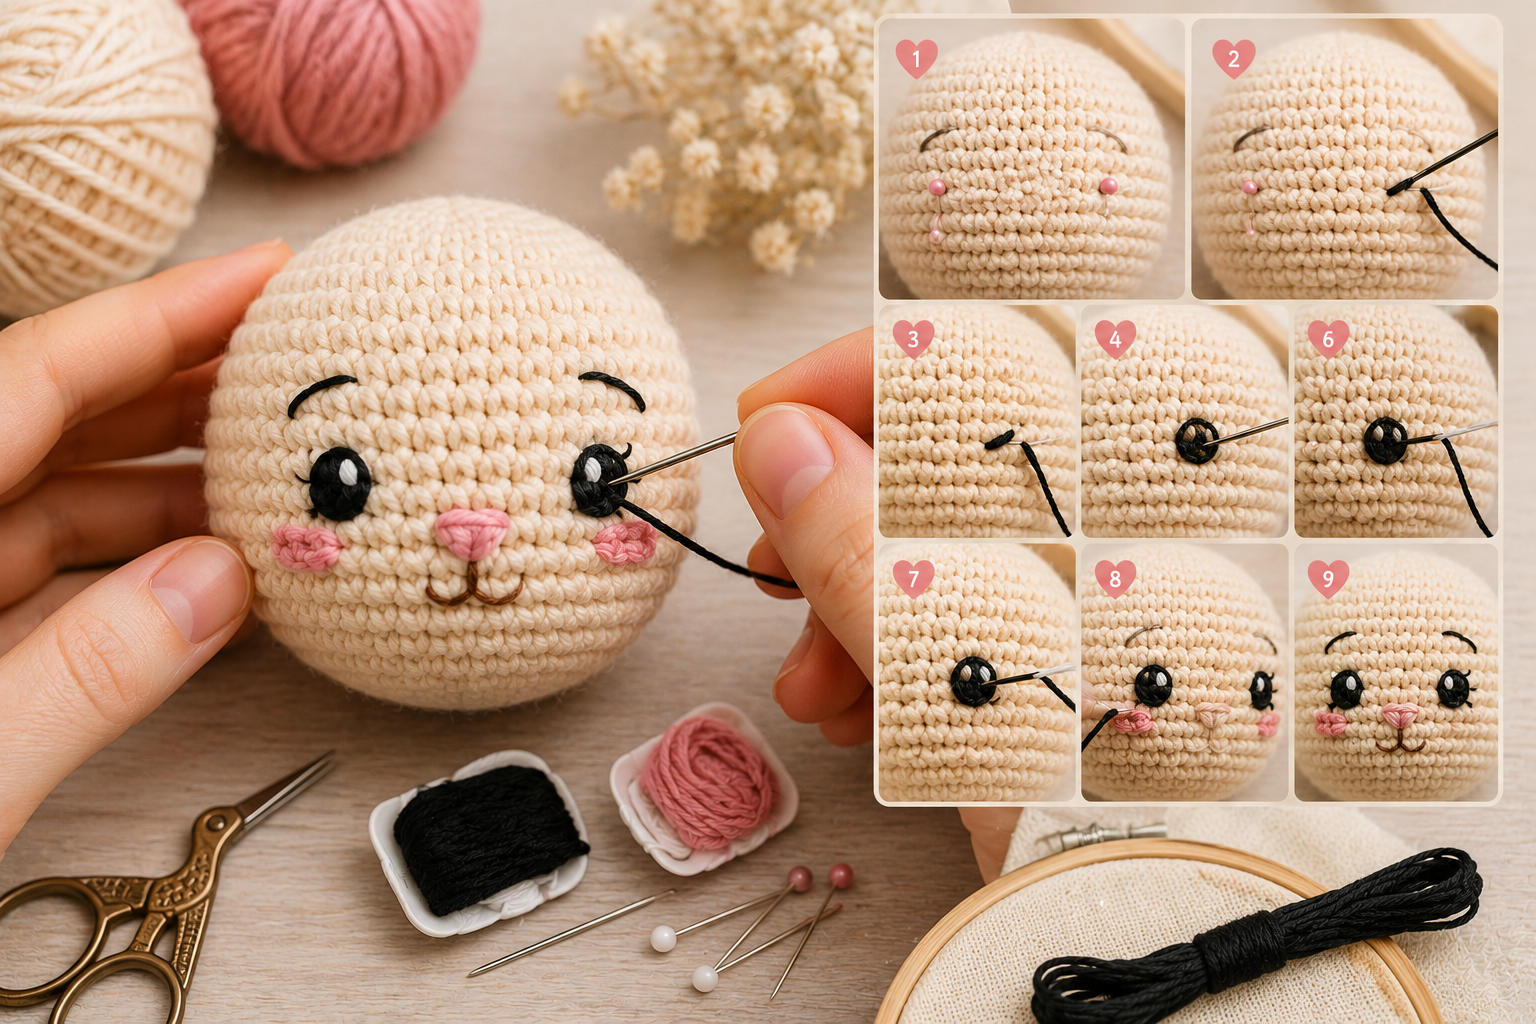
How to Embroider Eyes on Amigurumi Step by Step
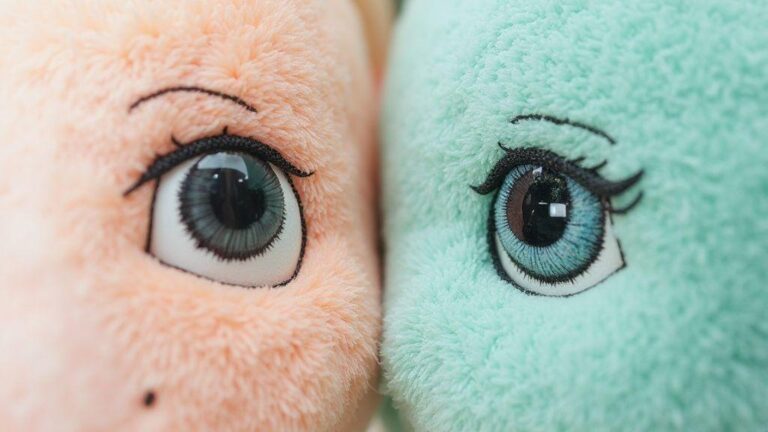
The eyes are one of the most important details in any amigurumi project. Even a beautifully crocheted character can feel unfinished if the eyes look uneven, misplaced, or overly stiff.
Embroidered eyes are a great alternative to plastic safety eyes because they give you much more control over shape, expression, and style. They can be tiny and subtle, large and cartoon-like, sleepy, smiling, curious, or playful.
They are also especially useful when you want a softer handmade look or when you prefer to avoid plastic facial components altogether.
The good news is that embroidered eyes don’t need to be complicated.
With the right thread, careful placement, and a few simple techniques, you can create clean, balanced eyes that completely transform the personality of your amigurumi.
In this guide, you’ll learn how to embroider eyes on amigurumi step by step, how to keep both eyes symmetrical, which stitches work best, and how to avoid the most common mistakes.
Why Choose Embroidered Eyes?
Many amigurumi patterns use safety eyes because they are quick, consistent, and easy to install.
However, embroidered eyes offer several advantages.
They allow you to create:
- closed eyes
- smiling eyes
- sleepy expressions
- curved eyes
- oval eyes
- tiny eyes
- cartoon-style eyes
- eyelashes
- highlights
- eyebrows
You can also adjust the shape much more easily than you can with fixed plastic eyes.
Another advantage is scale.
On very small amigurumi, safety eyes may look disproportionately large. Embroidery allows you to create extremely tiny facial features without changing the proportions of the character.
Embroidered eyes are also useful when making soft toys where you want all facial details to be made from yarn or thread.
Materials You’ll Need
Before beginning, gather a few basic materials.
You will need:
- finished or nearly finished amigurumi head
- embroidery floss or thin yarn
- blunt tapestry needle or embroidery needle
- scissors
- pins or stitch markers
- optional white thread for highlights
For most designs, black or dark brown thread works well.
However, you can also experiment with gray, blue, green, or other colors depending on the character.
The thickness of the thread should match the scale of the project.
For very small amigurumi, full-thickness yarn may look too bulky.
In that case, embroidery floss is often easier to control.
1. Stuff the Head Before Placing the Eyes
Whenever possible, determine eye placement after the head has been at least partially stuffed.
An unstuffed crochet head looks much flatter than the finished piece.
Once stuffing is added, the fabric stretches slightly and the curvature of the head changes.
This can affect how the eyes appear.
Add enough stuffing to establish the final head shape without closing the opening completely.
Then examine the head from the front and sides.
Make sure it is symmetrical before beginning the facial features.
2. Find the Center of the Face
Before placing the eyes, identify the center front of the head.
You can use stitch markers or pins to create a temporary vertical guideline.
For example, place one marker near the top center of the head and another near the bottom center.
Imagine a straight line between them.
This gives you a reference point for positioning both eyes evenly.
Don’t rely entirely on visual estimation.
Because crochet stitches spiral around the head, it can sometimes be difficult to recognize the true center without counting.
3. Decide the Height of the Eyes
Next, decide which round the eyes should sit on.
Count rounds from the top or bottom of the head.
Place two pins along the same horizontal round to mark the approximate eye positions.
At this stage, don’t worry about perfect spacing.
The first goal is simply to make sure both eyes are at the same height.
Lower eye placement often creates a cute, youthful expression because it leaves more space above the eyes.
Higher placement can create a more mature or elongated face.
Experiment before making anything permanent.
4. Determine the Spacing Between the Eyes
Now count the stitches between the proposed eye positions.
Place pins where you think the eyes should go.
Then look at the head from a normal viewing distance.
Try moving the pins closer together.
Then move them farther apart.
Small changes can have a significant effect.
Widely spaced eyes often look softer and more innocent.
Closer eyes can create a more alert or focused expression.
There is no universal perfect distance.
The best spacing depends on the head shape, muzzle size, and overall character design.
5. Choose the Eye Shape
Before threading your needle, decide what kind of eye you want.
Some of the easiest embroidered eye styles include:
Tiny Straight Eyes
A single short horizontal stitch creates a simple minimalist eye.
This works well for tiny characters.
Curved Closed Eyes
A curved embroidered line creates a peaceful, sleepy, or happy expression.
Oval Eyes
Several stitches placed side by side can create a small oval shape.
Round Eyes
A small cluster of embroidery stitches can imitate round safety eyes.
Crescent Eyes
A curved shape can create smiling or playful eyes.
Choose the simplest shape that communicates the expression you want.
6. Thread the Needle
Cut a manageable length of embroidery floss or yarn.
Avoid using an excessively long strand.
Long thread is more likely to twist, knot, or become fuzzy as it passes repeatedly through the crochet fabric.
Thread your needle and leave a short tail.
Depending on your preferred method, you can secure the thread internally or hide the ends inside the head.
Avoid creating bulky knots directly beneath the facial surface.
They may create visible bumps.
7. Insert the Needle From a Hidden Area
To hide the starting tail, insert the needle through an opening or another less visible area of the head.
Bring the needle out at the starting point of the first eye.
Gently pull until the tail disappears into the stuffing.
If the head is already closed, you can insert the needle through the back or bottom of the head and bring it out at the eye position.
The yarn tail can later be hidden inside the head.
8. Create a Simple Straight Eye
For a basic straight embroidered eye, bring the needle out at one side of the planned eye.
Insert it again at the opposite side.
Pull gently.
Do not tighten excessively.
The thread should sit against the crochet surface without cutting deeply into the stitches.
If you want the eye to appear thicker, repeat the stitch once or twice in nearly the same position.
Keep the layers aligned.
9. Create a Curved Eye
A curved eye usually requires several shorter stitches rather than one long stitch.
Start at the outer corner.
Create a short stitch toward the center.
Then create another short stitch following the curve.
Continue until you reach the inner corner.
Short stitches make the curve smoother and easier to control.
One long stitch may appear too straight or stiff.
For a smiling closed eye, curve the line gently upward.
For a sleepy eye, a softer downward or neutral curve may work better.
10. Create Round or Oval Eyes
If you want embroidered eyes that resemble safety eyes, build up the shape gradually.
Start with several vertical stitches placed closely together.
Add more stitches beside them until the shape becomes approximately oval or round.
Then add small stitches around the edge if necessary to smooth the outline.
Try to keep the thread tension consistent.
If some stitches are much tighter than others, the eye may become uneven.
11. Make the Second Eye Match the First
The second eye is usually the hardest part.
Before stitching it, compare the position carefully with the first eye.
Count:
- rounds from the top
- stitches from the center
- width of the eye
- height of the eye
Use the same number of stitches whenever possible.
After adding one or two stitches to the second eye, stop and compare both sides.
It’s easier to correct the shape early than after the entire eye is filled.
12. Add White Highlights
Small highlights can make dark embroidered eyes look much more lively.
Use white embroidery thread.
Add one tiny stitch near the upper portion of each eye.
The highlight should be placed in roughly the same position on both eyes.
For example, if the highlight appears in the upper right area of the first eye, place it correspondingly on the second.
You don’t need large white details.
A tiny stitch is often enough to suggest reflected light.
13. Add Eyelashes
Eyelashes can add personality to a character.
Use a thin thread and keep the stitches small.
One or two lashes at the outer corner are usually enough.
Avoid making them too long.
Very dramatic eyelashes can overwhelm a tiny amigurumi face.
For a delicate look, use a thinner strand than the one used for the main eye.
14. Add Eyebrows
Eyebrows are optional, but they are excellent for controlling expression.
A simple short embroidered line above each eye can completely change the character.
Higher brows can create surprise or innocence.
Slightly angled brows may suggest curiosity or determination.
Soft curves create a gentle expression.
Before embroidering them permanently, place short strands of yarn on the surface to test different angles.
15. Use Eye Direction to Create Personality
Embroidered eyes don’t need to face directly forward.
If you’re creating more detailed eyes, you can shift the pupil or dark section slightly to one side.
This makes the character appear to be looking in a particular direction.
A sideways glance can look playful.
Upward-looking eyes can suggest curiosity.
Downward eyes can create a shy expression.
This is especially effective when making multiple characters that are designed to interact with one another.
16. Combine Eyes With Blush
Blush placed just beneath the eyes can create a warmer and more expressive face.
You can use:
- pink embroidery
- small crocheted stitches
- felt
- suitable doll-making blush materials
Keep the placement symmetrical.
Usually, blush looks natural when positioned slightly below and outward from the eyes.
Use it subtly.
A small amount often produces a better result than a large, saturated area.
17. Check the Face From a Distance
When embroidering, it’s easy to focus so closely on individual stitches that you lose sight of the whole face.
Pause regularly.
Set the head down and look at it from a distance.
Ask yourself:
Are the eyes level?
Do they appear equally sized?
Is one more curved than the other?
Does the spacing look balanced?
Does the expression match the character?
Viewing the face from farther away often reveals issues that aren’t obvious when you’re holding it close.
18. Photograph the Face
Taking a photo can make asymmetry easier to notice.
Photograph the amigurumi straight on.
Look at the image on a screen.
Because you’re viewing it in a flatter format, differences in eye height or spacing may become more obvious.
This is especially useful before you secure all thread ends permanently.
19. Fix Uneven Embroidered Eyes
If an eye looks wrong, don’t be afraid to remove it.
One of the biggest advantages of embroidery is that it’s usually easier to redo than installed safety eyes.
Carefully cut or pull out the problematic stitches.
Then begin again.
Avoid repeatedly tightening and manipulating a badly placed eye in hopes that it will correct itself.
Sometimes starting over takes less time and produces a cleaner result.
20. Avoid Pulling Too Tightly
Overtightening is one of the most common embroidery mistakes.
When the thread is pulled too firmly, it can sink deeply into the crochet fabric and distort the head.
The eye may appear recessed or uneven.
Use enough tension to keep the thread secure against the surface, but not enough to compress the stuffing significantly.
If you intentionally want an indented-eye effect, that should be done gradually and separately as a shaping technique.
21. Match Thread Thickness to the Project
Scale matters.
A thick strand of yarn may look perfect on a large plush amigurumi but far too heavy on a miniature doll.
For small projects, consider separating embroidery floss into fewer strands.
For medium-sized projects, full embroidery floss or thin yarn may work well.
For large amigurumi, thicker yarn can create stronger visual features.
Always test the thread against the head before stitching.
22. Practice on a Test Piece
If you’re nervous about embroidering directly onto a finished amigurumi, practice first.
Crochet a small sphere or use a leftover swatch.
Experiment with:
- straight eyes
- closed eyes
- oval eyes
- eyelashes
- highlights
- eyebrows
This gives you a chance to understand how the thread behaves without risking a finished project.
It can also help you discover which eye style you prefer.
Common Mistakes to Avoid
Several problems appear frequently when embroidering amigurumi eyes.
Placing the Eyes Without Measuring
Visual estimation alone can lead to uneven placement.
Count rounds and stitches.
Using Thread That’s Too Thick
Bulky thread can overpower a small face.
Choose a thickness appropriate for the scale.
Pulling Too Tight
Excessive tension can distort the crochet fabric.
Using One Long Stitch for Curved Eyes
Multiple shorter stitches usually create smoother curves.
Finishing One Eye Completely Before Checking the Second
Compare constantly while working.
Ignoring the Rest of the Face
The eyes need to work with the nose, mouth, muzzle, and head shape.
Safety Considerations
One reason some makers choose embroidered eyes is to avoid hard plastic components.
However, secure construction still matters.
Make sure embroidery threads are properly anchored and the ends are hidden inside the toy.
Avoid leaving loose loops that could catch on fingers or objects.
If you’re making toys for children, consider the overall construction and applicable toy-safety recommendations for your region.
The facial embroidery should be durable enough to withstand normal handling.
How to Choose the Best Eye Style
The best embroidered eye style depends on the personality you want to create.
For a peaceful character, try gently closed eyes.
For a cheerful character, use upward-curved smiling eyes.
For a classic teddy-bear appearance, small dark oval eyes can work beautifully.
For a cartoon-inspired character, larger embroidered eyes with highlights can create stronger expression.
For minimalist mini amigurumi, a single tiny stitch for each eye may be enough.
Start by deciding how you want the character to feel.
Then choose the eye style that communicates that emotion most clearly.
Final Thoughts
Learning how to embroider eyes on amigurumi is one of the most useful finishing skills a crocheter can develop.
Unlike fixed plastic eyes, embroidery gives you almost unlimited control over shape, size, expression, and placement.
The process starts with careful planning.
Stuff the head enough to establish its final shape, identify the center of the face, count rounds and stitches, and test the eye placement before beginning.
Then build the eyes slowly using controlled stitches and moderate tension.
Simple straight eyes, curved closed eyes, ovals, round shapes, highlights, eyelashes, and eyebrows can all be combined to create completely different personalities.
Most importantly, don’t expect both eyes to look perfect on the first attempt.
Embroidery is easy to adjust, and removing a few stitches is often part of the process.
With practice, you’ll become more confident in judging spacing, curves, proportions, and expressions.
Eventually, the eyes will stop feeling like a risky finishing step and become one of the most creative parts of designing your amigurumi.
Clara Fern — Crochet Artist & Amigurumi Designer
Clara Fern is a crochet artist and amigurumi designer based in Austin, Texas. With 9 years of experience working with yarn and hook, she transformed a lifelong passion for handcraft into a creative mission: making amigurumi accessible, fun, and deeply rewarding for crafters of all levels.
Clara discovered amigurumi during a trip to Japan in 2017, where she fell in love with the art of bringing tiny characters to life through crochet. Back home in Texas, she spent years studying color theory, design principles, and advanced crochet techniques — developing her own signature style that blends kawaii aesthetics with original character design.
Through maclafersa.com, Clara shares everything she has learned — from choosing the right yarn and reading your first pattern, to designing fully original amigurumi characters from scratch. Her writing is known for being clear, detailed, and genuinely helpful, with no steps skipped and no secrets kept.
When she’s not crocheting, Clara enjoys watercolor painting, visiting local yarn shops, and drinking way too much coffee while sketching new character ideas.