How to Change Yarn Colors Without Creating Visible Jogs
Color changes can completely transform an amigurumi design. A simple pattern can become a striped cat, a panda with contrasting markings, a doll wearing colorful clothes, or an animal with a different-colored belly simply by switching yarns at the right moment.
But there’s one common problem: the visible jog.
When crocheting amigurumi in continuous rounds, color changes don’t naturally line up perfectly. Instead, the beginning and end of a stripe can appear slightly offset, creating a noticeable step in the color transition.
This happens because crochet worked in a spiral doesn’t create perfectly horizontal rounds. Each new round sits slightly higher than the previous one, so when a new color is introduced, the transition can look uneven.
Fortunately, several techniques can make color changes much cleaner.
In this guide, you’ll learn how to change yarn colors in amigurumi without creating obvious jogs, how to create smoother stripes, when to use invisible color-change techniques, and how to hide yarn ends for a professional finish.
Why Do Color Jogs Appear in Amigurumi?
Most amigurumi patterns are worked in continuous spiral rounds.
Unlike joined rounds, you don’t finish each round with a slip stitch and then begin a new one. Instead, you simply continue crocheting into the next stitch.
This construction creates a smooth surface without a visible joining seam, which is one reason it’s so popular for amigurumi.
However, technically, the rounds aren’t perfectly horizontal.
Imagine drawing a line around a cylinder while gradually moving upward. When the line reaches its starting position again, it will be slightly higher than where it began.
Crochet spirals behave similarly.
If you suddenly switch from white yarn to red yarn, the final white stitch and first red stitch won’t sit at exactly the same height.
That’s what creates the jog.
The Basic Way to Change Yarn Colors
Before learning how to reduce the jog, it’s important to understand the correct basic color-change technique.
Suppose you’re crocheting with Color A and the next stitch needs to be Color B.
Don’t finish the final stitch completely with Color A.
Instead:
- Insert your hook into the next stitch.
- Yarn over with Color A.
- Pull up a loop.
- You now have two loops on your hook.
- Drop Color A.
- Yarn over with Color B.
- Pull Color B through both loops.
The stitch itself belongs visually to Color A, but the loop sitting on your hook is now Color B.
When you crochet the next stitch, you’ll begin cleanly with the new color.
This is one of the most important principles of crochet color changes:
Change yarn on the final yarn-over of the stitch before the new color begins.
If you wait until the next stitch to introduce the new yarn, the transition will be less precise.
Why Changing Color at the Right Moment Matters
The loop on your hook becomes the top of the next stitch.
That’s why changing colors during the final yarn-over creates a cleaner transition.
For example, if a pattern says:
R10: 30 sc in white
R11: 30 sc in pink
Work the first 29 stitches of Round 10 normally.
Begin stitch 30 using white.
After pulling up the first loop, complete that final stitch with pink.
You’re now ready to begin Round 11 with pink already on the hook.
This creates a much sharper transition than fastening off white and attaching pink afterward.
Why the Basic Color Change Still Creates a Jog
Even when you change yarn correctly, you may still notice a small step where the colors meet.
That’s not necessarily a mistake.
The issue comes from the spiral construction itself.
If you’re creating a solid section of a new color, the jog may be subtle enough that it doesn’t matter.
But if you’re creating stripes—especially strong contrasting stripes—the step can become much more obvious.
For example:
- black and white
- red and white
- navy and cream
- orange and black
High-contrast colors make irregular transitions easier to see.
That’s where jogless techniques become particularly useful.
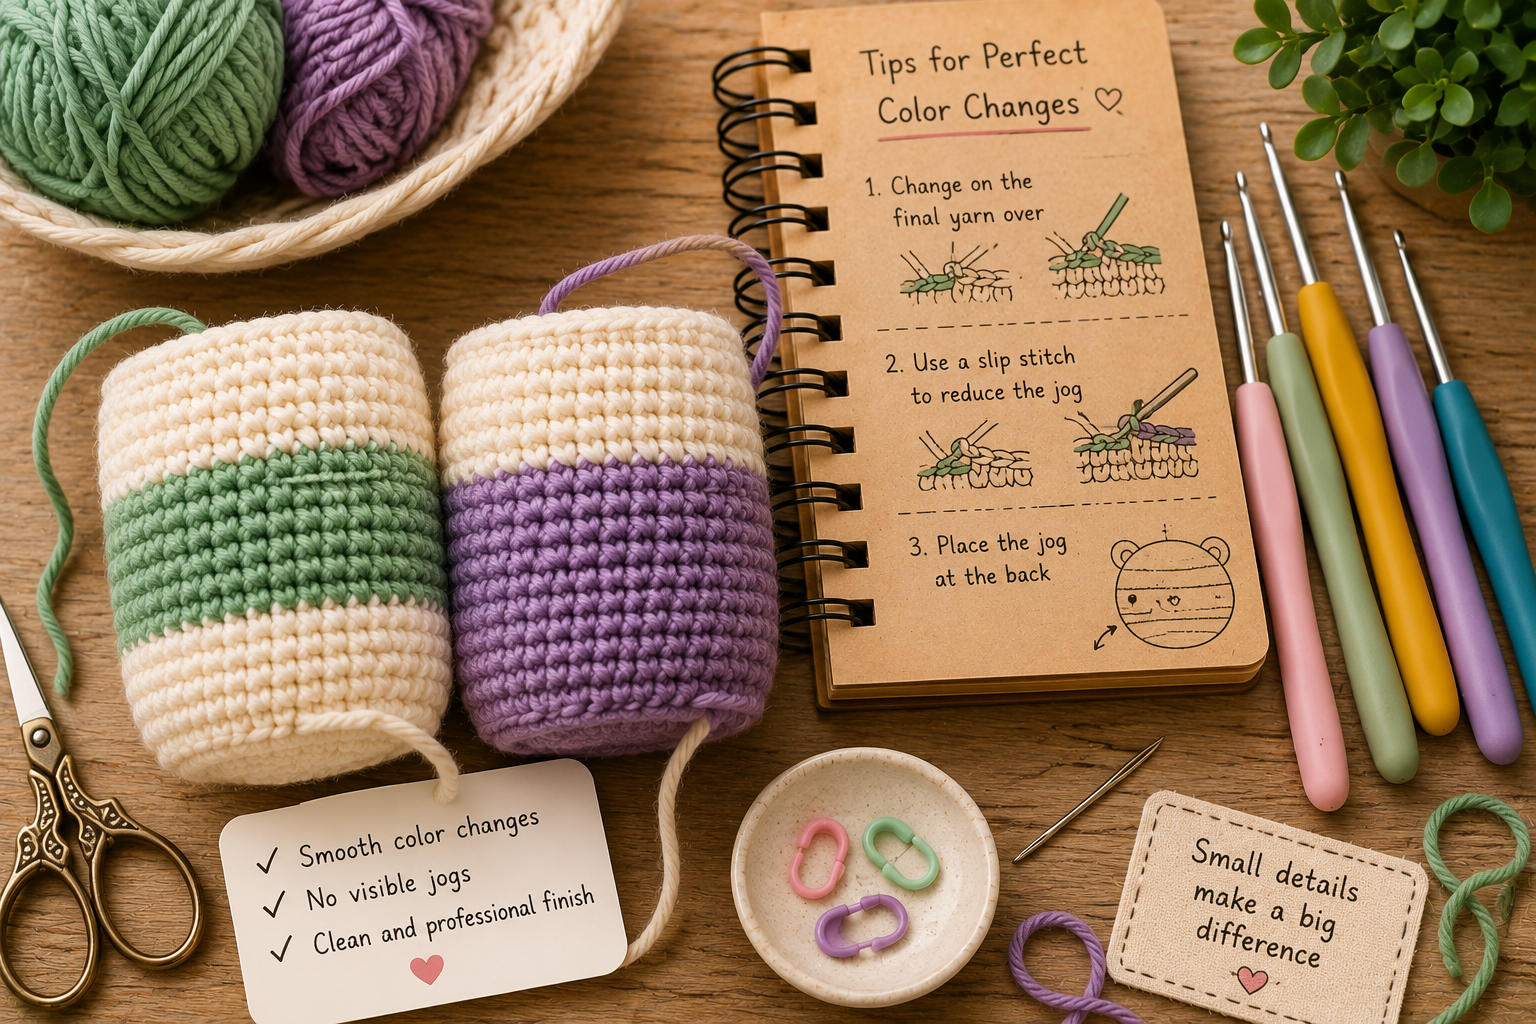
Method 1: The Slip Stitch Color Change
One simple way to soften the transition is to use a slip stitch at the beginning of the new color.
After changing to Color B, work a slip stitch into the first stitch of the new round.
Then continue crocheting normally.
Because a slip stitch is shorter than a single crochet, it helps reduce the sudden height difference between the two colors.
This can make the beginning of the stripe appear more gradual.
However, avoid pulling the slip stitch too tightly.
A very tight slip stitch can create an indentation or make the next round difficult to crochet into.
Method 2: The First-Stitch Slip Stitch Technique
Another variation is to replace the first single crochet of the new color with a slip stitch.
Suppose you’re beginning a pink stripe.
Instead of immediately working a regular single crochet, slip stitch into the first stitch.
Then work single crochet normally into the following stitches.
When you reach that area again on the next round, work normally into the slip stitch.
The shorter height of the slip stitch helps the new color rise more gradually instead of creating a sudden step.
This technique can work particularly well for simple horizontal stripes.
Method 3: Joined Rounds for Clean Stripes
If perfectly aligned stripes are extremely important to the design, consider using joined rounds instead of continuous spirals.
At the end of each round:
- Complete the final stitch.
- Slip stitch into the first stitch.
- Begin the next round according to your chosen joining method.
Because each round is intentionally closed, color transitions can be aligned more precisely.
However, there’s a trade-off.
Joined rounds may create a visible seam running vertically along the amigurumi.
For some designs, a small seam on the back is preferable to uneven stripes.
For others, continuous rounds look more natural.
Neither technique is universally better.
Choose according to which feature matters most for your particular character.
Method 4: Change Colors Away From the Front
Sometimes the easiest solution isn’t eliminating the jog completely—it’s placing it where nobody will notice.
If your amigurumi has a clear front and back, position color changes toward the back.
This works particularly well for:
- dolls
- bears
- standing animals
- characters wearing clothes
- striped bodies
Before beginning the project, identify where the spiral-round transition naturally occurs.
If possible, orient that area toward the back of the character.
Then even if a tiny jog remains, it won’t interrupt the main visual area.
This is a simple design decision that can make a major difference in the finished appearance.
Method 5: Use Surface Embroidery to Correct Tiny Jogs
If you’ve already finished the piece and a color transition looks slightly uneven, you may be able to correct it without unraveling anything.
Thread a tapestry needle with matching yarn.
Use one or two small stitches to visually extend the shorter side of the stripe.
Follow the direction of the existing crochet stitches as closely as possible.
This isn’t intended to create an entirely new section of color.
It’s simply a way to disguise a tiny step.
When done carefully with matching yarn, the correction can be almost invisible.
Method 6: Duplicate Stitch Over the Transition
Duplicate stitch is another useful finishing technique.
Thread a yarn needle with the stripe color and stitch over an existing crochet stitch, following its shape.
This can visually change the color of one stitch near the transition and make the stripe appear more level.
Duplicate stitch works particularly well when the jog is only one stitch wide.
It’s much easier than unraveling several rounds just to correct a small visual imperfection.
Changing Colors Within the Same Round
Not every color change happens between complete rounds.
Some amigurumi designs use several colors within a single round to create:
- facial markings
- bellies
- clothing
- patches
- paws
- animal patterns
For example:
10 sc white, 8 sc brown, 10 sc white
In this situation, every transition should happen on the final yarn-over of the previous stitch.
When approaching the brown section, begin the last white stitch normally but finish it using brown.
When returning to white, begin the final brown stitch with brown and complete it with white.
This creates much cleaner boundaries.
How to Carry Yarn Inside Amigurumi
If you’ll return to the previous color after only a few stitches, you don’t necessarily need to cut the yarn.
Instead, you can carry the unused yarn inside the piece.
For example, imagine you’re creating a white belly patch on a brown animal.
Rather than cutting brown yarn every round, leave it inside while working the white section.
When it’s time to return to brown, pick it up again.
This saves time and reduces the number of yarn ends.
However, don’t pull the carried yarn too tightly.
If you do, the fabric may pucker.
Leave enough slack for the crochet surface to maintain its natural shape.
Should You Crochet Over the Unused Yarn?
Another option is to crochet over the unused yarn.
Place the inactive strand along the top of the stitches from the previous round.
Then crochet around it using the active color.
This traps the unused yarn inside the new stitches.
The technique keeps the interior tidy and makes switching colors convenient.
However, it isn’t ideal for every color combination.
If you’re crocheting with very light-colored yarn over a dark strand, the carried yarn may show through the stitches.
Always check the outside of the amigurumi as you work.
When Should You Cut the Yarn?
Cutting the yarn makes sense when:
- the previous color won’t be used again soon
- carrying it would create excessive bulk
- the colors are highly contrasting
- the carried yarn might show through
- the color sections are far apart
Leaving the yarn attached makes more sense when the colors alternate frequently.
For example, a striped bee made with yellow and black yarn may be easier to crochet without cutting the yarn after every stripe.
How to Prevent Loose Loops at Color Changes
Color-change points sometimes become looser than surrounding stitches.
This happens because one yarn is being released while another is introduced.
After completing the first few stitches in the new color, gently pull the previous yarn until the transition sits neatly against the fabric.
Don’t pull excessively.
You’re only removing unnecessary slack.
Then continue crocheting with normal tension.
Check the transition again after several stitches.
Maintain Consistent Tension
Changing yarn can unconsciously change your tension.
You may pull the new color more tightly because you’re trying to secure it, or work more loosely while managing two strands.
Either problem can make the transition more visible.
Try to maintain the same tension you used throughout the rest of the project.
If necessary, pause after the first few stitches and compare their size with the previous round.
The goal is for the stitches to look identical apart from their color.
Use a Stitch Marker
A stitch marker becomes even more important when you’re working with color changes.
Mark the first stitch of each round.
This lets you see exactly where the spiral transition occurs and helps you plan where color changes should begin.
Without a marker, it’s easy to lose track of the true beginning of the round, especially when alternating several colors.
You can also use additional markers to indicate where color sections begin and end.
Plan Color Changes Before Starting
Complex colorwork becomes much easier when planned in advance.
If you’re designing your own pattern, sketch the character first.
Determine where the major color transitions should occur.
Then think about how those areas correspond to the crochet rounds.
For example, if you want a white belly patch centered on the front of a 36-stitch body round, you might decide that the middle 12 stitches should be white.
That leaves 24 brown stitches.
You could distribute those approximately evenly around the sides and back to center the patch.
Planning helps prevent markings from drifting unintentionally as the rounds progress.
Remember That Spiral Crochet Naturally Shifts
When designing multi-round color sections, remember that continuous crochet spirals gradually shift.
If you work exactly the same stitch positions every round, the marking may not appear perfectly vertical depending on your stitch construction and tension.
You may need to adjust the beginning or ending position of the color section occasionally.
This is particularly important for:
- belly patches
- face markings
- vertical stripes
- clothing openings
Always evaluate the actual fabric instead of relying only on theoretical stitch placement.
Use Yarn Under for Sharper Stitches
Some amigurumi makers prefer the yarn-under single crochet technique.
Instead of wrapping the yarn over the hook during the first part of the stitch, the yarn is brought under the hook.
This often creates more compact, X-shaped stitches.
The tighter stitch structure can make some color transitions appear sharper.
However, yarn under also changes the appearance and tension of the entire fabric.
If you decide to use it, it’s generally better to use the technique consistently throughout the project rather than switching only during color changes.
Choose Colors With Similar Yarn Properties
Color changes become more difficult when the yarns behave differently.
For example, imagine combining:
- firm cotton
- fluffy acrylic
Even if both yarns are labeled as the same weight, their stitches may have different sizes and textures.
For clean transitions, try to use yarns with similar:
- fiber composition
- thickness
- twist
- texture
- elasticity
Using different colors from the same yarn line is often the easiest solution.
Be Careful With Dark and Light Contrasts
Dark yarn can sometimes show underneath lighter stitches.
This becomes particularly noticeable when carrying black yarn beneath white or cream stitches.
If the dark strand is visible through the fabric, consider cutting it instead of carrying it.
Alternatively, allow the unused strand to float loosely inside the amigurumi rather than crocheting directly over it.
Check the surface frequently.
It’s much easier to correct the problem after five stitches than after five rounds.
How to Hide Yarn Ends After a Color Change
When you do cut the yarn, the ends should be secured and hidden.
If the piece is still open, you can tie or weave the ends securely on the inside.
Avoid creating large knots that may become visible through the crochet surface.
Another method is to weave the tail through several stitches on the inside using a tapestry needle.
For stuffed pieces, yarn tails can often be pulled through the body and trimmed so the end disappears inside.
The exact method depends on whether the yarn end contributes structurally to the piece.
Color Changes in Small Amigurumi
Color transitions can be particularly noticeable on miniature amigurumi because every stitch represents a larger percentage of the overall design.
One stitch may significantly change the appearance of a stripe.
For tiny projects:
- use thinner yarn
- maintain very consistent tension
- plan color placement carefully
- consider embroidery for extremely small markings
Sometimes it’s cleaner to crochet a tiny character in one base color and embroider a small contrasting detail afterward.
Color Changes in Large Amigurumi
Large amigurumi provide more room for gradual color transitions.
However, they also make long jogs more noticeable.
For broad stripes, jogless techniques become especially useful.
Large plush yarn can sometimes hide transitions naturally because the fibers obscure individual stitches.
Still, always check the color boundary before continuing several rounds.
Creating Striped Amigurumi
Stripes are one of the best ways to practice color changes.
Try a simple striped sphere using two contrasting yarn colors.
For example:
R1–6: Color A
R7–9: Color B
R10–12: Color A
R13–15: Color B
Experiment with different transition methods.
Make one sample using ordinary continuous rounds.
Make another using the slip-stitch technique.
Compare the joins.
This is an excellent way to discover which method works best with your personal tension.
Common Color-Change Mistakes
Changing Color Too Late
If you complete the entire final stitch with the old color and introduce the new color afterward, the transition won’t be as clean.
Change during the final yarn-over.
Pulling the New Yarn Too Tight
This can create an indentation at the color-change point.
Leaving Too Much Slack
Loose loops can appear between the two colors.
Carrying Dark Yarn Under Light Yarn
The unused strand may become visible through the stitches.
Losing Track of the Round
Without a stitch marker, color placement can drift.
Expecting Spiral Rounds to Align Perfectly
A small offset is a natural consequence of continuous crochet.
Use a jogless technique when precise stripes are important.
Should Every Jog Be Corrected?
Not necessarily.
Amigurumi is handmade, and tiny variations are normal.
Before spending significant time correcting a color transition, look at the character from a normal viewing distance.
If the jog is positioned on the back and barely noticeable, it may not need any correction.
If it runs directly across the front of a character’s shirt or facial marking, improving it may be worthwhile.
The importance of the transition depends on the design.
Which Jogless Technique Is Best?
There’s no single technique that works perfectly for every project.
For ordinary color changes, switching yarn on the final yarn-over of the previous stitch is often enough.
For stripes, adding a slip-stitch transition can reduce the visible step.
For designs where stripe alignment is extremely important, joined rounds may produce cleaner results.
For tiny imperfections discovered after finishing, embroidery or duplicate stitch can disguise the transition.
And when possible, simply positioning the color change toward the back of the character can be one of the most effective solutions.
Practice With a Simple Test Tube
Before attempting complicated colorwork, crochet a small cylinder.
Start with one color and work several rounds.
Change to a contrasting color and experiment with different techniques.
Try:
- regular color change
- slip-stitch transition
- joined rounds
- carried yarn
- cut yarn
Compare the results side by side.
Because every crocheter’s tension is slightly different, hands-on testing is often more useful than searching for one universal method.
Final Thoughts
Learning how to change yarn colors without creating visible jogs is one of those small skills that can make amigurumi look significantly more polished.
The first step is mastering the basic color change: begin the final stitch with the old color and complete its last yarn-over with the new color.
From there, you can experiment with slip stitches, joined rounds, careful yarn carrying, duplicate stitch, and strategic placement to make transitions even cleaner.
Remember that continuous spiral crochet naturally creates a slight height difference between the beginning and end of each round. A tiny jog doesn’t necessarily mean you’ve done anything wrong.
The goal is to control that transition so it doesn’t distract from the finished character.
With careful tension, thoughtful color placement, and the right technique for each project, you can create crisp stripes, clean markings, and smooth color changes that give your amigurumi a much more professional finish.

Clara Fern — Crochet Artist & Amigurumi Designer
Clara Fern is a crochet artist and amigurumi designer based in Austin, Texas. With 9 years of experience working with yarn and hook, she transformed a lifelong passion for handcraft into a creative mission: making amigurumi accessible, fun, and deeply rewarding for crafters of all levels.
Clara discovered amigurumi during a trip to Japan in 2017, where she fell in love with the art of bringing tiny characters to life through crochet. Back home in Texas, she spent years studying color theory, design principles, and advanced crochet techniques — developing her own signature style that blends kawaii aesthetics with original character design.
Through maclafersa.com, Clara shares everything she has learned — from choosing the right yarn and reading your first pattern, to designing fully original amigurumi characters from scratch. Her writing is known for being clear, detailed, and genuinely helpful, with no steps skipped and no secrets kept.
When she’s not crocheting, Clara enjoys watercolor painting, visiting local yarn shops, and drinking way too much coffee while sketching new character ideas.