
Hide seams for a clean finish
When you finish your project, the way you hide seams matters as much as the stitches you used to create them. You’ll want to keep your amigurumi looking smooth and professional, with seams that vanish from sight. Start by laying pieces flat and aligning them precisely before you sew. Small, deliberate stitches help you pull edges together without puckering. Use a tapestry needle with a handle you’re comfortable holding, and work on a flat surface so you can see every edge as you go. If you notice a slight gap, slide a tiny amount of yarn into the gap with a single thread to fill it, then continue stitching. The goal is to keep the fabric even and the seam invisible, so your finished piece reads as one whole sculpture rather than a collection of parts.
You’ll also want to think about the way you secure ends. When you finish with a knot, weave the end back into the seam line so it doesn’t poke through to the outside. You can weave along a column of stitches to tuck the end away. If your yarn color is a touch different from the surrounding fabric, try a tiny lick of Fray Check or a drop of fabric glue on the inside to prevent fraying, but avoid shiny residues that can catch light and draw attention. By treating each seam like a delicate line, you keep the surface clean and the form cohesive.
Finally, consider blocking or lightly shaping your crocheted pieces after sewing. A gentle block can relax tension and align stitches so the seams sit flat. If you’re joining parts in a complex amigurumi, pin pieces in place and test the look before final stitching. This extra step saves you from reworking seams later and helps you achieve that professional, seamless finish that makes your work stand out.
Compare crocheted joins vs sewn joins amigurumi for invisibility
Crocheted joins often appear almost invisible because the stitches merge with the fabric itself. You can crochet a little extra along the edge as you join, which hides the seam inside the fabric. This method is great for round shapes where you want a smooth transition. You’ll notice the seam blends with the texture, and the color looks continuous from stitch to stitch. If you’re new to joining, practice with a scrap piece to get a feel for how tight you pull and how the yarn sits.
Sewn joins give you precise control over alignment, especially on flat panels. They’re excellent for matching edges exactly and for parts that need to be flush against each other. The trade-off is that you might see a faint line if the tension isn’t perfectly balanced or if the yarn shows through the stitches. To minimize this, choose a yarn with a tight twist and a needle size that lets you weave through the fabric smoothly. In the end, your choice depends on shape, texture, and how much you value invisibility versus ease of alignment.
For best invisibility, you’ll often combine both approaches. Start with a crocheted join where the seam will be hidden in the fabric’s texture, then use a sewn join on tighter edges that need exact placement. The comparison isn’t about one method being better; it’s about letting the shape and surface guide your technique. Remember: your goal is to keep the surface uninterrupted and the form intact, not to draw attention to the seam.
Use matching yarn and even tension so your joins blend
Matching yarn is your first line of defense against visible seams. If the color is off, even a tiny difference can catch the eye. Choose the same dye lot when possible, or test a small swatch to see how it reads on the finished surface. You’ll notice that even slight shade variations become noticeable in tight joins. Keep your tension steady as you work; if you pull too tight, you’ll create puckers, and if you’re too loose, the seam will look loose and gappy. Practice makes perfect, so take a moment to feel the difference between a snug hold and a slightly slack one.
As you work, slowly build the seam so it lays flat. Don’t rush the process, and avoid twisting edges as you join. If you’re joining towards the end of a piece, try to finish with a small, tight weave that sits just under the visible surface. The more consistent your tension, the less the seam will stand out. When you get this right, the join becomes a whisper rather than a line.
For amigurumi, this is especially important because the surface is your canvas. You want a cohesive look where each piece reads as part of the whole. If you ever notice a seam catching light or showing through, switch to a slightly thicker needle for weaving to flatten the area, then trim and secure. The result is a smooth, almost magical transition from piece to piece.
Finish edges neatly with invisible stitching
Finish your edges with a stitch that disappears into the fabric. Small, evenly spaced stitches that weave along the edge will pull the seam tight without making it obvious. Use a fine tapestry needle and insert it into the inside of the piece, not across the surface where a thread could shine. When you pull your thread to snug the edge, do it gradually and check the surface as you go. If you see a bump forming, back off a tiny bit and rework that section.
Weave the tail back and forth along the inside, then snip close to the work but leave a tiny tail to prevent unraveling. Press lightly with your fingers to check that the edge lies flat. If you’re dealing with a curved edge, take tiny stitches at intervals to keep the curve smooth. The goal is to create an invisible line that holds the shape without drawing attention to where you connected pieces.
For your amigurumi, finishing edges neatly helps your sculpture read as a single piece rather than a patchwork. The cleaner the finish, the more professional your final look will feel. Practice these stitches on scraps first, then apply them to your main project for the best result.
Make joins strong and long lasting
You want your projects to endure, so you focus on strong joins from the start. Start by choosing the right method for the job—crocheted joins for seamless bonds or sewn joins for sturdy seams. You’ll get better results if you plan where each join goes and how it will be stressed during use. Keep your tension even and check that each join sits flush with the surrounding stitches. When you feel confident with your technique, you’ll notice fewer gaps, fraying, or wobbling at the joints, which means your finished piece stays together longer.
As you work, keep your tools ready and your workspace clean. A small hook or needle that’s sharp enough to pierce fabric, but not so thick that it widens the hole, makes a big difference. You’ll avoid pulling stitches out or creating loose spots if you slow down a notch to recheck alignment before finishing a joint. If you practice on swatches, you’ll spot weak spots early and fix them before they become problems in your final piece.
Remember: strong joins aren’t just about strength, they’re about durability under daily use. Treat each join as part of the whole design, not an afterthought. When you approach joints with intention, you’ll finish with pieces that look neat and hold up to wear and tear.
Check durability of crocheted joins before use
Before you put your project to work, test a few gentle pulls on each crocheted join. You’re checking that the stitches stay tight and don’t loosen with movement. If any join shows slack, tighten it or redo it so the tension matches the surrounding rows. You’ll notice split or loose loops if you don’t test, and those weak spots can grow over time. Another trick is to press a light amount of steam from a household iron held at a safe distance; this can help set the join and reduce movement when you handle the item. If you’re making a wearable piece, test the flexibility by bending the area where the join sits. You’ll want it to move with you, not fight you.
When you review durability, look for uniform stitching around the join. Uneven gaps or obvious lumpiness can indicate weak points. If you find them, redo with attention to tension and placement. Keep notes on what works so you can repeat it on similar joins later. You’ll save time and frustration on bigger projects by fixing small issues early.
Check durability of sewn joins and reinforce when needed
Sewn joins should hold as a sturdy seam, but wear happens. Inspect each seam for slight gaps or pulled threads. If you notice any give, reinforce with extra backstitching or a second layer of stitching close to the original. You’re aiming for a seam that can handle daily use without stretching out or ripping. For soft fabrics, use a small stitch length so the seam stays compact and less prone to snagging. If you see fraying along the seam line, add a whisper of new thread to bridge the edge and prevent unraveling.
You’ll often find the strongest result when you blend stitches and use a locking technique at the ends. For example, using a couple of backstitches at the end of a seam can lock it in place. If you’re working with stretchy yarns or fabric, consider overcasting near the edge to keep the seam from curling. Reinforcing points of stress—like shoulders, elbows, or seat seams—helps your piece keep its shape longer and resist wear.
Reinforce stress points with extra yarn
Where stress concentrates, add a little extra layer of yarn to the inside of the join. You’re not adding bulk on the outside; you’re building strength from the inside. Wrap or knot the extra yarn near the joint, then weave it into the surrounding stitches so it’s invisible on the outside. This technique smooths load distribution and prevents the seam from popping open during use. If you’re crocheting, you can crochet a small overhang over the join and secure it with a few tight stitches. If you’re sewing, consider a short zigzag or cross-stitch over the stress area to lock fibers in place. You’ll notice the difference when you pick up the item again—no wobbly joints, just solid, steady seams.
Speed up assembly: choose the faster join
You want to finish your project faster, and choosing the right join is the first step. Start by testing a few options on scrap pieces to feel the difference in speed and ease. If you’re working with tight spaces or small pieces, a join that sits flat and requires fewer passes will save you minutes per seam. You’ll notice big gains by picking one that glides through fiber without snagging or pulling. Remember, the fastest join isn’t always the strongest, but for many amigurumi projects, a reliable, quick join helps you keep momentum.
When you pick a join, think about your final look too. A near-invisible seam can speed up your process because you won’t waste time adjusting stitches to hide it. Conversely, if you want a visible line for texture, that might slow you down slightly but give your piece character. Balance speed with your design goals, and you’ll finish faster without sacrificing style.
Keeping your tools ready also speeds things up. Have a blunt tapestry needle on hand, a small amount of matching yarn, and a sharp pair of scissors nearby. If you set up your workspace with these items, you won’t waste time hunting for them mid-assembly. A simple routine—clip tails as you go and join as you crochet—lets you move smoothly from piece to piece.
Estimate assembly time crocheted vs sewn to plan your project
You estimate by thinking through your steps. Crocheted joins can be faster because you don’t switch tools as often. If you’re crocheting a loop and joining with a slip stitch, you might finish a seam in a couple of minutes. Compare that to sewing, where you have to thread a needle, tie knots, and manage fabric edges. For small amigurumi parts, crocheted joins often win on speed. If your project is large, tally the number of seams and multiply by your average join time to get a realistic plan.
Plan for mistakes and adjustments. When you crochet, you can undo a join by pulling gently and redo without re-threading. Sewing can take longer if edges are uneven or the fabric shifts. Be honest about your skills: if you’re newer to crochet, crocheted joins tend to be friendlier for a quick finish. If you’re comfortable with a straight hand-sewn seam, you might prefer that look and still stay on track.
Keep a simple schedule. Break the project into sections, estimate the number of joins per section, and add a small buffer for tricky spots. If you finish early, you gain extra time for final finishing or adjusting texture. If you’re behind, you’ll know where to focus your practice, not your whole project.
Prep pieces so you reduce sewing after crocheting
Before you crochet the last stitch, trim tails and plan where each join will sit. Laying out pieces in the order you’ll assemble helps you see how many joins you’ll need and where. When you know the plan, you can crochet a few sections with joins already worked in place. This reduces the amount of finishing work you’ll do after crocheting.
Think about edge alignment now. If you plan to match up edges precisely, weave in a few longer tails so you can tuck them in after you finish the join. This saves you from grabbing a needle mid-project. A little forethought goes a long way, turning extra minutes into a smoother, cleaner finish.
Use color to your advantage. Choosing yarn you already have in the right shade means you won’t waste time swapping skeins or hunting for the right dye lot. If you must join with a different color, plan where those changes occur so you can hide them in seams or under features like ears or limbs. Quick prep brings big payoff in the end.
Use efficient stitching patterns to save time
Pick stitches that sit flat and pull together cleanly. A slip stitch or simple whip stitch can seal parts quickly without bunching. If you need a stronger join, a snug mattress stitch might be worth the extra passes, but keep your pace in mind. Practice the few steps you’ll use most to keep them smooth and fast. Consistency matters; the more you repeat a pattern, the faster you’ll become.
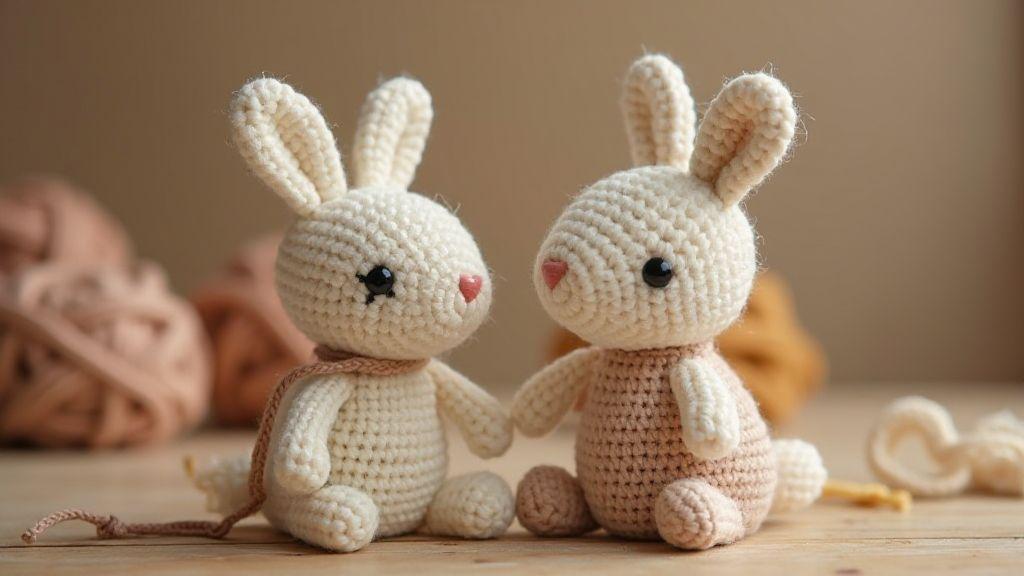
Crocheted Joins vs Sewn Joins: Pros and Cons for Amigurumi
Crocheted joins offer a continuous fabric feel with fewer gaps, often making seams near-invisible and ideal for round shapes. They’re quick to execute once you’re in rhythm and forgiving of small mistakes since yarn can give a little. The downside is that stitches can loosen without reinforcement, so add extra passes or rounds at stress points. For kids’ toys or frequent handling, well-reinforced crocheted joins stay tight and secure.
Sewn joins give crisper alignment and are excellent for flat panels or pieces that won’t stretch much. They can look neater, but a loose thread can unravel and stuffing may show if a seam isn’t fully locked. To minimize risk, use a tight twist yarn and a needle that weaves smoothly, and finish with a locking method. When a mix is used, you can get the clean look of sewn joins plus the durability of reinforced crocheted seams at stress points. This section helps you decide when to rely on crocheted joins, sewn joins, or a hybrid approach for your amigurumi.
Finish with locked stitches and hidden tails for strength
When you finish, you want stitches that won’t come undone. Use locked stitches at the end of each seam to prevent unraveling. A simple technique is to make a few tiny backstitches before trimming the thread close to the fabric. Weave the tails into the inside of the amigurumi so they stay hidden and don’t poke through the stuffing.
Hidden tails are your friend for a clean look. After you weave them, press lightly to blend any tiny lump of yarn into the fabric. If you’re crocheting, tuck the tail along a seam line before pulling the final stitch tight. For sewing, bury the end in a seam pocket or under folded fabric. The result is a toy that looks finished on the outside and holds together on the inside.
Secure joins to make toys child safe
You want your finished toys to be as safe as possible for kids, and that starts with secure joins. Your goal is to keep stuffing in and little bits out, so choose joining methods that hold up to gentle tugging and frequent handling. If a toy’s seam gaps open easily, a curious little explorer could pull out stuffing or snag a small part. Think of secure joins as the foundation of a trustworthy toy, not an afterthought.
When you work, focus on consistency. Use the same stitch type, the same tension, and the same seam throughout. Inconsistent joins can create weak spots where stuffing migrates or edges separate. If you need to switch colors or yarns, plan the transition so a knot or join doesn’t create a snag point. By keeping your joins uniform, you reduce chances of stuffing escape and keep the toy safely intact through lots of play.
You’ll also want to test your joins gently. Give the toy a light squeeze and a gentle pull in different directions. If a seam feels loose or a stitch pops, reinforce it right away. A little extra round of stitches now saves frustration later. Remember, secure joins aren’t just about looking neat; they’re about making toys that stand up to real kid-time without coming apart at the seams.
Follow child safety and secure joins rules when you finish toys
When you finish a toy, you must follow child safety rules for secure joins to minimize choking hazards. Choose stitches that stay compact and avoid loose ends that a tiny finger could pull loose. For example, use firm bedded knots or tiny backstitches that vanish into the body of the toy rather than sticking out. You want the seam to be confident enough that a pull won’t unravel a big chunk of stuffing.
Always weave in ends cleanly and trim closely. Leave no rough tails that could catch on fabric or skin. If a join is near an edge, tack it in place with a couple extra stitches to prevent it from reversing. By obeying safety rules, you turn your craft into a reliable, kid-friendly item rather than a delicate artwork that needs constant babysitting.
If you work with eyes, noses, or other small features, embed them securely or sew them on with double coverage. Avoid buttons or pieces that could come loose; opt for embroidered details or firmly attached safety eyes with backing. Your goal is a toy that invites play without inviting risk.
Choose methods that prevent stuffing escape and choking hazards
Pick joining methods that keep stuffing inside and small parts from escaping. Start with a tight, clean seam, then reinforce with a second pass or a secure knot. A common approach is a firm single crochet or whip stitch that sits flat against the fabric, followed by a hidden knot inside the seam line. This gives you a sturdy border that’s harder to pull apart.
Avoid long, loose ends near openings. If you must pull a yarn tail through, do it in a way that it ends up buried under a solid seam, not dangling where a child could grab it. When you’re finishing, consider using a closing technique like a zipper-like seam or a tight closing whip stitch that compresses the opening. The aim is a seam that stays shut when tugged or chewed on.
If you’re stuffing the toy, do it in stages and secure each section before moving on. This reduces bulk at the joins and helps keep the stuffing evenly distributed. A well-planned stuffing process supports a safer, more durable finish.
Double-check knots and fastenings before gifting
Before you gift, inspect every knot and fastening. Tug gently on all limbs, ears, and appendages to confirm they won’t loosen. If a knot looks suspicious or a join feels give-way, reinforce it now. A small extra stitch can save you a delayed gift, and a sudden returns scenario. It’s worth it to know you’ve done a thorough check.
Make sure all tails are woven in and sealed. Any exposed end can snag or pull loose. If you’re worried about a loose end, tuck it into a nearby seam and stitch over it again for extra security. A quick, careful review at the end means you’re confident about safety and quality.
Finally, do a quick final look at the overall shape. Ensure there are no gaps or folds that could trap fingers or shed stuffing. A neat, secure finish signals that you’ve put care into safety, not just appearance.
Use reinforced seam techniques for lasting finish
You want a sturdy finish that stays neat after lots of play. Start with reinforced seams where stress is highest, like arm and leg joins, and at the neck where heads meet bodies. Use a backstitch or ladder stitch to build extra strength, and double back over the same seam to lock in tension. When you sew or crochet, choose a yarn or thread that bears pull without fraying. Keep your tension firm but even, so the fabric doesn’t loosen over time. If you’re crocheting, weave a few extra passes through the last rounds before tying off to create a solid anchor point. This extra grip pays off in the long run, especially for smaller amigurumi that get a lot of handling.
You’ll notice a difference when you test your pieces. A reinforced seam resists popping apart during rough play or frequent dressing and undressing. If you’re crocheting, run a quick extra reinforcement along the seam line: a single extra row of slip stitches or a tight whip stitch can add a lot of staying power. For sewn joins, keep a steady hand and use baste stitches first, then switch to a stronger running stitch with a neat, tight finish. Don’t rush the last pass—this is where the finish shows its worth.
If you’re unsure about how much reinforcement you need, test a small seam by pulling gently. If it stretches, add another pass or two. Your goal is a seam that feels secure without puckering the fabric. Remember, reinforced seams aren’t about stiffness; they’re about resilience. A little extra stitching now saves you from loose seams later.
Apply reinforced seam techniques for amigurumi as you sew or crochet
You’ll apply a few practical tactics right at the seam line. Use a strong, thin yarn for the actual seam that blends with your amigurumi without standing out. When crocheting, consider an extra row of single crochets along the seam to create a double barrier against ripping. If you’re sewing, stitch with a tight backstitch, then add a second pass along the same line to lock the thread in place. Keep your work flat and avoid twisting as you go; a smooth seam distributes stress evenly.
In practice, you might pair a backstitch with a few hidden stitches to secure stuffing and prevent gaps. For crocheted joins, you can crochet over the seam once, then weave the yarn tail through the inside of the piece to hide it and add extra support. For sewn joins, baste first so you don’t lose alignment, then switch to a durable stitch like a linen stitch or an overcast stitch. You’ll feel the difference when you pull the piece: reinforced seams stay together better and look cleaner.
Compare advantages of crocheted joins amigurumi and benefits of sewn joins amigurumi when choosing
Crocheted joins give you continuous fabric with fewer gaps, which helps keep stuffing in place. They’re quick to execute once you’ve got the rhythm, and they tend to be more forgiving of small mistakes since the yarn can stretch a bit. The downside is that stitches can loosen if you don’t reinforce them, so you’ll want to add those extra rows or passes. For kids’ toys or frequent handling, crocheted joins can stay tight if you weave tails and secure every end.
Sewn joins, on the other hand, usually look crisper and can be very neat when you’re careful. They’re great if you’re stitching fabrics or pieces that won’t stretch as much. The risk is that a loose thread can unravel and stuffing might show if you miss a stitch, so you’ll need to finish with a solid locking method. If you’re combining both methods, you can enjoy the clean look of sewn joins with the durability of reinforced crocheted seams at stress points.
Finish with locked stitches and hidden tails for strength
When you finish, you want stitches that won’t come undone. Use locked stitches at the end of each seam to prevent unraveling. A simple technique is to make a few tiny backstitches before trimming the thread close to the fabric. This locks the end in place and reduces snags. Weave the tails into the inside of the amigurumi so they stay hidden and don’t poke through the stuffing.
Hidden tails are your friend for a clean look. After you weave them, press lightly to blend any tiny lump of yarn into the fabric. If you’re crocheting, tuck the tail along a seam line before pulling the final stitch tight. For sewing, bury the end in a seam pocket or under folded fabric. The result is a toy that looks finished on the outside and holds together on the inside.

Clara Fern — Crochet Artist & Amigurumi Designer
Clara Fern is a crochet artist and amigurumi designer based in Austin, Texas. With 9 years of experience working with yarn and hook, she transformed a lifelong passion for handcraft into a creative mission: making amigurumi accessible, fun, and deeply rewarding for crafters of all levels.
Clara discovered amigurumi during a trip to Japan in 2017, where she fell in love with the art of bringing tiny characters to life through crochet. Back home in Texas, she spent years studying color theory, design principles, and advanced crochet techniques — developing her own signature style that blends kawaii aesthetics with original character design.
Through maclafersa.com, Clara shares everything she has learned — from choosing the right yarn and reading your first pattern, to designing fully original amigurumi characters from scratch. Her writing is known for being clear, detailed, and genuinely helpful, with no steps skipped and no secrets kept.
When she’s not crocheting, Clara enjoys watercolor painting, visiting local yarn shops, and drinking way too much coffee while sketching new character ideas.


