
Choose your yarn and fibers
You’ll feel the difference the moment you pick the right yarn or fiber. Start with texture, weight, and how you want the finished piece to behave. For amigurumi hair, choose fibers that hold shape but stay soft. Look for fibers labeled for crochet or plush work, and keep budget in mind—premium options aren’t always necessary. Your choice sets the mood for the project, so pick with the final look in mind.
Think about color fastness and washing. If you plan to wash your amigurumi, pick fibers that hold color and don’t frizz when damp. For a keepsake, durability matters, so sturdier options may suit. Some fibers shed; test a small sample by pulling and washing to see how it behaves.
Also consider how easy the fiber is to work with. Fibers that split or fuzz a lot can slow you down. If you’re new to amigurumi hair, start with something forgiving and easy to manage. Comfort with the material translates into neater stitches and a nicer final piece. Let texture you enjoy, care you can handle, and a look that matches your doll’s character guide your choice.
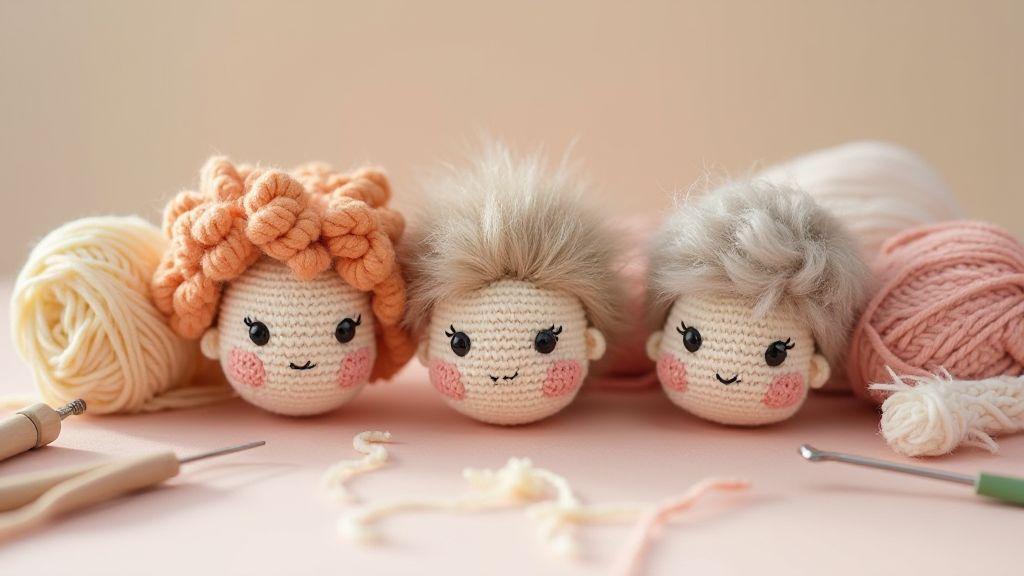
Compare yarn, mohair, and faux fur
First, yarn shines when you want controlled strands and a clean silhouette: sturdy, easy to shape, and you won’t fight with it as you stitch. If you’re after a neat, defined hairline or small spikes, yarn is your go-to. Second, mohair brings softness and a subtle halo. It can give you a fluffy, dreamy look, but it’s trickier to work with because it pills and sheds a bit. If you want a gentle, whimsical vibe, mohair can be worth the extra care. Third, faux fur creates big, dramatic effects. It’s dramatic and quick for large areas, but you’ll lose fine definition unless you cut and style it carefully. If your character wears very long, bold hair, faux fur can be a fantastic shortcut.
Mixing these options can give you the best of all worlds. For example, use yarn for the main hair body, add mohair for soft fringe, and save faux fur for a showpiece burst or a dramatic plume. Your doll’s personality guides the mix. Also, consider maintenance: yarns stay tidy with a quick comb; mohair needs gentle handling; faux fur benefits from trimming and brushing. Your choices become your signature style.
When you’re deciding, test swatches. Crochet a few strands, compare how they sit, and see how much bulk each option adds to the head. You’ll notice that even small differences in fiber can change how the hair moves and how easy it is to sew on. Use real-life tests to pick what fits your project best.
Pick the best yarn for amigurumi hair
For beginners, DK weight yarn is a reliable starting point. It’s not too thick, not too thin, and it gives you natural hair density without overwhelming the head. If you want a brighter, crisper look, go with a cotton blend. It’s smooth on the hook and lies flat, which helps when you’re shaping tiny strands. For a softer, fluffier appeal, choose a wool or wool-blend that blooms a bit after washing. The key is balancing texture with how easy you want to manipulate the strands.
Consider color options and dye lot consistency. Pick a color you love for the character’s hair and then get extra skeins to avoid shade mismatches later. When you pull the strand from the skein, check for even thickness and minimal splitting. You’ll thank yourself later when you don’t have to redo a chunk of hair because a strand keeps breaking. Finally, think about washability. If you’ll scrub your toy gently, wool blends that felt after a wash can still look cute, but you’ll want to test a sample first. Your decision should help you achieve the hairstyle you have in mind with less frustration.
Remember, the best yarn for amigurumi hair is the one that feels right to you in your hands. If you bite the bullet and test a few swatches, you’ll know exactly what to use for your character’s unique hair. This is a practical guide to How to Make Amigurumi Hair: Yarn, Mohair and Faux Fur Methods—start with what feels comfortable.
Essential tools list
You’ll need a simple set to keep your hair work smooth. A small, sharp pair of scissors helps you trim and shape strands cleanly. A fine-tibered crochet hook or blunt needle makes weaving hair into the head quick and tidy. A gentle spray bottle keeps fibers manageable during styling, while a soft comb or brush helps you separate and shape the strands without snagging. Finally, a few extra stitch markers are handy for keeping track of hair patterns and sections. Keep these tools within reach, and you’ll stay in your creative flow. This is a practical kit for How to Make Amigurumi Hair: Yarn, Mohair and Faux Fur Methods.
Secure hair on your amigurumi
You’re shaping a tiny character, and secure hair is where the magic starts. You’ll want strands that stay put through play, washing, and the occasional tug from a curious pet. Start by deciding your method: rooting, sewing, or a glue-based option. Each path has its own feel, but the goal is the same: hair that looks natural and stays strong. Think about the look you want—soft fringe, long locks, or funky micro-bangs—and plan accordingly. When you secure hair, you’re not just attaching fibers; you’re building personality into your amigurumi.
If you’re unsure, test on a spare piece of yarn or a mini sample head. This helps you see how dense you want the hair, how it drapes, and how it holds up when handled. Remember to keep tension even as you work. Loose threads can slip, and bulky areas can sag. You want a smooth silhouette that reads as real hair, not a collection of threads. And yes, it’s normal to redo a few spots until you’re satisfied—the character you’re creating deserves patience.
As you go, keep your tools close: a small tapestry needle, sharp scissors, a floss or thread that matches your yarn, and a tiny dab of fabric glue for sticking tips if needed. Label each technique in your mind so you can switch methods without chaos. Your amigurumi’s hair should feel cohesive, like a tiny person with a personal style. With careful planning, your finished head of hair will look deliberate, not accidental. This is a core step in How to Make Amigurumi Hair: Yarn, Mohair and Faux Fur Methods—secure, natural hair that stays put.
Rooting yarn hair step-by-step
Rooting gives you the most lifelike look. You’ll insert each strand into tiny holes so hair radiates from the scalp. Start by marking the scalp with tiny dotted lines where you want the hair to come from. This helps you space each strand evenly. Pick a hair length that matches your character—the shorter for a pixie cut, longer for a mermaid vibe. Use a fine needle or a rooting tool to pull each strand through the fabric. As you work, keep the ends clean and prevent fraying with a quick knot at the base when needed.
Next, bundle a few strands at a time to maintain even density. Insert them close to the scalp but leave a little room for shaping. After you pull a strand through, pull it snug, then tie off inside the head with a small knot or secure with a dab of fabric glue on the back. If you’re using mohair, you may need to trim and straighten each strand to keep the hair looking tidy and soft rather than fuzzy. Work slowly and step back often to evaluate how the hair falls and where you want to add more fullness.
When you finish rooting, comb gently with a wide-tooth comb or your fingers. You should see a natural drift at the ends and a realistic hairline along the edge of the scalp. If any strand looks out of place, carefully redo that spot with a new strand. Seal the tips with a tiny bit of glue to prevent shedding. Your amigurumi will have a head of hair that responds to light brushing and slight movement, just like real hair. This approach fits How to Make Amigurumi Hair: Yarn, Mohair and Faux Fur Methods—rooting for a natural look.
Sewing, knotting, and glue options
Sewing offers reliability with a clean, embedded look. You’ll sew hair as if stitching a fabric fringe, keeping the stitches small and close to the scalp. Start near the edge and work inward, securing each strand with short backstitches. For volume, layer several rows of stitches, letting the fibers lay flat and natural. If you’re using faux fur, trim the fur from a dense area and lay it down before stitching to prevent gaps. Always test a small section first to see how the fibers behave under tension.
Knotting is quick and great for playful, chunky looks. Tie small knots close to the scalp, then trim the tails so they resemble individual curls. Use a thread that blends with your yarn to keep the knots discreet. You can form a gentle cluster at the crown for a bouncy effect or line up knots along the hairline for a slick, intentional style. This method shines when you want a whimsical, stylized vibe.
Glue is fast and simple but needs careful control. Apply a tiny dot at the base of each strand or on the scalp area where you want the hair anchored. Press gently to secure, then let dry completely. For extra safety, place a small drop of glue on a toothpick and dab rather than dunk, so you don’t soak the fibers. Glue works well for faux fur tips or for tiny, delicate hairs near the ears. Always test glue on a scrap piece first to confirm that it won’t stiffen or discolor your yarn. This approach supports How to Make Amigurumi Hair: Yarn, Mohair and Faux Fur Methods by giving you flexible attachment options.
Strength and safety tips
Protect your work by keeping hands clean and hair tidy during the process. Use a soft grip on your amigurumi to avoid stretching the stitches. Reinforce the scalp area with a few extra rows if you’re planning heavy brushing or playing time. When you’re done, let any glue fully cure before handling aggressively. If you’re worried about shedding, seal the ends of the hair with a very light touch of glue or a fabric sealant meant for fibers.
Be mindful of small parts: hair fibers can be a choking hazard for little ones or pets. Consider adding a small, decorative cap or hairband that locks hair in place for extra safety. If you’re rooting for a child’s toy, choose shorter lengths and avoid loose fringe near the face to prevent eyes or mouth from getting snagged. Finally, store your amigurumi in a safe, dry place away from direct heat, which can distort fibers and weaken knots over time. This safety-minded approach is part of How to Make Amigurumi Hair: Yarn, Mohair and Faux Fur Methods.
Style and care for mohair doll hair
Mohair hair gives your dolls a soft shine and a lifelike look, but it needs steady care. Keep it fluffy and smooth without pulling out fibers. Start with a routine: gentle brushing after play, light detangling with a wide-tooth comb, and a quick clean if dust gathers. Use a tiny amount of leave-in conditioner or a few drops of water to reset a frizzy strand, then dry it flat to avoid kinks. Consistent care keeps the hair looking lush and prevents shedding when you handle the doll.
Keep color and texture in mind as you style. Mohair can be more delicate than synthetic hair, so handle with patience. When you’re dressing the doll or changing outfits, tuck the hair away from rough fabrics to prevent snagging. If you’re customizing, plan your look before you cut or trim. A little forethought saves you from over-trimming or misshaping the style. Treat mohair with respect, and it will reward you with a soft, natural drape.
If you’re sharing your doll with kids or showing it off, explain how to care for it too. A quick demo on brushing from tips to roots helps everyone avoid breakage. Keep a small brush handy and remind helpers to be gentle. A well-loved mohair hairstyle lasts longer and makes your doll feel more like a real, well-dressed character.
Brushing mohair hair without damage
When you brush mohair, you’re guiding the fibers, not forcing them. Start with a wide-tooth comb to detangle gently. Work from the ends toward the scalp, then finish with a soft brush to smooth the surface. If you feel resistance, dampen the hair slightly with water or a tiny amount of conditioner. This loosens knots without pulling out fibers. You’ll find the hair flows more naturally and stays intact.
For stubborn tangles, use a spray bottle with plain water and a drop of conditioner. Lightly mist the strand and repeat the detangling from ends to roots. Never yank or scrub at a knot; patience saves you from breakage. After brushing, pat the hair dry with a clean towel and let it air-dry into its natural shape. A little practice teaches you the rhythm: gentle, slow strokes that keep the mohair looking glossy rather than frayed.
If you’re styling for a specific look, avoid over-brushing after you’ve set the shape. Excess brushing can flatten volume and create flyaways. Instead, use your fingers to shape wisps and then a soft brush just on the surface. Remember, you’re coaxing texture into place, not carved into stone. Your doll’s hair will stay soft, bouncy, and ready for the next pose.
Trimming and shaping mohair doll hair
Trimming mohair is about precision, not speed. Start with small snips, just above the desired length. Use sharp, small scissors and work with the hair dry so you can see the true result. If you’re new to trimming, trim a little at a time and step back to evaluate. Over-trimming is hard to fix later, so err on the cautious side.
For shaping, section the hair and work in layers. This helps you create natural volume and prevent a boxy look. If you want bangs or a fringe, cut them last and keep the line slightly longer than you want; you can always trim again after styling. Keep the edge clean by wiping the scissors between cuts to avoid pulling fibers. Your goal is a soft, blended line that sits naturally with the rest of the hair.
After you trim, brush gently to blend any uneven spots. If you notice uneven length, tiny adjustments can make a big difference. Always step back and view the overall silhouette before deciding to trim more. You’ll end with a cohesive style that moves with the doll, not stiffly sits on top.
Work with faux fur doll hair
You’ll love how faux fur can give your dolls a fluffy, lifelike look. Start by choosing the right pile length for your project—shorter fibers feel cleaner for cute, compact hair, while longer fibers create dramatic styles. When you plan your design, think about a few key colors that will stay cohesive with your doll’s face and outfit. You can also mix a couple of shades to mimic natural shading, but keep your palette simple so your doll doesn’t look muddy. Practice on a small scrap first to see how the fibers behave with your glue or stitching method.
If you’re hand-sewing, you can use a curved needle to guide fibers and prevent snagging on the fabric. For glue, pick a clear, flexible adhesive that dries quickly but stays strong enough to hold a few gentle tug tests. You’ll want to brush the fur before you attach it so it lays flat, and you can use a comb or a soft toothbrush to lift the fibers into place. Your goal is a smooth, even fringe that blends with the doll’s scalp and doesn’t look pasted on.
As you work, consider the direction of growth. Faux fur fibers should flow from the scalp outward, not backward toward the face. You might section the head with light pins or tailor’s chalk to map where hair should go. This helps you avoid gaps and keeps the overall look balanced. If you’re unsure, step back and compare to a reference photo; small tweaks can make a big difference in realism. This approach aligns with How to Make Amigurumi Hair: Yarn, Mohair and Faux Fur Methods by shaping with intention.
Cutting faux fur and preventing fray
When you cut faux fur, you’re shaping the texture that frames your doll’s face. Use a sharp blade or scissors and cut the backing fabric, not the fibers themselves, to prevent fraying. Trim with the pile grain rather than across it for clean edges, and cut slowly in short, steady snips. After finishing a section, brush the fibers again so they settle and point in the right direction. If you see loose fibers on the cut edge, press them back in with a fine-tipped tool to keep the line tidy.
To reduce shedding, lay a thin layer of clear-drying glue along the cut edge and press a small seam tape or matching fabric over it. Let it dry fully before continuing. You can also fuse a tiny ribbon or faux leather strip along the edge as a clean finish. Temperature matters: don’t cut when the room is too humid or cold, or the fibers will kink and shed more easily.
If you’re attaching multiple patches or sections, keep all pieces consistent in pile direction. A mismatch will show up as a wobble in the hairline. Before final assembly, test-fit each piece on the head to ensure transitions look natural. A calm, measured approach beats rushing and ending with a frayed, uneven look.
Attaching faux fur patches to head
You’ll attach patches to create volume and personality for your doll’s hairstyle. Lay out the patches in the order you want, then secure them with temporary pins. If you’re sewing, use small, tight stitches along the backing only, so you don’t poke through the fur. A zigzag stitch can help grab more fiber and prevent shifting. If you’re gluing, apply a thin, even layer of adhesive to the backing and press the patch firmly for a count of 10. Avoid squeezing glue onto the tips of the fur, which can stiffen the fibers and create shine.
Blend edges where patches meet the scalp by lightly brushing in the direction of growth. You can hide join lines with a narrow strip of matching fur or a soft lock of fringe that sweeps across the seam. For a more natural look, stagger the patches slightly rather than lining them up perfectly. This imitates real hair growth and makes the final piece feel alive. Always check from multiple angles as you work; what looks fine from above can look off from the side.
If you’re using both sewing and glue, let the sewing stitches cure first, then reinforce with a tiny dab of glue at the corners for extra security. Keep stitches tiny and close so they don’t pull the fur fibers out of place. Your patches should feel solid to the touch but still light enough to move with the doll’s head. This is a key part of How to Make Amigurumi Hair: Yarn, Mohair and Faux Fur Methods—patch placement matters.
Reduce shedding
To keep shedding at bay, seal the cut edges and minimize friction where the hair meets the head. Apply a light coat of fabric adhesive or a clear glue along the base edge of each fur piece, then press firmly. Let it cure completely before you handle the head much. Use a brush to keep the fibers aligned as they dry, so you don’t trap glue between strands.
Regular brushing is key. Use a soft brush or comb to maintain the direction of the pile and remove loose fibers caught on the surface. If you notice extra shedding after long play, a quick, gentle wash with mild soap can reset the texture, followed by a thorough dry and a light conditioning spray designed for synthetic fibers. Don’t overdo it; too much moisture can loosen adhesives and shift patches. This tip supports How to Make Amigurumi Hair: Yarn, Mohair and Faux Fur Methods by keeping hair secure.
Embroider and loop stitch realistic hair
You can build real-looking hair on your projects by combining loop stitches and fine embroidery. Start with a clean base and plan where you want the hair strands to fall. Use a slightly darker shade for roots and lighter tones for highlights to create depth. Work in small sections, so you don’t crowd the stitches. When you pull the thread through, keep tension even so the hair sits naturally rather than bunching up. For mohair or faux fur effects, blend different fibers to mimic how real hair catches light. Stitch in directions that mimic natural growth, angling strands from the scalp outward. You’ll notice the texture change as you add each layer, giving your piece a more lifelike silhouette.
If you’re aiming for wispy strands, switch to a finer needle and thinner thread. Loop stitches add volume without heavy bulk, which is perfect for the crown area or bangs. When you finish a section, lightly separate the loops with a needle or your fingers to avoid a stiff look. This technique works well on amigurumi heads where you want soft, touchable hair. Remember to step back every few stitches to keep the overall flow natural. If a strand seems too long, trim carefully or weave it back into the base so it doesn’t stand out oddly. This aligns with How to Make Amigurumi Hair: Yarn, Mohair and Faux Fur Methods by using multiple textures for depth.
Loop stitch amigurumi hair basics
Loop stitches give you volume without overwhelming the piece. Start with a tight knot at the base to secure each loop and prevent unraveling. Create short, even loops along the scalp line to form the base layer. Build up the layers by adding longer loops as you move away from the scalp. Use a consistent stitch length so the hair lies evenly. If you want the hair to appear shiny, thread a second, lighter strand through the loops sparingly to catch the light. Always check your work from different angles; what looks good straight on might look flat from the side.
Blend in texture by mixing loop stitches with straight embroidery lines. For thicker hair, use several strands of thread together in each loop to simulate density. For finer hair, employ single threads and tighter loops. When you finish a section, gently comb the loops with a soft brush or your finger to separate them. This step prevents a tangled, artificial look and adds movement. Keep color transitions smooth; abrupt changes pull the eye and break the illusion. This method is part of How to Make Amigurumi Hair: Yarn, Mohair and Faux Fur Methods—loop stitches for volume.
Paint and embroider hairlines for depth
Painted hairlines can add subtle depth that embroidery alone misses. Start with a light base color on the scalp, then carefully sketch where the hair will frame the face. Use a fine brush to add hairline shadows, focusing on the inner corners and temples. Embroider over these painted lines with short, fine stitches to lock the paint in and add texture. This combo keeps the look cohesive and prevents the paint from flaking off with handling. If you’re unsure, test on scrap fabric or a swatch before applying to your project.
To create realistic depth, alternate matte and slightly glossy threads where the hair meets the skin. Glossy threads catch light differently and mimic how real hair has a sheen. Stitch small, curved lines that follow the brow line and temple curve to accentuate the face. If edges feel harsh, soften them with a few light stitches using a pale shade. The goal is a smooth transition from skin to hair, not a sharp boundary. This technique complements How to Make Amigurumi Hair: Yarn, Mohair and Faux Fur Methods by adding dimension with both paint and stitch.
Paint, trim, and customize final looks
You’ll guide your piece from basic to bold by layering color, texture, and shape. Start with a plan for your final look, then pick paints, threads, and trims that work together. Think of this like dressing a doll: the right colors and textures make the whole thing pop. Use bold accents for personality and lighter tones for balance, so your project doesn’t look crowded. When you mix techniques, you’ll see how tiny choices—like a single stitch or stroke—change the mood.
First, decide where your emphasis goes: hair, fabric, or accessory details. If you want a striking focal point, use a contrasting color or glossy finish to draw the eye. For a softer vibe, blend colors slowly and let edges fade. Build depth with layering: start light, then add darker shades for shadow, and finish with a highlight to catch the light. Keep your palette coordinated, so every piece looks like it belongs together rather than random scraps.
Finally, test your look on a small scrap piece before applying it to the main project. This helps you avoid surprises and saves you from redoing larger sections. As you practice, you’ll feel more confident adjusting hues and textures on the fly, which makes the process more enjoyable and less intimidating. This section ties into How to Make Amigurumi Hair: Yarn, Mohair and Faux Fur Methods by showing how color, texture, and placement shape the final look.
Paint scalp and add rooted color
Begin with a base that matches your project’s skin tone or scalp color, then add rooted color in fine, deliberate strokes. You’ll create realism by letting some strands show through and others fade into the base. Use a steady hand and short, quick dabs to mimic natural hair growth. If you want a subtle transition, blend edges softly with a damp brush or sponge. Keep your layers light; you can always add more, but removing color is tougher.
For rooted color, choose shades that mimic real roots—slightly darker at the roots and lighter toward the tips. Apply darker tones at the base with small, precise strokes, then feather upward to blend into lighter tones. You can mix synthetic fibers or mohair with gentle stippling to create natural variation. When you’re happy with the depth, seal the look with a light fixative designed for the materials you’re using. This keeps roots from shifting during handling. This technique is a practical example within How to Make Amigurumi Hair: Yarn, Mohair and Faux Fur Methods.
If you’re aiming for a dramatic effect, use a contrasting root color on selected sections to make the hair stand out. Remember to test on a scrap piece to ensure the color reads well under your lighting. The goal is a believable, textured look that invites closer inspection rather than a flat line.
Trim shaping and final styling tips
Shape your piece by trimming with clean lines and equal lengths for a neat silhouette. Start by defining the major landmarks—bangs, side layers, and crown shape—and then work in shorter, incremental cuts to soften edges. Use a sharp pair of scissors and cut dry so you can see the true texture and how it will settle. If you’re unsure, trim a little at a time and step back to view the overall line.
For final styling, consider growth direction and how light hits the surface. You can twist, bend, or comb fibers to create movement, then secure with a lightweight setting spray or a tiny touch of adhesive where needed. When you want a natural flow, avoid over-styling; a few carefully placed strands can look more alive than a fully styled, stiff surface. Keep edges clean by tidying stray fibers with a gentle brush.
If you’re blending multiple textures, use thinning shears or a micro-trim to avoid blunt blocks. This helps your piece look intentional, not unfinished. A good rule is to step back every few minutes and picture how the eye travels across your design—you want rhythm, not chaos. This approach supports How to Make Amigurumi Hair: Yarn, Mohair and Faux Fur Methods by showing how final styling completes the look.
Care and cleaning tips
Treat your materials gently and clean as you go to keep colors vibrant and fibers from matting. Use a soft brush to remove dust before it settles into folds or creases. If you need to refresh color, apply sparingly and test first on a hidden area. Avoid soaking fibers unless the material is designed to handle water; quick spot cleanings work best for most blends. This final care routine aligns with How to Make Amigurumi Hair: Yarn, Mohair and Faux Fur Methods by preserving texture and color over time.

Clara Fern — Crochet Artist & Amigurumi Designer
Clara Fern is a crochet artist and amigurumi designer based in Austin, Texas. With 9 years of experience working with yarn and hook, she transformed a lifelong passion for handcraft into a creative mission: making amigurumi accessible, fun, and deeply rewarding for crafters of all levels.
Clara discovered amigurumi during a trip to Japan in 2017, where she fell in love with the art of bringing tiny characters to life through crochet. Back home in Texas, she spent years studying color theory, design principles, and advanced crochet techniques — developing her own signature style that blends kawaii aesthetics with original character design.
Through maclafersa.com, Clara shares everything she has learned — from choosing the right yarn and reading your first pattern, to designing fully original amigurumi characters from scratch. Her writing is known for being clear, detailed, and genuinely helpful, with no steps skipped and no secrets kept.
When she’s not crocheting, Clara enjoys watercolor painting, visiting local yarn shops, and drinking way too much coffee while sketching new character ideas.


