How to Close Amigurumi Holes Neatly
Finishing an amigurumi can be incredibly satisfying. After hours of crocheting, counting stitches, adding stuffing, and shaping every detail, only one small step remains: closing the final hole.
Unfortunately, this tiny finishing step can have a surprisingly large effect on the appearance of the finished piece.
A poorly closed opening may leave a visible bump, create an uneven shape, expose stuffing, or make the final round look noticeably different from the rest of the crochet. This is particularly frustrating when the opening is located somewhere visible, such as the top of a head, the end of a limb, or the bottom of a round body.
The good news is that closing amigurumi holes neatly is relatively easy once you understand the right technique.
Instead of simply pulling the remaining stitches together randomly, you can use an invisible closure that gathers the final stitches evenly and creates a smooth, professional-looking finish.
In this guide, you’ll learn how to close amigurumi holes neatly, how to prepare the final rounds, how to use a yarn needle for an invisible finish, and how to avoid the most common closing mistakes.
Why Amigurumi Holes Can Be Difficult to Close
Most amigurumi pieces are crocheted in continuous rounds.
As the piece approaches its final section, decreases gradually reduce the number of stitches.
For example, a sphere might finish with rounds similar to:
R18: (2 sc, dec) × 6 (18)
R19: (1 sc, dec) × 6 (12)
R20: dec × 6 (6)
At this point, only six stitches remain.
You could continue decreasing, but eventually the opening becomes too small and awkward to crochet comfortably.
Instead, the usual solution is to fasten off with a long yarn tail and use a tapestry needle to close the remaining hole.
The way you weave the yarn through those final stitches determines how clean the closure looks.
What Is an Invisible Amigurumi Closure?
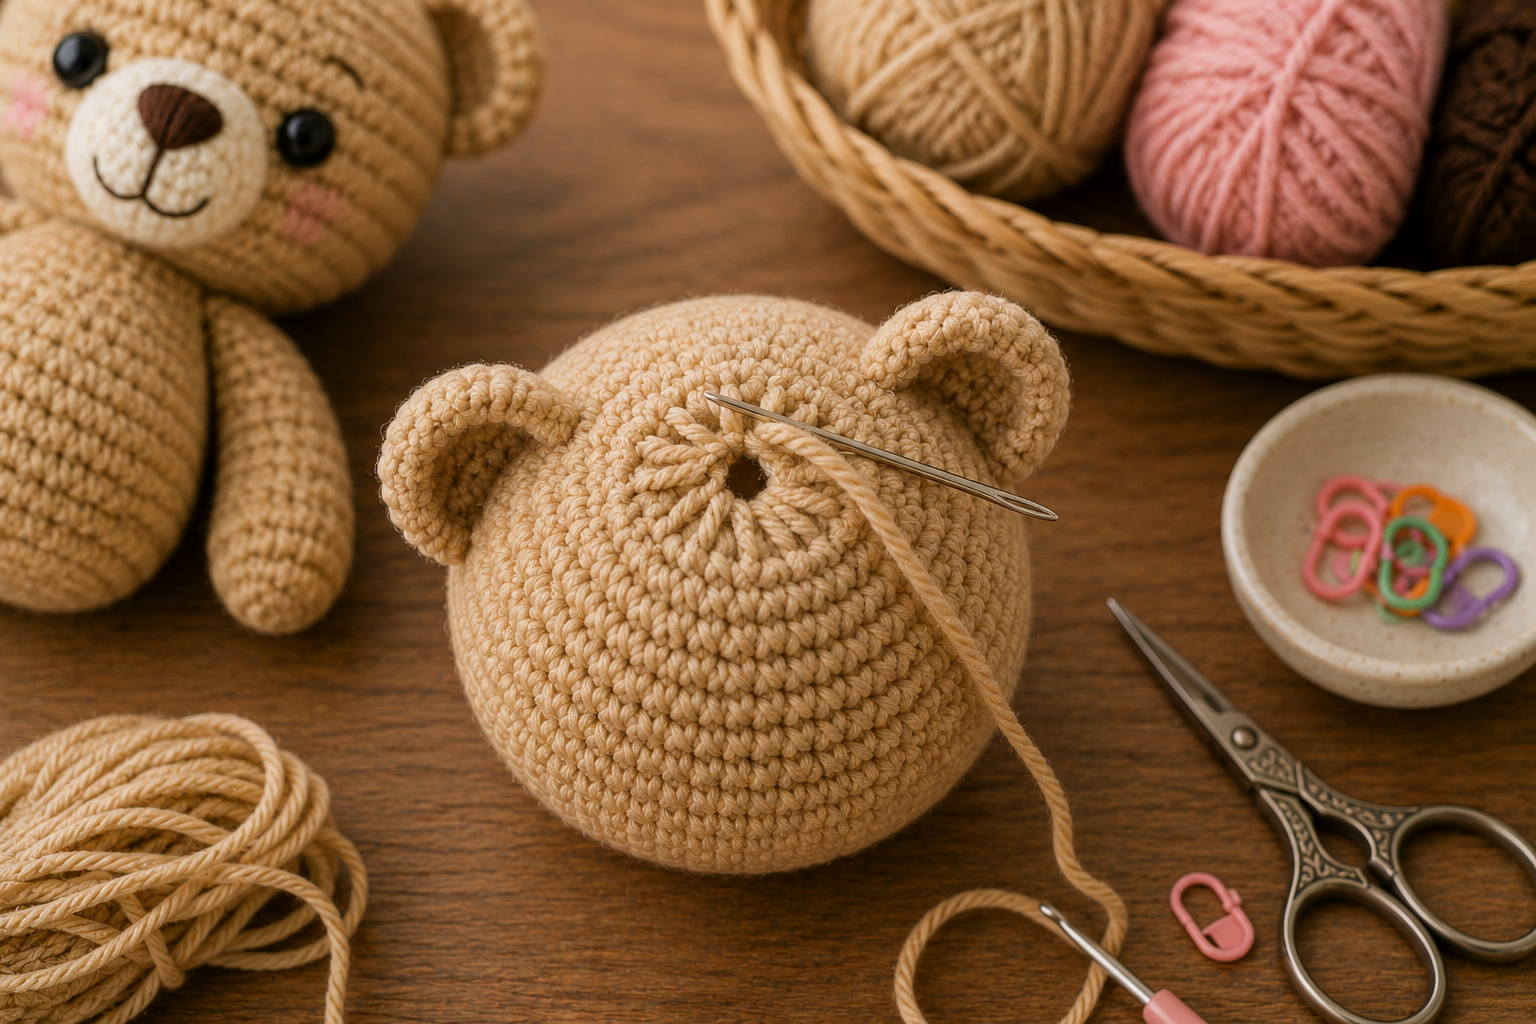
An invisible closure is a finishing technique in which the yarn tail is passed through the remaining stitches in a consistent way and then pulled to gather them toward the center.
When done correctly, the opening closes similarly to a drawstring.
The final stitches form a small circle that tightens neatly into the center.
This creates a finish that can closely resemble the center of a well-closed magic ring.
The technique is useful for closing:
- heads
- bodies
- arms
- legs
- tails
- round accessories
- balls
- stuffed decorative pieces
It requires only a tapestry needle and the yarn tail already attached to your project.
1. Don’t Wait Until Only One or Two Stitches Remain
One common mistake is continuing to decrease until the opening becomes extremely tiny.
This isn’t always necessary.
Trying to crochet decreases into an opening with only a few stitches can become difficult and may distort the final shape.
For many projects, finishing with approximately six stitches provides a manageable opening.
However, always consider the yarn thickness and pattern instructions.
Bulky yarn may require a slightly different approach than fine cotton.
The important thing is to leave enough stitches to create a controlled gathered closure.
2. Finish Stuffing Before Closing
Before threading your needle, make sure the amigurumi contains enough stuffing.
Once the hole is completely closed, adding more filling becomes much harder.
Look at the piece from several angles.
Check for:
- flat areas
- uneven sides
- hollow sections
- excessive bulges
- visible stuffing gaps
Add small amounts of stuffing rather than one large clump.
Use your fingers or a suitable stuffing tool to distribute the filling evenly.
Pay particular attention to the area immediately beneath the opening.
3. Don’t Overstuff the Final Section
Although you want the piece to be firm, excessive stuffing near the opening can make closure difficult.
If stuffing is pushing through the final stitches, the yarn may not gather smoothly.
Overstuffing can also stretch the remaining stitches apart.
This makes the closure more visible.
If necessary, remove a small amount of stuffing from directly beneath the opening before closing.
You can redistribute it after partially tightening the hole if needed.
4. Leave a Long Yarn Tail
After completing the final crochet round, cut the yarn while leaving a generous tail.
A tail of several inches or centimeters gives you enough yarn to:
- close the opening
- adjust the tension
- secure the closure
- hide the yarn end
It’s much easier to trim excess yarn afterward than to work with a tail that’s too short.
Thread the tail through a tapestry needle.
A blunt-tip needle is usually ideal for working between crochet stitches without splitting the yarn unnecessarily.
5. Identify the Front Loops
Each crochet stitch has two loops at the top:
- front loop
- back loop
For a common invisible closure technique, you’ll work through the front loops only of the remaining stitches.
Look carefully at the final round.
The front loop is the loop positioned closer to the outside or front surface of your work.
If you’re unfamiliar with identifying loops, gently stretch the final round and examine the V-shaped tops of the stitches.
6. Insert the Needle Through the Front Loop
Take the tapestry needle and pass it under the front loop of the first remaining stitch.
Then move to the next stitch and repeat.
Continue passing the needle through the front loop of every stitch around the opening.
Try to work in the same direction you crocheted.
Don’t tighten the yarn completely after every stitch.
Instead, leave the opening relatively loose until you’ve passed through all remaining front loops.
7. Work Through Every Remaining Stitch
Continue around the opening carefully.
If six stitches remain, the yarn tail should pass through six front loops.
Count them if necessary.
Skipping one stitch can make the closure uneven.
The skipped loop may remain visible after tightening, creating a small bump or opening.
Once you’ve worked through all the loops, check that the yarn travels evenly around the entire circumference.
8. Pull the Yarn Slowly
Now comes the satisfying part.
Hold the amigurumi securely and begin pulling the yarn tail.
Do this gradually.
As the yarn tightens, the front loops will move toward the center.
The opening should become smaller and smaller until it closes.
Avoid yanking the yarn suddenly.
A slow pull gives the stitches time to settle into position and allows you to correct any unevenness.
9. Massage the Final Stitches Into Position
Once the hole is nearly closed, use your fingers to gently adjust the surrounding stitches.
Massage the surface around the closure.
If one stitch looks higher than the others, gently move it into position.
This small step can make the center look much smoother.
The goal is for the gathered stitches to form a balanced circular closure rather than a puckered knot.
10. Tighten Until the Hole Disappears
Continue pulling gently until the opening closes.
Don’t pull harder than necessary.
Once the center is closed, excessive tension doesn’t usually improve the appearance.
Instead, it may cause:
- puckering
- distorted stitches
- broken yarn
- an indentation
Stop when the hole is securely closed and the surrounding surface looks smooth.
11. Secure the Closure
After tightening the opening, secure the yarn so it doesn’t loosen.
One method is to insert the needle through nearby stitches and pass it through the center area again.
The exact method can vary depending on the yarn and construction.
The goal is to prevent the gathered loops from reopening while keeping the finishing yarn hidden.
Avoid creating a large visible knot on the surface.
12. Hide the Yarn Tail Inside the Amigurumi
Once the closure is secure, insert the tapestry needle through the center of the finished piece.
Bring the needle out several centimeters away through another part of the crochet fabric.
Pull the yarn gently.
Then cut the tail close to the surface.
When you release the fabric, the cut end should retract into the stuffing.
This leaves no visible yarn tail.
Gently massage the area where the needle exited to help the yarn disappear completely.
Why Front Loops Create a Cleaner Finish
Using the front loops helps the remaining stitches gather inward in a controlled way.
When the yarn is pulled, the loops naturally move toward the center of the opening.
The result resembles a reversed magic-ring closure.
By contrast, randomly weaving the yarn through different parts of the stitches can create uneven tension.
Some stitches may pull inward while others remain raised.
Consistency is what makes the invisible closure look clean.
How to Close a Large Hole
Sometimes you may need to close an opening with more stitches than usual.
If the hole is large, simply pulling everything together at once may create heavy puckering.
Whenever possible, use additional decrease rounds before fastening off.
For example, if you have 18 stitches remaining, don’t immediately gather all 18 unless the pattern specifically requires it.
You might work:
(1 sc, dec) × 6 (12)
followed by:
dec × 6 (6)
Then close the remaining six stitches with the yarn needle.
Gradual decreases generally create a smoother shape.
How to Close a Hole With Bulky Yarn
Bulky and chenille yarn require slightly different handling.
Because the yarn is thicker, even a small number of remaining stitches can create a noticeable opening.
The same basic front-loop closure technique can often be used, but work gently.
Chenille yarn can sometimes shed or weaken if pulled too aggressively.
If your yarn is delicate, avoid excessive tension.
You may also consider using a stronger compatible yarn for certain hidden securing steps when appropriate for the project, while ensuring the visible finish still matches.
Closing Chenille Amigurumi
Plush yarn deserves special attention.
Some chenille yarns can strip when repeatedly pulled through tight loops.
Before closing:
- leave a generous tail
- avoid unnecessary repeated passes
- pull gradually
- don’t overtighten
If the yarn begins showing signs of damage, stop and reassess before it breaks.
For projects you make regularly, testing the closure technique on a small sample with the same yarn can help you understand how much tension it tolerates.
How to Close Tiny Amigurumi
Miniature amigurumi can be more challenging because the opening is extremely small.
Use a needle appropriate for the yarn thickness.
Make sure the needle eye isn’t so large that it stretches the stitches.
Work carefully through each front loop.
Because tiny pieces contain very little stuffing, avoid pushing the filling directly into the closing area.
Even a small amount of excess stuffing can interfere with the final closure.
How to Close the Top of an Amigurumi Head
Heads are one of the most visible places where a clean closure matters.
If the head is crocheted from the bottom upward, the final hole may sit directly on top.
Before closing, examine the shape carefully.
Rotate the head and make sure the stuffing is evenly distributed.
Then gather the remaining stitches using the front-loop method.
After hiding the yarn tail, massage the top of the head gently.
This helps distribute the stuffing and reduce any small indentation created during closing.
How to Close the Bottom of a Body
The bottom of an amigurumi body is often less visible, but a neat closure still matters.
An uneven bump can prevent a sitting character from resting properly on a flat surface.
When closing the bottom:
- don’t overstuff the base
- distribute decreases evenly
- gather the final stitches symmetrically
- hide the yarn tail completely
Afterward, place the character on a flat surface and check whether it sits as intended.
Closing Arms and Legs
Small limbs are often finished with narrow openings.
Depending on the pattern, you may either:
- close the opening completely
- flatten the opening and crochet across it
- leave it open for sewing to the body
Don’t automatically use an invisible gathered closure for every limb.
Follow the construction required by the design.
If the end of a foot or paw is supposed to be rounded and completely enclosed, the gathered method works well.
If the arm needs to be sewn flat against the torso, flattening the final round may be more appropriate.
Closing a Tail
A tail may be closed differently depending on how it’s attached.
If the tail is a separate stuffed piece that will be sewn onto the body, the opening is often left unclosed.
The remaining yarn tail is then used for sewing.
However, if you’re closing the free end of a tail, such as the tip of a shape crocheted from the base outward, a gathered closure can produce a clean result.
Always think about how the component will be assembled before closing it.
What If Stuffing Comes Through the Hole?
If stuffing is protruding while you close the opening, don’t simply pull harder.
Use the blunt end of your crochet hook or another suitable stuffing tool to push the filling slightly deeper inside.
Then continue tightening.
If stuffing repeatedly pushes back through the hole, the piece may be overstuffed.
Removing a tiny amount can make the closure significantly cleaner.
What If the Hole Won’t Close Completely?
Several issues can prevent the opening from closing.
Too Many Stitches Remain
You may need another decrease round.
Stuffing Is Blocking the Opening
Push it deeper or remove a small amount.
A Front Loop Was Skipped
Check whether one stitch remains outside the gathered circle.
Yarn Is Too Thick
The final stitches may need more careful manipulation.
Tension Is Uneven
Loosen slightly and redistribute the stitches before tightening again.
Don’t force the closure if something clearly isn’t moving correctly.
What If There’s a Small Hole After Closing?
A tiny central opening can sometimes remain.
First, check whether the yarn can be tightened slightly more.
If not, use the yarn needle to make a subtle reinforcing stitch across the center.
Pull gently enough to close the remaining gap without creating a visible ridge.
Then secure and hide the tail.
For a very small opening, this correction can be nearly invisible.
Fixing a Bumpy Closure
If the finished area looks bumpy, the problem may be uneven tension.
Before securing the yarn permanently, gently loosen the closure.
Redistribute the gathered loops.
Then tighten again more gradually.
You can also massage the surrounding fabric after closing.
Sometimes the stitches simply need to settle around the stuffing.
Fixing an Indented Closure
If the closure sinks too deeply into the piece, you may have pulled too tightly.
A slight indentation may disappear after massaging and redistributing the stuffing.
For a stronger indentation, you may need to loosen the closure carefully.
If the piece is still accessible, adding a tiny amount of stuffing beneath the area can help restore the shape.
The ideal closure should be secure without dramatically pulling the surface inward.
Use Invisible Decreases Before Closing
A neat final hole starts several rounds earlier.
Standard decreases can create visible bumps, particularly on tightly crocheted amigurumi.
Using the invisible decrease technique during the final shaping rounds can produce a smoother surface.
A common invisible decrease involves working through the front loops of two consecutive stitches before completing the decrease.
This helps reduce bulk.
When several decrease rounds lead into an invisible closure, the entire final section can look much cleaner.
Don’t Rush the Last Few Rounds
It’s tempting to crochet quickly when you’re almost finished.
But the final decrease rounds determine the shape of the closing area.
Keep your tension consistent.
Count your stitches.
Make sure decreases occur in the correct positions.
A mistake several rounds before the closure may create a shape that no finishing technique can completely hide.
Avoid Random Decreases Unless the Pattern Calls for Them
Evenly distributed decreases help maintain a symmetrical shape.
If you accidentally place several decreases next to one another, the fabric may develop a dent.
For a round piece, decreases are usually spaced systematically.
Follow the pattern carefully.
If you’re designing your own amigurumi, distribute shaping changes intentionally.
Don’t Make the Final Stitches Extremely Tight
Some crocheters tighten their final rounds excessively because they’re worried about stuffing showing.
This can make it very difficult to insert the tapestry needle through the front loops.
Maintain your normal amigurumi tension.
The gathering technique itself will close the center.
There’s no need to make the final stitches painfully tight.
Use the Right Needle
A good tapestry needle makes finishing much easier.
Look for a needle with:
- an eye large enough for your yarn
- a blunt or moderately rounded tip
- enough length to grip comfortably
For very thick plush yarn, you’ll need a larger yarn needle.
For miniature crochet, a smaller needle provides better control.
The needle should pass through the stitches without stretching them excessively.
How to Hide a Knot
Ideally, avoid leaving a visible knot on the surface.
If you need to secure the yarn with a knot, position it where it can be pulled into the interior of the amigurumi.
After securing, pass the needle through the stuffed piece and bring it out somewhere else.
A gentle pull can help bury the knot beneath the crochet surface.
Then trim the yarn tail and massage the fabric.
Closing Holes After Assembly
Sometimes you discover a tiny gap only after the amigurumi has been fully assembled.
Perhaps there’s a small opening near an arm attachment or a seam that didn’t close completely.
Thread a needle with matching yarn.
Use small, discreet stitches to bring the edges together.
Follow the direction of the surrounding crochet whenever possible.
Don’t pull excessively, or the repair may create a visible indentation.
Repairing a Hole in Finished Amigurumi
If an older amigurumi develops a hole, the approach depends on what caused it.
If a seam opened, you may simply need to resew the area.
If the crochet fabric itself broke, you’ll need to stabilize the surrounding stitches before closing the gap.
Use matching yarn whenever possible.
If stuffing is escaping, push it back inside before repairing.
For valuable handmade pieces, take your time identifying which loops remain intact rather than stitching randomly across the damaged area.
Common Mistakes When Closing Amigurumi
Closing Too Many Stitches at Once
This can create heavy puckering.
Forgetting to Finish Stuffing
Once the hole is closed, correcting the shape becomes harder.
Overstuffing Near the Opening
The stuffing can prevent the stitches from gathering.
Skipping a Front Loop
This can create an uneven center.
Pulling Too Quickly
The stitches may gather irregularly.
Pulling Too Tightly
This can create an indentation or damage the yarn.
Leaving the Yarn Tail Visible
Always hide the tail inside the finished piece.
Creating a Large Surface Knot
Secure the closure discreetly.
A Simple Invisible Closure Checklist
Before closing your amigurumi, make sure:
- the piece is stuffed evenly
- the final shape looks correct
- there aren’t too many stitches remaining
- you’ve left a sufficiently long yarn tail
- your tapestry needle fits the yarn
- you can clearly identify the front loops
During closing:
- pass through every front loop
- work consistently around the opening
- pull gradually
- adjust the stitches as they gather
- stop once the hole closes neatly
After closing:
- secure the yarn
- hide the tail inside
- trim excess yarn
- massage the surface
- check the shape from multiple angles
Practice the Technique on a Crochet Ball
If you’re new to invisible closures, a simple crochet ball is the perfect practice project.
Crochet a small sphere.
Stuff it.
Decrease until only a few stitches remain.
Then practice gathering the front loops.
Because the project is simple, you can focus entirely on the closing technique.
After a few attempts, the movement becomes very natural.
Is a Tiny Imperfection Normal?
Yes.
Amigurumi is handmade, and crochet stitches naturally have texture.
The goal isn’t necessarily to make the closing point completely impossible to locate under close inspection.
The goal is to make it blend naturally into the surrounding stitches.
When you look at the finished character from a normal distance, the closure shouldn’t distract from the overall design.
That’s a much more realistic standard than expecting machine-like perfection.
Why Finishing Techniques Matter
The difference between beginner-looking and polished amigurumi often comes from finishing details rather than complicated crochet techniques.
A simple character with:
- consistent tension
- clean decreases
- careful stuffing
- neat assembly
- well-positioned facial features
- invisible closures
can look more professional than a technically complicated character with rushed finishing.
Learning to close holes neatly is therefore a small skill with a surprisingly large impact.
Final Thoughts
Knowing how to close amigurumi holes neatly is one of the most useful finishing techniques any amigurumi maker can learn.
Instead of trying to crochet until the opening becomes impossibly small, leave a manageable number of stitches, cut a generous yarn tail, and use a tapestry needle to gather the remaining front loops.
Pull the yarn gradually and allow the stitches to move evenly toward the center.
Then secure the closure, hide the tail inside the stuffed piece, and gently massage the surface to restore the final shape.
Remember that a clean closure begins before you ever pick up the needle. Even decreases, appropriate stuffing, consistent tension, and the right number of remaining stitches all contribute to the result.
Once you become comfortable with the invisible closure technique, finishing heads, bodies, paws, and other rounded pieces becomes much easier.
And instead of ending an otherwise beautiful amigurumi with a noticeable hole or bulky knot, you’ll be able to create a smooth final detail that blends naturally into the rest of your work.

Clara Fern — Crochet Artist & Amigurumi Designer
Clara Fern is a crochet artist and amigurumi designer based in Austin, Texas. With 9 years of experience working with yarn and hook, she transformed a lifelong passion for handcraft into a creative mission: making amigurumi accessible, fun, and deeply rewarding for crafters of all levels.
Clara discovered amigurumi during a trip to Japan in 2017, where she fell in love with the art of bringing tiny characters to life through crochet. Back home in Texas, she spent years studying color theory, design principles, and advanced crochet techniques — developing her own signature style that blends kawaii aesthetics with original character design.
Through maclafersa.com, Clara shares everything she has learned — from choosing the right yarn and reading your first pattern, to designing fully original amigurumi characters from scratch. Her writing is known for being clear, detailed, and genuinely helpful, with no steps skipped and no secrets kept.
When she’s not crocheting, Clara enjoys watercolor painting, visiting local yarn shops, and drinking way too much coffee while sketching new character ideas.