
Gather tools you need for removable doll limbs
You’ll save time by gathering the right tools early. Start with sharp fabric scissors, a good seam ripper, and a sturdy needle set for both hand sewing and small-machine work, since removable limbs require precision. Keep pliers handy for snapping hardware into place, and have pins and tailor’s chalk nearby to mark button and snap locations. Choose high-quality tools for frequent use, and maintain a tidy workspace to prevent tangles or lost pieces.
Trustworthy measuring tools matter too. A flexible measuring tape maps seam and joint lengths, while a caliper checks button or snap holes for a snug fit. A ruler with metric and imperial marks helps translate pattern sizes. Use a marking pen that washes away cleanly to mark alignments, reducing sewing mistakes. Stock thread in colors matching your fabric for a tidy, strong finish.
When assembling, a dedicated grip tool or hemostat helps pull cords through tiny casings or thread thin elastic. A safety pin guides cords through tunnels without snagging. An airtight container keeps tiny hardware parts organized, so you finish faster and with less frustration. You’ll notice the difference when you can grab the exact tool you need at a glance.
Essential sewing tools you need
Narrow down to a few reliable options. Use a micro-needle set for fine fabric and a tapestry needle for tiny joints. For seams that move, pick a strong, flexible thread like cotton-wrapped polyester to resist fraying and avoid puckering. A thimble protects fingertips, and a small sewing gauge helps maintain even seam allowances.
Keep a curved-blade seam ripper, a fabric glue pen for edge finishing, and clamps or binder clips to hold pieces steady, especially around curves. A tiny iron or steamer helps press seam allowances flat before top-stitching. Fabric markers or tailor chalk that washes out easily are essential for clear placements.
Test your tools on fabric scraps to see how the material behaves with your needle size and thread. If fraying persists, apply fray check or switch to a zigzag stitch to seal edges.
Choosing buttons and snaps that fit
When selecting hardware, look for lightweight but sturdy options that won’t pop off with gentle use. For joints, choose snug snaps that won’t loosen after repeated removals. For buttons, small shank buttons are often easier to sew and less likely to pull through fabric than flat buttons. Consider color and finish to make joints look intentional.
Test hardware on scrap fabric first. Check how the button sits and whether the snap closes cleanly without wobble. For hinges, choose snaps with strong grip and smooth release. Durability matters: rust-resistant coatings help keep joints looking fresh.
Balance is key: a too-large button or snap adds bulk at the joint; a too-small one may fail under stress. If unsure, try several sizes on fabric to see what fits your doll design best.
Hardware size chart
For most hobby dolls:
- Snaps: 3–6 mm for small limbs; 8–12 mm for larger joints.
- Buttons: 6–10 mm for mid-sized limbs; 4 mm for tiny dolls.
- Thread weight should match the hardware: lighter for small snaps, stronger for larger buttons.
- If the fabric is very tight, consider one size smaller to sit flush.
Measure your limb width at the joint and compare to the hardware shank or socket depth. A small sampler pack lets you test several sizes on scraps before committing.
Read your pattern for removable limbs
Treat your pattern as a map: it shows where each limb goes, its size, and how pieces connect. Read the entire pattern at least once to catch notes about fabric, seam allowances, or special notions. Symbols indicate joints, alignment marks, and stitching lines—mark these on your fabric with chalk or a tracing wheel.
Choose the view you’re making and stick to its pieces. If unsure about a line, pause and compare the pattern to the fabric grain and size. A small mistake at the start can affect the whole limb, so read once, re-check twice, then cut once.
How to read socket and limb lines
Pattern lines mark the socket and limb edges. The socket line shows where the limb connects to the body; the limb line marks the outer edge. Always compare the socket line to notch marks to align pieces correctly. Pay attention to grain lines and center lines, and maintain consistent seam allowances around socket and limb edges.
If your pattern has multiple sizes, start with your desired size and verify scale on the tissue sheet. Use a ruler to confirm socket width and limb length against the pattern’s key. Do a quick scrap test before committing to fabric.
Sizing tips for pattern for removable limbs
Choose a size that fits smoothly without being tight. If you’re between sizes, go up a notch to allow ease. Check limb length against the body portion and trim or adjust seam allowances if needed after a mock-up. Cheap fabric for a mock-up helps you save good material later.
Be mindful of fabric type: stretch fabric needs a touch less length, while stiff fabric can handle a bit more ease. Let the pattern notes guide you, but trust your hands and the mock-up first.
Marking and cutting guide
Mark sockets and joints clearly with chalk or fabric pen, then cut along lines with the required seam allowances. Double-check you’ve cut the correct pieces for the limb and socket views. Do a quick dry-fit to confirm alignment before sewing; this saves rework.
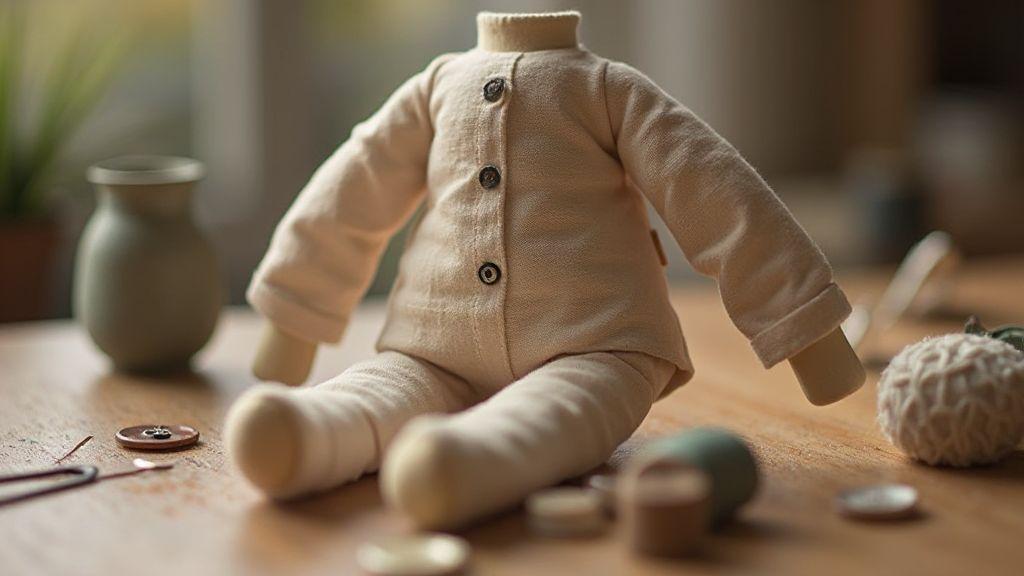
Use the button joint method for secure limb attachment
The button joint method provides a strong hinge feel with a clean look, allowing movement without bulky hardware. Choose durable buttons and sturdy thread so the joint endures regular use. Test by bending gently, then simulate wear. If the limb feels wobbly, recheck thread tension and button placement.
With practice, joints stay aligned longer and resist slipping. This method works for both small and large limbs since you control tension. Keep fabric and thread in good condition; worn cloth can loosen stitches. Test early and fix issues promptly for a reliable result.
Compared with other methods, the button joint balances strength and clean appearance with minimal bulk. It’s predictable during movement and feels natural.
Where to place the button joint for strength
Position the button at the widest part of the limb’s attachment area for stability. Align the button so fabric pulls evenly in all directions to minimize tipping. Mark the spot with chalk first.
Place the corresponding hole or loop where the limb pivots. Aim for a smooth, even pull. If fabric bunches at the joint, adjust and retest. For larger limbs, two buttons on opposite sides may be needed to prevent spinning; for smaller limbs, a single well-centered button can suffice. You’ll know it’s right when movement is smooth with minimal resistance.
Threading and knot techniques you should use
Use strong, high-tensile thread and avoid loose ends. A back-and-forth whip stitch locks the button securely without ripping the fabric. Space stitches evenly; avoid puckering. Finish with a double knot and trim close to the fabric.
Test by pulling in several directions to check for slack. If there’s give, tighten stitches slightly. If the fabric frays, reinforce with a small interior patch. A matching thread color helps the joint blend in.
A running stitch along the edges adds security if you worry about wear. Consistent thread and stitch patterns significantly improve joint life.
Button strength checklist
- Ensure the button is the right size for the limb and fabric.
- Use high-tensile thread and a lock knot.
- Place the button on solid fabric with even pressure distribution.
- Check pull in multiple directions to avoid wobble.
- Finish with a clean knot and trim ends flush to the fabric.
Fit snap fastener limbs for quick removal
Snaps offer a clean, quick detach. Choose snaps long enough for your fabric and limb size, with some slack for easy removal. Place snaps where your fingers land naturally for quick, repeatable removal, even with gloves. Test spacing for neat, uniform lines. Try on scrap material first before working on the real piece.
Test with real movement: clip and remove several times. Tighten or loosen the stitch line as needed. The goal is a limb you can pop off with one hand and reattach effortlessly.
Types of snap connections explained
- Classic male-female snaps give a sturdy hold and clean look.
- Magnetic snaps are easy to align but may be less rugged.
- Sew-on snaps are forgiving and good for beginner projects.
Metal snaps resist wear and keep a sharp look; plastic snaps are light and cheap for practice. For movement, consider a two-part system that allows twist-and-release. Test samples to ensure a confident click and quiet release.
Setting metal snaps vs sew-on snaps
Metal snaps often require a setting tool or hammer to crimp them in place. Pre-punch holes if fabric is thick, then dial in alignment before crimping. Sew-on snaps are friendlier for beginners or delicate fabrics: stitch the cap and socket with a strong, even pattern. If fabric stretches, go tighter and consider backing fabric to stabilize the area.
Check action from both sides: snaps should click firmly and release smoothly. If misaligned, resew or re-crimp. Practice makes speed and precision.
Sew strong limb sockets to keep them secure for you
Choose sturdy fabric and lining that won’t stretch over time. Sew even, tight edges to resist raveling and reinforce the inner rim where the socket meets the limb. Use a backstitch or small zigzag to lock the seam, then turn the socket inside out to check for gaps. Trim stray fibers.
Plan how the socket attaches to the limb shaft with flat, aligned fabric layers. Do a scrap test to catch misalignment early. Reinforce corners with extra stitches or tiny bartacks at stress points. Ensure the closure area remains comfortable against the skin; add a liner if needed. The result should be a snug but not tight socket with no shifting during movement.
Reinforcing with interfacing or padding
Add thin interfacing to the inner socket area to prevent tearing where the limb bends. Place padding on the skin-facing side for comfort. If using both, keep interfacing near the thickest part of the socket and padding on the skin side. Check for evenness after sewing and trim excess padding.
Stitch patterns that hold best when sewing removable limbs
Dense backstitch at edges and stress points resists pulling. Curved edges love a tight zigzag. For frequent removals, reinforce with a double row of stitches at the socket rim and mounting points. Short, even stitches help layers stay flush; longer stitches can shift layers and weaken the hold.
If you machine stitch, a satin stitch around the edge keeps threads from catching. Hand-stitch with a whip stitch at the edge and a running stitch on the interior for flatness.
Test the seam by pulling in different directions. Reinforce any loose threads. The right stitch pattern makes removable limbs feel secure and comfortable.
Seam allowance guide
Keep seam allowances tidy to prevent bulk at the socket edge. For most sockets, about 1/4 inch (6 mm) works; with thick padding or interfacing, 1/8 inch (3 mm) can help the edge lay smoothly against the skin. Pin before stitching to keep allowances consistent all around curves.
If you’re making larger or more rounded limbs, trim around curves as needed. Clip notches but don’t cut into the seam. Uniform seam allowances ensure a neat final edge and even wear.
Attach doll arms and legs step-by-step for your toy
Lay out all pieces to map where each limb goes. Have a clean workspace, a seam ripper or small scissors, and a gentle touch to avoid tearing. Align the limb with the torso opening, then guide it through so the joint sits evenly. Precision matters for a lasting result.
Double-check limb orientation before finishing. With a button joint, feel a tiny click as the button seats in the socket; with snaps, you should hear a clean snap. If anything feels loose, pause, realign, and reattach before moving on. Test movement gently after each attachment for a natural range of motion.
Attaching cloth limbs with the button joint method
Insert the thread through the limb and torso, anchoring with a hidden knot. Place the button at the limb end and stitch around it in a crisscross pattern for security. Check tension as you go to keep a clean seam that moves with the limb.
Test by moving the limb through its range of motion. If the button feels snug and the limb stays aligned, you’ve achieved the right balance. If it wobbles, tighten stitches or adjust the button position. Tuck loose thread ends inside for a neat finish. Practice on a scrap piece before working on the final doll if you’re new to this.
Attaching limbs with snap fastener limbs
Mark limb and torso positions for snaps, punch pilot holes if needed, and align so they meet cleanly when attached. Press or sew the snaps according to your kit’s instructions for a firm yet flexible connection.
Test the fit by clipping and removing several times. If the snaps don’t sit flush, reseat or re-sew. Consider reinforcing the snap area with a small patch or interfacing for added durability.
Test pull procedure
Grip the limb at the joint and apply a slow, steady pull in multiple directions. Check for looseness or fabric strain. If it holds, move on; if it shifts, tighten or reseat the attachment.
Move through a full, careful range of motion to simulate play. If anything fails, revisit the attachment method and reinforce as needed.
Check safety and durability before you give the toy
Inspect joints, edges, and fasteners for safety. Ensure limbs stay attached with light tugging and that the finish isn’t peeling or sticky. If a limb wiggles or snaps under light pressure, fix it before playtime. Think like a child: would the toy withstand a drop, a tug, and a busy afternoon?
Test durability under stress by bending and rotating joints. Look for creaks, looseness, or misalignment. If issues arise after a few moves, tighten, reinforce, or reconsider the attachment method. Ensure there are no gaps where skin or hair could snag and that removable parts are clearly labeled.
Age-appropriate safety rules for removable doll limbs
Tailor safety to the child’s age. For younger kids, keep limbs secured and limit loose pieces. Teach gentle handling and demonstrate how to attach and detach limbs with both hands. Use simple language like Gentle is strong and show the motion before play.
Set limits on how often limbs are used and stop if insertion feels tight. Avoid parts that don’t click in confidently. If a limb loosens after some use, consider a different attachment method or reinforcement. Supervise younger children during initial play.
Wear and stress tests to run for secure limb attachment
Run quick, repeatable tests to mirror daily play: light pulls from different angles, then increase the angle gradually. Note any wear or looseness and inspect the joint area. Do repeated motion tests to simulate hours of play; check that the limb returns to its original position smoothly. If fatigue shows, mark the limb for repair or replacement.
Evaluate the finish under stress by rubbing the attachment area to simulate dirt and cleaning. If finish wears or rubs away, reinforce the seam or adjust materials.
Maintain and replace detachable limbs for easy DIY repairs
Treat detachable limbs as serviceable parts. Regular checks help catch wear early. Look for loose joints and worn fasteners, and keep spare parts organized in labeled containers. If a limb wobbles, tighten connections or replace fasteners with minimal tools. Use lubricants sparingly on metal parts if the design allows it. A simple maintenance habit extends limb life and keeps the toy acting like new.
When repairing, gather spare parts and label each limb’s position to avoid mix-ups. Store replacements in labeled bins. A quick pre-check saves time during a repair.
How to remove and store spare limbs
Remove spare limbs calmly: twist or slide the joint to release the connector, then place the limb on a soft surface. Store in a labeled bag or container away from heat and direct sun. Note the model and size for easy replacement later.
Keep hardware protected: close fasteners to prevent snagging, and use a foam insert or small tray to prevent bending. Label each limb with its position for quick swaps.
Replacing a worn button or snap for toy limb replacement
If a button or snap wears out, replace it carefully. Remove the old fastener, clean the surrounding area, and install the new one. Test the limb’s movement after replacement to ensure a snug, secure fit. If a single fastener isn’t enough, add a second snap for extra security, but ensure it doesn’t restrict movement.
Choose a close size and color match if an exact replacement isn’t available. After installation, flex the limb to confirm smooth motion. If it feels loose again, try a different fastener or a small shim.
Spare parts list
- Replacement buttons and snaps
- Small screwdrivers and pliers
- Lubricant for joints
- Cleaning cloths and mild cleaner
- Storage containers or labeled bags
- Soft mat or tray for workspace
Finish professionally so your doll looks polished
Aim for a lasting, sturdy finish. Trim loose threads, re-baste if needed, and ensure seams sit flat. A professional finish is quiet and confident, like a well-tailored jacket. Align seams so they meet evenly and set hems with careful, even hands.
Hide hardware for a clean look. Conceal closures or place them where they won’t catch light. If you must show hardware, bury it behind folds or decorative elements to keep the focus on fabric.
Match fabrics and trims for a pro finish
Choose fabrics with similar weight and drape, and align prints or textures so seams disappear. Select trims that echo the main fabric’s color or texture. If colors are off, a touch of dye or fabric paint can harmonize the set. The finished piece should read as a cohesive design, not a patchwork of parts.
Pressing and topstitch tips
Use a clean iron with a pressing cloth to avoid shine on delicate surfaces. Press seams open or to the side as appropriate, and topstitch a comfortable distance from the edge. Keep stitches even and straight, backstitch at the start and end, and use a touch of steam to set shapes, especially on curved edges.
How to Make Removable Limbs Using Buttons and Snaps
You’ll want a sturdy method that looks clean and can detach easily. Start with the right size buttons and snaps, and place them so they sit flush when closed. Stitch buttons securely with a strong thread, using a cross or shank stitch. For snaps, reinforce the fabric around each snap with a small patch to prevent tearing. Test the mechanism gently after sewing and adjust tension so the limbs stay in place but can be removed without strain. This technique gives you a professional, durable result that you can explain confidently to others.

Clara Fern — Crochet Artist & Amigurumi Designer
Clara Fern is a crochet artist and amigurumi designer based in Austin, Texas. With 9 years of experience working with yarn and hook, she transformed a lifelong passion for handcraft into a creative mission: making amigurumi accessible, fun, and deeply rewarding for crafters of all levels.
Clara discovered amigurumi during a trip to Japan in 2017, where she fell in love with the art of bringing tiny characters to life through crochet. Back home in Texas, she spent years studying color theory, design principles, and advanced crochet techniques — developing her own signature style that blends kawaii aesthetics with original character design.
Through maclafersa.com, Clara shares everything she has learned — from choosing the right yarn and reading your first pattern, to designing fully original amigurumi characters from scratch. Her writing is known for being clear, detailed, and genuinely helpful, with no steps skipped and no secrets kept.
When she’s not crocheting, Clara enjoys watercolor painting, visiting local yarn shops, and drinking way too much coffee while sketching new character ideas.


