
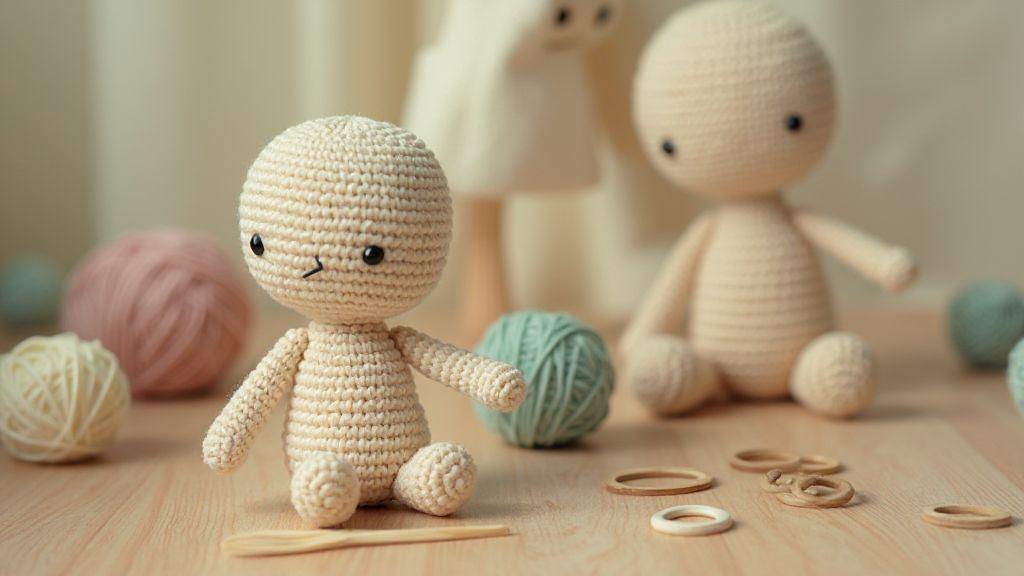
Pick the Right Joint Type for Your Doll
You want your doll to move how you imagine, not just stand there. The joint you choose changes everything from pose ability to how long your doll lasts. Think about how flexible you want the arms and legs to be, how much weight they’ll carry, and how visible the joint will be in the final look. The right joint type can make your project feel effortless, while the wrong choice can turn your doll into a stiff statue.
When you pick a joint, consider how you’ll store and handle the doll. If you want quick posing for photos, you’ll lean toward joints that move easily and snap back into place. If you mostly want a decorative figure, you might pick joints that stay put and don’t loosen with time. Your decision should hinge on how you plan to use your amigurumi and how sturdy you want it to feel in your hands.
Remember: the goal is to match the joint to your pattern and your skill level. Start with a simpler joint if you’re new, then move up as you gain confidence. The more you practice with, the better you’ll get at predicting which joint will work best for each project.
If you’re asking How to Add Articulated Limbs to Your Amigurumi Dolls, the joint choice is the first big step that determines poseability and durability.
Safety vs sew-in joints for amigurumi
Safety joints give you a lot of control over movement while keeping the doll safe for kids. They’re usually inserted with a bit of structure that helps the limbs rotate without wobbling too much. If your project will be played with or handled a lot, safety joints are a smart pick because they’re designed to handle regular use without ripping the fabric.
Sew-in joints are a clean look and hide inside the fabric better. They’re great when you want the joint to blend with the body and you don’t need a lot of range of motion. If your amigurumi is mostly for display or posing in short bursts, sew-in joints give you a neat, seamless finish. They’re also easier to keep compact because you don’t have separate hard pieces sticking out.
Decide based on how much the doll will move and who will handle it. If you want maximum motion with less bulk, safety joints win. If you want a soft, smooth look with modest movement, sew-in can be the better route. Either way, keep the pattern and your comfort level in mind.
When to use ball joint options for amigurumi dolls
Ball joints are the kings of range. They let your limbs move in many directions, giving you natural poses and a lifelike feel. If your doll is meant to sit, bend, and twist in dynamic ways, ball joints are your best friend. They shine when you want a high level of articulation and you’re comfortable with a bit more sewing and precision work.
Ball joints do come with a learning curve. You’ll need to plan for openings in the limbs and careful stitching to keep the joints centered. If you’re making a larger doll or something you want to pose dramatically, ball joints pay off with impressive flexibility. For a small or simple pattern, they can feel overkill and add unnecessary weight or complexity.
Use ball joints when you crave fluid posing, when your doll will be photographed in many angles, or when you’re crafting a character with lots of action. If you’re unsure, test a small sample joint on scrap fabric first to feel out the motion and the weight.
Quick joint choice guide
If you want fast answers, here’s a simple guide you can bookmark. For beginners or casual display dolls, start with sew-in joints for a clean look and easy handling. If you want more movement but still a tidy finish, try safety joints. For dolls meant to move in many directions or imitate real joints, ball joints are the way to go, but only if you’re comfortable with a bit more work.
- Purpose: display only vs play-ready.
- Movement: little vs a lot.
- Look: seamless vs visible hardware.
- Skill: beginner vs confident.
Keep these four questions in mind as you skim patterns and decide on your joint type. The right combo will feel obvious once you weigh these points against your project goals.
Gather Tools and Materials You Need
You’re about to start a fun project, so gather what you need first. Your kit should feel complete and easy to grab. Think of it like packing for a weekend craft trip: you want the essentials and a few handy extras. Keep everything in a labeled box or pouch so you’re not hunting for parts mid-project. When you have the right tools, your hands can flow and your amigurumi will look more polished from the first stitch. Remember, your comfort matters here, so choose tools that fit your grip and let you work steadily.
Now, plan for safety and durability. You’ll want sturdy needles, smooth yarn, and safe joints that won’t pop out with one tug. Check your pattern and note any special materials it calls for, like a specific yarn weight or hook size. Having a small scissors, stitch markers, and a yarn needle nearby saves you time and frustration. If a tool feels awkward, swap it out. Your project should feel easy, not a fight.
Finally, organize your space. A clean workspace keeps your focus sharp and your stitches even. Lay out your yarn by color or weight, set your pattern within easy reach, and keep spare parts close by. When your tools are ready and visible, you’ll start with confidence and finish with a stitched finish you can be proud of.
Tools for how to add articulated limbs to amigurumi
You need a few specific items to add articulated limbs smoothly. A compact set of pliers helps with tiny joints, while small safety eyes or noses finish the face cleanly. Choose a few different needle sizes so you can sew tight without snagging. Have a plush yarn needle for threading and attaching limbs, plus a blunt tapestry needle for clean passes through stuffing. A small screwdriver can be handy if your joints use tiny screws.
Keep your joints organized. You’ll use safety joints, discs, and washers, so keep them in a labeled container. Include spare parts like extra discs and small screws in case you drop or misplace one. Your goal is to glide through assembly without hunting for parts.
When you’re ready to sew, your grip matters. Use a finger-thick tool like a knitting needle for pushing joints through and a round needle for neat stitching. The right tools help you move with control, so your limbs stay in the position you want. These tools support How to Add Articulated Limbs to Your Amigurumi Dolls with clean, precise results.
Using safety joints in amigurumi: parts list
Safety joints keep limbs secure without visible seams. You’ll want a set that matches your limb size and the doll’s overall scale. Typical parts include a joint socket, a connecting rod or plug, a washer, and a cap or nut to lock the limb in place. You may also find small screws or elastic tips depending on your joint system. Gather extras like spare washers and plugs, so a tiny part doesn’t stall your progress.
Organize the parts by limb. For each arm or leg, you’ll likely use one socket, one rod, one washer, and one cap. Keep a few extra washers and rods on hand because they wear a little with use. When you have the right parts, you’ll feel ready to move from pattern to finished pose.
Think about safety while you work. Choose joints rated for soft toys and verify your stuffing pockets won’t pinch any moving pieces. A quick test fit before stitching helps you avoid loose limbs later.
Prep your kit
You’re prepping so your project flows. Kick off by labeling each part with your pattern’s limb numbers, then lay out the safety joints in order. Double-check your chosen yarn and hook size match the pattern’s tension guide. A dry run of the joints, without stuffing, can save you from major fix-ups later. When everything looks right, you’re ready to start assembling.
Now you’re set to begin. Clip small threads from the joins, wipe away any dust, and keep a clean surface. Finally, tuck your tools back in their place as you go, so your next step is smooth and quick.
Prep Your Kit
You’re about to make assembling easier, so set up a calm workspace first. A tidy table, good light, and a comfortable chair make every move feel natural. Put your pattern front and center, with notes visible so you can glance and keep your pace. When your kit is ready, you’ll jump into the project with focus and fewer interruptions.
Keep your constants close. Your main yarn colors, needle sizes, and the safety joints should sit in easy reach. A small tin or tray helps you separate pieces by limb, so nothing gets mixed up. When you can see everything at a glance, you’ll stitch with confidence and keep your hands moving without pausing.
Last, set a mini ritual for prep. Shuffle your pieces like you’re arranging a tiny parade, then double-check your measurements. A calm start helps your amigurumi stay adorable and well-proportioned as you add articulated limbs. Remember, the key is to be ready so you can start smoothly and finish with pride.
Add a Wire Armature to Your Limbs
You’re about to give your amigurumi real moveability. A wire armature lets your doll bend at the elbows, knees, and wrists without losing its shape. Start by choosing a simple design first, then add strength as you go. This isn’t magic—it’s careful planning and a little practice. You’ll notice your dolls stand up with better posture and joint positions, and you’ll be able to pose them for photos and play.
Think of the armature like the bones in your toy. It should be light but sturdy enough to hold poses. You’ll thread the wire through the limbs and torso, then cover it with stuffing and fabric. The result is a doll you can pose with confidence, not a stiff statue. You’ll find that practice makes your patterns come to life, and your friends will notice the difference in how yours move.
Once you nail the routing and securing, you’ll feel like you cracked a code. The armature is not just for flexibility; it protects your stitches from popping when you bend a joint. You’ll enjoy experimenting with different poses for photos or display. And remember, start small—test one limb, then expand to the rest of the body.
Choosing wire for adding wire armature to amigurumi
Pick lightweight steel or craft aluminum wire that’s easy to bend but strong. A gauge of around 16–20 works well for most limbs; finer wires can bend more but break easier, while thicker wires hold weight but are harder to shape. Buy a mini spool so you don’t waste material, and keep pliers handy to get clean bends. A short length for arms and legs is fine to begin with, and you can extend as your pattern grows. Always smooth the ends to avoid poking stuffing or skin.
Consider the limb size you’re making. For tiny dolls, use 16–18 gauge so the joints feel natural without looking bulky. For bigger amigurumi, switch to 14–16 gauge to hold weight and keep joints from sagging. You’ll want pliable wire that can hold a curve but not kink too easily. If you’re unsure, test a short piece first to see how it behaves inside your yarn.
How to route armature through body and limbs
Create a light tunnel inside the stuffing so the wire sits close to the surface where the joints bend. Thread the wire from the tip of each limb toward the body, then back out to the other end. Use a gentle weave so the wire doesn’t press against stitches. For arms, loop the wire through the shoulder area and down to the elbow and wrist. For legs, route from hip to knee and ankle, leaving a little extra length for poses.
Keep the wire centered inside each limb. If you need two segments for a joint, leave a small bend at the connection so the limb can flex. Use a stitch or scrap yarn to secure the wire at each joint before adding stuffing. This keeps the wire from shifting and gives you a clean, hidden look once you finish with fabric.
Secure the armature
Tack the wire to the inside of the limb with a few stitches before you add stuffing, so it can’t wobble. Seal joints with extra yarn around the bend, then wrap with more yarn to lock it in place. Once you’ve stuffed the limb, test the range of motion gently. If something catches, loosen a few stitches and adjust. You want smooth movement without the wire popping through the fabric.
Protect exposed wire ends with a small amount of fabric or clothing tape. If you’re worried about rust or corrosion, keep your wire dry and away from moisture. Label or mark the joints so future you doesn’t forget where to bend when you rework the armature. This step makes maintenance quick and your doll durable over time.
Sew-In Joint Methods That Hold
Sew-in joints give your amigurumi real playability without losing cuteness. You’ll want joints that stay put when you pose them and don’t show gaps or loose threads. The key is choosing methods that balance strength with a neat look. In practice, you’ll mix simple stitches with a few smart reinforcements, so your dolls stay sturdy through hours of cuddling and posing. Think of these methods as the bones of your doll—strong, reliable, and almost invisible when done right.
You’ll often start with a basic ring or swivel anchor, then add extra stitching around each joint to lock in motion. The goal is to keep movement smooth while preventing wobble or tugging on the crochet stitches. As you sew, you’ll notice that a little extra stitching around the joint makes a big difference in overall durability. This approach works well for shoulders, hips, and knees, where most movement happens. Stay deliberate, and you’ll build joints that feel truly responsive.
Step-by-step sew-in joint methods for amigurumi
You’ll begin with a small anchor inside the limb. Make a tight ring of single crochet stitches where the joint will connect. This anchor gives you a solid base to build from and protects the crochet fabric from tearing. Next, thread your needle and bring it through the anchor to create a back-and-forth knot that locks the position. Then, run a second loop or two around the anchor to create a stable hinge. This first line of defense stops the limb from pulling away when you move it.
After the anchor, you’ll add a few short passes of stitches along the joint seam. This is where you build reinforcement. Use a few tiny cross-stitches or whip stitches that cross the seam in multiple directions. The cross-stitches distribute movement and reduce stress on any single point. If you’re attaching an arm, loop the thread through both sides of the joint to keep the arm from twisting. For leg joints, make sure the stitches run both along the length of the limb and across the joint for even support. Keep your stitches tight but not so tight that the fabric puckers.
Finish with a securing knot inside the fabric. Weave the end in so it won’t show on the outside. Clip close and test the joint by gently tugging in different directions. If you feel any give, add one more overlay stitch across the seam. You’re aiming for a clean, strong joint that holds its position.
Aligning and reinforcing joint stitches
When you align stitches, you’re setting up a sturdy path that guides movement. Start by lining up the limb with the body so the joint sits evenly. If one side sits too high or too low, adjust before you sew the final passes. Use a few stitches that run perpendicular to the main seam to lock alignment. These cross-stitches help resist rotation and keep the limb pointing where you want it.
Reinforcement comes next. Add extra layers of stitches around the core anchor. Think of it as adding a belt around the joint: more layers give you more strength without changing the look. Use small, tight stitches that lay flat. Avoid bulky bumps that show through the crochet fabric. If you’re worried about visibility, keep the color the same as the surrounding yarn or slightly darker to hide hints of stitching.
As you reinforce, test the joint by moving it through its entire range. If you notice any stiffness, loosen carefully by trimming just enough thread and adding a new pass of stitches in the right direction. The idea is to create flexibility where you want it and firmness where you need it.
Fit Safety Joints Correctly in Your Doll
When you fit safety joints, you’re making your amigurumi doll stronger and more lifelike. You’ll want joints that move smoothly but stay put, so your doll can pose without wobbling. Start by lining up the inner pieces so they sit flat, then press each part into place with steady hands. If a joint feels loose, you may need a tiny bit of extra reinforcement or a slightly different size. Remember, the goal is secure motion without slack that makes the doll floppy.
Choosing the right joint isn’t a mystery once you know what to look for. You want joints that fit the scale of your doll, not something that sticks out awkwardly. The right joint will turn easily with a gentle twist and stay in place when you stop. If you’re unsure, test a few options on scrap pieces or a practice limb before you commit to your final doll. Your finished project will shine when the joints move naturally and hold their pose.
As you practice, you’ll notice the difference between joints that are too tight and those that are just right. Too tight and you’ll crease fabric or strain the yarn; too loose and your limbs flop. Finding that sweet spot takes a little trial, like tuning a guitar string. With patience, you’ll end up with a doll that looks polished and moves with confident, controlled grace.
Picking the right washer and size
Choosing the correct washer size is key to a snug, safe joint. Start by measuring the width of your limb’s hole and the thickness of the yarn you used. Pick a washer that fills the space without bulging, so the joint sits flush. If your washer is too small, the joint will wobble; too large, and it won’t bend properly. When in doubt, you can test a spare washer on a scrap piece to feel the right amount of resistance.
Not all washers are created equal. Some are flat and dull, others are rings with a tiny lip. The best choice gives a clean turn and a solid hold without leaving marks on the fabric. You’ll know you chose right when the limb can rotate smoothly but doesn’t slip out when you tug lightly. If you’re working with delicate yarn, consider a slightly thinner washer or a softer material so you don’t create bulk at the joint.
The size you pick also depends on the joint type you’re using. If you’re using a standard ball-and-socket joint, you’ll want a washer that seals the gap. For screw-in joints, a flat washer often works best to keep the screw centered. Keep a small selection of sizes on hand so you can swap quickly if one doesn’t fit just right. Your patience pays off in tighter, more reliable joints.
Locking and fastening safety joints securely
Locking joints securely is your safety net for a durable doll. Use a lock washer or a dab of thread sealant if your design permits, but test first on a scrap piece. You want a bite that keeps the joint from backing out, not something that binds the limb completely. Tighten slowly and check the range of motion as you go. If you feel any snag, back off a touch and adjust.
When fastening, keep the fabric clean around the joint. Loose fibers can hide gaps that later let the joint loosen. Wipe away dust, lint, or stray yarn so the washer sits perfectly. After you fasten, gently move the limb through its full range to confirm smooth rotation without any creaking or friction. A little patience here saves you from redoing the joint later.
As you gain confidence, you’ll develop a thumbs-easy method: insert, test, tighten a hair more, test again. If you’re making multiple dolls, a small routine becomes your superpower. You’ll notice that consistent technique yields consistent results, and your dolls will hold poses longer without needing adjustments.
Safety check
Do a final, careful safety check before you call the doll complete. Ensure all joints move smoothly, return to center, and don’t slip under light tension. Look for any loose threads or gaps around the washers and tighten or replace as needed. Run a simple pose test: bend and straighten each limb slowly, then try a casual pose you’d like your doll to hold. If anything feels off, revisit the joint and reinforce or reseat.
Add Ball Joints for Smooth Rotation
You want your amigurumi dolls to move naturally, and ball joints are the key. With ball joints, your pieces can turn, twist, and bend without huge effort from you. Think of them as tiny, smooth hinges that make every pose look right. When you choose the right joints, your doll can rotate at shoulders, elbows, hips, and knees with ease. You’ll notice your doll’s charm increases when the movement feels fluid, not stiff.
Choosing the right joint size is part of the magic. If the ball is too large, it looks awkward and won’t sit properly in the socket. If it’s too small, it might slip or feel loose. You’ll want joints that fit your pattern’s scale and your yarn thickness. Practice with a couple of test joints on scraps first, then commit to the final crochet pattern. The payoff is worth it: a doll that can strike a pose you’ll be proud of.
Ball joints also affect durability. Your pattern’s joints should handle a few wiggles without coming loose. Use secure sockets and snug fits, and don’t force movement beyond what the yarn can handle. With the right balance of fit and material, you’ll keep your doll stable while still allowing smooth rotation.
Ball joint options for amigurumi dolls explained
There are several options you can choose from. You might start with the classic metal ball joints, which are sturdy and reliable. They give predictable movement and are easy to replace if needed. If you crochet a lot and want something softer, consider silicone or polymer ball joints; they glide nicely through fabric sockets and feel gentler on yarn. Plastic ball joints can be lighter and cheaper, but they may not last as long if you handle your dolls a lot. Each option changes how your doll moves, so pick the one that matches your pattern and your care routine.
Another option is creating your own embedded joints using layered crochet pieces and wire or tubing for a pseudo-ball effect. This approach gives you total control over size and movement, but it takes practice. You’ll get a personalized fit that blends with your crochet stitches. If you want simple, ready-made joints, look for sets designed for amigurumi. They come with sockets and the hardware you need, and you can follow a few tutorials to install them correctly. Your doll will move with confidence, and you’ll feel the difference in every pose.
Fitting ball joints into crochet patterns
Start by planning where each joint goes. Mark the locations on your pattern before you crochet the limbs. You’ll need to create sockets that match the ball’s diameter, so measure carefully and crochet slightly snug sockets. If a socket feels tight, give it a gentle stretch while it’s damp or use a small amount of fabric-safe sealant to prevent looseness later. You want a socket that holds the ball steady but still allows rotation. This planning step saves you from redoing sections.
When you’re attaching joints, keep tension even in your crochet to prevent distortion. Use a crochet hook to pull yarn through the socket cleanly, and avoid extra stuffing that would crowd the joint. A snug fit means your doll can move without wobbling. If you’re unsure, practice on a scrap limb first. Once you see how the joint sits inside the socket, you’ll know how to adjust your pattern for a clean, durable fit.
Maintain free movement
To keep movement free, you want clean sockets and minimal friction. Use a soft finish on the inside of each socket—just enough to reduce snagging but not so slick that the joint slips. If you notice stiffness, check for tight yarn tangles inside the socket and remove them. A little bit of smoothing with a dry, soft brush can help. You’ll keep your doll’s joints turning smoothly without sacrificing durability.
Regularly test each joint’s range of motion as you finish your doll. Move it through its natural poses and adjust as needed. If a joint binds, loosen the surrounding stuffing or rework the socket slightly. The goal is a steady glide, not a hollow clack or stiff stop. With care, your articulated limbs stay flexible, and your doll keeps its charming, lifelike pose.
Modify Crochet Patterns for Jointed Dolls
You’re about to turn simple crochet into movable, expressive dolls. When you modify patterns for jointed amigurumi, you’ll add life to your creations. Start by choosing a pattern that already has basic shaping you like, then plan where you’ll place the joints. Think of it as giving your doll a way to bend and pose, not just stand. Your goal is sturdy, flexible pieces that look natural when you move them. This approach helps you learn while you build confidence for bigger, more complex projects.
As you work, picture your doll in a few common poses: a waving hand, a seated stance, or a tilted head for curiosity. Each pose guides where to place joints and how tight your stitches should be. Use light, single-color yarn for easier seam placement and to trace where pieces will connect. Keep your gauge consistent, so parts align smoothly. And don’t rush—jointed dolls pay off when you test fit and adjust before finishing.
When you’re satisfied, you’ll see how much personality you can pack into a single project. You’ll also gain a repeatable method you can apply to many patterns. With each doll, you’ll get faster and more confident at planning joints, choosing materials, and finishing with clean seams. Your future creations will feel effortless, like you’ve finally found the right rhythm.
Crochet patterns for jointed amigurumi: changes to make
You’ll want to map out every joint before you start. Decide which limbs you’ll hinge and where the bodies will connect. Use a stitch count that fits your pattern but leaves a little extra space for movement. If you’re unsure, practice on a small swatch to see how the fabric behaves when you pull at the joints. Don’t fear reworking a section—adjusting stitch counts early saves you from major fixes later. When you’ll join pieces, mark the connection points with a removable stitch marker so you don’t forget where to sew.
Think about the type of joint you’ll use. Simple threaded joints with a cord or elastic can be enough for basic bending, while more advanced dolls may use washers or ball joints. Start with the easiest option and only upgrade if you want more range of motion. Remember to add reinforcement around each joint so your doll can bend without tearing. Rework tight spots first—if you pull and the fabric gaps, your joints will loosen fast.
Record your changes as you go. Keep notes on the exact stitch counts, where you added increases or decreases, and how you secured joints. This makes it easier next time and helps you compare outcomes. The better your notes, the more polished your final piece will feel. You’ll see that your early tweaks become the standard you rely on for future projects. And you’ll be proud when your dolls move in natural, almost lifelike ways.
Add openings and reinforcement for joints
Openings should be placed where movement happens most, like elbows, knees, and wrists. Leave just enough room to insert the joint parts, then close with a sturdy seam. Use a felling or invisible stitch to keep the opening tidy and strong. You want movement without loose threads or gaps that catch on yarn. If you’re worried about strength, weave a thin reinforcing thread along the seam when you stitch it shut. That tiny extra step makes a big difference in how long your doll stays poseable.
Reinforcement is your best friend when you’re making jointed limbs. Double or triple stitch the areas that will bend most. Reinforce on both sides of the seam so you don’t get bulky knots that throw off the doll’s shape. Sometimes, adding a small piece of fabric or felt behind the joint helps keep everything aligned and reduces wear. You’ll thank yourself later when you’re posing your doll and it doesn’t sag or loosen. A well-reinforced joint feels solid, not flimsy, and that confidence shows in your photos.
Update stitch counts
When you update stitch counts, you’re tailoring the pattern to your joint technique. Start by increasing or decreasing at the points right before and after the joint to keep smooth curves. If you’re using a ball joint, you’ll likely need fewer increases near the joint to avoid bulges. For elastic or threaded joints, you may want a slightly looser fabric in the limb to accommodate movement. Test fit as you go, so you’re not surprised by tight spots or gaps.
Keep a note of every change. Record exactly where you added or removed stitches and how many. This will save you from guessing next time. You’ll be able to reproduce the same look on future dolls or adjust slightly for different sizes. The more methodical you are, the more your final figures will feel like they’ve come from a shop—only you did this with your own hands.
Stuffing and Weighting for Stable Poses
You’re aiming for toys that stand, sit, and pose without wobbling. The core idea is simple: balance your stuffing so your amigurumi holds its shape. You’ll find that a little extra weight in key areas creates a solid center of gravity, while too much or the wrong placement can tip the whole doll. Start with a modest amount of stuffing and test pose after pose. If you notice shelves or fingers drooping, add small, evenly distributed weights to the opposite side to keep things stable. Keep things snug but not tight—too much pressure can make the fabric pucker and ruin the look.
The goal is predictable positions, not floppy limbs. Use a mix of fiberfill for softness and tiny weights like metal beads or sewing pellets for weight. You want the doll to feel alive in a few fixed poses, not a rigid statue. As you work, remember that your hands will guide where the weight sits best. If a limb droops, tuck a tiny weight near the joint or inside a stuffed segment to counteract the pressure when you move that limb. Test a lot. Your hands should feel the toy settle into its pose as you guide it.
Keep a consistent technique: add weight in small increments and test often. Too little weight and you’ll still have wobbles; too much and you’ll lose the supple feel. When you’re happy with the stand, finish by sealing the stuffing so nothing shifts. Your doll’s stability comes from careful distribution, not a single big weight. This balance makes your amigurumi look intentional in every pose, not casual and drift.
Even stuffing for making poseable amigurumi arms and legs
Distribute stuffing evenly inside arms and legs so they bend naturally. Start with a soft core and add small amounts of weight at the ends or near the joints where you want strength. If you want a leg to hold a pose, add a touch more weight toward the knee or ankle where gravity tends to pull it. Keep the overall circumference consistent so the limb moves smoothly without pinching. Test by bending; if you feel a tilt, adjust with tiny weights or repack the stuffing to even out the balance.
When you’re finishing, tuck the stuffing into the curves so there are no gaps that grab the eye. A uniform fill helps the limb hold its pose without looking stiff. If you’re unsure, compare with a hand-made friend you already finished; you’ll notice where the weight sits and how the limb behaves in a natural pose.
DIY movable limbs for amigurumi: adding weight
To create movable limbs, you’ll add lightweight weights in the limb sections that need extra hold. Think of it like training wheels for your pose. You want enough weight so the limb stays put when you set it down, but not so much that it can’t bend or move at the joints. Start by placing a small bead near the joint and test the range of motion. Add more beads or pellets gradually until you reach a balance where the limb holds a pose after you guide it.
Always keep the interior smooth. Seal the weights inside a small fabric pouch or thread a tiny bit of weight into a sewn channel, then cover with stuffing. You’ll get clean lines and no rattling that distracts from the look. If you plan a lot of movement, you may want to pilot with a lighter limb first to see how much resistance you prefer before committing to heavier weights.
Care, Repair, and Troubleshooting Tips
You’re building and caring for your amigurumi, so you deserve tips that keep your creations sturdy and fun. This section covers how to fix common issues, prevent wear, and replace parts before cracks become city-block-sized problems. You’ll learn practical moves you can do at home without fuss, plus quick checks to keep your dolls looking fresh and feeling sturdy.
Comfort comes first, so start with simple care routines. Regularly inspect your stitches and joints, and you’ll catch wear early. Gentle handling, clean hands, and a light dusting can make a big difference over time. If you notice loose threads or a wobbly limb, you’ll know the first steps to take—before a small issue becomes a big one.
Your projects deserve longevity, not a one-season fling. By staying proactive with small fixes, you keep your amigurumi safe for play, display, and gifting. You’ll feel the difference when every stitch holds its place and every limb moves with confidence. Now, let’s dive into the common fixes you’ll reach for most often.
Amigurumi articulated limbs tutorial: common fixes
When your limbs feel loose or wobbly, you’re not stuck. You can tighten them by resecuring the joints and reassessing the stuffing balance. Start by gently pulling the limb to locate the looseness, then reinsert stuffing to even out pressure. If the joint is sewn to a fabric area, re-stitch with small, even stitches that sit snugly. You want the limb to move but not flop.
If you notice cracking or tearing at the joint, reinforce it with a few extra stitches or a small dab of fabric glue designed for yarn crafts. Let it dry fully before testing movement again. For a hinge-like feel, you can wrap a little extra yarn around the base of the limb before stitching it back in place. This boosts the joint’s grip without making the fabric bulky. Remember: you’re aiming for smooth motion, not a rigid statue.
Common fixes also include checking the elastic or thread inside the limb. If you used elastic for a bendy feel, test the stretch. If it’s too tight, cut back a loop; if it’s too loose, replace a shorter segment. With thread-legs or arms, you’ll often find better balance by slightly shifting the stuffing’s position inside the limb to even out movement. Keep your stitches neat and hidden, so the fix stays invisible but effective.
Preventing wear and replacing parts
Prevention is your best friend. Use a gentle, consistent stitch pattern along high-stress areas and avoid overstuffing limbs, which can stress seams. If a limb shows early signs of wear, address it immediately—don’t wait for a visible tear to arrive. Reinforce joints before they fail by adding extra passes of stitching around the base where the limb attaches to the body.
Replacing parts is not a failure; it’s smart craftsmanship. When a joint or limb is beyond easy repair, swap it with a stronger filler or a different technique that suits your pattern better. If you regularly swap limbs for pose-ability, consider stitching a small reinforcement ring at the joint with a contrasting color for strength and a quick visual check. Replacement parts keep your dolls safe for play and display, and they let you keep your favorite designs alive.
Simple repair steps
- Identify the weak spot and choose a repair method that matches your yarn and stitch style.
- Re-stitch the joint or seam with small, even stitches to avoid bulk.
- Rebalance stuffing around the fix to restore smooth motion.
- Test movement gently, then re-hide any visible stitching with a match-colored yarn.
You’ll love how small, careful steps can restore your amigurumi’s charm. The key is to act early and use steady, tidy stitches that blend with the original work.

Clara Fern — Crochet Artist & Amigurumi Designer
Clara Fern is a crochet artist and amigurumi designer based in Austin, Texas. With 9 years of experience working with yarn and hook, she transformed a lifelong passion for handcraft into a creative mission: making amigurumi accessible, fun, and deeply rewarding for crafters of all levels.
Clara discovered amigurumi during a trip to Japan in 2017, where she fell in love with the art of bringing tiny characters to life through crochet. Back home in Texas, she spent years studying color theory, design principles, and advanced crochet techniques — developing her own signature style that blends kawaii aesthetics with original character design.
Through maclafersa.com, Clara shares everything she has learned — from choosing the right yarn and reading your first pattern, to designing fully original amigurumi characters from scratch. Her writing is known for being clear, detailed, and genuinely helpful, with no steps skipped and no secrets kept.
When she’s not crocheting, Clara enjoys watercolor painting, visiting local yarn shops, and drinking way too much coffee while sketching new character ideas.


