
Materials and Tools for Advanced Amigurumi Dragon Pattern
You’re diving into a project that demands sturdy materials and smart tools. For an Advanced Amigurumi Dragon Pattern: Wings, Scales and All, choose supplies that hold shape, resist wear, and keep stitches neat. Start with a durable base: yarns that can handle tight, precise stitching without curling. You’ll also need a reliable set of hooks and a few specialty tools to manage the dragon’s tiny scales and delicate wings. Think of this as assembling a small, wearable sculpture: the right gear makes every stitch feel like it’s reaching its full potential. Your goal is clean edges, secure joins, and a finish that stays plush but firm.
When you’re selecting materials, balance softness with structure. Choose yarns with a bit of stiffness so scales and spikes keep their form, but not so rough they irritate your hands. You’ll work with varied textures—smooth bodies, bumpy scales, and careful wing membranes—so you want fibers that play nicely with different stitches. Keep a flexible mindset: if one brand behaves differently, switch to a second option without starting over. With the right mix, you’ll sew the dragon together with confidence and end up with a piece that’s ready to display or play with.
Plan for realism and durability. You’ll stuff firmly to maintain shape, yet you don’t want a doll that can’t bend or sit. The tools you choose should support precise shaping, safe assembly, and clean finishing. When you finish, you’ll love how the sculpture holds posture and looks in natural light, as if you could take a breath and watch your dragon blink its mighty wings.
Yarn weights and hook choices
Your yarn weight sets the dragon’s overall feel. For an Advanced Amigurumi Dragon Pattern: Wings, Scales and All, aim for a balance: medium to light worsted yarns give clear stitch definition without bulk. Use DK or worsted weight for the body and a finer yarn for tiny scales or membranes. The hook size should match your yarn to keep stitches snug, but you may adjust up or down depending on your tension. Try a few sample swatches to lock in the right gauge before committing to the full dragon. The goal is smooth, even stitches that don’t pucker when you stuff.
Consistency is king here. If your stitches look loose, switch to a smaller hook or firmer yarn. If they’re too tight and your fabric won’t stretch into wings, go up a hook size. For the wings and scales, you may use textured yarn or mini-skeins of a contrasting color to add depth without crowding your stitches. You want the body to have clean lines, while the wings and scales pop with defined shapes. Keep notes on each section so you can replicate the tension if you choose to make another dragon later.
Needles, stuffing, and safety parts
You’ll need a few sturdy needles to weave seams and close tiny gaps without ripping the fabric. A sharp tapestry needle works well for fastening off threads and sewing in any small pieces like spikes or horns. For stuffing, use a light, breathable fiberfill that can be packed firmly but still fluffs up around curved shapes. Don’t skimp on fullness where wings meet the body; a well-supported wing root helps your dragon sit upright and look alive. When you pin sections together before sewing, you’ll avoid misaligned scales and keep the dragon’s silhouette true to the pattern.
Safety parts matter if you’re making this for kids or display. Small beads or pellets can create weight and balance, but they’re risks for little mouths. If you use safety eyes, choose a size that fits your dragon’s face and secure them with a backing that won’t loosen over time. If you prefer to avoid small parts, substitute embroidered eyes or felt domes. Your choice should prioritize durability and child-safe construction while preserving expressiveness in the dragon’s face and eyes.
Recommended brands and quantities
For reliable performance, you’ll want premium-brand yarns and tools. A standard kit might include: 3–4 skeins of main body color (DK weight), 1–2 skeins for accents (scales or wing membranes), and a contrasting color for highlights. Look for fiber blends that keep shape when stuffed, like cotton blends or acrylic with a touch of wool for warmth. Pair these with a versatile crochet hook in sizes that align with your yarn gauge. Keep a spare hook or two in adjacent sizes in case you need a quick tweak during shaping. This compact setup keeps you ready to adjust without losing momentum.
Choose brands you trust for consistent stitch definition and colorfastness. If you’re new to amigurumi, pick a starter kit with a few colors and a basic safety eyes option. For more advanced projects, you’ll want at least one extra color with a contrasting shade for scales and wings to give your dragon depth. Stock care items like a blunt needle, stuffing, and backup safety parts so you’re prepared to finish without delays.
Reading Gauge and Sizing for a Scaly Amigurumi Dragon
Gauge is your secret to a dragon that fits the pattern and your hooks. When you stitch, you want your fabric to be the right size, not too tight or too loose. Your gauge tells you that, so you can compare your swatch to the pattern’s measurements and keep your dragon proportional. If your swatch is bigger than the pattern gauge, your dragon will grow and may end up taller than you expect. If it’s smaller, the final toy could end up undersized or out of proportion. Think of gauge as your measuring stick for every scale and ridge you plan.
Your swatch is your report card. Compare stitches per inch to the pattern’s numbers and adjust with your hook or yarn to match. If you want a dragon with chunky scales, loosen your gauge a notch; if you’re aiming for finer, tighter scales, tighten. This is where your hands get to be precise without getting stiff. You can also swap yarn brands or fiber contents and still hit the target by checking the gauge first. Your goal is simple: your finished Advanced Amigurumi Dragon Pattern: Wings, Scales and All should feel right in your hands, not just on the page.
Gauge isn’t just about size. It affects how the scales stack, how the wings lay, and how sturdy the body feels when you pose it. If your gauge is off, your dragon’s bulges or gaps can appear. Check early and often, adjusting your hook size or yarn weight until the swatch and the pattern match. Once you’ve got that harmony, you’ll feel confident that every scale sits where it should and every stitch lines up with the next.
How to check your gauge quickly
Grab a small square swatch and stitch for a minute or two, then count stitches per inch and rows per inch with your current hook and yarn. If the numbers line up with the pattern’s gauge, you’re good to go. If not, switch hook size by one and recheck. A quick 2″ x 2″ swatch, lightly blocked if needed, keeps you on track. If you’re off by more than a stitch or two per inch, adjust and recheck.
Resize tips with hook and yarn changes
If your gauge is too tight, use a larger hook or plumper yarn. If it’s too loose, go down a hook size or switch to a thinner yarn. Small changes make big differences in scale alignment, so tweak in steps. A practical tip: test a single row on a small section before committing to the whole dragon. If the scales align into a clean line and sit snug, you’ve found your combo.
Calculate final dimensions before you start
Do a quick math check to estimate final size with your gauge. Multiply the pattern’s final dimensions by the ratio of your swatch gauge to the pattern gauge. If the numbers don’t line up, adjust your hook size or yarn and recheck. This saves time and avoids surprises at the last scale and wing assembly.
Advanced Amigurumi Stitch Patterns for Texture
Texture adds real character to your amigurumi. Mix stitches beyond single crochet to give depth and grip, with practical effects for structure and detail. Texture isn’t just decorative; it helps your dragon stand up to play and display. Use patterns like crocodile and puff stitches to create rugged scales and highlighted texture. Layering stitches builds a sturdy core that holds shape after stuffing and sewing. Experiment with different textures to see how each one shifts the dragon’s personality.
Using crocodile and puff stitches
Puff stitches create raised blobs that resemble scales or bubbles, great on the back of a dragon’s neck. Crocodile stitches yield bold, defined scales with a dramatic, reptile-like look. Start with puff stitches in small rows for subtle texture, then build a panel for crocodile stitches to measure progress. Pair puff stitches with plain rounds to balance density, and secure ends as you go.
Layered stitches for scale bases
Layered stitches give a sturdy base that supports texture without sacrificing flexibility. Build a simple base with basic stitches, then add a second layer with a different stitch height for a built-up feel. Maintain even tension and adjust as needed to keep the base from becoming too stiff. Layered stitches help you control density and shape for a dragon that needs both sturdiness and movement.
When to choose each stitch pattern
Choose puff stitches for soft highlights or small raised features. Crocodile stitches for bold, defined scales that read well in photos. Layered stitches for a solid base with controlled texture. As you master them, you’ll know exactly which stitch to reach for to bring the Advanced Amigurumi Dragon Pattern: Wings, Scales and All to life.
Crochet Dragon Scales Technique and 3D Effects
Combining crochet stitches with careful placement creates depth you can feel. Think in layers: base fabric, scale rows, then shading or edging for dimension. Scale work should overlap slightly to form a natural, tactile surface. Small changes in tension affect each scale’s bite; practice to find a balance that looks lifelike without being stiff. The secret isn’t a gimmick—it’s predictable spacing and deliberate overlaps. With planning, your dragon grows from a flat piece to a creature full of life before eyes are added.
Step order for 3D dragon scales crochet
Create a foundation row, then crochet a row of scales in a staggered pattern. Add a second pass to build height, allowing edges to curl slightly. Attach the completed scale rows to the body with gentle backstitching or slip stitching so they sit above the fabric. Count stitches, maintain even tension, and check overlaps as you go. If a scale loosens, resew; if a row edges into space too much, adjust the starting point. Over time, your step order will feel automatic, and your dragon will gain character.
How scale rows overlap for realism
Overlapping scales add depth. Start with the bottom row, then shift the next row by half a scale. Slight light shading on edge rows enhances the 3D effect. Inspect both sides for natural curves; adjust to avoid rigid lines. Realistic dragons curve their bodies, so scale rows should follow gentle arcs, not straight lines.
Stitches per scale row and spacing
Plan 2–3 stitches per scale with a spacing from half to a full stitch between scales. Pinning the row before stitching helps you verify overlap and fill gaps. Place longer scales along the spine and shorter ones on limbs to create natural variation.
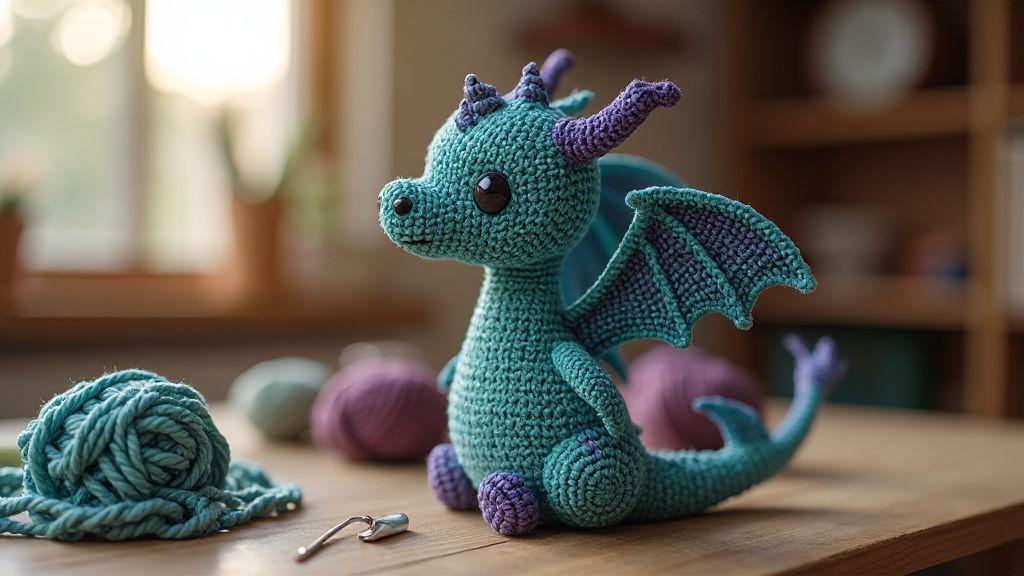
Amigurumi Dragon Wings Tutorial and Construction
You’ll shape, attach, and finish wings that stay put and move with your dragon’s personality. Decide the wing style early—bat-like for drama or feathered edges for whimsy. Start with a simple wing frame, then add ribs and membrane textures. Document steps with quick notes and sketches to stay consistent and adjust if the dragon sits differently in display.
Wing frame options and shaping
Choose a simple pipe frame with wire or a lightweight foam core. If using wire, two rails per wing curled to follow the dragon’s back keep the frame light and strong. A foam core wrapped in fabric provides a smooth edge and reduces snag risk. Shape the frame in a gradual arc to mirror the shoulder line for a natural look, especially if you want translucent membrane.
Adding ribs and membrane texture
Place ribs evenly along the frame, spacing for slight membrane curvature. Crochet arches or use lightweight ribbing for stability. Attach ribs regularly to anchor firmly. Texture the membrane with lighter yarns or thread for veining. Reinforce joints near the attachment to the body to help pose without sagging. Practice on scrap first to manage tension.
Attaching wings so they stay put
Attach at a strong point on the back with a tight seam along the wing’s top edge. Reinforce with multiple passes, and consider a dab of fabric glue near the base for extra hold. Test pose carefully; if the wing droops, add anchors near the base or adjust the angle. For extra security, thread a narrow elastic along the attachment seam inside the body to allow gentle flex without wobble.
Amigurumi Dragon Shaping Tips for a Professional Finish
Increases and decreases for curves
Treat increases and decreases as the bones of your dragon’s curves. Use gradual increases for gentle curves; increase every second stitch for soft bulges; decrease more often for sharper contours. Weave in ends firmly to avoid puckers.
Shaping limbs, tail, and snout
Keep joints tight for sturdiness, then ease toward tips for taper. Test bends to ensure read as solid but flexible. Balance limbs for standability, using small flat spots under feet. Attach limbs with stitches that anchor into multiple rows to prevent wobble.
Stuffing methods for balance and form
Distribute stuffing evenly, using tools to push into corners. Aim for a solid core without overfilling near joins. If you see creases, reposition stuffing. After stuffing, sew openings firmly and then lightly massage to settle shapes.
Assembly Guide for Amigurumi Dragon Seaming
Best joins for limbs and tail
Attach limbs by aligning with marked points, using whipstitch or mattress stitch. Pull firmly but evenly. For tails, distribute stress along a longer seam. Add a small core of stiff material if needed for extra rigidity. Reinforce with additional anchors near bases.
Aligning head and neck for pose
Position the head to bend as desired, pin with markers, and start with a loose slip stitch to set the pose. Use a stronger ladder stitch for final hold. Ensure eyes are aligned on the body’s midline. Test balance by lifting the neck; add anchors if needed. Weave ends inside the seam to secure. Consider a tiny support inside the neck for display poses.
Invisible seaming methods and reinforcement
Use invisible mattress stitches or backstitch where seams are straight; piano key or ladder stitch for curved seams. Start with anchor stitches, then maintain even tension inside the seam. Reinforce joints that bear movement (neck base, hip connections, tail root). Weave in tails and ends, then, if desired, add a light layer of fabric glue inside for extra durability.
Color, Texture, and Yarn Choice for Your Dragon
- You want your dragon to feel alive, not flat. Bold color choices give personality, while soft textures keep scales believable. The right yarn can sharpen stitches; test swatches first. Pair brighter hues with deeper shadows for depth.
- Texture is your secret weapon. Mixing smooth and tweedy fibers adds dimension, while a slightly fuzzy or variegated yarn can mimic natural surface variation without overpowering the pattern.
- Keep a practical color plan. Start with 2–3 main colors plus a couple of accents to avoid detail blur. Ensure stitch definition remains crisp, reserving darker shades for underlayers and lighter shades for highlights.
Picking fibers for durability and drape
- Balance longevity with drape. Durable fibers like merino or cotton blends hold shape well; choose smooth blends for natural fall and scale lay.
- Consider scale size. Small scales benefit from lighter, smooth yarns; larger scales look stronger with slightly thicker fibers. You may swap a suggested yarn for a similar-weight alternative to achieve the desired texture.
Using variegated yarns for scale depth
- Variegated yarns add depth with slow color changes, avoiding blur on scale lines. Use variegated yarns on broad surfaces and solid colors for detail lines and shadows to keep the dragon readable.
Color placement to enhance 3D scales
- Place darker tones along undersides and lighter tones on tops to simulate light catching edges. Avoid too many shifts; a few transitions guide the eye along the body for a carved appearance.
Finishing, Safety, and Troubleshooting Your Pattern
Blocking, gloss, and final trims
Blocking helps stitches sit evenly and keeps seams neat. Dampen and pin to size, then dry flat. If needed, a light steam can be used with caution. After blocking, apply a subtle gloss and trim stray ends. Mark progress with notes on color changes or stitch counts.
Child-safe eyes, joints, and fastenings
If using safety eyes, insert before closing the head and secure with backing discs or fabric glue. Stitch eyes for softness, doubling over for durability. Align eyes to avoid cross-eyed effect. Use secure joints with multiple passes; avoid overfilling. Reinforce attachments to prevent tugging loose. For kid-friendly toys, reinforce tails and wing tips, and hide end tails inside seams.
Common fixes and pattern FAQs
If a stitch loosens or misaligns, unpick to the last good row and rework. For color changes, seam with a tiny slip stitch or weave through back loops to minimize bulk. If wings or tail don’t sit right, re-pin and reblock just the affected area. When unsure, consult pattern notes or craft groups with photos. The goal is clean lines and secure pieces, ready for display or gifting.
Quick recap: Advanced Amigurumi Dragon Pattern: Wings, Scales and All in one glance
- Start with sturdy materials and precise tools to shape the dragon’s body, wings, and scales.
- Master gauge early to ensure correct sizing and scale placement.
- Use texture wisely: choose stitches (puff, crocodile, layered) to add depth without sacrificing form.
- Build a solid wing frame and attach securely for poseable display.
- Finish with careful seaming, safe eyes, and balanced stuffing for a professional look.
This is your path to bringing the Advanced Amigurumi Dragon Pattern: Wings, Scales and All to life—layer by layer, stitch by stitch.

Clara Fern — Crochet Artist & Amigurumi Designer
Clara Fern is a crochet artist and amigurumi designer based in Austin, Texas. With 9 years of experience working with yarn and hook, she transformed a lifelong passion for handcraft into a creative mission: making amigurumi accessible, fun, and deeply rewarding for crafters of all levels.
Clara discovered amigurumi during a trip to Japan in 2017, where she fell in love with the art of bringing tiny characters to life through crochet. Back home in Texas, she spent years studying color theory, design principles, and advanced crochet techniques — developing her own signature style that blends kawaii aesthetics with original character design.
Through maclafersa.com, Clara shares everything she has learned — from choosing the right yarn and reading your first pattern, to designing fully original amigurumi characters from scratch. Her writing is known for being clear, detailed, and genuinely helpful, with no steps skipped and no secrets kept.
When she’s not crocheting, Clara enjoys watercolor painting, visiting local yarn shops, and drinking way too much coffee while sketching new character ideas.


