
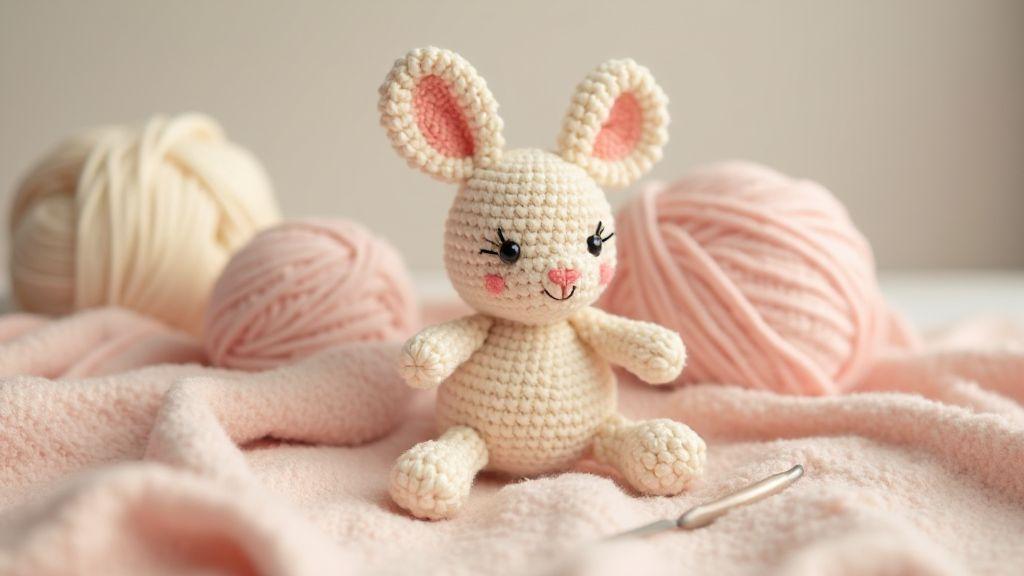
Why this your first amigurumi bunny pattern is perfect for you
You’ll feel confident from the first stitch because this pattern guides you step by step, almost like a friendly mentor at your side. Each detail is explained in plain language, and you’ll see how tiny choices—like where to place a stitch or how tight to pull—shape a cute, cuddly bunny you can be proud of. This pattern keeps your hands busy with clear rounds and simple shapes, so you stay focused and motivated. By the end, you’ll notice your technique slowly click into place, and your projects won’t feel overwhelming anymore.
This pattern is designed to fit your pace and your space. If you’re juggling a busy schedule, you can still finish a complete bunny in short sessions. If you’re near a cozy corner, you’ll enjoy curling up with your yarn and watching your bunny grow. The instructions are direct, with little room for guesswork, so you feel steady as you work. And if you ever pause, you’ll know exactly where to pick up again without re-reading pages.
Most importantly, this pattern helps you build confidence you can carry to your next project. When you complete the first bunny, you’ll see your skills improve in real time—stitches look even, seams align, and your finishing touches feel satisfying. This isn’t just a pattern; it’s a small victory you can hold in your hands.
Who this pattern suits
You’ll find this pattern suits you if you’re new to amigurumi or returning after a break. The steps are organized to build your skills gradually, so you won’t feel overwhelmed. If you like a clean, friendly style with simple shapes, this bunny is a great match for your projects. You’ll also appreciate the clear photos and diagrams that show exactly where each stitch goes, making it easy to follow along.
If you enjoy learning by doing, this pattern is for you. It lets you practice basic stitches while still making something cute and useful. You’ll find that the size is just right for cuddles, and the fabric you choose can reflect your personality. Whether you want a classic white bunny or a colorful, bright friend, this pattern adapts to your taste without losing its straightforward flow.
This pattern also suits you if you’re sharing your hobby with others. It’s easy to photograph and show off, and you can gift the finished bunny or customize it for a friend’s favorite color. The approachable style means you can invite a family member to join in, turning crafting time into a small, joyful project you both can enjoy.
What you will learn as a beginner
You’ll learn how to create a rounded head and body with even increases so your bunny looks soft and friendly. The pattern teaches you how to join parts cleanly, which makes your finished bunny look polished. You’ll also practice simple color changes or accents, like tiny cheeks or a bow, without getting tangled in complicated techniques.
As you work, you’ll gain familiarity with basic stitches and tension control. You’ll learn how to read a chart, count rounds correctly, and keep your stitches consistent. These are the building blocks you’ll carry into future projects, so every small win adds up to bigger confidence.
Quick benefits list
- Clear, beginner-friendly steps you can follow without getting lost.
What you will learn as a beginner
You’ll practice basic stitches and learn how to keep your tension even so your bunny’s fabric sits neatly. This pattern shows you how to shape limbs and ears with simple rounds, helping you understand how to make your bunny look balanced.
You’ll also discover tips for finishing touches—like hiding yarn ends and adding tiny facial features—so your bunny feels complete and cute. By the end, you’ll be able to replicate the same steps with other small toys, widening your skills for future projects.
Tools and yarn you need for your first amigurumi bunny pattern
You’re about to bring your soft, huggable bunny to life, and the right tools make all the difference. This starter guide keeps things simple: you’ll want a trusty crochet hook, a couple of yarns in friendly colors, a blunt tapestry needle for weaving in ends, and some light stuffing. With the right kit, your first amigurumi bunny will feel less like a project and more like a little friend forming in your hands. Keep your goals in sight: neat stitches, snug stuffing, and a finish that looks tidy from every angle. Your setup should feel easy and comforting, not overwhelming.
For most beginners, a medium-weight yarn (aka worsted weight) is your best friend. It’s easy to see your stitches and doesn’t slip through your fingers. Pair it with a hook that matches the yarn label, usually 4.0 mm to 4.5 mm for worsted weight. If you choose a lighter yarn, go with a smaller hook; if you go bulkier, uptick the hook size. The idea is to feel confident while you work, not wrestle with the yarn. Have a spare hook and a small pair of scissors handy, because you’ll be cutting yarn and switching colors a few times as you shape your bunny.
Stitch markers are handy when you’re starting, especially for keeping track of rounds. A stitch marker that sits on your hook or a simple paper clip can save you from losing your place. You’ll also want a blunt tapestry needle for weaving in ends and for closing up the last seam. If you plan to add eyes, safety eyes are a quick, safe option that won’t poke through the yarn. A little bag of polyfill stuffing completes your basic kit, giving your bunny its cheerful plump shape. With these basics, you’re set to focus on the fun parts: shaping, stuffing, and finishing with care.
Best yarn weight and hook size for a free easy amigurumi bunny
Choosing the right yarn weight makes your life easier from stitch one. A classic worsted weight yarn is forgiving and shows your stitches clearly. It also helps you feel in control as you learn the rhythm of rounds. Pair it with a crochet hook in the 4.0 mm to 4.5 mm range, which most beginners find comfortable to grip and maneuver. If you’re using brand-new yarn, always check the label for the recommended hook size—your yarn knows best. The goal is consistent tension and snug stuffing, so your bunny holds its shape nicely.
If you want a softer, fuzzier look, you could try a DK (double knitting) weight with a 3.5 mm hook. That combo creates a cute, lightweight bunny, but you’ll need to pay closer attention to stuffing density and stitch tension. For your first project, I’d stick with worsted weight and a standard hook size; it makes it easier to see mistakes and fix them quickly. Whichever route you choose, practice a few test stitches on a small swatch to confirm you’re happy with how your stitches sit and how the fabric feels in your hands.
Stuffing, safety eyes, and basic tools you need
Your stuffing choice affects the final look and feel of your bunny. Polyfill is my go-to for beginners because it’s affordable, lightweight, and easy to shape. You’ll want to stuff firmly enough to avoid flat spots, but not so tight that you distort the stitches. A practical tip: stuff gradually and check symmetry as you go. If you notice a difference between the ears or limbs, stop and adjust before finishing the seam. This little habit saves you from redoing large sections later.
Safety eyes are a popular, quick option for a friendly, cartoon-like bunny. They come in various sizes; pick a pair that sits neatly against your stitches and won’t pop out with gentle handling. If you’d rather avoid plastic eyes, embroidery eyes or simply stitching dark yarn dots can achieve a sweet, homemade look. You’ll also want a light pair of scissors, a blunt tapestry needle, and a few spare stitch markers. These tiny tools keep your project tidy and help you finish with confidence.
Materials checklist
- Worst or solid DK yarns in your chosen colors
- Crochet hook in 4.0–4.5 mm (adjust if your yarn says so)
- Polyfill stuffing in a small bag
- Safety eyes or embroidery eyes (optional)
- Blunt tapestry needle for weaving in ends
- Small scissors and a couple of stitch markers
- A comfortable workspace and good lighting
Learn basic stitches in a beginner amigurumi tutorial
You’re about to start a fun journey into knitting tiny friends. You’ll learn stitches that form the body, ears, and tiny paws of your first project. Each stitch is a tiny building block, and patience pays off when your stitches stay neat and even. As you practice, you’ll see your projects grow from simple rounds to cute shapes you can proudly call your own. By the end, you’ll feel confident to customize and tackle small patterns with ease. Your first amigurumi can be simple, and this tutorial helps you get there step by step.
You’ll notice that the basics are easy to memorize, and once you get the rhythm, you’ll want to stitch more. Keep your yarn snug but not tight, and count your stitches so your work stays even. If you make a mistake, don’t worry—you can fix it or, sometimes, turn it into a quirky feature. This learning curve is normal, and your progress shows in every round you complete. You’ll also start spotting how different stitches create curves and shapes, which is the magic behind your future designs.
Your journey starts with one idea: a friendly character you can hold in your hands. As you practice, you’ll gain confidence to try small changes—like making ears longer or eyes smaller—without losing the overall look. Think of each stitch as a tiny step toward your next creative win. And remember, your first amigurumi can be finished faster than you expect when you stay steady and enjoy the process.
Single crochet, increase, and decrease explained
You’ll begin with single crochet, the backbone of most beginner amigurumi. You wrap the yarn around your hook and pull through two loops, creating a tight, neat stitch that holds shape well. When you work in rounds, you’ll keep your stitches tight to avoid gaps in the fabric.
Increases are how you add size and shape. You’ll insert your hook into a stitch, yarn over, and pull up two loops, then repeat in the same stitch to create two stitches in one. This bumps up your round’s stitch count and helps you form rounded parts like heads and paws. Decreases are the opposite—work two stitches together so the round gets smaller and curves inward. Mastering these two moves is your fast track to smoother, more dimensional pieces.
If you mess up, don’t panic. You can drop your hook, rip back one or two rounds, and redo the section. It’s all part of learning. You’ll start to see patterns in how increases and decreases shape the toy, and that insight makes your next project feel easier.
Slip stitch, invisible join, and using stitch markers
A slip stitch helps you move yarn without adding bulk, which is handy when you’re changing colors or joining rounds. You simply insert, pull through, and you’re done. It keeps transitions clean and tidy so your amigurumi looks professional.
An invisible join is how you end a round or connect pieces without showing a seam. You’ll learn tiny, steady pulls that tuck the end of the yarn neatly into the fabric. When you master this, your pieces look polished from every angle.
Stitch markers are your best friends here. They tell you where a round starts and ends, which is crucial when you’re counting stitches. You’ll place a marker at the beginning of a round and move it as you go. It saves you from losing track and makes your counting less frustrating.
Practice stitch guide
Use a simple practice guide to lock in your skills. Start with a small swatch, doing a few rounds of single crochet, then add an increase in one round and a decrease in the next. Compare your counts and your density—your goal is even, consistent stitches. If you notice looseness or tightness, adjust your grip and tension and rerun the section until it feels right.
Keep a tiny notebook or digital note of your stitch counts and any tweaks you made for future patterns. This habit helps you reproduce your successes and quickly fix repeated issues. You’ll build muscle memory with steady practice, and your confidence will grow along with your stitches.
Step by step amigurumi: make the head and body first
You’re about to learn a simple flow that keeps your project focused. Start by making a tight, round head and then a sturdy body. Picture your bunny’s face as friendly and big, with a body that supports playful poses. When you finish the head first, you’ll feel confident shaping everything else around it. Keep your yarn tension steady so the head stays smooth and round, not bumpy. This approach helps you see your progress quickly and stay motivated as you move to the body.
As you crochet, imagine the head and body as two puzzle pieces that fit together later. The head sets the scale for the whole bunny, so you want clean, even stitches and careful increases. Your stitches should be uniform, not loose or tight, so the head holds its round shape. When you switch to the body, use the same tension to maintain a cohesive look. If you’ve never crocheted in this order before, you’re building a solid habit that makes future amigurumi easier.
When you finish the head and start the body, you’ll notice how the project feels lighter and more intentional. This rhythm keeps you engaged and prevents you from rushing through steps. Your First Amigurumi Bunny: A Free and Easy Pattern is within reach when you treat each part as its own mini-project. Stay focused, check your counts, and celebrate small wins as you go.
How to crochet the head rounds
You’ll begin with a magic ring and work in continuous rounds to grow the head. Count your stitches carefully and keep the ring tight so you don’t get a hole at the center. When you increase, make sure you insert your hook in the correct places to keep the round smooth. You’ll notice the head starts to puff gently as you add stitches; that puff is what gives your bunny its cute round face. As you near the shrinking rounds, be mindful of your stitch count so you don’t end up with an oval.
If you see a flat spot, don’t panic—adjust your tension and check that you’re following the pattern’s increases correctly. It helps to pause after each round and count. This is where your confidence grows. When you finish the final round of the head, your work should feel even and rounded, not squeezed. You’ll be ready to attach the head to the body and begin shaping the neck area.
Remember to weave in ends securely after you finish the head, so no loose yarn pokes through the finished surface. This keeps your bunny tidy and professional-looking. If you want a friendlier look, you can add a few tiny cheek stitches with a lighter yarn to give a subtle blush. Your First Amigurumi Bunny: A Free and Easy Pattern thrives on neat finishing.
How to crochet the body rounds
The body starts a bit larger than the head and then tapers a little at the neck. Use the same stitch height and tension you used for the head to keep everything proportional. When you increase, do so in the same places you did for the head to preserve the overall silhouette. You’ll feel rewarded as the rounds build up into a soft, pillow-like form that supports the head and the arms later on.
As the rounds progress, you’ll alternate between increasing and maintaining stitches to maintain a gentle curve. If your body looks too cylindrical, check your increases and spacing; small tweaks here save you from bigger fixes later. Once you’re happy with the body’s size, you’ll be ready to transition to stuffing and shaping. The goal is a plump, even form that doesn’t feel lumpy.
Keep an eye on the transition between the head and body. You want a smooth neck area that doesn’t pull or bunch. If you need to, you can slightly adjust the final rounds to ensure the neck sits neatly when you attach the head. Your patience pays off here, giving your bunny a balanced look that’s pleasing from every angle.
When to stuff and shape
Stuff your head and body gradually as you go, not all at once. Early stuffing helps you keep the rounds round and prevents gaps. Use small bits of fiberfill and press gently to avoid misshapen areas. After a few rounds, stop and check symmetry on both sides; you want the form to look even, with no wobbly spots. You’ll want to stop just before the last couple of stitches so you can close up cleanly without stressing the stitches around the opening.
Shaping comes after initial stuffing. Gently push in and mold the stuffed parts with your fingers to create a natural curve. If you want a slightly squishy feel, add a bit more stuffing in the chest area and a touch less toward the neck. This balance keeps your bunny looking soft and inviting. When you’re happy with the shape, finish with the final single- or slip-stitch round to close firmly, then secure the end. Your careful stuffing and shaping will make your amigurumi bunny look polished and ready for the next steps.
Make ears, arms, and legs for your small crochet rabbit amigurumi
You’re close to finishing your tiny bunny, and the next steps are where your work really shines. The ears, arms, and legs bring your amigurumi to life, so you want them to be sturdy but soft. You’ll shape each part with simple stitches, then attach them in a way that looks natural and stays secure. If you’ve followed Your First Amigurumi Bunny: A Free and Easy Pattern before, these steps will feel familiar, but you’ll add your own tweaks to fit your bunny’s personality. Think about balance too—longer ears for a curious look, shorter limbs for a chubby, cuddly vibe.
First, you’ll shape the ears to arc just right. Think of them like tiny leaves that invite you to peek into your bunny’s world. You’ll crochet a narrow tube, then flatten and shape it while you stitch so the ear curves toward the head. For the arms and legs, you’ll crochet small tubes or rounded shapes, depending on your preferred style. The key is to keep tension even so every limb matches in thickness and feel. As you work, you’ll notice how the stitches create a natural, friendly silhouette that invites a hug.
When you attach the pieces, you’ll aim for durability without stiffness. You’ll sew the limbs on securely, but you’ll still allow a touch of softness so the bunny sits comfortably. You may stuff limbs lightly to keep their shape while preserving a gentle give when you hold them. If you’re new to attaching, place the limbs first on the torso to test angle and balance before final sewing. Your careful placement will make your bunny’s pose look effortless and adorable.
Shaping simple ears
You’ll start with the ears as two equal pieces, so your bunny looks symmetrical. Crochet a short, narrow tube that widens at the base, then fold or twist to create a gentle curve. When you stuff, use just enough to hold the arc without bulging. Attach the ears to the head with back-stitching or a whip stitch so the seam stays inside and out of sight. If you want a perkier look, don’t flatten the ears completely; leave a tiny bend for character.
If you’re unsure about symmetry, compare both ears side by side after you finish the first. A quick flattening check helps—press lightly and adjust before closing the final seam. Use a yarn needle to weave in the end securely at the base of each ear so it doesn’t peek out. You’ll feel confident seeing how nicely the ears frame your bunny’s face once both sides pair up.
Crocheting and attaching limbs safely
You’ll crochet the arms and legs to the same thickness as the body for a cohesive feel. Use the same stitch pattern and yarn weight so everything looks like it belongs together. Before you close each limb, test its length by laying it against the torso. If it seems too long or short, you can adjust by adding or skipping a round. When you’re ready to attach, pin the limb in place first to check the angle—aim for natural sit/stand looks, not robotic straight lines.
Sew the limbs on with a sturdy stitch that won’t come loose in play. Consider reinforcing the joints with a couple of extra stitches where the limb meets the body. If you want a poseable feel, you can sew a small collar or a soft joint using a few extra stitches and a touch of stuffing at the base. The goal is a secure, neat join that still keeps your bunny cuddly to the touch.
Limb finishing tips
You’ll finish each limb by weaving in the end through several nearby stitches to hide it. Don’t pull too tight—you want the limb to retain a touch of softness. After weaving in, snug the base a little to keep the seam flat against the body. Trim excess yarn close to the weave so nothing catches on clothing or fingers. If you ever see a gap at the base, add a few tiny stitches to close it cleanly.
Finishing touches for a plush toy amigurumi bunny
You’ve earned a little victory with your bunny, and now these finishing touches bring it to life. You’ll feel the craft click into place as you add tiny details that matter. Take your time with each step, because your final result speaks to you in stitches. Think of these finishes as the bow on your homemade gift: simple, personal, and so you.
First, decide how much personality you want to show. You can go classic with a simple, sweet look, or add tiny quirks—like a shy tilt of the head or a tiny pocket on the tummy. The key is consistency: if you choose a face, keep all eyes and cheeks similar in size and placement. Your bunny will feel more polished when every part agrees with the style you chose from the start.
Finally, check the overall balance. Hold the finished bunny in your hands and ask yourself if the features sit evenly. If a ear seems a touch low, adjust early rather than redoing whole sections. This moment is where patience pays off—and you’ll be proud to show your finished toy to friends and family.
Embroidering a safe face for children
You want a face that’s adorable and safe for kids. Start with simple eyes: small black satin stitches or securely sewn plastic safety eyes, placed evenly and a little above the midline of the head. If you lean toward embroidery, use a small French knot or satin stitch that sits snugly against the yarn so it won’t snag little fingers. The mouth can be a tiny stitched line or a smile curve, kept modest to avoid sharp edges.
Color choice matters. Choose soft tones that won’t overwhelm the face: a gentle brown, blush pink on the cheeks, or a pale gray. If you add blush, use a tiny dab with a cotton swab and blend softly—you don’t want obvious circles. Always keep security in mind: if you use safety eyes, ensure they’re firmly anchored and the backing is tight. If you’re not sure about safety eyes, embroidered eyes are a safer route for children’s toys.
Finish with cheeks or a tiny nose. A small pink or peach dot can add charm without overstating the face. Remember to knot securely and hide your thread ends inside the head so nothing irritates a curious child. Test the face by gently pressing on the yarn—if anything loosens, reinforce before you call it done.
Adding clothes, bows, and tiny accessories
Clothes make the bunny feel extra special. You can knit or sew a tiny sweater, a little dress, or even a removable cape. Start with simple shapes: a rectangle for a scarf, a tube for a skirt, or a small rectangle with sleeves for a sweater. Secure the pieces with neat whipstitches or hidden seams so nothing peels off during play. If you want that extra pop, add a tiny sewn-on pocket or a mini button detail—but only if you’re sure the button is securely attached.
Bows and accessories are where your personality shines. A delicate satin ribbon tied in a bow behind the ear looks delightful, while a small felt carrot on a string can be a cute pretend toy. If you’re stitching accessories, consider durability: reinforce edges and use sturdy thread. Remember to keep pieces lightweight so they don’t pull on the yarn or affect softness.
When you’re done, test for comfort and safety. Tug lightly on each accessory and check that threads aren’t exposed. Ensure there are no loose beads or rough edges that could snag skin. A few quick passes with a lint roller can remove stray fibers that might irritate little hands.
Washing and storage tips
You want your bunny to stay cute after many adventures. Hand washing is the safest route: use lukewarm water and a tiny drop of gentle detergent. Gently squeeze, don’t wring, and reshape while damp. Lay flat to dry away from direct heat. If you need a quick refresh, a gentle spot clean works well—dab, don’t rub, to avoid fuzzing the stitches.
Storage is simple: keep your bunny in a dry, clean place away from direct sunlight. A small breathable cotton bag or a drawer with a soft separator protects it from dust and snags. If you notice flattening from storage, gently reshape and fluff the yarn with your fingers. Your First Amigurumi Bunny: A Free and Easy Pattern is incredibly forgiving—just treat it with a little care, and it will last.
Customize size and color to make a quick amigurumi project for beginners
You can finish a cute amigurumi fast when you pick the right size and color. Start small with a simple head, body, and two ears, and plan a limited color palette so you don’t get overwhelmed. Your goal is a project you can complete in a single sitting or over a weekend, not a marathon. By choosing a single main color and a contrasting accent, you keep the process simple and satisfying. When you stay focused on a tiny, recognizable shape, you’ll see progress quickly and stay motivated.
If you’re new, use a light yarn and a hook you’re comfy with. Softer yarns and larger hooks let you see your stitches more clearly, which helps you fix mistakes early. You can scale up later if you want a bigger bunny or a different character. Remember, your ease matters more than hitting a perfect size on the first try, so don’t fear small changes. This is your practice run and your doorway to faster, fun crochet sessions.
To keep things moving, set up a quick plan: one round for the head, a small body, two ears, and a cute tail. Use a color you like for the head and a contrasting shade for the ears to add personality without extra fuss. Your finished piece should feel like yours—that personal touch makes it feel fast, friendly, and totally doable. Your First Amigurumi Bunny: A Free and Easy Pattern can serve as your blueprint for quick, charming results.
Scale up or down with yarn and hook choices
If you want a bigger bunny later, switch to a thicker yarn and a bigger hook. This naturally creates a chunkier, more huggable figure. If you want a smaller version, go down a hook size and use a thinner yarn. You’ll still keep the same shape, just in a bite-sized form that’s perfect for display or as a keychain. Your ability to adjust is your superpower here.
Choosing yarn that’s easy to work with helps you stay confident. Look for smooth yarn without split fibers, so your stitches stay neat. A larger hook means bigger stitches, which are easier to see and count. If you’re aiming for a quick project, start with medium-weight yarn and a hook you already know well. Your comfort with the tool makes a big difference in how fast you finish.
Experiment with this rule of thumb: one size change on the hook equals roughly a 1.5x to 2x change in overall project size. Don’t worry about precision—practice is how you learn. Your first attempt can be a learning step, not a final exam. This is your path to faster, more confident crocheting.
Color combos and simple patterns you can try
Bound your palette to two or three colors for a speedy, clean look. A classic bunny uses a main color for the body, a contrasting color for the ears, and a tiny nose color if you want a cute detail. You’ll notice the contrast makes each feature pop without clutter. Your eyes will catch the shape faster, and you’ll feel the finish sooner.
Try a few simple pattern ideas: a plain round head with two tiny ears, a rounded body, and a small tail. Keep the stitches mostly single crochet to stay steady and quick. You can add a small cheek blush with a tiny dab of pink yarn or a tiny embroidered nose if you want a little personality. Your bunny will look friendly and bright with minimal effort.
If you’re feeling adventurous, switch the color for the ears to a soft pastel and keep the rest in a neutral. Your piece can look fresh without becoming complicated. The trick is to commit to a simple shape and a restrained color plan. Your finished project will feel polished and fast.
Sizing guide
Your size choice starts with the yarn weight and hook you pick. A light-weight yarn with a small hook creates a tiny bunny, great for ornaments. A medium-weight yarn with a larger hook makes a cuddly, medium-sized bunny. Your final look should feel balanced and proportional, not squished or stretched. Use a quick head-to-body ratio as a guideline, roughly 1:1 for a cute short figure, or a slightly longer body for a more lop-eared vibe.
Measure as you go if you’re unsure. When the head and body look right together, you’re close to done. A small tail should complete the shape without adding bulk. Your pattern choice now is to keep it easy: a few rounds for the head, a few for the body, and two small ears. If it feels off, adjust the hook size or yarn weight next time. Your sizing should be comfortable and satisfying.
Time, difficulty, and fixes for beginner friendly crochet amigurumi
You’ll find that your first amigurumi is a little like learning to ride a bike: a mix of patience, small wins, and steady practice. This beginner-friendly crochet bunny pattern is designed to fit inside a comfortable time window, with a gentle slope of difficulty so you don’t feel overwhelmed. You’ll likely spend a few evenings getting the feel for the stitches, then a bit more to stuff, sew, and finish. The trick is to break the steps into tiny chunks: practice your magic ring, master a few tight stitches, and keep your tension even as you work. If you feel rushed, slow down and re-check your gauge; a calm pace saves frustration later. When you hit a snag, you can fix it in minutes by un-doing a few rounds and re-doing them with looser or tighter tension as needed. Your persistence will pay off when you see your bunny take shape, stitch by stitch.
In practical terms, plan for about 2–4 hours of focused work for a complete, small bunny, depending on your pace and how you handle color changes or tiny details. If you’re juggling other tasks, you can split the project into 20–30 minute sessions across several days. Having a clear list helps: crochet around the head, attach ears, stuff the body, sew limbs, and add the eyes and nose. Keeping your supplies within arm’s reach reduces interruptions and keeps your momentum going. Remember to take short breaks if your hands start to feel stiff or sore; comfort matters just as much as speed. When you finish, you’ll feel a real sense of achievement, knowing you stuck with a simple plan and finished strong.
If you run into a snag, don’t panic. Most beginner fixes are quick: tighten a loose stitch, close a hole with a few tight rounds, or switch to a smaller hook for a neater seam. You’ll learn to spot tension issues early, which means fewer holes or gaps as you go. You can also keep a small notebook for little fixes you discover—like need looser stitches in the head to prevent puckering—so future projects go even smoother. And if you ever feel stuck, stepping back to a simpler part of the pattern can reset your confidence and keep you moving forward.
How long this free beginner crochet bunny pattern will take
You’ll likely finish this pattern in a couple of sessions, especially if you’re new to crochet. Expect to spend time on the magic ring, basic stitches, and a few color changes. The body usually takes the longest, while the ears and face come together quickly once you’re comfortable with tight stitches. If you stay organized, you’ll quickly see steady progress and feel encouraged along the way. Keep your notes handy: a short reminder of where you left off helps you pick up right where you paused.
With a calm pace, you’ll hit milestones: wrapping the head, attaching the ears securely, and then stuffing and sewing the pieces. Your first amigurumi bunny should feel like a small victory you can hold in your hands. If you’ve got a busy day, you can spread the work over a couple of evenings and still end with a cute, finished bunny. Either way, you’ll end up with a finished project you’re proud to say, Your First Amigurumi Bunny: A Free and Easy Pattern, helped you create.
Common beginner mistakes and how you fix them
A common misstep is loose tension, which leaves holes and floppy seams. If you notice gaps, tighten the stitches slightly and rework the problematic area with smaller, tighter stitches for a smoother edge. Another frequent issue is inconsistent stuffing, which can make the bunny look lopsided. Stop and gently shape the piece, then re-stuff with even amounts so the form stays round and neat. If you see puckering around the head or muzzle, loosen the last round a touch and stretch the yarn gently before finishing.
Missing or misaligned color changes can also trip you up. When you transition colors, keep a clean pull and weave in the ends as you go to avoid loose threads showing. If you see a gap where colors meet, add a few extra tight rounds at the switch point to close it. For eyes and facial details, place them before fully stitching the parts together so you can adjust symmetry. If your bunny looks a little lopsided, step back and swap the order of attaching pieces to balance the weight.
Troubleshooting tips
If you see a hole after stuffing, it’s often caused by an opening between rounds. Close it with a tight slip stitch and, if needed, stitch a tiny tail from the inside to seal the gap. For uneven edges along the seams, go back and reinforce a few stitches on the inside to pull the pieces snugly together. When color changes create a visible jump between rounds, try carrying the yarn behind the work for a few stitches instead of cutting and rejoining each time.
If you’re unsure about your gauge, compare your project to the pattern swatch and adjust your hook size accordingly. A smaller hook makes tighter stitches that hold stuffing well; a larger hook creates a looser texture that’s easier to stuff but may show gaps. If you run out of yarn, finish with a similar shade and explain in your notes where you made the substitution so you can keep consistency on future projects.
Where to find free easy amigurumi bunny patterns and community help
You’re looking for quick, friendly starts with your bunny project, and you’ll find them right here. Free, easy patterns are hiding in plain sight if you know where to look. Start with beginner-friendly cut-and-crease patterns that guide you every stitch of the way. You’ll notice that many creators label projects as beginner or easy, so you can jump in without any overwhelm. Look for patterns that use simple shapes, like spheres and ovals, and be sure the instructions include clear photos or close-up diagrams. If a pattern has a short video clip, that’s a big plus for understanding how tight or loose your stitches should be. The goal is to build confidence with a project you can finish in a day or two, not a maze of complex terms. As you save patterns you love, you’ll build your own little library of go-to bunny makes.
Your search will also reward you with community help. When you start sharing progress photos or asking for tips, you’ll find friendly crafters who’ve been in your shoes. The best groups celebrate small wins and offer gentle guidance for the tricky parts. If a link leads to a blog that requires payment, skip it and bookmark the free options so you can return without worry. Remember, the simplest patterns often become your favorite because they teach you the rhythm of the stitches and give you the confidence to tackle bigger projects later. Keep an eye out for printable checklists and stitch glossaries too—these little extras save you time and stress.
If you bookmark a few reliable sources, you’ll never be stuck for ideas. You can assemble a little toolkit of free resources—basic stitches, yarn suggestions, and size recommendations—that makes your bunny feel possible from the start. The more you explore, the more you’ll see how many creators love to help beginners. And you can start mixing and matching patterns once you know the basics, which is where the fun really begins.
Video tutorials and step by step amigurumi guides you can follow
Video tutorials are like a friendly coach guiding you through the first few rounds. You’ll hear the rhythm of the stitches, see the exact tension, and catch small tricks that aren’t always in the written pattern. Pick videos labeled beginner or easy so you don’t get overwhelmed. Watch a clip once to get the overall flow, then rewind to practice the same section until you’re comfortable. This repeated practice helps you convert written steps into real, tangible progress. The best videos show close-ups of the hands and the yarn, making it easier to see where your hook goes next. A good sign you’ve found a helpful guide is when the instructor offers a quick recap at the end and suggests simple tweaks to customize your bunny.
Step-by-step guides paired with videos are your fastest path to confidence. If a tutorial includes a printable pattern or a materials list, that’s even better, because you can prepare everything before you begin. Don’t skip the comments section—many times you’ll find extra tips from other beginners who’ve already walked this path. And if you try a video and feel stuck, pause, jot down the scale of your stitches, then compare with the video again. You’ll soon notice your hands moving with more ease, and you’ll be a lot closer to your very own cute bunny.
Groups, forums, and pattern libraries to join
Groups, forums, and pattern libraries are like a sewing circle for amigurumi lovers. You’ll get feedback, encouragement, and fresh ideas all in one place. Start with a local or online group that focuses on crochet basics; these spaces tend to be welcoming for beginners and you can ask for help without feeling naive. When you post a progress photo, you’ll often get pointers on tightening your stitches or how to fix a wobble in the ears. Regulars will share links to new free patterns and test projects that are beginner-friendly, so you’ll always have something you can finish with pride. If you’re shy about posting, just lurk for a bit and learn the common mistakes to avoid; then join in with a small, friendly comment like, I’m new, any tips for keeping this stitch even?
Pattern libraries offer a neat way to discover free options without hunting all over the web. They categorize by difficulty, size, and animal type, so you can filter quickly. Look for libraries that explicitly include beginner-friendly bunny patterns and clear materials requirements. Keep a short list of your favorites, and check back often—creators add new free patterns regularly. The real payoff is you’ll build a personal vault of go-to designs you can return to when you want a simple project or when you’re teaching someone else how to crochet.
Helpful resources
- Free amigurumi pattern roundups and beginner guides that highlight easy bunny designs with photos and tips you can actually use. These lists are gold for fast starts and preventing frustration.

Clara Fern — Crochet Artist & Amigurumi Designer
Clara Fern is a crochet artist and amigurumi designer based in Austin, Texas. With 9 years of experience working with yarn and hook, she transformed a lifelong passion for handcraft into a creative mission: making amigurumi accessible, fun, and deeply rewarding for crafters of all levels.
Clara discovered amigurumi during a trip to Japan in 2017, where she fell in love with the art of bringing tiny characters to life through crochet. Back home in Texas, she spent years studying color theory, design principles, and advanced crochet techniques — developing her own signature style that blends kawaii aesthetics with original character design.
Through maclafersa.com, Clara shares everything she has learned — from choosing the right yarn and reading your first pattern, to designing fully original amigurumi characters from scratch. Her writing is known for being clear, detailed, and genuinely helpful, with no steps skipped and no secrets kept.
When she’s not crocheting, Clara enjoys watercolor painting, visiting local yarn shops, and drinking way too much coffee while sketching new character ideas.


