
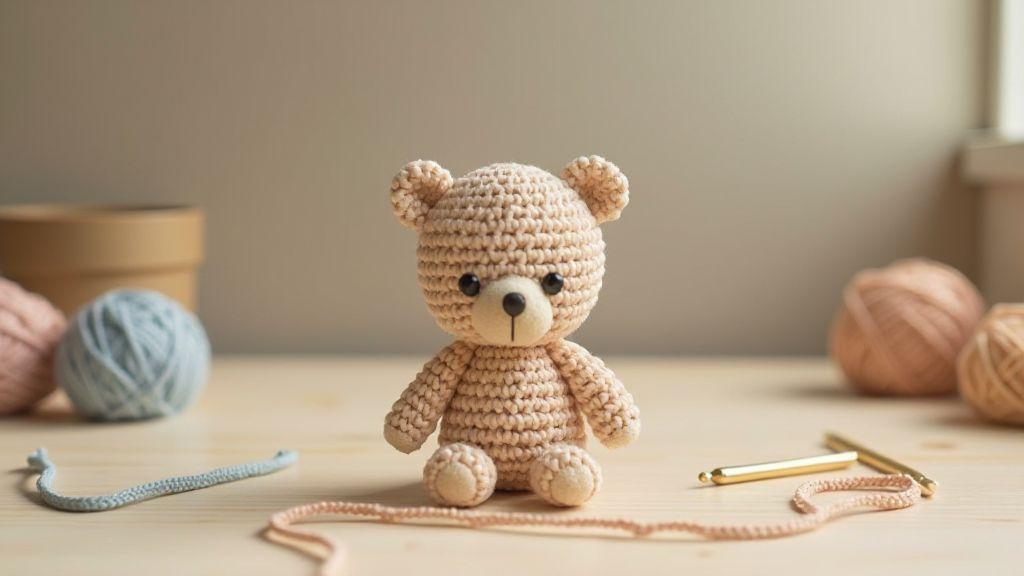
Materials and tools for your free amigurumi bear pattern
You’re about to start something cozy, so gather the basics before you chain stitch your first nose. Choose a soft, washable yarn for a cuddly bear that’s easy to care for. Pick a light, smooth hook that fits your yarn weight to keep your control and your bear’s shape neat. Stock a small amount of stuffing, safety eyes (or use embroidery if you prefer), a blunt-tipped yarn needle, and stitch markers to keep track of rounds. Being prepared helps you glide through the pattern from start to finish, with tidy stitches all the way.
Materials are your toolkit. For a beginner-friendly look, stick with a medium weight yarn (#4) in a soft acrylic or cotton blend for clear stitch definition without frustration. Add safety eyes that match your yarn color, or opt for embroidered eyes if you prefer a non-safety option. Fill with light polyester stuffing for a soft, even shape. A blunt needle and a few stitch markers save time when you sew pieces together. If you’re unsure about color choices, pick a main color and a contrasting nose color to improve visibility of your stitches. A small pair of snips and a fabric scrap or gentle fabric glue can help secure tiny parts for peace of mind while you sew. With these tools in hand, you’ll move smoothly through the pattern and finish with a bear you’re proud to show off. This Free Amigurumi Bear Pattern: Simple, Cute and Perfect for Beginners is designed to be approachable and tidy from round one.
Yarn types and recommended weights
Your yarn choice sets the look and feel of your bear. For a soft, huggable finish, stick to acrylic, cotton, or a cotton-blend yarn in a medium weight (often labeled #4). This weight gives clear stitches without being bulky. If you prefer a natural feel, a soft cotton blend works well, but it can be stiffer for tiny shapes. The key is consistency: use the same yarn throughout the pattern to avoid mismatched textures. Switching yarns mid-pattern can turn your bear into a blob rather than a cohesive friend.
For beginners, choosing a colorway helps keep motivation high. Start with a classic teddy-brown or cream, and consider a lighter shade for the snout or inner ears to add character. You can swap the main color later, but test a small swatch first to see how it sits. Also check the yarn label for care instructions; you’ll thank yourself when your Free Amigurumi Bear Pattern: Simple, Cute and Perfect for Beginners comes out of the wash looking brand new.
Hook sizes, stuffing, and safety eyes
Your hook size should match your yarn weight for even stitches. For #4 weight yarn, a common choice is G/6 (4.0 mm) or H/8 (5.0 mm) depending on your tension. If your stitches look loose, go up a size; if they’re tight, try a smaller one. The goal is a neat fabric with minimal gaps so the stuffing stays inside and the bear holds its shape. Practice a few rounds to settle your tension before the main body to avoid guessing during assembly.
Stuffing decisions matter for the final feel. Use light polyester stuffing for a soft, springy result, filling evenly to avoid lumps. Overstuffing distorts shapes; under-stuffing leaves parts floppy. Safety eyes give the bear personality; pick small eyes with secure backs or use embroidered eyes for a safety-conscious option. If unsure about placement, mark spots with a stitch marker before attaching anything so the face stays balanced and friendly. This approach helps ensure your bear remains adorable and durable, especially for beginners following the Free Amigurumi Bear Pattern: Simple, Cute and Perfect for Beginners.
Starter checklist for your project
- Yarn in your chosen colors and weight
- Hook size matched to your yarn (usually G/6 or H/8 for #4 weight)
- Polyester stuffing, plus a bit of scrap for shaping
- Safety eyes or embroidery for the eyes
- Stitch markers, tapestry needle, and small scissors
- A printable copy of the Free Amigurumi Bear Pattern: Simple, Cute and Perfect for Beginners to reference
Basic stitches used in this simple crochet bear pattern
In this section, you’ll learn the core stitches that make the bear come to life. You’ll see how each stitch adds structure, shape, and personality to your crochet project. You’ll find the hands-on steps easy to follow, with tips that keep your work neat and your yarn in check. When you finish, your bear will feel sturdy enough to hug, not fall apart at the seams.
You’ll start with the stitches that create the body and features. Each stitch type has a purpose, from building a round belly to giving you tiny ears that stand up just right. Don’t worry if you stumble at first—practice makes the stitches smooth and consistent, and soon you’ll see your bear take shape with confidence.
As you practice, you’ll notice how these stitches pair with simple increases and decreases. The rhythm helps you stay on track, and soon your hands will move on instinct. Your finished bear will look polished, not pieced together, delivering a cuddly toy you’ll be proud of.
Single crochet, increase, and decrease
When you work with single crochet (sc), you’re laying a tight, sturdy fabric that holds shape well. It’s the backbone of this bear, giving you a clean, tight round that won’t sag. Practice even stitches so your bear’s body stays smooth and balanced. Maintain comfortable tension so seams don’t pull or pucker.
Increases help you grow rounds evenly. Replace one stitch with two to widen the circumference. If unsure, count stitches after each round to keep the math on your side. Decreases taper areas like paws or the top of the head. It’s all about control: too tight a decrease can pinch fabric; too loose and you lose shape.
A tip: keep a shallow hook angle and insert where the next stitch should be, then wrap and pull through as for a normal sc. This creates a neat, compact join that blends into the round. With practice, switching from increases to decreases becomes second nature, giving your bear its cuddly silhouette.
Magic ring and slip stitch basics
The magic ring starts rounds cleanly and closes the center hole for a smooth outset. Practice a few times on scrap yarn until the center looks nearly invisible. Once you’ve got it, you’ll begin every round with a solid anchor.
Slip stitches are your fast track for finishing rounds or moving across spaces without adding height. They’re perfect for tightening edges or creating seamless transitions between sections. You’ll use slip stitches to tidy up after a round and connect parts without bulky knots.
A practical tip: tighten the magic ring just enough to close the hole, then begin your first round with the correct stitch count. That control helps your bear look even from every angle, especially for a beginner-friendly project like the Free Amigurumi Bear Pattern: Simple, Cute and Perfect for Beginners.
Common stitch abbreviations
Here are the most common abbreviations you’ll see and what they mean, so you can keep your project moving without pausing to look up terms. sc = single crochet, inc = increase, dec = decrease, sl st = slip stitch, mr = magic ring. Knowing these keeps your pattern flowing and helps you stay on track as you follow the steps. When you see a number next to an abbreviation, that tells you how many times to repeat the stitch. If a step says inc once in each stitch around, you’ll add a little extra fabric evenly around the circle. This keeps your bear balanced and proportional.
Follow a step by step amigurumi bear tutorial
You’re going to learn a simple, friendly way to make your own little bear. This tutorial stays clear and steady so you stay confident from start to finish. You’ll see how each part fits together, and you’ll feel pride when you finish your cuddly buddy. Think of it as a mini project that you can build on later, adding tiny details or swapping colors for a unique bear. The Free Amigurumi Bear Pattern: Simple, Cute and Perfect for Beginners is designed to be approachable for first-timers.
First, gather supplies and print or save the pattern. If you’ve never crocheted before, don’t worry—this is beginner-friendly. You’ll work in rounds, use basic stitches, and keep your stitches neat so your bear looks even and cute. As you practice, your hands will grow steadier and your patience will turn into real skill. By the end, you’ll have a plush friend that’s all yours.
You’ll also discover how this bear pattern becomes a foundation you can reuse for other animals or more complex shapes. With each project, your confidence grows, and you’ll love sharing your finished bear with friends and family.
Order to crochet head, body, and limbs
You’ll start with the head to create a focal point, then move to the body, and finish with the limbs. This order helps your gauge stay consistent and makes stuffing easier later. If the head feels a touch large at first, that’s common for amigurumi heads and can be adjusted with a few extra rounds or a snug decrease.
For the head, work in the round, increasing evenly to form a sphere. The body follows with similar shaping, but with a slightly longer torso for a natural sit. Crochet two arms and two legs that taper gently. Stuff firmly to hold shape, but don’t overfill. A soft, plump look is what you’re after.
As you assemble, you’ll notice tension leveling out. If a seam looks jagged, slip-stitch it closed later. Consistency beats speed—neat, tight stitches stay sturdy when you pose your bear.
How to stuff and shape each part
Stuffing is your secret weapon for life-like curves. Use small, firm bits and push them in with a blunt tool or your fingers. Begin with the head, filling evenly for a smooth round shape and a gentle tilt. The body should feel substantial but still soft enough to hug. Stuff the limbs firmly but leave a bit of give at the ends so you can sew them on without distorting the fabric.
Periodically step back and check symmetry. If one side looks higher, adjust with more stuffing or a light poke to even things out. Your careful eye will pay off in a clean, professional finish.
Assembly flow you can follow
Attach the head to the body with secure whip stitches around the neck. Then affix the arms just below the head on the sides, sewing with a slight upward angle for a friendly look.
Next, attach the legs so the bear can sit upright. Use a few dense stitches to prevent shifting. If you want a poseable look, you can add a tiny zipper or a discreet seam line to suggest joints, but keep the design simple and cozy.
Finish with finishing touches: embroidery for a nose, small eyes, and a little blush if you like. A scarf or bow adds personality without complicating the build. You’ll feel proud when you step back and admire your completed, cuddly bear.
Beginner friendly crochet bear pattern tips for success
You’re starting a cozy project, and momentum matters. Break the work into small, doable steps, and celebrate each row as a win. Create a calm workspace with good light and a comfortable chair, and keep yarn looped neatly to stay focused.
Keeping your hands relaxed matters more than you might think. If your shoulders tense, stitches can tighten or loosen without you noticing. Use soft, even movements, pause to shake out your fingers, and hold your hook like a friendly tool. Patience leads to steadier stitches and a smoother finish. The Free Amigurumi Bear Pattern: Simple, Cute and Perfect for Beginners rewards calm, consistent practice.
As you practice, keep a tiny notebook or notes on your phone. Jot what works, what feels off, and any adjustments. This quick log helps prevent frustration later and shows your progress as a beginner turning into a confident maker.
How to keep even tension
Even tension is the heart of a neat bear. Choose a comfortable hook size and yarn that feel smooth in your hands, and crochet with a calm tempo. Practice a few rounds in a single color to lock in muscle memory before adding details. Slow down at color changes and twist yarn tails lightly to prevent pulling. If you see gaps, don’t yank—loosen it slightly and adjust. Your swatch days pay off; try a small sample to gauge consistency and carry that rhythm into the full pattern.
How to fix common beginner mistakes
Mistakes happen, and they’re part of learning. If you notice loose stitches, check tension and avoid pulling too tight. Slow down and redo the round with even pace. Dropped stitches can be fixed by picking up the loop with your hook and tightening carefully; counting stitches helps you mend accurately. If you miscount or color-tile, count every few rows and compare to the pattern. Remember, you’re shaping a little bear, not solving a math problem—mistakes teach you what to adjust next time.
Quick practice moves to learn
Try a simple willowy stitch drill: a few rounds in a single color to settle tension. Practice color changes in a controlled swap by winding the new color over the old for a clean transition. Finish with a tiny stuffing exercise: flatten the piece and check tension again, then lightly fill and adjust to avoid lumps. This practice sharpens your eye for shape and makes your final stitches secure and neat.
Quick small amigurumi bear pattern for fast gifts
You can finish a tiny amigurumi bear in just a few evenings by keeping steps simple: basic, tight stitches, head, body, and limbs in easy rounds. This approach is perfect for a thoughtful gift in a short time—quick pieces sew together fast, and tiny ears with a bow add charm without slowing you down. If you’re new, follow the straightforward order: head, body, limbs, then simple details. Working in tight rounds helps avoid gaps and keeps the bear polished from the first try. With practice, color swaps or a scarf personalize each bear in minutes.
As you sew, you’ll notice how a compact pattern reduces mistakes. Keep a loose end handy for seam finishes and don’t rush the stuffing—let it settle evenly. When you attach limbs and ears, the bear starts to look like a character, not a lump. This keeps your momentum up and your finish clean, cute, and gift-ready.
How to scale down to a small size
To scale down, switch to thinner yarn and a smaller hook. Change one thing at a time: try a finer yarn first, then test the gauge with a small swatch. If gaps remain, go one hook size smaller. Count stitches to keep proportions aligned with the original. The result is a pocket-sized bear that stays tidy and adorable.
Keep rounds tight—any looseness stands out in a smaller piece. If gauge is off, adjust the number of rounds in the head or limbs to preserve the silhouette. A few careful changes keep the design’s charm while fitting into a tiny gift bag.
Typical time ranges for a small bear
A small bear can take as little as 1–2 hours if you’re familiar with the pattern. For beginners, plan 3–4 hours as you line up rounds, count stitches, and adjust stuffing. A few extra minutes for tightening seams or adding a simple face can push toward 4 hours, but it remains a quick, satisfying project. Break the work into short sessions if needed and finish with a tidy bear that’s ready to hug.
By keeping the pieces compact, you’ll see quicker results and gain confidence with each session.
Parts you can finish quickly
The ears, face, and paws are the fastest parts. Crochet ears in one go and attach with a few neat stitches. The face—eyes and nose—can be done quickly and gives the bear instant expression. A small tummy or scarf adds charm without delaying the project.
Focus your quick finish on the head and limbs for the strongest character. Pre-cut and label stuffing pieces to save time, and keep your final touches tidy for a polished result in record time.
Amigurumi bear pattern no sewing options
You’ll love a no-sew approach that finishes in one piece or with minimal fuss. Choosing the right yarn and hook size helps your bear hold its shape, while consistent tension prevents gaps or lumps. Plan color changes carefully and use joining methods designed to minimize sewing. This keeps the project flowing from start to finish and makes the final toy cuddly and ready to hug without extra stitches.
As you practice, you’ll notice patterns repeat and you’ll predict where to place increases and decreases. This pattern becomes smoother with each row, and your bear looks neater with fewer visible joins. The satisfaction of a completed toy that’s ready for gifting or show-and-tell comes with less sewing needed.
Crochet-join methods that reduce sewing
Reduce sewing by using crochet-join methods that lock pieces as you go. Try slip-stitch joins along seams to keep the underside flat and neat, avoiding loose yarn tails. Continuous spiraling methods with a few strategic rounds also help maintain a smooth surface and minimize visible seams. Plan color changes at obvious places like the belly or ears to keep joins unobtrusive.
Attach small parts with a single flat join along the edge to minimize bulk while preserving a soft touch. Practice leads to invisible joins to anyone not inspecting closely. With time, your one-piece bear becomes a clean, cuddly character.
Working in one piece to avoid seams
If you can manage a one-piece build, you’ll cut sewing to almost zero. Start with a large starting ring and work in the round to grow the body, head, and limbs without cutting the fabric. Plan increases and decreases to avoid odd angles that require later sewing. You may carry color changes in one continuous strand to minimize ends to weave in.
For a cohesive bear, ensure smooth transitions where limbs meet the body. Use gradual increases to shape the neck and shoulders to minimize pinch lines. Place eyes, nose, or paws early in positions that feel natural once the piece is complete. You’ll still secure small parts, but you’ll minimize visible joins by keeping most of the toy in one shell.
As you work, your bear grows with you. Fewer ends to tuck away means a more professional finish. The key is steady, even tension and thoughtful color placement so the final look stays balanced. With planning, you’ll enjoy the flow from start to finish.
Secure joins for long use
When joining pieces or reinforcing areas, use a strong, invisible anchor stitch. A tight, small whip stitch along the seam keeps edges aligned without bulk. Pull snugly, but not so tight that the fabric puckers. This makes the bear durable for daily cuddles. A light spray of fabric stiffener or a gentle steam can set the shape and give a touch more body to arms and legs. For gifting, secure joins feel extra thoughtful and durable.
End with patience and you’ll have a bear ready to love for years. Secure joins will stay snug, colors will stay neat, and the no-sew project will feel like a small win each time you pick it up.
Free crochet teddy bear pattern sources and printable PDF
You’ll love starting with a Free Amigurumi Bear Pattern: Simple, Cute and Perfect for Beginners. Look for sources offering clear, labeled instructions and a clean printable PDF. Some sites provide multiple sizes, from tiny 6-inch bears to larger cuddle buddies. Choose a source with straightforward patterns and user photos to see real results. A beginner-friendly pattern source often includes step-by-step photos along with notes on color changes, seam finishing, and stuffing tips. A printable PDF that keeps everything in one place helps you crochet without frantic page-flipping.
When choosing patterns for your first bear, look for beginner or easy labels. These cues indicate simple stitches like single crochet and basic increases. The best sites offer printable PDFs you can download in one click, notes on color changes and finishing, and helpful tips. If a pattern includes a photo gallery or video tutorial, it’s a strong sign you’ve found a reliable source. The Free Amigurumi Bear Pattern: Simple, Cute and Perfect for Beginners shines when paired with clear guidance and a friendly community.
Trusted sites that offer free patterns
Seek trusted sites that post beginner-friendly patterns with a printable PDF option and exact stitch counts. User photos help you see real results and anticipate common pitfalls. A clear license or terms section matters—it tells you how you can use the pattern. A direct PDF download button keeps printing simple, and a site that welcomes questions in the comments gives you quick help if you’re stuck. The Free Amigurumi Bear Pattern: Simple, Cute and Perfect for Beginners remains easier when the source is well organized and supportive.
How to download a printable amigurumi bear pattern PDF
Find the Print-friendly PDF or Download PDF link and save the file. Before printing, verify the pattern name and size match your project. If multiple sizes exist, choose the one you’ll crochet to avoid waste. Check gauge and yardage notes to prevent running out of yarn mid-project and note color amounts accordingly. Print single-sided for clean notes or double-sided to save paper. A well-structured PDF usually includes Materials, Abbreviations, and Step-by-step rounds for easy reference. This pattern, the Free Amigurumi Bear Pattern: Simple, Cute and Perfect for Beginners, is designed with beginners in mind.
Check license and terms before printing
Before printing, confirm personal use rights. Some authors permit printing or downloading for personal use but restrict resale. If you plan to share your bear online, verify whether you may post photos or mention the pattern name. If licensing isn’t clear, ask in the comments or contact the author. A quick check keeps you safe while you craft your Free Amigurumi Bear Pattern: Simple, Cute and Perfect for Beginners.
Safety and care for your cute amigurumi bear tutorial toy
Safety first: choose kid-friendly yarn and stuffing that don’t shed, and keep a simple safety routine after finishing each part. Ensure small parts are securely attached, especially around necks and limbs, to prevent choking hazards. For homes with toddlers or pets, place the bear where it won’t be grabbed or pulled apart. Robust stitching around the neck and limbs helps the toy survive daily play and baths. The goal is a cuddly bear that stands up to adventures, not one that falls apart.
Practice safe handling: wash hands before you craft to avoid transferring oils or dirt to yarn. After finishing, inspect seams for loose threads and trim and resew as needed. Your diligence protects the bear and adds peace of mind for gifting or home use.
Safe eyes and attachments for children
Choose safety eyes or embroidered eyes that stay put when tugged. Attach with secure backs so small fingers can’t remove them. If using buttons, select large, flat-backed buttons sewn with multiple passes and a buried knot. This makes the bear safe for curious kids.
For noses and other attachments, prefer embroidery or securely sewn pieces. Reinforce stitches and use a touch of fabric glue only if allowed by the pattern, then cover glue areas with extra yarn. Test by gentle tugging to ensure every part stays snug. Your safe design lets kids cuddle without worry while you enjoy the craft.
Washing and spot-cleaning tips
Spot-clean to keep your bear bright without a full wash. Mix a tiny dab of mild detergent with warm water and dab—don’t scrub—on dirty spots. Use a soft cloth or brush to lift grime, then wipe with a damp cloth and air-dry completely. If a full wash is needed, check care instructions for your yarn; acrylic blends usually tolerate gentle hand washing, while cotton blends may shrink. Always air-dry away from direct heat to keep stuffing fluffy and seams secure.
For stubborn stains, try a light baking soda paste on the spot, then wipe clean. Never wring or twist the toy, and avoid wetting the face where eyes and nose sit. Gentle care keeps your bear cute and cuddly, not misshapen.
Age and care recommendations
This bear is ideal for kids under 6 when all small parts are securely sewn and removable accents are avoided. For families with older children or pets, re-check seams every few weeks and repair any looseness. Remind kids to hug, not pull or bite at the limbs for safety. Store the bear in a cool, dry place away from direct sunlight to preserve color and fabric integrity. Regular light washing extends its life and keeps the magic alive for years.
Customize colors and features in your free amigurumi bear pattern
You can make your bear uniquely yours by choosing colors that speak to you and adding small features that showcase your style. Start with a main body color and a contrasting accent. Soft pastels create a cute look; bold combos add playful energy. Contrasting colors on ears, paws, or the nose bring the bear to life. Test a few shade swaps on scrap yarn first to preview the final look. The Free Amigurumi Bear Pattern: Simple, Cute and Perfect for Beginners becomes a canvas for your taste.
Consider facial expressions and tiny details. A simple stitched smile adds warmth, or a tiny orange nose adds whimsy. For a calm vibe, keep eyes small and round with a gentle mouth. A cheeky look can be achieved with a curved mouth and a tiny eyebrow. Safety eyes or black yarn stitched eyes both work. It’s easy to switch expressions for photos or gifts, and your pattern becomes your own art.
Easy tweaks that personalize without slowing you down include a scarf, a tiny hat, or a bow. A small heart or button adds charm. For gifts, write a tiny tag with a message and tie it to the bow. These touches make your bear unique while keeping the process enjoyable and manageable.
Choosing color combos and facial expressions
Bold color combos grab attention and set the bear’s mood. Pair a soft body with bright accents for playful charm, or go monochrome for a vintage feel. Lay colors side by side to feel the contrast. If unsure, start with a classic pink or gray body and add a pop on ears or paws. Your color choices affect how the bear photographs and reads in real life, so trust your eye and enjoy the process.
Facial expressions are the heart of character. A tiny stitched smile reads friendly, while a straight mouth can read sleepy or calm. Larger safety eyes read as alert, while smaller eyes appear softer. You can change expressions quickly by adjusting mouth shape and eye size. Your patience here pays off in photos and gifts, and the Free Amigurumi Bear Pattern: Simple, Cute and Perfect for Beginners makes it easy to experiment and capture different moods.
Adding clothes, bows, or props
Clothes and accessories transform your bear into a character. A striped sweater, a cardigan, or a simple scarf sewn on with tiny stitches keeps the pattern clean. Bows are quick wins: a small ribbon or a fabric bow on one ear adds charm without bulk. Props like a felt book, a mini heart, or a tiny tote bag make your bear ready for a photo, gift, or story. Removable accessories give flexibility for seasons or moods and let you update the bear without redoing the whole pattern.
Notes for easy customization: keep a small swatch book of yarn colors and quick sketches of looks you try. Label eyes, noses, and buttons to avoid mixing sizes or styles. Test tension on scraps to ensure neat stitches stay sturdy with added clothes or accessories. With planning, your Free Amigurumi Bear Pattern: Simple, Cute and Perfect for Beginners stays enjoyable and predictable even as you experiment.
Notes for easy customization
Keep a tiny swatch book and quick sketches to reproduce looks later. Label components to avoid mix-ups, and test tension on scraps before adding clothes or accessories. With a little planning, your Free Amigurumi Bear Pattern: Simple, Cute and Perfect for Beginners remains fun and predictable as you customize.

Clara Fern — Crochet Artist & Amigurumi Designer
Clara Fern is a crochet artist and amigurumi designer based in Austin, Texas. With 9 years of experience working with yarn and hook, she transformed a lifelong passion for handcraft into a creative mission: making amigurumi accessible, fun, and deeply rewarding for crafters of all levels.
Clara discovered amigurumi during a trip to Japan in 2017, where she fell in love with the art of bringing tiny characters to life through crochet. Back home in Texas, she spent years studying color theory, design principles, and advanced crochet techniques — developing her own signature style that blends kawaii aesthetics with original character design.
Through maclafersa.com, Clara shares everything she has learned — from choosing the right yarn and reading your first pattern, to designing fully original amigurumi characters from scratch. Her writing is known for being clear, detailed, and genuinely helpful, with no steps skipped and no secrets kept.
When she’s not crocheting, Clara enjoys watercolor painting, visiting local yarn shops, and drinking way too much coffee while sketching new character ideas.


