
Intermediate Amigurumi Witch Doll Pattern for Halloween Overview
Jump into a crocheting project that moves you from basic stitches to an intermediate level. The Intermediate Amigurumi Witch Doll Pattern for Halloween challenges you with shaping, color changes, and tiny details that bring a witch to life. You’ll practice precision as you move from simple rounds to more complex joins, and you’ll love how the hat and broom come together as a complete display piece. Think of it as a small sculpture you can cuddle or display for spooky season.
As you work, you’ll see how each piece fits together like puzzle parts. The pattern guides you through stitches, stuffing, and sewing with clear steps so you can focus on the fun parts—making the witch look playful yet mysterious. If you like personal touches, this is the perfect project to tweak with different color combinations or facial expressions. By the end, you’ll have a charming, sturdy, poseable witch doll ready for Halloween photos.
This project builds confidence for your next crochet adventures. The techniques you practice here—tight amigurumi stitching, shaping the head, and attaching limbs—are transferable to other characters. You’ll gain skills you can reuse, finishing with a small yet meaningful achievement that motivates you to tackle more complex patterns.
What the pattern includes and finished size
You’ll find a detailed materials list, including yarn weights, hook size, and stuffing recommendations, so you’re not scrambling mid-project. The pattern breaks the doll, hat, cape, and broom into clear steps with photos or diagrams for tricky parts. Each section builds on the last, helping you stay organized as you crochet.
The finished size depends on your yarn choice, but the aim is a compact figure with presence on a shelf. Typical results range from a few inches to the low teens in height, making it a perfect Halloween desk buddy or spooky shelf decor. You’ll get gauge tips to hit your target size, plus finish options like a tiny felt face or embroidered features for different looks.
Easy finishing instructions cover sewing limbs securely, attaching the hat tilt, and adding a tiny buckle or ribbon. The pattern emphasizes safe stuffing and clean closures so the doll stays neat if you share it with family or friends. By the end, you’ll see how each piece comes together to create a cohesive Halloween figure.
Who this crochet Halloween witch amigurumi pattern is for
This pattern is ideal for crafters who have moved into intermediate crochet and want a themed project that remains approachable. It suits you if you enjoy working with small parts, color changes, and detail that gives your doll personality. If you’ve completed basic amigurumi and want to level up, this is a natural step forward.
If you love Halloween crafts or seasonal decor you can customize, this witch doll fits perfectly. Experiment with skin tones, hair colors, and outfit accents to reflect your style. The pattern also challenges you to improve sewing and assembly skills, since you’ll attach many small components and ensure neat results. It’s a satisfying balance of technique and creativity.
This is a forgiving intermediate project. Small adjustments in stitch count or stuffing let you personalize the doll. If you like motifs and accessories, you can add touches like a tiny cat or pumpkin to complete the scene. Customize while keeping the core steps intact.
Quick project time estimate
Expect about a weekend or a few evenings, depending on pace. Plan roughly 6–10 hours of crochet, assembly, and finishing touches, with extra time for added details. If you’re new to intermediate patterns, allow an extra session to review head shaping and limb attachment.
Your Materials and Tools for an Intermediate Crochet Witch Doll Tutorial
The goal is a sturdy, expressive Intermediate Amigurumi Witch Doll that’s reliable and fun to stitch. Gather materials that stay steady through tricky shapes and small stitches. Think of this like assembling a well-planned recipe—everything should support steady progress, not distract with fiddly substitutes. Comfort and clean finishes are key, since you’ll repeat stitches and shading to bring your character to life.
Focus on the core essentials—yarn, hook, stuffing, and safety eyes. Choose a yarn weight and fiber that balance ease of use with durability. A medium weight yarn (like DK or worsted) is a good starting point for an intermediate pattern, providing solid structure without being too stiff. Pick a hook size that matches your yarn so stitches stay even. Have enough stuffing to fill limbs and torso firmly but not so much you lose shape. Safety eyes add character; position them carefully to avoid wobble as you crochet around them.
Keep a small pair of scissors, a yarn needle, and stitch markers handy. Markers help you track rounds, especially around the hat and cape where shaping happens. A light pencil or fabric chalk can help you mark reference points on the yarn so you don’t lose your place during color changes. With dependable tools and materials, you set yourself up for clean joins, neat finishing, and a witch that feels alive.
Yarn, hook, stuffing and safety eyes for intermediate amigurumi witch doll pattern
Your yarn should support clear, rounded stitches that hold their shape after stuffing. A neutral color palette helps you focus on shading and facial features. Use a yarn that’s comfortable in your hands and resistant to splitting. For the eyes, safety eyes provide a polished look; place them thoughtfully to convey expression and secure them well.
A hook in the 2.5–3.5 mm range is typical for DK or worsted weights. The hook should glide smoothly so you can insert and pull through stitches without snagging. Choose stuffing that’s soft and springy but holds its shape under the witch’s limbs and torso. Finish with a dab of fabric glue or a touch of thread to secure the safety eyes if your pattern calls for extra security. You want a doll that stands and reads cleanly.
Optional notions: wire, glue, and embellishments for amigurumi witch costume pattern crochet intermediate
Optional wires allow you to pose limbs and the hat, but insert them carefully. Use light floral or jewelry wires and bend gently to maintain shape without stressing the crochet. Glue can help secure small embellishments like a buckle, broom handle, or cape clasp, applied sparingly to avoid stiffness. Embellishments—such as a stitched patch, tiny belt, or hat button—add depth but should stay balanced so the crochet texture remains the focus. The costume should read as thoughtful details, not clutter.
Gauge and hook size tips
Gauge matters more than you might expect. A loose gauge can make limbs floppy; a tight gauge can reveal stuffing. Make a small swatch and measure how many stitches fit in 1 inch with your yarn and hook. If you’re off, adjust your hook size up or down until the swatch matches target gauge. Test gauge consistency as you work on the hat and cape. With the right gauge, the Intermediate Amigurumi Witch Doll Pattern for Halloween will come out balanced, sturdy, and expressive.
Skills and Stitches You Need
You’re tackling an intermediate project, so build a solid toolkit of skills. The pattern relies on precise tension, consistent stitch counts, and a clear plan for each part of the witch. Practice makes this smoother, especially when switching between color changes and tiny facial details. Maintain even tension, count stitches after each round, and keep your goal in sight: a polished witch who stands or poses confidently.
Hold the crochet hook in one hand and the yarn in the other, letting the yarn slide smoothly as you work in the round. Move with a steady grip to avoid missing stitches or pulling the fabric too tight. If the weave tightens, loosen your grip slightly and let the hook glide. The aim is clean stitches, even increases, and deliberate color patches that read as intentional.
When you finish, you’ll have a sturdy Halloween witch with smooth color transitions and well-defined features. You’ll know when to switch hooks for shaping, how to color-change cleanly, and when to finish with soft edges on the cloak. This is how you move from basic amigurumi to a character with charm and atmosphere.
Essential stitches: sc, inc, dec for step by step intermediate amigurumi witch pattern
- sc: single crochet
- inc: increase (2 sc in 1 stitch)
- dec: decrease (sc before two stitches together)
- ch: chain
- sl st: slip stitch
- BLO: back loop only
- FLO: front loop only
You’ll start with the basics that keep the witch sturdy: single crochet, increases, and decreases. Use sc to build a tight plush surface, inc to add volume, and dec to taper. These stitches recur as you form the cloak’s flare and the hat’s curve. Keep tension even for a balanced, neat look.
Approach each section with a step-by-step rhythm. Build from a starting round, add an increase, and continue in a pattern that shapes the form. Decode head shaping by gradually decreasing to reduce size smoothly. Use light decreases for hat brim and cloak edges to form gentle curves. Maintain consistent stitch counts and color changes for crisp color blocks. This rhythm gives you a balanced finish for the Intermediate Amigurumi Witch Doll Pattern for Halloween.
Shaping, color changes, and surface details in a crochet Halloween witch amigurumi pattern
Shaping turns yarn into a witch with personality. Shape the head on the neck, let the cloak drape naturally, and create gentle curves for cheeks, chin, and the hat’s brim. Plan arm placement and how they tuck into the cloak for natural movement.
Color changes add magic. Change yarns smoothly, using a tight carry or a concealed join to hide joins. Switch to black for the hat and other colors for the cloak to create crisp color blocks. Needle brows or a tiny smile with a fine touch, keeping stitches tight and even. Surface details like a tiny broom, belt buckle, or moon embroidery come alive with careful back loops or surface slip stitches placed precisely.
The result is a witch with personality. Clean cloak edges, a flat hat brim, and intentional facial features—all contributing to a cohesive feel for the Intermediate Amigurumi Witch Doll Pattern for Halloween.
Abbreviations and stitch glossary
- sc: single crochet
- inc: increase (2 sc in 1 stitch)
- dec: decrease (sc before two stitches together)
- ch: chain
- sl st: slip stitch
- BLO: back loop only
- FLO: front loop only
Step-by-Step Construction Order
Follow a clear sequence to assemble the Intermediate Amigurumi Witch Doll Pattern for Halloween. Organize yarn, hook, and safety eyes before you start. Keep a few pins handy for loose scraps and fabric paint for tiny details. Check gauge and count stitches often; a missed stitch can throw off the entire look. Shape the head before attaching the body, then test colors on scrap yarn to ensure bold, consistent results.
As you move through sections, note how each part fits into the whole. Hands, feet, and hat rely on base chain-and-sc around stitches, with increases, decreases, and color changes to add character. Mark tricky rounds with a stitch marker to avoid losing your place. If tension feels off, practice a small sample amigurumi on spare yarn first. The goal is clean, even stitches so the Witch Doll can stand or pose without tipping.
As you near the finish, switch to final assembly. Attach limbs carefully and check symmetry in a mirror or by stepping back. Small details—a crooked hat brim, blush on the cheeks, or a glossy eye—often determine the overall look. A calm, measured pace yields a polished, durable result you’ll be proud to display.
Head and body assembly for a 3D amigurumi witch doll pattern intermediate
Crochet the head and neck first, shaping a friendly yet spooky expression. Use tighter stitches toward the crown for stability and looser stitches at the jaw for a natural smile. When joining the head to the body, align the neck with the torso center and pin before sewing to prevent wobble. Add safety eyes or embroidery eyes, then sew a small mouth for a playful look.
The body is built in two parts that meet at the shoulders. Start with a rounded torso that increases gradually to create a gentle curve, then flatten for the back. For extra charm, add a tiny pumpkin belly or potion bottle applique. Carry yarn smoothly to avoid gaps at color changes, and finish with a tidy closing knot tucked inside. Stuff firmly but not overly tight to maintain a natural shape.
Arms, legs, and joining techniques for the Halloween amigurumi doll pattern intermediate level
Create two arms and two legs with the same tight-stitch approach as the head, keeping arms and hands defined and limbs slightly looser for a natural look. Leave openings for sewing to the body, and stuff evenly to prevent drooping. Attach arms slightly forward for a friendly pose, using whip stitches to hide seams. For legs, aim for a gentle knee bend if the doll will stand, or keep them straight for a seated pose.
Joining techniques matter. Sew limbs to the torso with anchor stitches to hold shape without puckering. Use a contrasting thread to establish the initial stitches, then switch to the body color for finishing. Avoid pulling too tight so joints stay secure yet flexible. After attaching, review from all angles and adjust seams if needed.
Seaming, stuffing, and safety tips
Keep stuffing even and avoid overfilling near seams to prevent lumps. Use a blunt tapestry needle to close openings and weave ends as you go to reduce bulk. Double-check safety eyes or beads are secure, especially for a child’s doll. Embroider tiny details last to prevent color bleed. Seal blind stitches with a touch of fabric glue or clear nail polish to prevent ends from poking out.
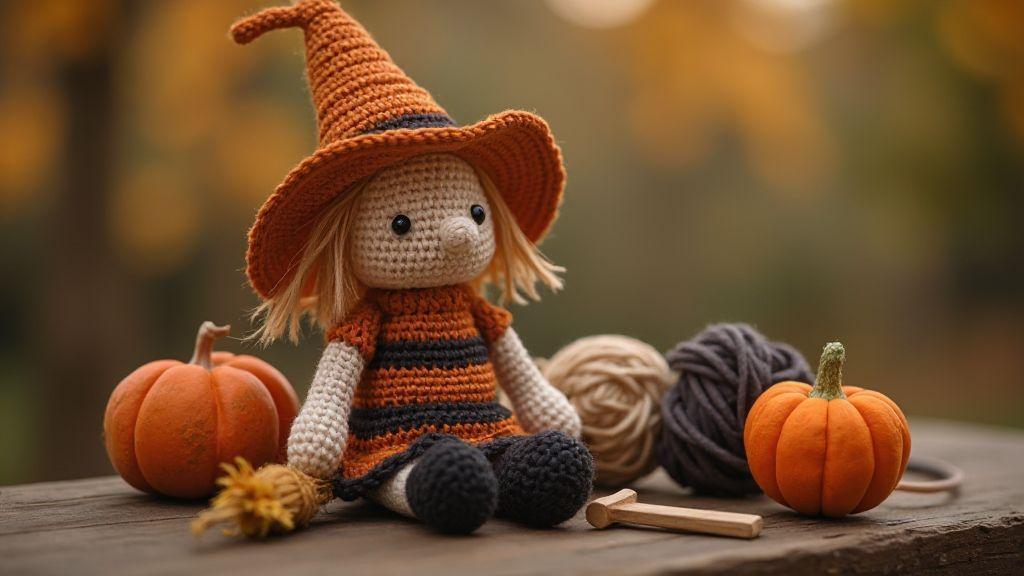
Hat, Broom, and Costume Builds
Crafting an amigurumi witch is about finishing touches that bring character to life. This guide focuses on three core builds to elevate the Intermediate Amigurumi Witch Doll Pattern for Halloween: hat, broom, and cohesive costume.
Begin with yarns and hooks that balance stiffness and softness. The hat should hold its cone shape, while the brim stays flexible. The broom needs a sturdy yet bendable handle with neat bristles. Costume pieces should crochet easily and attach without bulk. Aim for clean finishing: seamless joins, secure ends, and deliberate surface details. Use color blocking to separate the hat from the hair, and a contrasting broom color to highlight the handle. For a spookier vibe, add subtle shading with a dry brush technique. The result is a ready-to-display amigurumi witch with a cohesive hat, broom, and costume.
Amigurumi witch pattern with hat and broom instructions
Shape the hat in three parts: crown, brim, and band. Crochet the crown tightly for a tall, pointed silhouette, then attach the brim with a snug edge. The hat band sits around the crown’s base with a small contrasting stripe. Crochet a short broom with a wooden handle and tapered head, stitching bristles to fan out neatly. Attach the broom securely to the doll’s hand and hide joins with micro-stitches for a natural look. Check the head tilt against the hat angle and ensure the broom doesn’t poke through the leg or arm. If needed, a dab of fabric stiffener along the outer edge can help the brim hold shape without becoming too rigid.
Making the costume and accessories from an amigurumi witch costume pattern crochet intermediate
Crochet a cape with a hood and attach it to the neck with invisible stitches for a clean look. A contrasting collar with small picot stitches can add a crisp line. Tailor sleeves and dress length to fit the doll’s proportions, avoiding added bulk under the hat. Add boots if desired, sewing them on at the ankles for a grounded pose. Embellishments like a belt buckle or tiny motifs on the cape (moons or stars) bring depth. Use color blocking to separate cape from the dress for a distinct silhouette. Keep the costume lightweight to preserve poseability.
Attachment and posing methods
Secure each piece with hidden stitches and light fabric-safe glue to prevent shifting during posing. Anchor the hat under the hairline and reinforce with a small amount of glue if extra hold is needed. Attach the broom by a secure knot and stitches, allowing it to rest naturally. Pose the broom at a slight angle, and ensure the cape and belt move with the doll. For longer-lasting stability, add a tiny anchor point inside the cape near the shoulder to hold the hood in place. Practice three favorite stances and photograph from two sides to ensure the costume reads well from all angles.
Downloadable Patterns, Variations, and Troubleshooting
Downloadable patterns act as your roadmap, guiding stitches, color changes, and shaping. Look for clean diagrams and a clear bill of materials to avoid mid-project guesswork. If you’re on a deadline, choose a pattern with a printable checklist and stitch counts. Check font size and image clarity; download a high-res version if needed. Verify the pattern’s notes and notation style (American vs UK terms) and keep a glossary handy. If color codes or yarn substitutions are included, follow those guidelines to save time. Save a copy to your device and back it up to the cloud for updates or license terms changes.
Many intermediate patterns offer optional features like hat brims, capelets, or facial details. Save variations in a separate folder to compare progress without clutter. Print a clean version of the steps and circle tricky stitches to practice first for a polished finish—or to add your own twist.
Where to find a downloadable pdf amigurumi witch pattern intermediate and license notes
Look for reputable sources that clearly label the difficulty. A true intermediate pattern should include a row-by-row plan, stitch counts, and a thumbnail gallery. Check license notes to see whether you can sell finished items or share your version. If a site hides terms behind login walls, look elsewhere.
Make sure the downloadable file includes a materials list and gauge guide. The notes should tell you the starting round stitch counts, what to expect each round, and how to adjust for yarn choices. A clear section on color changes is essential when multiple hues are used. Save the PDF in a dedicated folder for easy reference during your sessions.
Custom variations and scaling from beginner to intermediate amigurumi witch pattern
Start by adjusting scale in small steps. If the original calls for a 15 cm tall witch, try 12 cm first, then 18 cm if you want more. Use a different hook size or thicker yarn to shift proportions. Ensure the head-to-body ratio remains balanced and limbs stay sturdy. These tweaks help you move from beginner to intermediate with the same character charm.
Add a personal touch that respects the pattern’s structure. Change colors to fit the theme, or add a simple broom, hat band, or eye buttons. Keep basic shaping the same, but you can decorate the face with a tiny smile or rosy cheeks. If unsure, test modifications on a swatch first to keep the witch recognizable while showing your style.
Common problems and quick fixes
- Tension troubles? If stitches look loose or uneven, re-check the magic ring and round stitch counts. Practice maintaining steady tension with slow, deliberate stitches, and consider a lighter yarn or smaller hook for a moment to stabilize your grip.
This streamlined version preserves the core guidance and structure of the original article, while reducing redundancy and strengthening SEO with the target phrase Intermediate Amigurumi Witch Doll Pattern for Halloween across sections. It remains suitable for readers seeking a clear, step-by-step approach to crafting an intermediate-level Halloween-themed amigurumi witch doll.

Clara Fern — Crochet Artist & Amigurumi Designer
Clara Fern is a crochet artist and amigurumi designer based in Austin, Texas. With 9 years of experience working with yarn and hook, she transformed a lifelong passion for handcraft into a creative mission: making amigurumi accessible, fun, and deeply rewarding for crafters of all levels.
Clara discovered amigurumi during a trip to Japan in 2017, where she fell in love with the art of bringing tiny characters to life through crochet. Back home in Texas, she spent years studying color theory, design principles, and advanced crochet techniques — developing her own signature style that blends kawaii aesthetics with original character design.
Through maclafersa.com, Clara shares everything she has learned — from choosing the right yarn and reading your first pattern, to designing fully original amigurumi characters from scratch. Her writing is known for being clear, detailed, and genuinely helpful, with no steps skipped and no secrets kept.
When she’s not crocheting, Clara enjoys watercolor painting, visiting local yarn shops, and drinking way too much coffee while sketching new character ideas.


