
Materials and tools you need
You’ll start with the basics to keep your first amigurumi fruit neat and cuddly. Think foundation: consistent stitches, tight seams, and safe finishes. You’ll want yarn that behaves, a hook that fits your grip, and a few handy tools to avoid mid-project scrambles. With these in hand, progress speeds up and confidence grows with every round.
Choose yarn that’s easy to work with and holds its shape. A light DK or cotton blend works well for beginners, grips the hook just right, and provides a neat finish. A yarn with a tight twist helps your fruit stand up to play and washing. Pick a hook size that matches the yarn label; for amigurumi, use a slightly smaller hook to keep stitches tight and prevent stuffing from showing. Keep stitch markers handy to stay on track in longer rounds. You’ll also want a blunt yarn needle for finishing, small scissors, and a bright, well-lit workspace for tiny stitches.
Comfort and control matter as you collect tools. A soft-grip hook reduces hand fatigue, especially during longer sessions. A small, clear container keeps safety eyes, needles, and scrap yarn secure. Consider color-coding tools with a tiny ruler or color pencil to map color changes. When your kit is easy to grab, motivation stays high and the process stays joyful.
How you pick yarn and hook for beginner crochet amigurumi fruit
Your yarn choice sets the tone. A forgiving, easy-to-see yarn helps a beginner track stitches. A light DK or cotton blend holds shape and maintains tidy curves. A slightly tighter twist makes stitches pop and seams stay closed.
For the hook, choose a comfortable grip size that matches the yarn label. If stitches look loose, drop down one or two sizes to tighten without sacrificing workability. Testing a scrap swatch helps you compare how different hook sizes affect the fabric. The goal is snug stitches to prevent stuffing from peeking through.
How you choose stuffing and safety eyes for kids
Stuffing should be light and even to maintain a rounded shape. Start with fluffy polyester and distribute as you go, shaping to form natural curves. For kid-friendly items, ensure stitches are tight and consistent to avoid showing stuffing.
Safety eyes require care when kids are involved. For very young children, consider yarn noses and embroidered eyes. If you use safety eyes, secure them with washers and stitch around the backing. Always test with a gentle tug to ensure parts stay attached.
Quick materials checklist
- Yarn: light DK or cotton blend, smooth twist, color close to your fruit shade
- Hook: ergonomic grip, size matching label guidance (usually one size down for tighter stitches)
- Stuffing: polyester, fluffy but evenly distributed
- Safety eyes or noses: consider kid-safe options; embroidery can be safer
- Needle and scissors: blunt yarn needle, sharp scissors
- Stitch markers and a small ruler for accuracy
Choosing free amigurumi fruit patterns
Free patterns let you start right away. Look for beginner-friendly patterns with clear photos, a listed skill level, and instructions using basic stitches like single crochet and magic ring. Pick patterns that provide a materials list, abbreviations, and a finishing guide so you know what you’re in for. If you plan more than one fruit, choose sets from the same designer or with similar shapes to build rhythm and save time.
Save links to favorites to revisit without hunting. Organize a small folder of options to keep your crochet journey smooth. Read comments for tips from other makers, and try a tiny sample first if you’re unsure. Choose patterns you can finish in a weekend to keep motivation high.
What you find in amigurumi fruit patterns free
Free patterns usually include a materials list (yarn, hook, stuffing, and eyes if used), step-by-step photos or instructions, color-change guidance, and finishing tips like adding a leaf or stem. Look for clear explanations of magic rings and starting chains. Some patterns provide full mini-tutorials on trickier stitches; others are simpler but include a glossary. Printable formats and size guides are helpful for planning.
Designer notes often share tips for smooth color changes or secure limb attachment. You might see ideas for light stuffing or using a tiny seed dot for realism. These details help elevate a basic round into a polished fruit.
How you read a pattern as a beginner crochet amigurumi fruit maker
Start with an overview: size, yarn type, hook size, and finishing steps. Look up unfamiliar abbreviations (e.g., sc, inc, dec) to plan your timing. Skim rounds to understand flow; amigurumi is usually worked in continuous rounds, so note where the opening closes.
As you crochet, compare your work with photos. If needed, frogging a few rows is fine. Finish exactly as directed—yarn tails, stuffing amount, and neat seams matter. Reading patiently turns beginner hiccups into solid progress.
Best free sources
Look for well-loved blogs and pattern roundups that curate reliable, beginner-friendly patterns. Collections like How to Make a Simple Amigurumi Fruit Set: Free Patterns group fruit ideas for easy planning. Ensure sites list yarns and hook sizes and that photos match steps. A good source invites comments, helping you learn from others’ questions and tips. If a pattern is repeatedly recommended, that’s a good sign it’s beginner-friendly.
Follow a simple amigurumi fruit tutorial
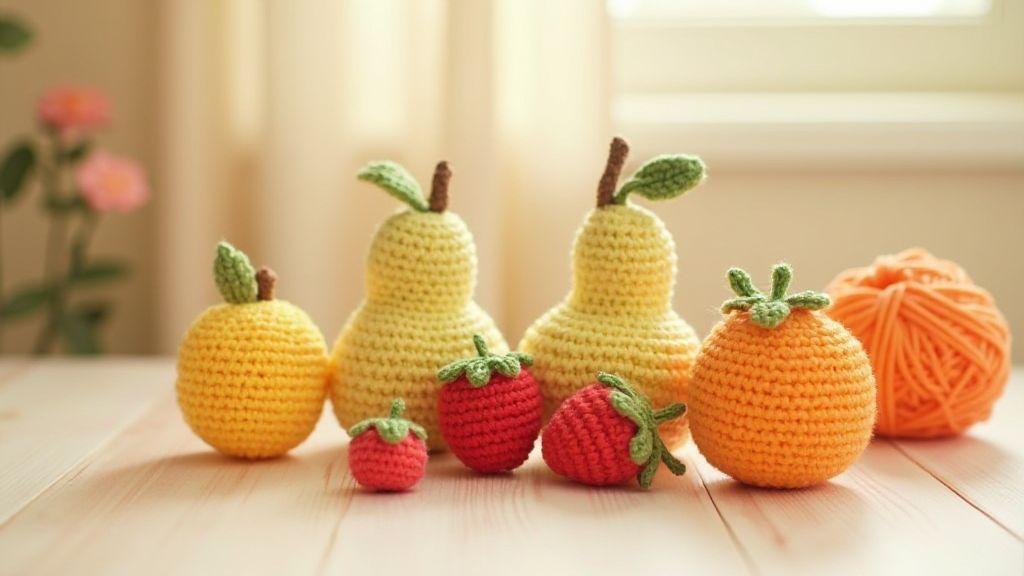
A simple tutorial helps you keep stitches even and fruit shapes sturdy. This practical guide covers from the first loop to final assembly, with small differences in size or shape that add character. Start with a basic round fruit and add leaves and stems for realism. Finished pieces look great on a desk, shelf, or as gifts. While the math matters, remember each fruit is unique, making your set special.
How you make a basic round fruit — how to make amigurumi fruit
Start with a tight magic ring and work in continuous rounds to keep the fruit round and plump. Close holes neatly and weave in ends. Maintain consistent tension for soft, squeezable fruit.
Change colors or add small accents to suggest shading without complicating the pattern. Practice with a few small balls before committing to a full set. You can adjust size by starting rounds earlier or changing stitch height, enabling a cohesive lunchbox of mini fruits.
How you add leaves and stems for crochet mini fruit amigurumi
Leaves and stems add character. Begin with a few small chain stitches to anchor the stem, then work a few rounds for a leaf. Attach near the top and shape with gentle increases and decreases. A tiny stem and two leaves give your fruit a ready-to-display look.
For extra realism, add blush stitches or a tiny seed dot. Finish by tucking ends and giving the fruit a light puff to set shape.
Stitch count and increase tips
Keep a steady rhythm and check round totals with a stitch marker. If the piece leans or flattens, adjust increases for even spacing. Note counts when switching colors or adding leaves. To plump a fruit, add one or two rounds before decreases; for a smaller fruit, reduce rounds. End with neat sewing of ends and a gentle squeeze to settle stitches.
Shape, stuff, and finish like a pro
Choose the right yarn and hook to keep stitches even and avoid lumps. When stuffing, stop just before the last rounds to shape cleanly. Flatten seams as you work for a natural look. Close tightly, weave tails neatly, and trim excess yarn close to the body.
Stuff in sections, testing shape as you go. For bulges in apples, pears, and oranges, twist and flatten sections to form defined curves. If you spot a gap, add stuffing and rework the seam. Finish with tails well hidden inside the body and a light press to set the shape.
How you stuff evenly for smooth shapes in your DIY amigurumi fruit set
Use small amounts of stuffing and distribute it with your fingers to avoid air pockets. Press from the outside to settle stuffing and create a center that’s firmer than the outer curves. Shape in sections (top, middle, bottom) for balanced fullness. If you see hollows, add stuffing and press gently.
Test the final shape with a light squeeze; adjust stuffing if needed.
How you sew seams and hide tails using free amigurumi patterns fruit
Seams should be tight and near-invisible. Use mattress stitch or invisible whip stitch and pull snugly. Weave tails inside the stuffing path to keep them hidden. Take your time with the last seam for a clean finish. After weaving tails, tuck and sew a few extra stitches to secure, then trim close and weave the end back into the body.
Durability and safety tips
Durability comes from tight stitches, sturdy seams, and careful stuffing. Use a matching hook size and keep tension steady. Double-check seams, especially around the bottom. For kids, opt for kid-safe stuffing and avoid beads or small parts in the core. Ensure tails are woven and trimmed securely.
Quick easy amigurumi fruit set projects
Projects here are designed for speed: simple, repeatable stitches let you finish several pieces in a single afternoon. Use small shapes, bright colors, and reliable techniques to create a cohesive display. Begin with one fruit, then repeat constructions to build a full set. Keep color changes predictable to stay motivated. Patterns that reuse similar shapes help the set come together quickly.
How you build an easy amigurumi fruit set fast with quick patterns
Start with a simple circular base and shape it with minimal color changes. Use basic increases and decreases to form the fruit, then tuck ends and add tiny leaves or stems. Repeating the same construction makes the set come together faster. Small variations in stem length or surface stitches add character without adding complexity.
As you assemble, slight tweaks—from longer stems to subtle shading—increase personality. Choose patterns with minimal colorwork and clear instructions. You’ll improve color-change technique and maintain even tension, yielding a crisp, cohesive group.
If you want a head start, gather three to five hues and pick patterns that reuse the same base stitches. Label pieces to keep track of them later, especially for sets on a shelf or in a child’s toy box.
How you mix fruits for play sets or home decor — easy amigurumi fruit set ideas
For play sets, balance size, color, and texture. Use consistent stuffing for plump, durable pieces that withstand play. Add simple seeds with French knots or tiny stitches for personality without complicating patterns. For decor, include small leaves and stems, group by color, and mix matte and shiny yarns for depth. Durable yarns and sturdy embroidery help prevent loose pieces. Simpler shapes ensure little hands can grasp and toss easily.
Time and skill estimates
- Time: About 1–2 hours per piece for beginners; a starter set of 5–6 fruits typically 5–9 hours total
- Skill: Basic amigurumi with simple increases, decreases, and color changes
- What you’ll learn: Creating a cohesive fruit set quickly, mixing colors for decor, finishing pieces neatly for durability
Care, gift, and sell your amigurumi fruit
Amigurumi fruit is lovable yet practical. Clean as you play, store in a dry place, and handle gently to protect stitching and stuffing. Test wash a swatch to see how pieces hold up and consider including a care card with hand-wash and reshaping tips for longevity.
If selling, label each piece, track materials, and photograph from multiple angles. Clear product photos plus care tips help buyers feel confident. Packaging can be simple and charming—wrap a single fruit in tissue, add a care card, and tie with a ribbon. For free patterns, you can include a note with care tips and a link to How to Make a Simple Amigurumi Fruit Set: Free Patterns to guide new makers.
Display and child safety tips
Display fruits in a safe place, out of reach of very young children. Use a sturdy stand or decorative bowl and ensure leaves and stems are securely attached. If a piece sheds, repair promptly to maintain safety and appearance. A careful display helps others trust your work and enjoy it longer.
How you clean and store pieces from amigurumi fruit patterns for beginners
To clean, wash gently in lukewarm water with a little mild detergent. Soak briefly, squeeze gently (no twisting), rinse, and press between towels. Lay flat to air dry and reshape as needed. Store finished pieces in a cool, dry place away from direct sun. Use breathable bags or boxes to avoid dust, and group by fruit type for easy care and gifting. Label containers for quick access.
How you price, package, or gift your free amigurumi patterns fruit creations
Pricing reflects value: time spent, materials used, and skill level. Even for free patterns, present your creations with care. Package a finished fruit with a care note or bundle pieces into a themed gift set. Simple, thoughtful packaging enhances the gift experience.
If you’d like more direct guidance on the exact phrasing of the main title, consider naming a dedicated section after your primary keyword: How to Make a Simple Amigurumi Fruit Set: Free Patterns. This helps reinforce SEO while keeping the article readable and practical.

Clara Fern — Crochet Artist & Amigurumi Designer
Clara Fern is a crochet artist and amigurumi designer based in Austin, Texas. With 9 years of experience working with yarn and hook, she transformed a lifelong passion for handcraft into a creative mission: making amigurumi accessible, fun, and deeply rewarding for crafters of all levels.
Clara discovered amigurumi during a trip to Japan in 2017, where she fell in love with the art of bringing tiny characters to life through crochet. Back home in Texas, she spent years studying color theory, design principles, and advanced crochet techniques — developing her own signature style that blends kawaii aesthetics with original character design.
Through maclafersa.com, Clara shares everything she has learned — from choosing the right yarn and reading your first pattern, to designing fully original amigurumi characters from scratch. Her writing is known for being clear, detailed, and genuinely helpful, with no steps skipped and no secrets kept.
When she’s not crocheting, Clara enjoys watercolor painting, visiting local yarn shops, and drinking way too much coffee while sketching new character ideas.


