
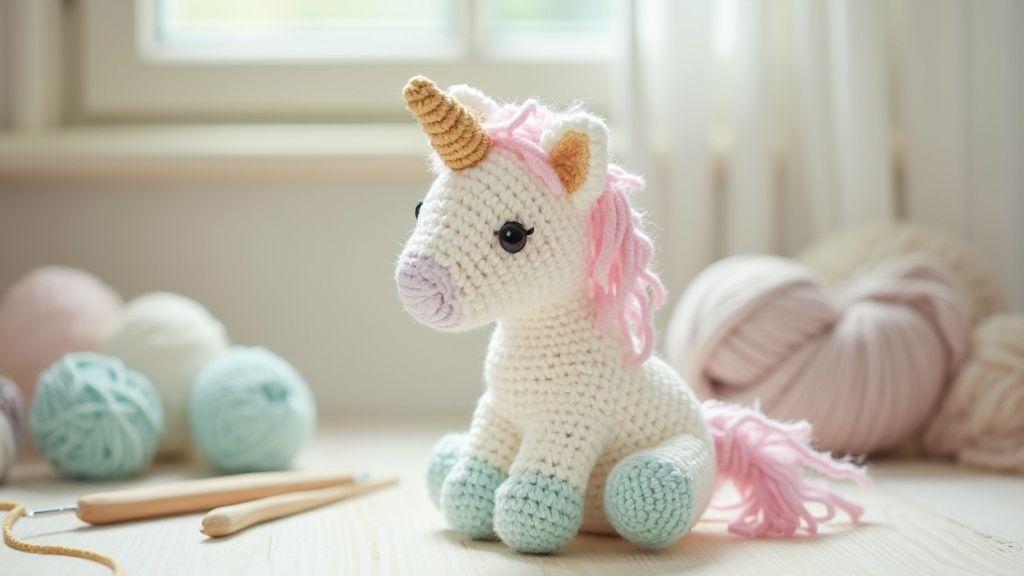
Materials and tools for a beginner amigurumi unicorn pattern
You’re about to start a fun project, so you want a clear, simple setup. This section lists what you need to make a cute, sturdy unicorn. Choose warm, soft colors and textures to keep you motivated from the first stitch. Gather essentials to keep your workflow smooth and avoid interruptions. With the right tools, your stitches stay neat and your unicorn stays sturdy—from horn to hooves.
The plan is simple: pick forgiving yarns for beginners, a hook that fits your yarn, and stuffing that holds shape without being stiff. Add safety eyes and easy-to-use markers to track your rounds. Keeping everything within reach helps you stay on track and finish with confidence. The right combination makes the pattern feel almost effortless.
You’ll notice cleaner decreases, smoother color changes, and a more even finish as you prep properly. Your early prep saves time later, guiding you from slip knot to final stitch.
Yarn weight, hook size, and stuffing choices
Your first choice is yarn weight. For a beginner amigurumi unicorn, light to medium weight works best. It’s easy to control and forgiving on tension. Look for DK or worsted weight in a soft acrylic or wool blend. Pick a color you adore since you’ll be using it a lot. Aim for a smooth fabric that hides stitches without being see-through and a yarn that feels pleasant in your hands.
Next comes the hook size. Match your hook to your yarn label; as a rule of thumb, use a 3.0–4.0 mm hook for DK or 3.5–4.5 mm for worsted. If stitches look tight or crack a little, try a larger hook; if loose, go down a size. The hook should feel comfortable in your grip, with steady control during long rounds.
Stuffing should be soft yet resilient. Polyfill is affordable, light, and easy to press into small areas. For a greener option, mix in cotton or wool scraps—just avoid lint that could snag yarn tails. Choose stuffing that stays plump without becoming stiff, so the unicorn remains plush enough to hold small details like the horn and ears.
Safety eyes, needles, and markers you need
Safety eyes are quick and secure for beginners. They snap in place and stay put if you follow the reverse-loop technique. If you’re not comfortable with safety eyes, you can use felt or embroidery for eyes. Place features after shaping the head so you can gauge expression, and align eyes evenly for the best look.
You’ll also want blunt embroidery needles for tidy weaving, markers to track rounds, and a small pair of scissors for trimming ends. Use removable stitch markers to mark the first round and switch to a locking marker as you go. Spare needles help with quick adjustments.
Must-have basic supplies list
- A soft, medium-weight yarn (DK or worsted) in unicorn colors
- A hook that matches your yarn (usually 3.0–4.0 mm for DK, 3.5–4.5 mm for worsted)
- Polyfill stuffing, plus a few small texture scraps if desired
- Safety eyes (or felt/embroidered eyes) and a tightening mechanism if using safety eyes
- Blunt embroidery needle, scissors, stitch markers, and a yarn needle for weaving ends
Basic stitches for a simple amigurumi unicorn for beginners
You’re building a small project, and the basics set you up for success. This section introduces the moves you’ll use repeatedly to create a cute unicorn.
Each stitch has a purpose: single crochet gives tight fabric, increases add size, and decreases shape curves. Worked in rounds, your piece becomes a small cylinder—perfect for a head or body. Keep notes of stitch counts, tension, and round boundaries to maintain a neat finish.
If you’re familiar with a classic pattern, you’ll see these basics in many beginner amigurumi guides. You’ll quickly switch between gauge and tiny details as you gain confidence.
Single crochet, increase, and decrease steps
Start with a tight single crochet (sc) to create firm fabric. To grow, insert your hook for an increase (usually two stitches in one). To taper, work a decrease (two stitches together). Keep a steady pace and count aloud if needed. If the fabric is too loose, adjust tension; if too stiff, loosen a touch.
Practice increases and decreases in a small circle to avoid gaps. In rounds, there’s usually no turning unless the pattern says so. If rounds feel crowded, pause to recount and adjust. Accuracy grows with every round, helping the head hold its shape.
Magic ring and working in rounds explained
A magic ring creates a tight start with no hole in the middle. Wrap the yarn, pull a loop, and crochet into that loop. As you close the ring, the fabric tightens at the center. In rounds, add stitches to form a flat circle, then switch techniques as the body grows taller. Think bricks laid neatly in a circle.
If you’re new to a magic ring, practice makes it natural. A snug base helps the unicorn stay sturdy. After finishing a round, count stitches to ensure you haven’t added or skipped stitches.
Counting stitches and keeping gauge
Counting stitches is your compass. Each round should hit the stitch count the pattern calls for. If you drift, the unicorn won’t be symmetrical. Maintain gauge by keeping consistent tension and the same hook size. A stitch marker at the first stitch of each round helps you stay on track, saving time and preventing surprises.
Step-by-step head and body instructions for an easy crochet unicorn pattern (free)
You’re turning yarn into a charming unicorn. This step-by-step path moves from a tight starter stitch to a plump finish, showing how each part fits together. Stay steady with your tension so the stuffing sits evenly and the head, neck, and body align.
- Keep your hands relaxed and your yarn smooth to maintain even stitches during stuffing. For beginners, this pattern is friendly enough to complete over a weekend.
- Regularly compare with a reference photo or ruler to maintain size and shape. Planning ahead helps you avoid surprises later and keeps you motivated through final shaping.
Making the head with a basic amigurumi crochet step by step
Begin with a tight magic ring and about a dozen rounds to form a smooth head. Aim for a rounded sphere, not a flat disk. If you see gaps, tighten stitches and pull snugly. Attach ears and a horn later, so the head has a clean base.
Add ears as small crescents, either in the head or as separate pieces. Place them toward the top for a kid-friendly look. Crochet a small horn and sew it centered between the ears. Once the head shape is sound, close with a few final rounds and weave in the end. Stuff the head so the opening stays small and secure. A quick shape check helps ensure balance.
Crocheting the body and stuffing for the right shape
Start the body with a similar round-in-round approach but add a slight elongation for a torso that sits well. Keep stitches snug but not too tight to preserve a plush feel. Use increases and decreases to shape the belly and back into a gentle curve.
As you reach the widest part, begin decreases to form the hindquarters. Stop early for a shorter body or go longer for a taller unicorn. Stuff gradually, filling legs and neck areas to avoid lumps. Sew the head to the body with a secure seam, aligning them straight for a balanced look.
Where to place eyes and nose for symmetry
Place eyes a little below the horizontal center, spaced evenly by about one eye width. If you’re using safety eyes, insert them before closing the head so you can anchor from inside. For embroidered eyes, use dark yarn or thread to create two even dots, keeping spacing consistent.
Place the nose at the center of the face, about half a centimeter below the eye line. A small tuck of yarn or stitch defines a mouth if you want one, but keep it subtle for a sweet expression. Regularly step back to verify symmetry.
Ears, horn, mane, and tail in a free crochet unicorn tutorial
Ears sit on top of the head in small, neat shapes. Use tight stitching to keep insertions secure. The horn should be firm and centered between the ears. Crochet a few base stitches to anchor it, then stuff just enough to maintain a pointed look. The mane and tail are showpieces—use yarn that matches or contrasts for effect, and consider looping extra strands for fullness. A spark of color can add personality.
Tip: attach ears before sewing the head to the body to position them naturally. The horn should sit between the ears, pointing up but not so tall it tips the head. For the mane, pull multiple long yarn strands through near the crown and comb into place after sewing. Gather a few bold strands for the tail and secure at the base. Aim for a cohesive look where the mane and tail move with the body.
Crocheting a small horn and firm stuffing tips: Use a solid core (rolled paper or stiff stuffing) inside the crochet tube before closing. Thick base stitches help anchor it, then taper toward the tip. After stuffing, push from the base to keep the tip pointy. A snug seam around the opening helps prevent wobbling.
Simple mane and tail methods using yarn strands: Fold strands in half and pull the folded ends through a stitch to create a secure knot. Layer strands for depth, trim longer strands after attaching the head to even them out. For color pops, mix shades in the strands. The finished mane and tail should balance with the head and body, not overpower the unicorn’s face.
Assembly and finishing for a crochet unicorn pattern beginner-friendly
Lay out all parts to ensure nothing’s missing. Check stitches and join points for clean, neat edges. If gaps appear, touch up with a small amount of yarn and a needle. The goal is a tidy, compact toy that holds its shape when touched, squeezed, or displayed. This is where your patience pays off—tiny fixes now save rework later.
Attach pieces with matching yarn and a tapestry needle, using small, tight stitches. Keep seams flat and tension even so they disappear into the toy. If a lump forms, re-stitch with a bit more tension. After sewing, weave ends inside to hide them. Test for sturdiness and reinforce any loose areas.
Finally, trim ends, adjust shape, and give a light finger-brush to settle stitches. Check from all angles and tuck away stray loops. Your unicorn should feel solid in hand and look smoothly finished.
Sewing pieces together with neat invisible seams
Aim for seams that vanish into the fabric. Line edges and use a ladder stitch or invisible slip stitch with a matching yarn. Use small, tight stitches and gentle pulls to avoid puckering. If you’re using different colors, switch threads carefully to keep the seam clean. Rotate pieces to reach tricky angles and take time with corners. When you finish, weave the end inside so it’s not visible. Your stitching style may reflect your personality—steady hands win.
Weaving in ends, trimming, and final shaping
Weave in the ends securely with several passes to lock them. Snip close to the fabric, leaving a tiny tail just in case you need to re-tighten. Hide every color end so nothing peeks out. Gently pat and adjust to smooth rough spots, especially around ears, horn, and legs. If a part needs a minor tweak, a tiny extra stitch can restore the curve. The result should feel solid in your hands and look evenly finished.
Simple finishing touches for a polished toy
Add personality with small details: a tiny embroidered eye, a little blush, or a decorative scarf can elevate the unicorn. Keep colors balanced for a cohesive look. Finishing touches are what make your unicorn feel complete and ready for adventures.
Where to find free amigurumi unicorn PDF and beginner tips
You’re seeking a solid start, so here’s the straight path to free PDFs and beginner tips that work. Look for reputable crochet blogs and communities offering free amigurumi unicorn PDFs as starter kits. These files typically include a pattern, yarn suggestions, needle sizes, and a beginner-friendly stitch glossary. Printable patterns and quick material lists are especially handy for a straightforward start.
Join beginner-focused channels and forums to see real examples and tips on tension, common mistakes, and how to stuff without losing shape. Check user comments for sizing and seam guidance. A good PDF often includes photo progress and a materials list. Save a few favorites for later.
Print and organize PDFs in a dedicated folder. Keep a short checklist: materials, gauge, stitch counts, and a reference photo. If you can’t find a perfect unicorn starter, any beginner-friendly PDF covering single crochet basics and increasing/decreasing will help you practice rhythm and stitches until you’re ready to tweak details.
Trusted sites and video channels for free crochet unicorn tutorial PDFs
There are trusted sites where PDFs come with clear videos or step-by-step photos. Look for craft sites that post beginner patterns with short videos or photo progressions. Video channels often have comments where beginners ask questions, and PDFs with videos can be especially helpful.
Prefer sources that label sections clearly (head, ears, body, assembly). This structure helps you map progress and avoid mixing parts. Check that PDFs include a materials list, gauge notes, and a stitch glossary. A strong PDF will note common beginner mistakes so you know what to watch for. Save a few favorites for easy reference.
If a source seems unfamiliar, look for user reviews or comments about beginner suitability. A good PDF may include a quick-start section that covers zero-to-hero basics in minutes. Print or save to a crochet folder, and start small: practice the first rounds until stitches are even and smooth.
Common beginner mistakes and easy fixes for amigurumi
Even a cute unicorn benefits from a few fixes. Common issues include loose tension causing gaps. To fix, tighten your grip slightly and practice even, snug stitches without over-pulling. If rounds don’t close neatly, use a stitch marker to track rounds and ensure you’re in the correct stitch at the end of each round.
Overstuffing can cause seams to pop or bumpiness. Stuff gradually, compressing gently as you go. If edges wave, recheck increases and decreases for even spacing. A smaller hook can help tighten the fabric. Keep your workspace organized with markers, scissors, and fillings handy.
Pattern-reading mistakes happen too. If you misread a row, compare your work to the pattern’s photos and count aloud. If ears flop, you likely skipped a decrease or misplanted a stitch. Rework that section slowly to restore shape. Every beginner makes a few fixes on the way to a neat unicorn.
Quick pattern variations to personalize your unicorn
Make it yours with quick touches. Change mane and tail colors to reflect a favorite hue or season. Add a metallic horn embellishment or glittery eyes for extra sparkle. Tweak ear shape or size for personality—shy and rounded or bold and pointy.
Try different body textures by using another crochet stitch—like a popcorn stitch for little bumps or a softer half-double crochet for cuddliness. Add a scarf or bow for a special occasion vibe. Keeps the changes aligned with the basic pattern so the unicorn remains sturdy while looking unique.
If you’re confident, crochet a small collection in varying sizes using different hook sizes and yarn weights. Display them together for a charming display. Attach a tiny tag with your name or a message to make each unicorn feel truly yours.
How to Crochet a Simple Amigurumi Unicorn: Free Beginner Pattern is a comprehensive, beginner-friendly guide embedded in this article. For a complete, downloadable version, you can reference the free beginner PDF collections mentioned above and practice the rhythm and stitches until you’re ready to customize every little detail.

Clara Fern — Crochet Artist & Amigurumi Designer
Clara Fern is a crochet artist and amigurumi designer based in Austin, Texas. With 9 years of experience working with yarn and hook, she transformed a lifelong passion for handcraft into a creative mission: making amigurumi accessible, fun, and deeply rewarding for crafters of all levels.
Clara discovered amigurumi during a trip to Japan in 2017, where she fell in love with the art of bringing tiny characters to life through crochet. Back home in Texas, she spent years studying color theory, design principles, and advanced crochet techniques — developing her own signature style that blends kawaii aesthetics with original character design.
Through maclafersa.com, Clara shares everything she has learned — from choosing the right yarn and reading your first pattern, to designing fully original amigurumi characters from scratch. Her writing is known for being clear, detailed, and genuinely helpful, with no steps skipped and no secrets kept.
When she’s not crocheting, Clara enjoys watercolor painting, visiting local yarn shops, and drinking way too much coffee while sketching new character ideas.


