How Yarn Weight Changes the Size of Your Amigurumi
One of the easiest ways to change the size of an amigurumi without rewriting the entire pattern is simply to change the yarn.
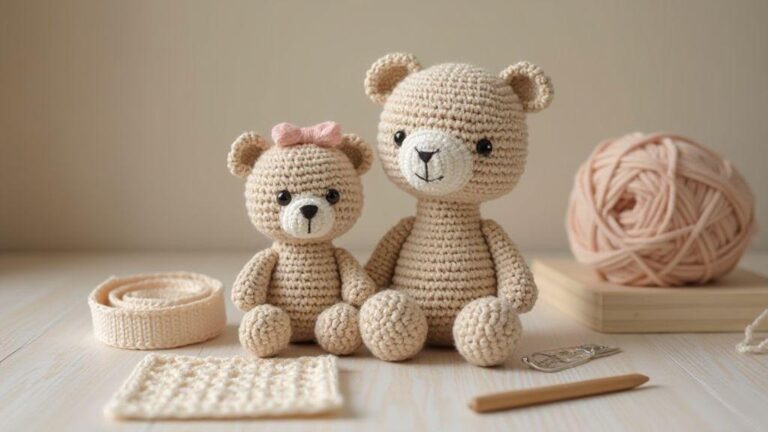
The same teddy bear pattern crocheted with thin cotton yarn might produce a tiny collectible toy, while the exact same stitch counts worked with bulky chenille yarn could create a large, huggable plush. No additional increases, complicated calculations, or pattern modifications are necessarily required.
This happens because yarn weight directly affects the size of every stitch. Thicker yarn creates larger stitches, while thinner yarn creates smaller ones. When hundreds or thousands of stitches are combined in an amigurumi project, those small differences dramatically change the final dimensions.
However, changing yarn weight affects more than height. It can also influence proportions, firmness, stuffing requirements, facial features, safety-eye size, hook selection, and the overall appearance of the finished character.
In this guide, we’ll explore exactly how yarn weight changes the size of your amigurumi and how to resize a project successfully while keeping the original pattern intact.
What Is Yarn Weight?
Yarn weight refers primarily to the thickness of the yarn strand.
It doesn’t necessarily describe how much a ball of yarn physically weighs. Instead, yarns are grouped into categories based on their thickness.
Common categories include:
- Lace
- Fingering
- Sport
- DK
- Worsted
- Bulky
- Super Bulky
The exact terminology and numbering system can vary depending on the country and manufacturer, but the general principle remains the same: as yarn becomes thicker, the stitches created with it generally become larger.
For amigurumi, this means yarn weight has a direct relationship with finished size.
Why Does Thicker Yarn Make Larger Amigurumi?
Imagine crocheting a simple sphere using 36 stitches around its widest point.
If those stitches are made with very thin yarn, each stitch occupies only a small amount of space.
If you make those same 36 stitches with thick chenille yarn, each stitch is significantly larger.
The pattern still contains 36 stitches, but the circumference of the sphere increases because every individual stitch is wider and taller.
The same effect happens across the entire project.
The head becomes larger.
The body becomes larger.
The arms and legs become longer and thicker.
If every component uses the same yarn and appropriate hook, the entire character generally scales up together.
This makes changing yarn weight one of the simplest methods for resizing amigurumi.
Can You Use a Different Yarn Weight Without Changing the Pattern?
In many cases, yes.
Suppose a pattern uses DK cotton yarn and creates a 20 cm tall bunny.
You could potentially use:
- sport yarn for a smaller bunny
- worsted yarn for a larger bunny
- bulky chenille yarn for a much larger plush bunny
You would still follow the same rounds, increases, decreases, and stitch counts.
However, you need to change the crochet hook to match the new yarn.
You may also need different sizes of eyes, noses, accessories, and other details.
The crochet instructions can remain identical while the materials scale the project.
An Example of How Yarn Weight Affects Size
Imagine a simple amigurumi bear pattern.
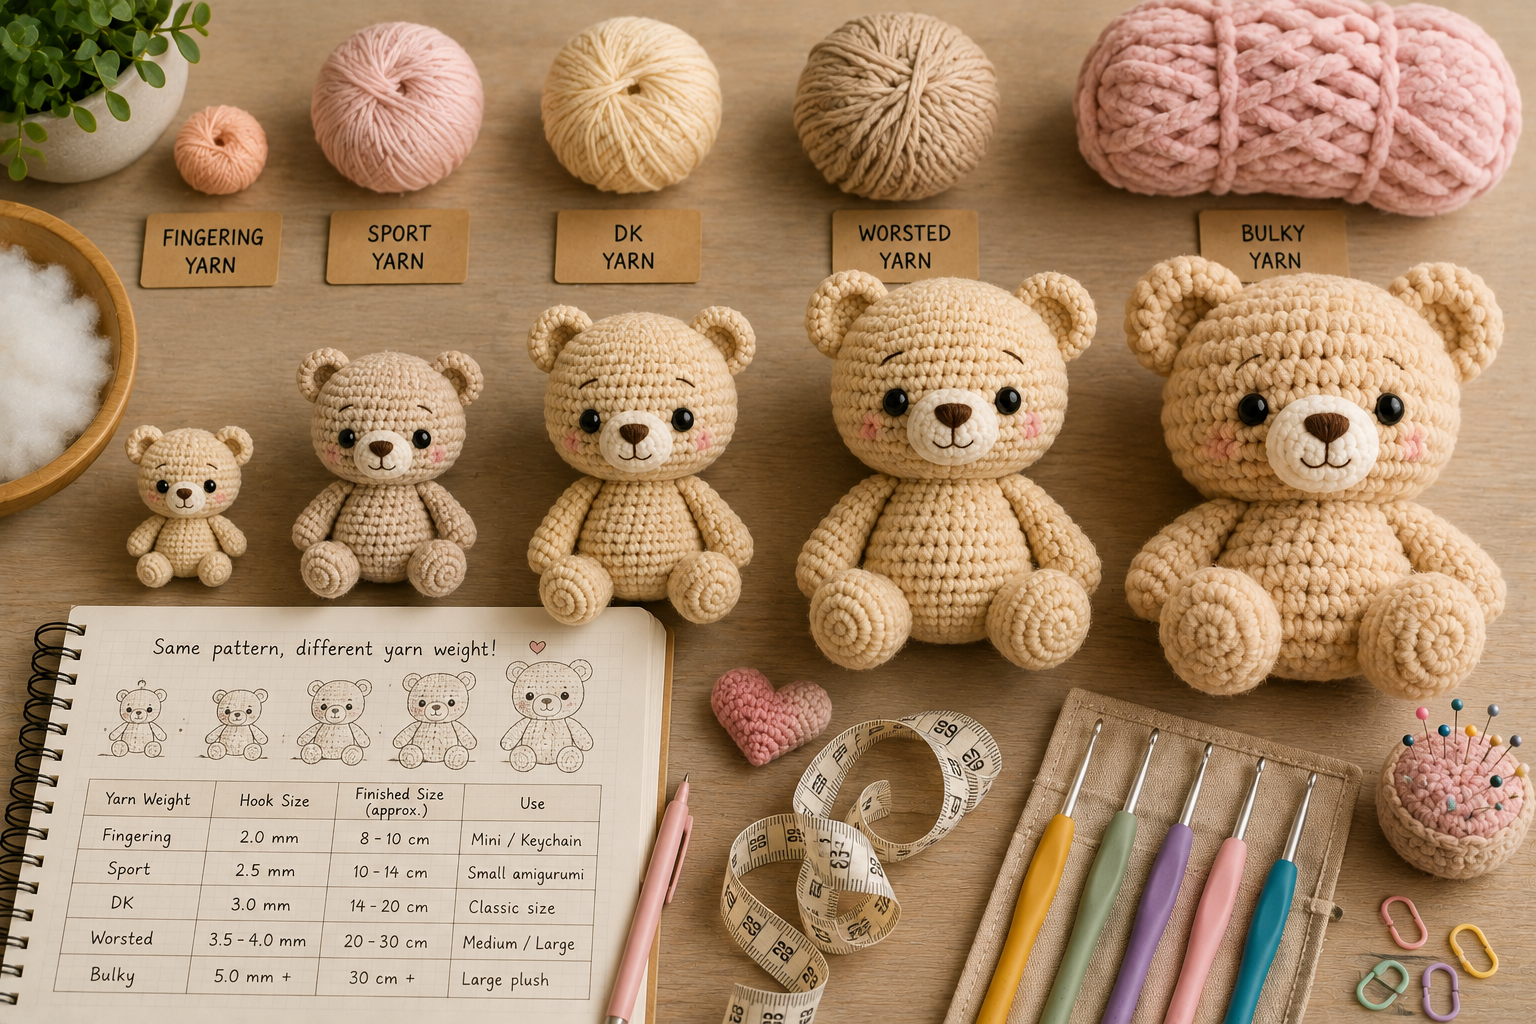
Depending on the yarn, you might get results similar to this:
| Yarn | Hook | Possible Result |
|---|---|---|
| Fingering | 2.0 mm | Mini bear |
| Sport | 2.5 mm | Small bear |
| DK | 3.0 mm | Medium bear |
| Worsted | 3.5–4.0 mm | Larger bear |
| Bulky | 5.0 mm | Large plush |
| Super Bulky Chenille | 6.0 mm+ | Oversized plush |
These are examples rather than guaranteed measurements.
Your actual result will depend on the specific yarn, hook, fiber, stitch technique, and personal tension.
Yarn Weight and Hook Size Work Together
Yarn weight isn’t the only factor controlling finished size.
Your hook matters too.
If you switch to thicker yarn but continue using an extremely small hook, your stitches may become very tight and difficult to work.
If you use a hook that’s too large, the stitches may become loose enough for stuffing to show through.
When changing yarn weight, you should therefore adjust the hook at the same time.
For amigurumi, makers often choose a hook smaller than the general recommendation on the yarn label because the fabric needs to be dense enough to contain stuffing.
The goal is to find a combination that produces:
- firm stitches
- minimal visible gaps
- comfortable tension
- good shape retention
- enough flexibility to crochet comfortably
Don’t Follow the Yarn Label Blindly
Yarn labels usually recommend hook sizes for general crochet projects.
Those recommendations may be appropriate for scarves, sweaters, blankets, or other fabrics where drape is desirable.
Amigurumi has different requirements.
A toy needs relatively compact stitches so stuffing doesn’t become visible between them.
For example, if a yarn recommends a 4.5 mm hook for general crochet, you might find that a 3.5 mm or 4.0 mm hook works better for amigurumi.
The exact reduction depends on the yarn and your tension.
Always test the combination before starting a large project.
Make a Test Sphere
If you’re unsure how a new yarn will affect a pattern, make a small test sphere.
A sphere is ideal because it lets you evaluate several important characteristics at once.
After crocheting and stuffing it, check:
- stitch density
- visible gaps
- firmness
- overall size
- surface texture
- stuffing pressure
If the stitches are too open, try a smaller hook.
If the fabric is extremely stiff and difficult to crochet, try a slightly larger hook.
Once the test sphere looks good, you can use that yarn-and-hook combination for the complete character.
How Much Bigger Will My Amigurumi Become?
This is one of the most common questions when changing yarn weight.
Unfortunately, there’s no universal answer such as:
“Moving up one yarn category makes your amigurumi exactly 25% larger.”
Different yarns within the same category can behave differently.
Two yarns labeled DK may have different thicknesses, fiber compositions, textures, and elasticity.
The hook size also affects the final dimensions.
If precise sizing matters, create a sample and compare it with the original gauge or measurements.
A Simple Way to Estimate the New Size
If you have already crocheted part of the project with both yarns, you can estimate the size difference.
Suppose the original yarn produces a head that’s 10 cm wide.
The new yarn produces the same head at 15 cm wide.
The scale factor is:
15 ÷ 10 = 1.5
That means the new version is approximately 1.5 times the size of the original.
If the original finished character is 20 cm tall, you could estimate:
20 × 1.5 = 30 cm
So the new version may be approximately 30 cm tall.
This won’t always be exact, but it’s much more reliable than guessing based only on yarn labels.
Yarn Fiber Also Changes the Result
Two yarns can have similar thicknesses and still produce noticeably different amigurumi.
That’s because fiber composition affects how the stitches behave.
Cotton
Cotton generally provides:
- excellent stitch definition
- relatively low stretch
- firm structure
- crisp shaping
It’s extremely popular for traditional amigurumi.
Acrylic
Acrylic can be:
- softer
- lighter
- slightly more elastic
- more flexible
Depending on the yarn, the finished character may feel softer than a comparable cotton version.
Chenille and Velvet
Plush yarns create a completely different effect.
They are thick, soft, and fluffy, which makes them ideal for larger cuddly amigurumi.
The fuzzy surface can also visually fill spaces between stitches.
However, stitch definition is often less visible, making it harder to identify individual stitches.
Thin Yarn for Mini Amigurumi
Using thinner yarn is one of the simplest ways to create miniature versions of existing patterns.
You can take a pattern originally designed with DK yarn and experiment with sport or fingering yarn.
Use an appropriately smaller hook and follow the same instructions.
This can transform a regular-sized animal into:
- a keychain
- miniature doll
- ornament
- bag charm
- small collectible
However, miniaturizing a pattern creates new challenges.
Individual stitches become harder to see, and embroidery requires more precision.
Small components can also become difficult to stuff.
Thick Yarn for Giant Amigurumi
The opposite technique works equally well.
Use thicker yarn to enlarge the pattern.
Bulky and super bulky yarns can turn relatively small designs into large plush toys.
This is particularly popular with chenille yarn.
A small animal originally designed with cotton might become a large cuddly plush while keeping exactly the same stitch counts.
But remember that every other material must scale accordingly.
You Will Need More Stuffing
A larger amigurumi doesn’t just require more yarn.
It can require dramatically more stuffing.
When dimensions increase in three directions—height, width, and depth—the internal volume grows quickly.
A character that’s twice as tall isn’t necessarily going to require only twice as much stuffing.
Its body volume may be several times larger.
If you’re planning to make an oversized version of a pattern, make sure you have enough filling before starting.
Running out when the head is half stuffed can make it difficult to maintain an even shape.
Safety Eyes Need to Scale Too
Imagine enlarging a teddy bear from 15 cm to 40 cm while keeping the original 6 mm safety eyes.
The bear’s proportions may technically remain similar, but its eyes will suddenly look tiny compared with its head.
When changing yarn weight significantly, evaluate whether you also need larger or smaller:
- safety eyes
- noses
- buttons
- accessories
- embroidery
- bows
- clothing details
Don’t automatically multiply every measurement mathematically.
Instead, test several sizes against the actual crocheted head before permanently installing anything.
Embroidered Features Must Scale
If your amigurumi uses embroidered eyes, mouths, eyebrows, or noses, the thickness of your embroidery material may also need adjustment.
A single strand of embroidery floss might look perfect on a tiny cotton doll but almost disappear on a large chenille plush.
Likewise, thick yarn used for facial details may overwhelm miniature amigurumi.
Always evaluate details relative to the finished head size.
Does Changing Yarn Weight Affect Proportions?
If every component is crocheted using the same new yarn and hook, the basic mathematical proportions usually remain similar.
However, the finished character may not look perfectly identical.
Why?
Because different yarns behave differently.
A thick plush yarn may:
- round out corners
- hide subtle shaping
- make limbs look chunkier
- soften facial contours
- reduce stitch definition
A fine cotton yarn may emphasize those same details.
So although the stitch proportions haven’t changed, the visual proportions can feel different.
Some Details May Become Too Small
Imagine a pattern with tiny separately crocheted fingers, horns, or ears.
When you reduce the yarn weight dramatically, those pieces may become so small that they’re difficult to crochet or assemble.
Likewise, a small decorative element enlarged with super bulky yarn may become disproportionately thick.
In these situations, you may need to simplify or modify secondary details even if the main pattern remains unchanged.
How Yarn Weight Affects No-Sew Amigurumi
No-sew patterns can behave differently when resized with yarn.
A limb crocheted directly into the body using thin cotton may sit neatly against the torso.
The same limb made with thick chenille can become much bulkier at the attachment point.
When scaling a no-sew pattern significantly, check whether:
- arms still sit naturally
- legs remain correctly spaced
- ears aren’t too bulky
- attached pieces don’t distort the body
You may need small placement adjustments.
How Yarn Weight Affects Clothing
If your amigurumi has removable clothes, changing the character’s yarn without changing the clothing yarn can cause fitting problems.
For example, a doll made with thicker yarn will need larger clothing.
If the clothing pattern uses stitch counts designed for the original doll, simply changing the doll yarn means the original outfit may no longer fit.
One solution is to scale both the doll and clothing using proportionally similar yarn changes.
Another is to redesign the garment according to the new measurements.
Always measure the finished character before making fitted accessories.
How Yarn Weight Affects Jointed Amigurumi
If your design uses joints or internal hardware, these components may also need to change.
A larger character may require stronger or larger joints to support its limbs.
A tiny version may require much smaller components.
This is especially important when the head is oversized relative to the body.
The crochet fabric isn’t the only thing being scaled—the structural requirements change too.
Keep All Main Yarn Consistent
If you’re resizing an amigurumi through yarn weight, use yarns with similar thicknesses throughout the main design.
Suppose the body uses super bulky yarn while the contrasting belly uses ordinary DK yarn.
Even if the colors look beautiful together, the stitch sizes may be dramatically different.
This can distort the colorwork and shape.
Whenever possible, use different colors from the same yarn line.
If that’s not possible, compare the yarn thicknesses before beginning.
Don’t Trust Category Names Alone
Yarn weight classifications are useful, but they aren’t perfectly standardized.
One manufacturer’s “worsted” yarn may feel noticeably different from another manufacturer’s worsted yarn.
Plush yarns can vary even more dramatically.
Instead of relying only on the category printed on the label, compare:
- strand thickness
- recommended hook
- meters or yards per weight
- fiber type
- texture
When precision matters, making a test sample remains the safest approach.
Yarn Weight and Yarn Consumption
Thicker yarn changes how much material you need.
A large amigurumi made with bulky yarn may require multiple skeins, particularly for large heads and bodies.
Before substituting yarn, check how much yarn is available.
Pay attention to yardage or meterage, not just the physical weight of the skein.
A 100 g ball of thin yarn contains much more length than a 100 g ball of thick yarn.
This is why simply buying the same number of grams as the original pattern may not always be enough.
Keep Notes When Experimenting
Whenever you resize a pattern successfully, write down what you used.
Record:
- yarn brand
- yarn weight
- fiber
- hook size
- finished height
- eye size
- amount of stuffing
- approximate yarn usage
If you decide to make another version later, these notes will save a lot of experimentation.
They’re especially useful if you sell finished amigurumi in multiple sizes.
Creating a Size Collection From One Pattern
Once you understand yarn substitution, a single pattern can become an entire collection.
Imagine one bunny pattern offered in three finished sizes:
Mini: Fingering yarn
Classic: DK cotton
Plush: Bulky chenille
The stitch instructions remain essentially the same, but the materials create three dramatically different products.
This can be useful for:
- craft fairs
- gifts
- themed collections
- matching family sets
- ornaments
- plush toys
It’s one of the most versatile advantages of understanding yarn weight.
Common Mistakes When Changing Yarn Weight
Keeping the Original Hook
A different yarn usually requires a different hook.
Forgetting to Scale the Eyes
Facial proportions can change dramatically.
Buying Too Little Yarn
Larger versions may consume significantly more material.
Underestimating Stuffing
Large plush projects can require a surprising amount of filling.
Mixing Different Yarn Thicknesses
This can distort the character.
Expecting Exact Measurements
Changing yarn introduces variables that make exact predictions difficult.
Ignoring Fiber Type
Thickness alone doesn’t determine how the finished fabric behaves.
Should You Change the Stitch Count Instead?
Not always.
If your only goal is to make the entire amigurumi proportionally larger or smaller, changing yarn weight is often much easier than rewriting the pattern.
Changing stitch counts requires recalculating:
- increases
- decreases
- limb placement
- color changes
- facial placement
- assembly points
Changing yarn lets the existing mathematics do most of the work.
However, if you want to change only one part of the character—such as making the head larger while keeping the body the same—then yarn substitution isn’t the ideal solution.
In that case, modifying the pattern itself provides more control.
A Simple Yarn Substitution Test
Before committing to an entire project, crochet one recognizable component.
The head is usually ideal.
Make the head using the original yarn if you have it.
Then make the same head with your substitute yarn.
Compare:
- width
- height
- firmness
- texture
- stitch visibility
- overall shape
This immediately shows you approximately how the entire character will scale.
It also helps you choose the appropriate eye size before continuing.
Can You Make the Same Pattern in Several Sizes?
Absolutely.
That’s one of the most useful features of amigurumi construction.
As long as the yarn-and-hook combination produces suitable fabric, you can often use the same pattern across several yarn weights.
For example, one animal pattern could become:
- a miniature ornament
- a small desk decoration
- a standard toy
- a large plush
All without recalculating every round.
The final results won’t necessarily be exact scaled replicas because different fibers behave differently, but the overall design can remain remarkably consistent.
Which Yarn Weight Is Best for Beginners?
For traditional amigurumi, DK or light worsted yarn is often comfortable for beginners.
The stitches are large enough to see clearly without making the project excessively bulky.
Cotton and smooth acrylic yarns also make stitch identification easier than fluffy yarn.
Very thin yarn can make counting difficult.
Very fluffy chenille can hide stitches and make mistakes harder to correct.
Once you’re comfortable reading the structure of single crochet stitches, experimenting with other yarn weights becomes much easier.
Which Yarn Weight Is Best for Amigurumi?
There isn’t one universally best yarn weight.
It depends on the result you want.
Choose fingering or sport yarn for miniature projects and detailed collectibles.
Choose DK or worsted yarn for classic amigurumi with visible stitch definition.
Choose bulky or super bulky yarn for large plush characters.
The best yarn is the one that creates the size, texture, and style appropriate for your particular design.
Final Thoughts
Yarn weight is one of the most powerful—and simplest—tools for controlling the size of your amigurumi.
Thinner yarn creates smaller stitches and therefore smaller characters. Thicker yarn creates larger stitches and can transform the exact same pattern into a dramatically larger plush.
In many cases, you don’t need to change a single stitch count.
Simply select a different yarn, pair it with an appropriate crochet hook, and follow the original instructions.
But remember that resizing affects more than height. Larger projects require more yarn and stuffing, while eyes, noses, accessories, embroidery, clothing, and structural components may also need to scale.
The safest approach is to make a test piece before committing to the entire project.
Once you understand how different yarn weights behave with your personal crochet tension, you’ll be able to look at almost any amigurumi pattern and imagine it in multiple sizes—from a tiny keychain character to an oversized cuddly plush.
Clara Fern — Crochet Artist & Amigurumi Designer
Clara Fern is a crochet artist and amigurumi designer based in Austin, Texas. With 9 years of experience working with yarn and hook, she transformed a lifelong passion for handcraft into a creative mission: making amigurumi accessible, fun, and deeply rewarding for crafters of all levels.
Clara discovered amigurumi during a trip to Japan in 2017, where she fell in love with the art of bringing tiny characters to life through crochet. Back home in Texas, she spent years studying color theory, design principles, and advanced crochet techniques — developing her own signature style that blends kawaii aesthetics with original character design.
Through maclafersa.com, Clara shares everything she has learned — from choosing the right yarn and reading your first pattern, to designing fully original amigurumi characters from scratch. Her writing is known for being clear, detailed, and genuinely helpful, with no steps skipped and no secrets kept.
When she’s not crocheting, Clara enjoys watercolor painting, visiting local yarn shops, and drinking way too much coffee while sketching new character ideas.