How to Fix Loose Stitches After Finishing Amigurumi
Finishing an amigurumi project is incredibly satisfying. After hours of crocheting, stuffing, assembling, and adding tiny details, your character is finally complete. Then you notice something frustrating: a few stitches look noticeably looser than the others.
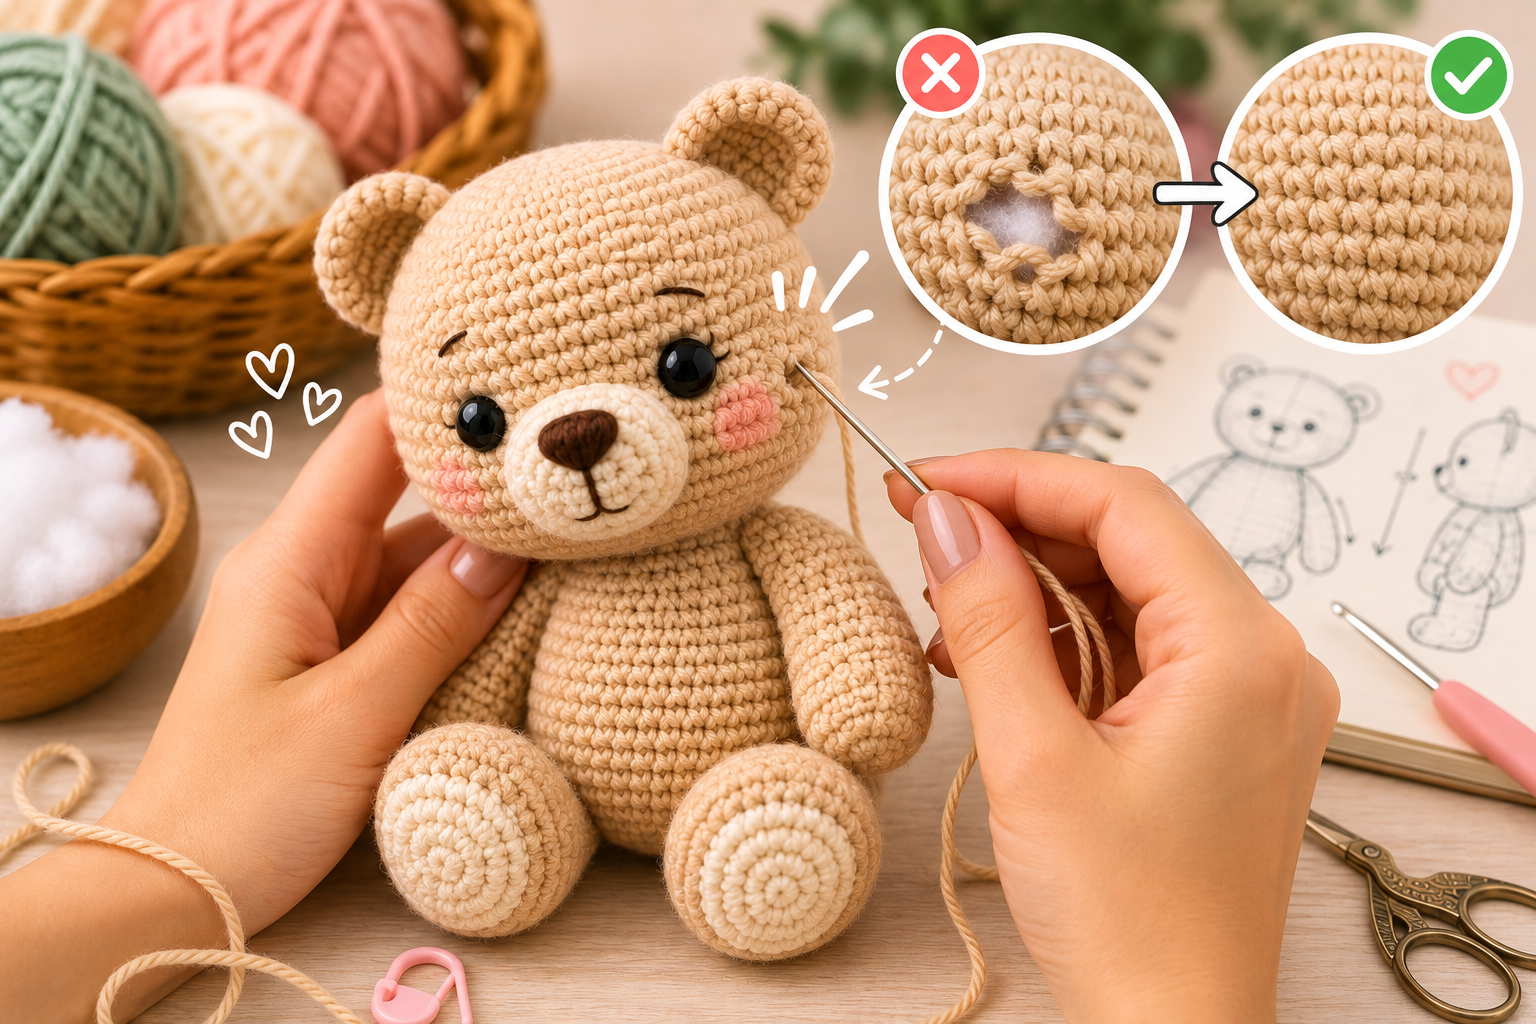
Loose stitches can create small gaps in the fabric, expose the stuffing underneath, distort the shape of the piece, or simply make an otherwise beautiful amigurumi look less polished.
Fortunately, discovering loose stitches after finishing your project doesn’t necessarily mean you have to unravel everything and start again.
In many cases, loose stitches can be corrected or significantly improved even after the amigurumi has been stuffed and assembled. The best solution depends on where the loose stitches are located, how severe the problem is, and whether the yarn itself has stretched or the tension was inconsistent during crocheting.
In this guide, we’ll explore practical ways to fix loose stitches after finishing amigurumi, along with techniques that can help prevent the problem in future projects.
Why Do Loose Stitches Appear in Amigurumi?
Before trying to repair the problem, it helps to understand why certain stitches become loose.
Amigurumi requires relatively consistent tension because the fabric needs to be dense enough to contain stuffing while maintaining a smooth surface.
Loose stitches can appear for several reasons.
One of the most common causes is inconsistent yarn tension. You may have relaxed your grip during a particular section or changed the way the yarn moved through your fingers without realizing it.
Another common cause is using a crochet hook that’s slightly too large for the yarn.
Stuffing can also contribute to the problem. Even stitches that looked perfectly fine before stuffing may begin to separate when too much filling stretches the fabric from inside.
Increases, decreases, color changes, and areas where pieces are joined can also naturally create slightly larger openings.
Identifying the likely cause will help you choose the best repair technique.
1. Redistribute the Slack Between Neighboring Stitches
Sometimes a loose stitch isn’t actually caused by a structural problem. Instead, one loop may simply contain slightly more yarn than the stitches around it.
In this situation, you may be able to redistribute the excess yarn.
Using the tip of a crochet hook or a blunt yarn needle, gently pull a small amount of the loose loop toward the neighboring stitch.
Then continue moving that excess yarn through the next few stitches.
Instead of having one obviously oversized stitch, you’re distributing a tiny amount of additional yarn across several stitches.
Work slowly and make very small adjustments.
Pulling too aggressively can simply transfer the problem from one stitch to another.
This technique works especially well when only one or two stitches appear slightly larger than the surrounding fabric.
2. Use a Yarn Needle to Adjust the Stitch
A tapestry or yarn needle can be one of the most useful tools for repairing finished amigurumi.
Insert the needle carefully underneath the loose stitch and gently manipulate the loop until it more closely matches the size of neighboring stitches.
If the stitch has stretched sideways, you may be able to guide some of the yarn back toward the previous or following stitch.
The goal isn’t to pull the stitch extremely tight.
You’re simply trying to restore a more consistent appearance.
A blunt tapestry needle is generally preferable because it’s less likely to split the yarn fibers while you’re working.
3. Add a Hidden Reinforcement Thread
If a loose stitch creates a visible gap that can’t be corrected simply by redistributing the yarn, you can reinforce the area from the inside or surface.
Thread a yarn needle with the same yarn used for the amigurumi.
Insert the needle through a nearby stitch and bring it out close to the loose area.
Carefully pass the yarn through or underneath the surrounding stitches, gently drawing them closer together.
The reinforcement thread should follow the natural direction of the crochet stitches so that it blends into the fabric.
Once the gap has closed sufficiently, weave the yarn securely through several nearby stitches and hide the tail inside the amigurumi.
This technique is particularly useful for small gaps where stuffing has started to become visible.
4. Use Duplicate Stitch to Cover a Problem Area
Duplicate stitching involves placing a new strand of yarn over an existing stitch to imitate its shape.
It’s commonly used for decorative purposes, but it can also help disguise loose or distorted stitches.
Choose yarn that matches the original color as closely as possible.
Thread it onto a tapestry needle and follow the shape of the existing crochet stitch, placing the new yarn directly over the loose area.
Don’t pull excessively tight.
The new stitch should blend naturally with the surrounding crochet rather than appearing like a knot or repair.
This technique can be particularly effective when one stitch has become permanently stretched and can’t easily be returned to its original size.
5. Reduce Visible Stuffing Behind the Gap
Sometimes the loose stitch itself isn’t the main visual problem.
The white stuffing visible behind it may simply make the opening much more noticeable.
If possible, use a blunt tool, crochet hook handle, or stuffing tool to gently move the filling away from the gap.
You don’t need to remove large amounts of stuffing.
Moving a small amount deeper into the piece can reduce the pressure against the crochet fabric and make the opening much less visible.
Be careful not to create a dent in the amigurumi.
The goal is to redistribute the stuffing, not remove the structure that gives the piece its shape.
6. Check Whether the Amigurumi Is Overstuffed
Overstuffing is one of the most common reasons stitches begin separating after a project is finished.
When too much stuffing is forced inside an amigurumi, pressure pushes outward against the crochet fabric.
The stitches stretch apart, creating visible gaps.
If several stitches across an entire section appear loose rather than just one isolated stitch, overstuffing may be the real problem.
If the piece still has an accessible opening, remove a small amount of stuffing and reshape it.
If the amigurumi is already completely closed, removing stuffing becomes more difficult and may require reopening a seam.
Whether that’s worthwhile depends on the severity of the problem.
For a very noticeable distorted section, carefully reopening the closing seam, adjusting the filling, and sewing the piece closed again may produce a better result than trying to repair every stretched stitch individually.
7. Repair Loose Stitches Around Increases
Increases can create larger openings because two stitches are worked into the same stitch from the previous round.
If these areas become particularly visible after stuffing, reinforcement can help.
Using matching yarn, carefully pass a strand through the base of the stitches around the increase.
Gently pull the surrounding stitches closer together and secure the yarn invisibly inside the piece.
Avoid pulling too tightly, because this can create an obvious indentation.
The goal is to reduce the opening while preserving the original shape.
8. Repair Loose Stitches Around Decreases
Decreases are another common location for visible gaps.
Traditional single crochet decreases can leave relatively large openings, especially when the piece is firmly stuffed.
If the amigurumi is already finished, use matching yarn to reinforce the area discreetly.
For future projects, consider using the invisible decrease technique.
An invisible decrease is usually worked through the front loops of the next two stitches before completing the single crochet.
This creates a flatter, less noticeable decrease that works particularly well for amigurumi.
9. Fix Loose Stitches Near Attached Limbs
Areas where arms, legs, ears, tails, or heads are attached can sometimes stretch because the weight or positioning of the attached piece pulls against the fabric.
If you notice gaps around an attachment point, don’t simply tighten the original sewing yarn aggressively.
Instead, add a few additional securing stitches using matching yarn.
Distribute these stitches across several nearby crochet stitches so the tension isn’t concentrated in one small area.
This provides additional support and can reduce stretching around the attachment.
It also helps prevent the limb from becoming loose over time.
10. Hide Small Gaps With Embroidery or Details
Occasionally, the simplest solution is to incorporate the repair into the design.
If a small loose area appears near the face, body, or clothing of the character, you may be able to disguise it with an appropriate decorative element.
Depending on the design, this could include:
- embroidered details
- small crocheted appliqués
- blush
- patches
- clothing
- bows
- collars
- decorative stitching
However, decoration should only be used when it makes sense visually.
Adding unnecessary details purely to hide a mistake can sometimes draw more attention to the area rather than less.
11. Be Careful With Glue
It may be tempting to use fabric glue to hold loose stitches together.
For most structural amigurumi repairs, however, yarn-based solutions are usually preferable.
Glue can dry stiff, discolor certain fibers, or become visible between stitches.
It may also behave differently when the amigurumi is washed.
If glue is used at all, it should generally be reserved for specific decorative applications where the material and project are suitable for adhesive.
For loose crochet stitches, manipulating or reinforcing the yarn itself usually creates a cleaner and more durable result.
12. Know When It’s Better to Redo a Section
Not every problem can be repaired invisibly.
If an entire area contains extremely loose stitches, the hook was clearly too large, or the stuffing has dramatically stretched the fabric, surface repairs may only partially disguise the issue.
If you notice the problem before closing the piece, unraveling several rounds and crocheting them again may actually save time.
If the amigurumi is already completely assembled, you’ll need to decide whether the flaw is significant enough to justify reopening it.
For a personal handmade project, a few slightly uneven stitches may not matter at all.
For a piece intended for sale, photography, competition, or pattern promotion, correcting a highly visible area may be worth the additional work.
How to Prevent Loose Stitches in Future Amigurumi
Repairing loose stitches is useful, but preventing them is even better.
The most important factor is consistent tension.
Try to hold the yarn the same way throughout the project and maintain a steady rhythm while crocheting.
If you notice your hands becoming tired, take a break. Fatigue often causes tension to change without you realizing it.
Hook size is equally important.
Amigurumi usually requires a smaller hook than other crochet projects made with the same yarn because the fabric needs to be relatively dense.
Before starting a large project, crochet a small test sphere.
Stuff it firmly and examine the fabric.
If stuffing is clearly visible between stitches, consider reducing the hook size slightly.
Also pay attention to stuffing technique.
Add small amounts gradually rather than pushing large clumps inside at once.
This makes it easier to control the pressure against the fabric and maintain an even shape.
Check Your Work Before Closing the Piece
One of the easiest ways to avoid difficult repairs is to inspect the amigurumi before the final opening is closed.
Turn the piece slowly and examine it from every angle.
Look for:
- unusually large stitches
- visible stuffing
- uneven decreases
- stretched increases
- gaps around color changes
- distorted areas
- uneven stuffing
At this stage, many problems are still easy to correct.
You can adjust individual stitches, redistribute stuffing, reinforce an area from inside, or even redo a few rounds if necessary.
Once the opening has been closed and the yarn tail hidden, those same repairs become considerably more difficult.
Should Every Loose Stitch Be Fixed?
Probably not.
Handmade crochet naturally contains small variations.
A slightly larger stitch doesn’t automatically mean the project is poorly made.
In fact, examining an amigurumi too closely can make tiny imperfections seem much more important than they actually are.
Set the finished character down and look at it from a normal viewing distance.
Does the loose stitch still immediately catch your attention?
Does it expose stuffing?
Does it distort the shape?
Does it weaken an attachment point?
If the answer is no, the best solution may simply be to leave it alone.
The goal should be a neat, durable, visually balanced piece — not microscopic perfection.
Final Thoughts
Finding loose stitches after finishing an amigurumi can be disappointing, but it rarely means the entire project is ruined.
Small inconsistencies can often be corrected by redistributing excess yarn between neighboring stitches, manipulating loops with a tapestry needle, adding hidden reinforcement, using duplicate stitches, or adjusting the stuffing behind the affected area.
For larger problems, check whether overstuffing, incorrect hook size, or inconsistent tension may be responsible.
And remember that prevention begins long before the final stitch. Choosing an appropriate hook, maintaining consistent tension, using clean increase and decrease techniques, stuffing gradually, and inspecting the piece before closing can dramatically reduce the likelihood of loose stitches appearing.
Most importantly, don’t let one imperfect stitch overshadow the entire project.
Amigurumi is handmade, and small variations are part of the process. Knowing how to recognize which imperfections need repair — and which ones can simply be accepted — is itself an important skill that develops with experience.
Clara Fern — Crochet Artist & Amigurumi Designer
Clara Fern is a crochet artist and amigurumi designer based in Austin, Texas. With 9 years of experience working with yarn and hook, she transformed a lifelong passion for handcraft into a creative mission: making amigurumi accessible, fun, and deeply rewarding for crafters of all levels.
Clara discovered amigurumi during a trip to Japan in 2017, where she fell in love with the art of bringing tiny characters to life through crochet. Back home in Texas, she spent years studying color theory, design principles, and advanced crochet techniques — developing her own signature style that blends kawaii aesthetics with original character design.
Through maclafersa.com, Clara shares everything she has learned — from choosing the right yarn and reading your first pattern, to designing fully original amigurumi characters from scratch. Her writing is known for being clear, detailed, and genuinely helpful, with no steps skipped and no secrets kept.
When she’s not crocheting, Clara enjoys watercolor painting, visiting local yarn shops, and drinking way too much coffee while sketching new character ideas.