Why Does My Amigurumi Look Uneven? Common Mistakes and Fixes
You followed the pattern carefully, counted every stitch, and used the recommended yarn and crochet hook. Still, when you look at your finished amigurumi, something seems slightly wrong. Maybe the body leans to one side, the stitches look irregular, the head is not perfectly round, or one arm sits higher than the other.
Uneven amigurumi is one of the most common problems crocheters experience, especially when learning the technique. Even experienced makers occasionally finish a project and notice that the shape is not as symmetrical as expected.
The good news is that uneven amigurumi usually does not mean you are bad at crochet. Small inconsistencies can come from tension, stuffing, stitch placement, yarn characteristics, assembly, or even the way increases and decreases are distributed throughout a pattern.
Understanding what causes these problems makes them much easier to prevent.
Below are the most common reasons amigurumi looks uneven and practical ways to fix them.
1. Your Crochet Tension Is Inconsistent
One of the biggest causes of uneven amigurumi is inconsistent tension.
Crochet tension refers to how tightly or loosely you hold the yarn while making stitches. Ideally, your tension should remain relatively consistent throughout the entire project.
However, beginners often alternate between tighter and looser stitches without realizing it.
For example, you might crochet tightly while concentrating on complicated sections but loosen your grip during easier rounds. The difference may seem small while crocheting, but it becomes much more noticeable once the piece is stuffed.
How to fix inconsistent tension
Try to maintain the same hand position and yarn tension throughout the project.
Avoid pulling every stitch extremely tight. Instead, aim for firm, controlled stitches that are tight enough to prevent stuffing from showing through.
If your hands become tired, take a short break. Hand fatigue can significantly affect crochet tension.
Practicing simple spheres or small amigurumi pieces can also help you develop more consistent tension before starting larger projects.
2. You Are Using the Wrong Crochet Hook Size
Hook size has a major influence on the appearance of amigurumi.
Traditional crochet projects often use the hook size recommended on the yarn label. Amigurumi, however, usually requires a smaller hook.
Why?
Because amigurumi fabric needs to be dense.
If your hook is too large, the stitches may become loose and irregular. Stuffing can also become visible between them.
A hook that is too small can create the opposite problem. Your stitches may become extremely tight, making the fabric stiff and difficult to work with.
How to choose the right hook
Start with the hook size recommended by your amigurumi pattern.
If the stitches look loose, try going down approximately 0.5 mm.
If crocheting feels painfully tight or inserting the hook becomes difficult, consider increasing the hook size slightly.
The ideal combination produces firm fabric without making crocheting uncomfortable.
3. Your Stitch Count Is Incorrect
A single missing or additional stitch can completely change the shape of an amigurumi piece.
This happens frequently when crocheting in continuous rounds.
Because there is usually no visible seam marking where each round begins, it can be easy to lose track of your starting point.
One accidental increase can make one side wider.
One missing stitch can cause the opposite side to become narrower.
After several rounds, the difference can become surprisingly noticeable.
How to prevent stitch-count mistakes
Always use a stitch marker to mark the first stitch of every round.
Move the marker after completing each round.
You should also count your stitches regularly instead of waiting until the end of a section.
If the pattern says you should have 36 stitches, verify that you actually have 36 before continuing.
Finding a mistake immediately is much easier than discovering it ten rounds later.
4. Your Increases Are Creating Visible Corners
Have you ever crocheted what should be a round head only to discover that it looks slightly hexagonal?
The problem may be your increases.
Many amigurumi patterns begin with six stitches and then increase evenly:
6 stitches
12 stitches
18 stitches
24 stitches
30 stitches
36 stitches
When increases are repeatedly positioned directly above the increases from previous rounds, subtle lines or corners can form.
Instead of looking perfectly circular, the piece may develop a geometric shape.
How to make increases less noticeable
When the pattern allows it, stagger the increases.
Instead of always beginning a round with several single crochet stitches followed by an increase, shift the position of some increases.
This distributes them more naturally around the piece.
The total stitch count remains the same, but the resulting shape often looks significantly smoother.
5. Your Decreases Are Too Visible
Decreases can also create uneven areas.
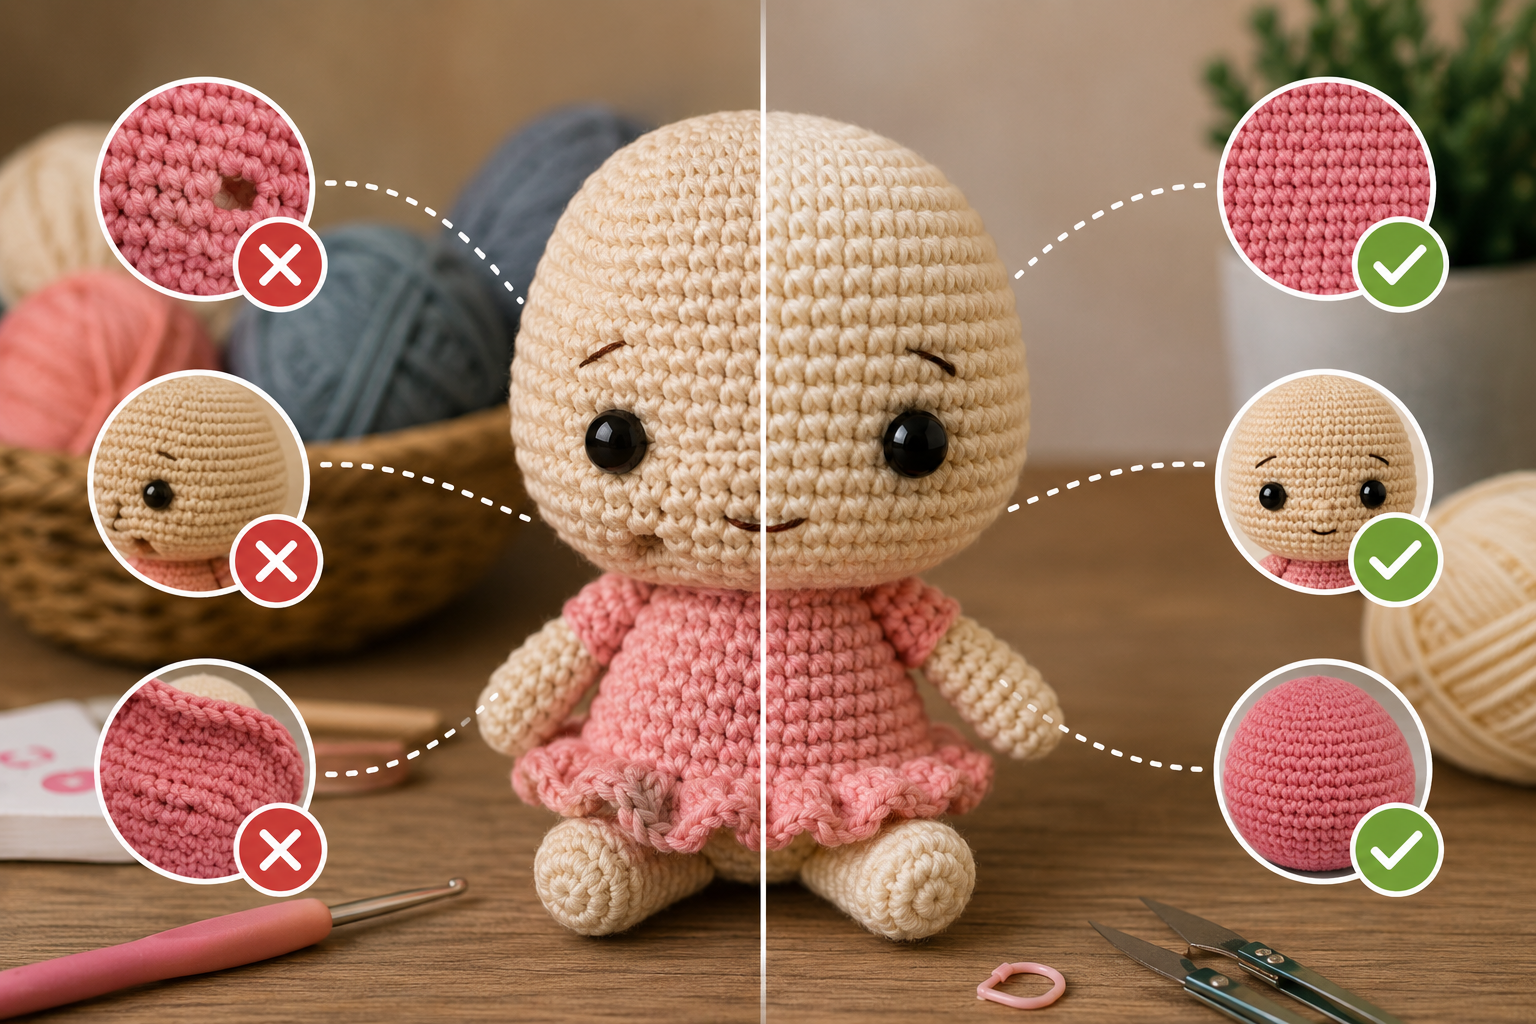
A standard single crochet decrease can leave small bumps, gaps, or visible indentations.
This becomes particularly noticeable after stuffing.
One of the easiest solutions is using the invisible decrease.
How to make an invisible decrease
Insert your hook through the front loop only of the next stitch.
Without completing the stitch, insert your hook through the front loop of the following stitch.
Yarn over and pull through both front loops.
Then complete the single crochet.
This technique produces a flatter decrease that blends more naturally into the surrounding fabric.
Invisible decreases are particularly useful for heads, bodies, legs, and other stuffed pieces.
6. Your Stuffing Is Uneven
Sometimes your crochet is perfectly fine.
The real problem is the stuffing.
Polyester fiberfill can dramatically change the final shape of an amigurumi piece.
If one area contains more stuffing than another, the piece can become lopsided.
Large clumps of stuffing can also create bumps underneath the crochet fabric.
How to stuff amigurumi evenly
Add stuffing gradually.
Instead of pushing one large handful inside the piece, separate the stuffing into small portions.
Insert each portion individually and distribute it around the interior.
Use your fingers or a blunt tool to move stuffing into smaller areas.
Frequently rotate the piece while stuffing and examine it from multiple angles.
For round heads, gently roll and shape the piece between your hands to distribute the stuffing.
7. You Are Overstuffing Your Amigurumi
More stuffing does not necessarily create a better shape.
Overstuffing is another common cause of uneven amigurumi.
When too much stuffing is forced inside the crochet fabric, stitches become stretched. Gaps may appear between stitches, and the original shape created by the pattern can become distorted.
A round head might become elongated, while a cylindrical body can develop unexpected bulges.
How much stuffing should you use?
Your amigurumi should feel firm but not extremely hard.
Add stuffing until the piece holds its intended shape without significantly stretching the stitches.
Remember that you can often add more stuffing before closing the opening.
It is usually easier to gradually add stuffing than to remove tightly compressed fiberfill later.
8. Your Yarn Thickness Is Inconsistent
Not every uneven amigurumi problem comes from technique.
Sometimes the yarn itself is responsible.
Certain yarns naturally vary slightly in thickness. Handmade, textured, fuzzy, velvet, chenille, and specialty yarns can be especially unpredictable.
Even yarn from different dye lots may occasionally behave differently.
If one section of yarn is thicker, the stitches in that area may appear larger.
What can you do?
For highly detailed amigurumi, choose yarn with consistent thickness and good stitch definition.
Cotton and cotton-blend yarns are popular because they generally create clean, structured stitches.
If you are using plush or chenille yarn, expect slightly more variation in the finished surface.
9. Your Starting Magic Ring Is Too Loose
The magic ring creates the starting point for many amigurumi heads, bodies, arms, and legs.
If it is not closed tightly enough, you may notice a visible hole at the center.
Sometimes the surrounding stitches can also look uneven.
After completing the first round, gently but firmly pull the yarn tail until the center closes completely.
For slippery yarns, securing the magic ring properly is particularly important because it may loosen over time.
Always leave enough yarn tail to weave in securely.
10. Your Pieces Are Attached Unevenly
Your individual pieces might be perfectly symmetrical, yet the completed toy still looks crooked.
This often happens during assembly.
Attaching one ear slightly higher than the other or positioning an arm one stitch forward can noticeably change the character’s appearance.
How to improve amigurumi assembly
Pin every piece into position before sewing.
For example, if you are attaching ears, position both ears and secure them with pins.
Then examine the amigurumi from the front, sides, and back.
Count stitches or rounds whenever possible.
If the left arm begins on round 18, the right arm should generally begin at the corresponding location.
Do not rely entirely on visual judgment.
A few millimeters can make a surprisingly large difference.
11. You Are Crocheting Through Different Loops
Most standard amigurumi patterns expect you to crochet through both loops unless stated otherwise.
Accidentally crocheting through the front loop only or back loop only can change the texture and tension of the fabric.
It may also create visible horizontal lines.
Always check the pattern carefully when changing techniques.
If instructions specifically mention BLO (back loop only) or FLO (front loop only), return to both loops when that section is finished unless instructed otherwise.
12. Your Crochet Direction Has Changed
Another surprisingly common problem happens when a piece gets accidentally turned inside out during crocheting.
Amigurumi worked in continuous rounds naturally begins curling as it grows. Beginners sometimes allow the piece to curl in the wrong direction and continue crocheting.
The result may have a noticeably different stitch texture.
Generally, the traditional “right side” of amigurumi displays clean V-shaped stitches on the outside.
Before stuffing, check that your piece is oriented correctly.
13. Your Safety Eyes Are Misaligned
Sometimes the crochet itself looks uneven because facial features create an optical illusion.
Eyes positioned at slightly different heights can make an otherwise symmetrical head appear crooked.
Before permanently attaching safety eyes, carefully count the stitches between them.
Also confirm that both eyes are inserted through the same round.
If your pattern recommends placing the eyes between rounds 12 and 13 with eight stitches between them, count carefully before attaching the washers.
Once safety-eye backs are installed, repositioning them can be difficult or impossible.
14. You Are Rushing the Final Shaping
Finishing an amigurumi does not necessarily end when the last stitch is made.
Many pieces benefit from gentle shaping.
Use your hands to redistribute stuffing, smooth bumps, and adjust the overall silhouette.
For example, you can gently squeeze the sides of a head to make it rounder or redistribute stuffing around the bottom of a body so the toy sits more evenly.
Small adjustments can make a surprisingly big difference.
Can You Fix Uneven Amigurumi After Finishing It?
Sometimes, yes.
If the problem is caused by stuffing, gently massage and reshape the piece. You may be able to redistribute the filling without reopening it.
If an attached arm, leg, ear, or other piece is obviously misplaced, carefully removing the stitches and sewing it again may produce the best result.
For severe stitch-count mistakes or major shaping problems, unraveling part of the project may unfortunately be necessary.
However, tiny imperfections usually do not require correction.
Handmade amigurumi naturally contains subtle variations, and those small differences are part of what makes each piece unique.
Final Tips for More Even Amigurumi
Before starting your next project, remember these simple habits:
- Use a stitch marker on every round.
- Count your stitches frequently.
- Maintain consistent yarn tension.
- Choose an appropriate hook size.
- Use invisible decreases whenever appropriate.
- Add stuffing in small amounts.
- Avoid overstuffing.
- Pin pieces before sewing.
- Count rounds and stitches when positioning facial features and limbs.
- Examine your work from multiple angles as you crochet.
Most importantly, do not judge your work only when you are halfway through the project.
Unstuffed amigurumi often looks surprisingly strange. Crochet fabric changes significantly after stuffing, shaping, and assembly.
Conclusion
If your amigurumi looks uneven, the cause is usually something small and completely fixable.
Inconsistent tension, incorrect stitch counts, poorly distributed stuffing, visible increases and decreases, and uneven assembly are among the most common reasons finished toys look asymmetrical.
Improving these details comes primarily through practice.
As you crochet more projects, you naturally become better at controlling tension, recognizing stitch placement, distributing stuffing, and positioning individual pieces.
Instead of expecting every stitch to look perfect, focus on consistency.
Count carefully, crochet at a comfortable tension, stuff gradually, and take your time during assembly.
With these simple adjustments, your amigurumi will gradually become smoother, more symmetrical, and more professional-looking—and every new project will teach you something that makes the next one even better.
Clara Fern — Crochet Artist & Amigurumi Designer
Clara Fern is a crochet artist and amigurumi designer based in Austin, Texas. With 9 years of experience working with yarn and hook, she transformed a lifelong passion for handcraft into a creative mission: making amigurumi accessible, fun, and deeply rewarding for crafters of all levels.
Clara discovered amigurumi during a trip to Japan in 2017, where she fell in love with the art of bringing tiny characters to life through crochet. Back home in Texas, she spent years studying color theory, design principles, and advanced crochet techniques — developing her own signature style that blends kawaii aesthetics with original character design.
Through maclafersa.com, Clara shares everything she has learned — from choosing the right yarn and reading your first pattern, to designing fully original amigurumi characters from scratch. Her writing is known for being clear, detailed, and genuinely helpful, with no steps skipped and no secrets kept.
When she’s not crocheting, Clara enjoys watercolor painting, visiting local yarn shops, and drinking way too much coffee while sketching new character ideas.