
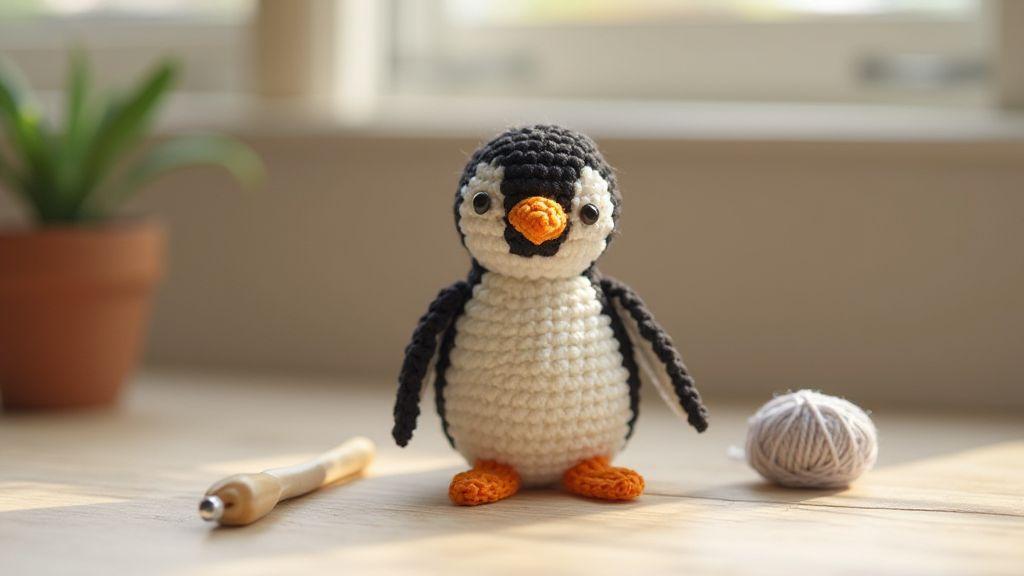
Materials You Need for a Free Amigurumi Penguin Pattern
You’re about to stitch a cute penguin, and the right supplies make all the difference. This starter kit helps you go smoothly from the first slip knot to the final stitch. Choosing yarn, a matching hook, and soft stuffing keeps your penguin balanced and easy to shape. A few finishing touches—eyes, stitch markers, and a tapestry needle—finish the piece neatly and securely.
Start with beginner-friendly yarn, typically medium weight (worsted). Pick a hook that matches the yarn’s recommended size to keep stitches snug yet easy to stuff. For stuffing, use soft polyfill that’s easy to push into small spaces and holds shape well. When you pair yarn, hook, and stuffing well, the pattern comes together faster.
Finishing touches give your penguin character. Safety eyes are popular for a clean, kid-friendly look, but embroidered eyes are a good alternative. Stitch markers help you track rounds, especially near the end. A tapestry needle is essential for weaving in ends and attaching pieces. Keep extras on hand—snips, extra needles, and a spare needle—to avoid interrupting your progress.
A quick materials checklist can save extra store trips. You’ll want: the chosen yarn and correct hook size, stuffing, safety eyes or embroidery option, stitch markers, a tapestry needle, scissors, and a small ruler or measuring tape. Being organized keeps momentum and makes the project feel approachable. This Free Amigurumi Penguin Pattern: Great for Beginners becomes less intimidating and more enjoyable when you’re prepared.
Quick materials checklist
- Yarn (medium weight) and the corresponding hook size
- Polyfill stuffing
- Safety eyes or option to embroider eyes
- Stitch markers
- Tapestry needle
- Scissors and small ruler or measuring tape
Learn Basic Stitches in a Beginner Amigurumi Penguin Tutorial
This guide covers stitches you’ll use repeatedly. Start with basics, then add a few tricks to keep your work neat and sturdy. Practice helps your stitches sit evenly and stay consistent.
Practice single crochet, increases, and decreases
Master single crochet to form a tight, smooth fabric. Use increases to widen as needed and decreases to close rounds cleanly. A steady rhythm makes shaping natural and predictable.
Master the magic ring and invisible join for neat work
Learn the magic ring so your starting circle is tight and centered, helping the penguin sit flat. Practice the invisible join to close the circle with no visible seam, keeping edges clean. When working with color changes, hide ends with a tiny invisible seam for a polished finish.
Simple stitch drills for beginners
Do quick drills to cement the basics: maintain consistent tension, accurate stitch counts, and clean joins. Track progress with small practice comparisons to stay motivated.
Follow an Easy Crochet Penguin Pattern Free Step by Step
This beginner-friendly pattern guides you from body to head, then finishing touches. Keep yarn, hook, and patience handy to see progress with every row. Consistent tension yields neat pieces and a satisfying finish.
Work the body and head rounds one at a time
Crochet the body first, followed by the head, using the same round-by-round approach. Don’t rush increases and decreases; correct counts make the penguin take shape. Attach the head gently to the body, adjusting tension as needed to avoid lumps. This method keeps the project organized and approachable.
Crochet wings, beak, and belly panels as directed
Wings add personality; two small wings sewn to the sides, a beak centered on the front, and a belly panel for contrast complete the look. Place pieces carefully for a natural, friendly silhouette.
Clear step by step amigurumi penguin guide
Begin with a softly padded magic ring and increases to widen, then decreases to close. Switch colors for a belly if desired, keeping tension even. Attach wings slightly above the midline for a natural look, sew the beak, and finish with light stuffing.
Use Amigurumi Penguin Sewing and Assembly Tips
Plan your assembly like a mini project. Organize yarn colors, stuffing, and small parts before sewing. Keep a small tray with all pieces to avoid misplacing parts mid-assembly. Check tension with a quick scrap stitch to save time later. Consider your penguin’s appearance from all angles as you work; this isn’t just sewing, but shaping a tiny character.
Position eyes and facial parts for the best look
Set eyes first, map facial features around them, and place them symmetrically for balance. Slightly higher and farther apart eyes create a friendlier expression. Align the beak just below the eye line, with a gentle upward tilt.
Sew pieces securely and hide yarn tails correctly
Sew with even stitches, work from the inside, and weave tails into the body. When finishing a seam, secure tails with knots and hide them under a seam line. If stuffing, add gradually to maintain a smooth shape. Trim loose threads close to the surface and patch any gaps with a bit of extra stuffing and careful stitching.
Neat finishing and safety checks
Tug gently on every limb and feature to ensure they’re secure. Weave in all tails, give the penguin a light press to smooth crinkles, and recheck seams after cooling. A tidy finish looks professional from any angle.
Customize Your Simple Amigurumi Penguin Pattern
Tweak colors, sizes, and yarn weight to make your penguin uniquely yours. Start with a base you like, then adjust variables one at a time to see how each change affects the final look. The charm should stay intact while reflecting your style.
Changing colors affects mood as well as appearance. Swap black-and-white for blues or grays, or add a white belly for contrast. Thinner yarn yields a smaller penguin; thicker yarn creates a chunkier plush. Keep stitch counts in check and gauge consistent with your chosen hook size.
Size and yarn weight offer easy variations. If your gauge shifts, adjust the number of rounds in the body to maintain the silhouette. A mini penguin feels playful, while a larger one reads as cozy. A fluffy yarn adds texture without extra effort.
Add scarves, hats, or embroidered details for personality
A scarf adds whimsy without complicating the pattern. Crochet a stripe or a tiny loop-scarf that sits nicely on the neck. Hats come in beanies or small toppers for character. Embroidered eyes, beaks, or tiny footprints add a final touch. Keep details simple and secure yarn tails to avoid extra complexity.
Easy customization ideas for beginners
If you’re just starting, swap the main body color or add a single accent color on the belly or wings. A small embroidered heart or dot can personalize without overwhelming. Finish with secure knotting, weave in ends, and lightly steam to neat silhouettes. Photograph your work against a plain background to track changes and stay motivated.
Find Free Crochet Penguin Pattern PDF and Video Tutorials
You’re ready to begin with reliable resources. Look for a Free Amigurumi Penguin Pattern: Great for Beginners that includes beginner-friendly stitches, diagrams, and a clear materials list. PDFs and videos work well together: PDFs provide step-by-step instructions and gauge notes, while videos show stitch motions and rhythm. This combination helps you crochet with confidence and reduces guesswork.
Download vetted pattern PDFs for reliability
A good PDF includes a materials list, gauge notes, and clear round-by-round counts. Save PDFs in a dedicated crochet folder for easy access on your device. Photos and diagrams let you compare your work to the reference as you go. Look for beginner notes such as yarn substitutes or tension tips to keep the first penguin feeling easy and enjoyable.
Video tutorials offer live guidance
Video tutorials let you pause, replay, and practice along. They’re especially helpful for beginners learning stitch flow and how to place increases and decreases. Use videos as guided practice, not as flawless demonstrations. Build your confidence by mimicking the moves and adding personal touches like a tiny scarf or a beak.
Where to save and organize your pattern links
Keep pattern links in one accessible place. Create a dedicated folder labeled Free Amigurumi Penguin Pattern Resources. Save PDFs in a PDF Patterns subfolder and videos in a Video Tutorials subfolder. Use clear naming like PenguinPattern_March2026 and add notes like beginner-friendly or gauge 4.0 mm hook. A tidy system saves time and keeps momentum, especially if you attempt a second penguin after finishing the first.
Free Amigurumi Penguin Pattern: Great for Beginners — Quick Start
This Free Amigurumi Penguin Pattern: Great for Beginners is designed for new crocheters. It emphasizes simple stitches, clear step-by-step instructions, and practical tips for tension, color changes, and finishing. With the right materials and a calm pace, you’ll progress from the first round to a polished penguin you’re proud to gift or display. Start with the body, then the head, and finish with eyes, beak, and wings. You’ll finish a cuddly penguin and gain confidence for future amigurumi projects.
Download and Video Tutorial Options
- Download vetted free amigurumi penguin pattern PDFs with clear gauge notes and round-by-round instructions.
- Follow crochet penguin pattern video tutorials that pause at key moments to explain why a move matters.
- Save and organize resources as described to keep momentum and reduce frustration.
Find the pattern that fits your pace—concise photo guides or longer narrated videos—and enjoy a small, satisfying project you can finish with pride. The Free Amigurumi Penguin Pattern: Great for Beginners is a friendly entry into crochet amigurumi, offering clear steps, helpful tips, and a charming final toy.

Clara Fern — Crochet Artist & Amigurumi Designer
Clara Fern is a crochet artist and amigurumi designer based in Austin, Texas. With 9 years of experience working with yarn and hook, she transformed a lifelong passion for handcraft into a creative mission: making amigurumi accessible, fun, and deeply rewarding for crafters of all levels.
Clara discovered amigurumi during a trip to Japan in 2017, where she fell in love with the art of bringing tiny characters to life through crochet. Back home in Texas, she spent years studying color theory, design principles, and advanced crochet techniques — developing her own signature style that blends kawaii aesthetics with original character design.
Through maclafersa.com, Clara shares everything she has learned — from choosing the right yarn and reading your first pattern, to designing fully original amigurumi characters from scratch. Her writing is known for being clear, detailed, and genuinely helpful, with no steps skipped and no secrets kept.
When she’s not crocheting, Clara enjoys watercolor painting, visiting local yarn shops, and drinking way too much coffee while sketching new character ideas.


