
Why choose this free Easter bunny amigurumi pattern
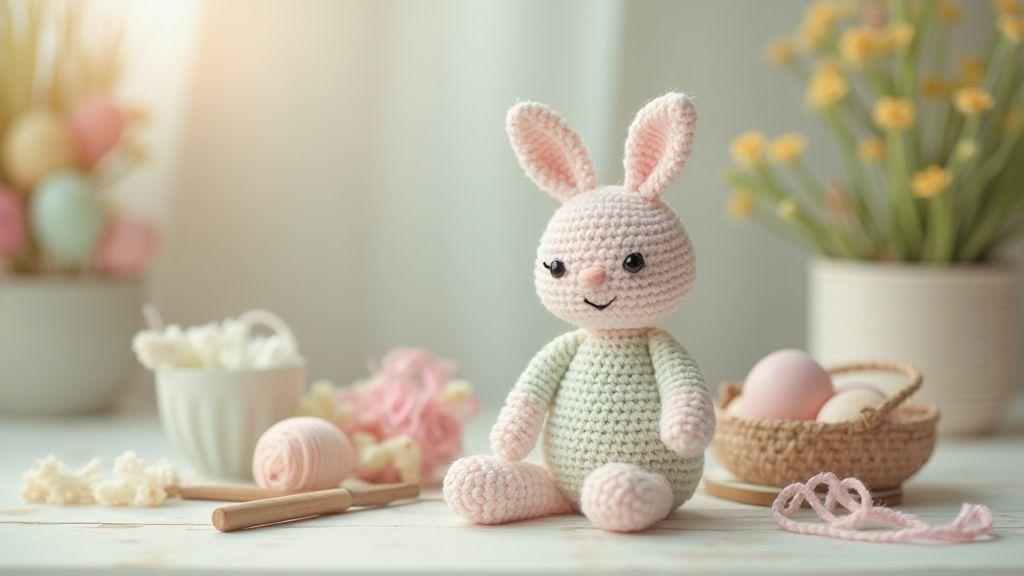
This Adorable Easter Bunny Amigurumi Pattern: Free and Easy is designed to be practical and enjoyable. It offers clear steps, simple stitches, and a project that builds confidence as you crochet. The pattern centers on a cute, huggable bunny you can finish quickly, making it ideal for a fast gift or a cozy after-school project. You’ll love how the design stays straightforward while delivering a high-quality result.
You’ll feel empowered by the layout and tips, which guide color choices, stuffing amounts, and finishing touches so you don’t get stuck. This pattern isn’t just a recipe; it’s a mini craft lesson you can reuse for future amigurumi ideas. When you finish, you’ll have a handmade, thoughtful keepsake that makes your effort feel worthwhile. Choosing this pattern means a low-stress experience with focused instructions and clear milestones you can celebrate along the way. Best of all, it’s free, so you can practice or learn a new skill without cost getting in the way.
Free Easter bunny amigurumi pattern benefits
You’ll get a compact, easy-to-follow pattern that minimizes confusion. The steps are organized into small, steady chunks to keep you motivated, especially if you’re new to amigurumi. You’ll also learn how to customize the bunny’s color and size so your project feels personal and special.
The pattern builds skills without overwhelming you. It introduces essential techniques like tight single crochet stitches and simple finishing touches. You’ll learn how to shape ears, add a cute face, and stuff evenly so the bunny sits nicely. The result is a bright, endearing toy you’ll be proud to display or gift.
Another big benefit is reusability—the construction logic, how pieces come together, how to finish cleanly, and how to hide seams translate to other amigurumi projects. That means you’ll save time next time and improve with each project you tackle.
Beginner-friendly crochet bunny pattern features
This pattern uses basic stitches and short rounds, so you stay in control. Clear notes spell out every step, reducing guesswork. The size is beginner-friendly, not too big or too tiny, so you can see progress quickly.
It includes simple color choices and minimal shaping. You’ll learn to add eyes safely and to sew ears without fuss. Finishing steps are straightforward, with tips on attaching limbs smoothly and giving the bunny a cheerful face. You’ll also find practice tips like tightening your grip on the hook and checking for loose ends to keep your work neat.
What makes it easy for you
The simple round-by-round instructions and gentle pacing break tasks into small goals, letting you finish in sessions that fit your schedule. Yarn choice and hook size are explained to remove guesswork, keeping you confident as you crochet. Seams stay minimal and stitches uniform, so your bunny looks neat with little effort. You’ll also find a note on customization—swap colors, adjust ear size, or add a little bow, allowing you to make something you love without overwhelm.
Materials and tools you need
You’re getting started, so gather what you actually need. For clean, neat stitches, use a dedicated crochet kit with a comfortable hook, sharp scissors, a stitch marker, and a yarn needle. Keep a small box of essentials within reach to stay organized. Choose tools that fit your hand to avoid strain, and create a tidy workspace to spot mistakes quickly.
A reliable light source is essential, along with spare batteries or a plug-in lamp. A fabric bag or container for small notions—safety eyes, stuffing, stitch markers—prevents mid-project hunting. A project mat or soft surface protects your yarn and helps stitches stay tidy. For beginners, start with a clear workspace and a short pattern like the Adorable Easter Bunny Amigurumi Pattern: Free and Easy to build confidence. A calm setup makes finishing this pattern feel easy.
Yarn types and recommended hook sizes
Yarn comes in many textures, but for amigurumi, snug, tight stitches are preferred. Cotton yarn holds detail well; super-bulky options finish quickly but can create gaps. For a soft, plump toy, choose worsted weight or DK yarn and maintain steady tension. The key is consistency.
Hook choice matters as well. For most amigurumi, use a smaller hook than the yarn label suggests to tighten stitches. With worsted weight, a 3.5mm to 4.5mm hook is common—test a swatch to check if your stitches are compact enough. If you see fluttery loops or loose fabric, don’t hesitate to switch hooks mid-project. Note the yarn brand and hook size used for future patterns so your next project turns out just right. The right combo makes the Adorable Easter Bunny Amigurumi Pattern: Free and Easy look clean and professional.
Safety eyes, stuffing, and small notions
Small parts like safety eyes and noses add personality but can be a choking hazard for little ones. Use safety eyes with secure backing, or backing stickers, and consider embroidered features for safety. Stuffing should be snug but not overpacked to maintain shape while staying soft.
Keep stuffing organized in a small bag to avoid spills. Choose polyester stuffing for a bouncy feel or natural fiber for a firmer shape. Attach safety eyes before sewing the final seam and secure with backing. Store notions in labeled containers to protect your project and the people who’ll hug it.
When you finish, double-check that all parts move only as intended and that there are no loose threads. If you notice a wobbly seam, reinforce with extra stitches. A sturdy finish elevates your final piece, and the Adorable Easter Bunny Amigurumi Pattern: Free and Easy deserves it.
Where to buy supplies safely
Look for reputable craft stores and well-rated online shops. Choose retailers with clear images, honest descriptions, and reviews that mention yarn feel and hook size accuracy. For safety eyes or stuffing, pick vendors with safety certifications and known dimensions. A trusted seller offers return policies, so you can exchange if color or texture isn’t right.
Compare prices, but don’t default to the cheapest option. Quality matters for durability and finish. Read yarn labels to match weight and hook size to your project. Free patterns typically include material recommendations, so you don’t guess. By sourcing reliably, you keep your projects consistent and your workspace stress-free. If you’re after a reliable starter kit, start with items that lead you toward finishing the Adorable Easter Bunny Amigurumi Pattern: Free and Easy quickly and confidently.
Follow the easy amigurumi bunny tutorial
You’re about to start a simple, cozy project you can finish in a weekend. This bunny tutorial keeps your hands busy and your mind calm, and you’ll feel proud when you see the Adorable Easter Bunny Amigurumi Pattern: Free and Easy come to life. You’ll begin with a quick materials list, then glide through rounds and shaping to create a soft, huggable bunny. By the end, you’ll have a finished toy you can gift or keep, with guidance on how to adjust for a smaller or bigger bunny.
Think of crochet as a tiny story you’re stitching: stitches become ears, rounds form the body, and joins tie it all together. If you’re new to amigurumi, this guide breaks the process into tiny, doable steps. You’ll see how each round builds on the last and gain confidence to tweak colors or add cheeks and a nose for extra personality. The result is a cuddly bunny that stands up to hugs and compliments.
When you finish, you’ll have a little bunny you’re excited to show off, plus a reusable template for other color variations. You might even start a small project line for friends and family. The best part is tangible progress: a bunny that’s yours, with your own personal touch.
Step-by-step rounds and joins
Begin with a magic ring or a small loop, then proceed through rounds that build the body and head. Keep tension steady for a smooth surface. When you close each round, join with a slip stitch and continue the next round without gaps. If you forget a stitch, don’t panic—rip back one round and adjust. Your goal is consistent, tight stitches to keep stuffing neat.
As you progress, shaping happens in short, deliberate bursts. Each round adds height and width, and joins keep seams tight. If you need a pause, mark the first stitch of the round so you don’t lose your place. By the time you reach the ears, your bunny will begin to look familiar, and momentum will grow.
When the final round is finished, lightly stuff and secure with a few slip stitches. Then sew the pieces together—head to body, ears to head, and limbs where you want them. The joins are small but mighty, keeping the bunny’s shape neat for posing.
Common crochet stitches used
Rely on classic, beginner-friendly stitches: single crochet is your workhorse for tight, durable amigurumi, slip stitches to join rounds, and a few increases or decreases to shape the head, body, and ears. These stitches keep your project snug, so your bunny stays cuddly after many hugs.
If you’re comfortable, you can add a tiny back loop-only technique to introduce subtle texture along the edges. It’s a small touch that makes the finish feel more polished without complicating the pattern. Maintain even tension to avoid distortion or gaps. With practice, you’ll enjoy how a few familiar stitches create a well-made final piece.
As you work, keep your tension even. Practice on a small swatch if you’re unsure, then apply that feel to your amigurumi for a smooth surface and professional look.
Typical abbreviations and counts
You’ll see common abbreviations like ch for chain, sc for single crochet, inc for increase, dec for decrease, and sl st for slip stitch. Most rounds end with a slip stitch to move to the next round. For stuffing, use small, gentle pushes until the bunny feels snug but not stiff. Read counts carefully to maintain the shape.
Keeping a quick reference handy helps. For example, if you see Rnd 6: 6 sc, you’re making six single crochets in that round. If you reach a decrease, count stitches around the round to stay on track. With practice, these abbreviations become familiar friends guiding you through a smooth craft flow.
Make a small crochet bunny pattern free
You can craft a tiny bunny that fits in your hand and still looks charming. Start with a simple round body and short head, then add small ears and a cheerful face. Basic stitches keep the project quick and satisfying. Maintain steady tension so pieces line up, and don’t fear undoing a few rounds if needed. This pattern is a great entry point for beginners who want a finishing project in one sitting.
Shape for balance so the bunny can stand or sit easily. Simple eyes like French knots or small stitched circles work well without bulk. Finish with a soft belly insert for added character. Enjoy the process—small projects are perfect for gift pockets or desk decor. If you want a quick result, try a single color with a contrasting nose for personality. Weave in ends neatly so your bunny stays neat and gift-ready. This small crochet bunny pattern is flexible and forgiving, ideal for practicing techniques while producing something cute.
How to scale to a tiny amigurumi rabbit
Scaling to a smaller size begins with imagining a shorter ruler. Reduce rounds and stitch height, start by trimming the foundation chain, and consider a smaller hook with tighter tension to fit joints neatly. Keep proportions cute by adjusting the head-to-body ratio, then stay consistent in thickness to maintain the recognizable shape. Don’t worry if the first try isn’t perfect—practice makes better.
Consider switching to a different yarn or hook to preserve the look while shrinking size. A lighter cotton or plush yarn can yield different textures. Always test gauge and compare to the pattern notes so finished dimensions stay close to expectations.
Choosing yarn and hook to change size
To change size, swap to a different hook for your yarn: a smaller hook creates a denser, smaller piece; a thinner yarn with a proportionally smaller hook achieves a similar effect. Test a small swatch first to gauge how the stitch changes the final dimensions. Aim for smooth, even stitches.
Size charts and finished dimensions
A size chart helps predict finished size. For a standard tiny amigurumi, aim for roughly 2–3 inches tall with a palm-friendly width. With finer yarn and a smaller hook, you might reach about 1.5 inches tall. Track rounds and stitches to know when to stop. Keep notes on hook size, yarn type, and tension to recreate the size later. Finished dimensions matter for display and tiny props—measure as you complete each major piece.
Finish fast with a quick Easter amigurumi project
This quick Easter amigurumi project is designed for speed without sacrificing charm. You’ll experience a satisfying sense of accomplishment as you whip up a cute, durable piece perfect for gifting or decoration. With simple shapes and bold color blocks, you’ll see progress fast and stay motivated to finish with a polished product.
This approach uses efficient techniques and strong color blocks to keep you moving. Maintain tight, even tension and a two-tone palette to keep shaping clean. Short rounds and clear color changes cut down on fiddly parts, helping you finish with a neat result—the Adorable Easter Bunny Amigurumi Pattern: Free and Easy looks finished and ready to brighten a shelf or gift bag.
When you finish, you’ll have a tiny piece you can be proud of, and the momentum will carry into bigger projects. You’ll gain confidence for future work as you complete this speedy pattern.
Time estimates for each part
Body and head may take about 20 minutes, ears 5 minutes, feet 5 minutes, and facial details another 5 minutes. Plan for roughly 40 minutes in total if you stay steady. Add a tiny tail and a smile in about 5 more minutes. If you want a scarf or bow, allow 5–10 minutes more. You’ll have a complete Easter Bunny Amigurumi that’s gift-ready in a single sitting if you stay in the groove.
Speed tips for crocheting quickly
Choose a small hook and maintain tight, even tension. Use color changes on the same side to minimize turning, and keep yarn tucked neatly to prevent snagging. Crochet in a smooth, continuous round and add facial features after assembling the head and body. Prep in advance—snip yarn ends, thread the needle, and gather safety eyes. A steady rhythm helps you finish with a polished result.
Best short sessions are 15–20 minutes. If you’re busy, split into two 20-minute sessions: one for shaping the head and body, the other for ears, limbs, and facial details. A 15-minute lunch-break stretch can also yield a cute result. These compact sessions fit easily into real life.
Stuffing, closing, and safety tips for toys
You want a toy that holds its shape and stays safe for kids. Start with sturdy, skin-friendly stuffing in small, evenly sized pieces. Leave a small opening, then push stuffing in gently, rolling to prevent lumps. A firm but squeezable feel is ideal. Safety is the priority, so check for stray fibers or gaps.
Close the opening with a strong stitch, using ladder or backstitch for extra security. If a seam loosens after use, reinforce it. After sewing, gently squeeze the toy to check for hollow spots; add stuffing and reseal if needed. Inspect for loose parts and reinforce as needed. Proper finishing ensures a safe, long-lasting toy.
Trim stray threads, brush away loose fibers, and smooth the surface. If edges feel rough, seal them with a tiny dab of fabric glue inside and let it dry. A well-stuffed, tidy toy remains adorable and safe.
How to stuff for firm shape
Pack stuffing in small portions, pressing firmly into corners and curves. Use your fingers to guide stuffing around limbs and ears to avoid flat spots. If you see a dent, add more stuffing and press again until the surface is even. A consistent density helps the toy keep its pose over time. You can mix in firmer stuffing or, if needed, polymer stuffing as a last resort. Smooth overfilled areas and rotate pieces to maintain symmetry. When density is satisfactory, close the opening with a strong stitch.
Securing eyes and loose parts for kids
Eyes and small parts are safety concerns. Use securely attached eyes with a backing, or embroider features for extra safety. If using plastic eyes, ensure they’re firmly fixed and test by gently tugging. Stitch noses and accessories down with tight passes to prevent loosening. If limbs could be tugged, sew them with strong, even stitches.
When securing loose parts, reinforce with multiple stitches and consider a dab of fabric glue inside before stitching over it. Give the toy a light tug test to ensure nothing moves. Careful safety details help create a toy that’s durable and safe.
Washing and care for your bunny
Spot clean small stains with mild soap and a soft cloth. For deeper cleaning, hand wash in lukewarm water with mild detergent, then rinse. Avoid hot water or harsh chemicals. Gently press out excess water and lay flat to air dry—do not tumble dry. After drying, brush to restore softness. Check seams after washing and reinforce if needed. Store in a cool, dry place away from direct sunlight to prevent fading. Regular care keeps your bunny looking cute and cuddly.
Decorate your amigurumi rabbit for Easter
Turn your amigurumi rabbit into a springtime centerpiece with a soft, fresh color palette and a few bright accents. Layer textures with a fuzzy scarf, a felt carrot, or a tiny woven basket for a charming yet simple look. Add fabric flowers, a small bow, or embroidered daisies to create a cheerful vibe. Aim for adorable, not busy—select 2–3 cohesive accents that complement your rabbit’s colors. Your finished piece should invite touch and admiration and be easy to swap for different holidays.
If space is limited, use the rabbit as the star of a small display—on a pastel stand, with framed photos or inside a glass cloche with faux grass. When gifting, include a short note sharing a crafting tip or Easter memory to add warmth and meaning to your handmade present.
Simple embroidery and color ideas
Keep embroidery minimal to emphasize cuteness. Tiny cheek blushes and a stitched smile add personality. Use soft pink or peach for blush and dark brown or gray for eyes. For a playful pop, a tiny blue or yellow dot works well without overwhelming the look. For color ideas, start with a classic Easter base like creamy white, pale gray, or warm tan. Accent with mint, lilac, or buttercup yellow. A striped scarf in two bright colors can look adorable against a solid body. Always test a small swatch first to ensure harmony.
Use as decor or basket gifts
Your amigurumi rabbit can shine as a decorative piece or a thoughtful gift. Place it on a tray with miniature eggs and faux greenery for a simple centerpiece. In a gift basket, tuck the bunny among candy, a small book, and a personal note. The handmade touch makes the present feel extra special.
If gifting, include a brief crafting tip or a memory to add warmth. Your bunny becomes not just décor, but a tangible reminder of spring and care.
Seasonal display and storage tips
Store your amigurumi rabbit in a breathable bag with a soft cloth to prevent dust and snagging. For year-round display, rotate looks with removable accessories. Place the bunny at eye level in a shelf or mantel, and pair with pastel props like faux eggs or faux grass for a complete scene. A tidy storage routine keeps things easy to pull together next year.
Where to get a free downloadable bunny amigurumi pattern
Look for a free downloadable bunny amigurumi pattern with direct PDF downloads, clear abbreviations, and labeled parts. A good pattern suggests simple color choices, basic stitch counts, and tips to create a cute first try. Bookmark and print patterns that are beginner-friendly and include troubleshooting for common issues. A clean, easy download with a materials list helps you stitch quickly and confidently.
When you land on a pattern, preview images should show the head, body, ears, and paws clearly. If the pattern mentions beginner-friendly stitches and simple shaping tricks, you’ll likely finish with something you’ll proudly gift or display. Note whether the pattern includes troubleshooting for loose stitches or gaps. If a page feels cluttered, keep looking until you find a clean download that respects your time.
How to download and save the PDF
A smooth download should occur from a reliable host. Save the file in a dedicated craft folder, and consider backing up to cloud storage for easy access across devices. The PDF should have clear pages with large diagrams and legible stitch counts. If images are blurry, find a different source. Name the file consistently, such as Adorable Easter Bunny Amigurumi Pattern: Free and Easy plus the date, and note the main assembly page for quick reference.
If the PDF has locked pages or prompts for passwords, skip it and choose a pattern that opens freely. A clean download respects your time, like a Sunday morning.
Printing tips for pattern pages
Print only the pages you need to save paper. Start with the materials list and basic stitch instructions to confirm you have everything. Use Actual Size or 100% scale so counts match your project. If your printer smears, try glossy paper or high-quality white sheet and let ink dry. Highlight key sections with markers or sticky notes for easy reference.
Print a single, two-sided sheet with the materials list and gauge on one side and main steps on the other for quick reference while stitching. A neat printout feels professional and helps you follow along with confidence.
Copyright and personal use info
You can download and use the pattern for personal projects or gifts. The file is for non-commercial, handmade items. You may not distribute the pattern itself or claim it as your own. If you plan to sell finished bunnies, check the creator’s policy, as some patterns permit small-batch sales but not mass production. Always credit the original pattern when sharing photos of your amigurumi.
Troubleshooting for beginners
You’re starting out, so learn by doing. If your yarn misbehaves or your stitches look off, stay calm and follow a simple plan: check gauge, count stitches, and compare to the pattern. Pause, re-check, and adjust before moving forward. Each fix builds your confidence, and soon your Adorable Easter Bunny Amigurumi Pattern: Free and Easy will look consistently neat.
Keep a small notebook or digital log of common problems and fixes. You’ll have a quick reference when you encounter a snag. Typical potholes include droopy ears, uneven rounds, or stuffing showing through. Tackle them with small, deliberate steps: tighten tension, switch to a smaller hook for tight rounds, or snug stuffing before closing a seam. Your progress will feel steady and satisfying.
Embrace a routine: check stitch counts before closing rounds, measure against gauge, and pin pieces before sewing. This prevents surprises at assembly and helps you finish with a bunny that looks deliberate and polished.
Fix common mistakes in a cute amigurumi bunny pattern for beginners
Uneven rounds are common at first. Mark the first stitch of each round and count to stay on track. If a round drifts, gently undo the last few stitches and rework them. An even face matters too—redo eyes or nose if placement isn’t symmetrical. If stuffing shows, loosen it slightly and adjust tension. If ears sag, reinforce the base with extra stitches and consider using a touch of glue or secure stitching.
Loose ends should be woven in neatly. If stuffing shows leaks, add more stuffing and reseal the seam. These small fixes add up to a big improvement without redoing large sections.
When to frog and when to fix stitches
Frogging is best for deep mistakes that affect proportions. If you spot a wrong increase or color change, rip back to the last good stitch and rework. For minor miscounts or alignment issues, stitch-by-stitch fixes can salvage the piece. If a limb is off by a stitch, re-stitch that area instead of ripping everything back. Cosmetic flaws like a crooked mouth can often be corrected with embroidery or small over-stitches without major rework.
When to ask for help or watch tutorials
If you’re stuck after trying a few times, ask for help from a friend who crochets, or post a photo in a pattern forum. Fresh eyes can spot issues quickly and offer solutions tailored to the Adorable Easter Bunny Amigurumi Pattern: Free and Easy. Watching short tutorials can also help—look for videos matching your pattern version and hook size, and practice the demonstrated moves on your own piece.

Clara Fern — Crochet Artist & Amigurumi Designer
Clara Fern is a crochet artist and amigurumi designer based in Austin, Texas. With 9 years of experience working with yarn and hook, she transformed a lifelong passion for handcraft into a creative mission: making amigurumi accessible, fun, and deeply rewarding for crafters of all levels.
Clara discovered amigurumi during a trip to Japan in 2017, where she fell in love with the art of bringing tiny characters to life through crochet. Back home in Texas, she spent years studying color theory, design principles, and advanced crochet techniques — developing her own signature style that blends kawaii aesthetics with original character design.
Through maclafersa.com, Clara shares everything she has learned — from choosing the right yarn and reading your first pattern, to designing fully original amigurumi characters from scratch. Her writing is known for being clear, detailed, and genuinely helpful, with no steps skipped and no secrets kept.
When she’s not crocheting, Clara enjoys watercolor painting, visiting local yarn shops, and drinking way too much coffee while sketching new character ideas.


