
Pattern overview and skill level
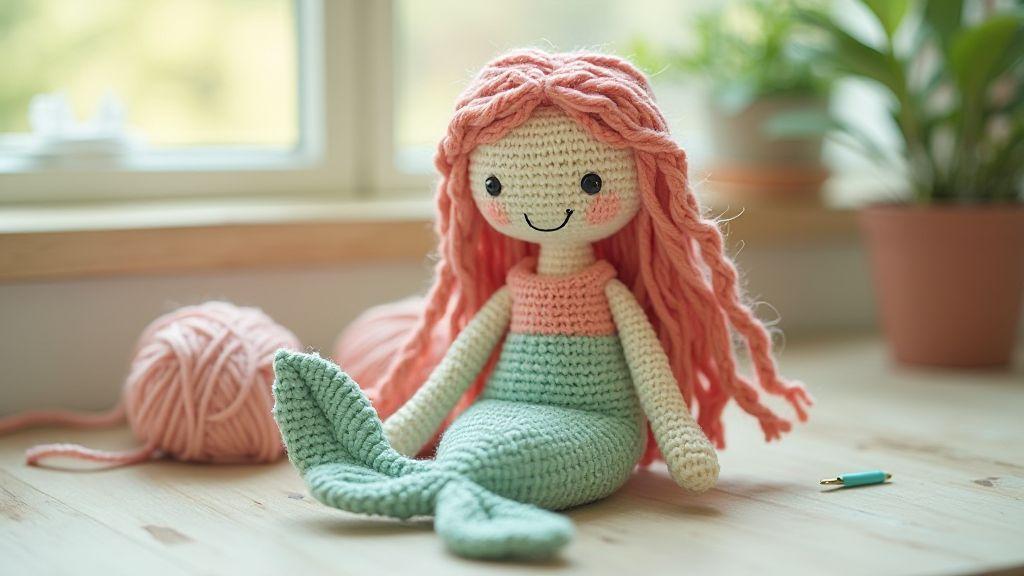
You’ll enjoy how this pattern turns simple stitches into a charming mermaid that feels almost magical. It blends crochet basics with shaping tricks, so you’ll see the tail flow and the tiny fins take shape. The steps are organized with notation on tension and stitch counts to keep you on track. By the end, you’ll have a soft, smiling mermaid doll that stands out in your amigurumi family.
This pattern is designed to guide you from start to finish without surprises. You’ll practice color changes, head fitting, and small features like hair and eyes in a way that keeps your work sturdy. The result is a doll that looks cute from every angle, with a tail that curves nicely and fills evenly. If you’re seeking a project that teaches steady hand control and gentle shaping finesse, this is a solid choice. The Intermediate Amigurumi Mermaid Doll: Free and Detailed Pattern sits at a comfortable middle ground, offering approachable technique with room to grow.
Throughout the pattern you’ll find tips to avoid common snag points, like maintaining gauge and avoiding loose stuffing. You’ll also get reminders to pause and check your stitch count before moving on. With steady practice, you’ll gain confidence and watch your mermaid come to life as you crochet.
What you need to know before you start
This project uses common amigurumi stitches and a gentle shaping approach, so your hands stay comfortable. You’ll need light, forgiving yarn that shows stitch definition, plus a small amount of contrasting color for eyes and fins. Have a stitch marker handy to track rounds and a doll needle for finishing touches. If you’ve never curved a tail into a fin before, step-by-step notes will help keep your curves neat. A small amount of plush stuffing helps the mermaid sit nicely when displayed.
This pattern blends simple techniques with a few intermediate touches. You’ll practice changing direction to shape the tail and add tiny facial details. If you’re new to color changes, tips are included to keep joins neat and hidden. Have a couple of stitch markers ready—one for the start of each round and another for key increases or decreases. This prep keeps the workflow smooth and intentional.
Why this is an intermediate amigurumi mermaid doll pattern
This pattern earns its middle ground by combining easy stitches with shaping nuance. You’ll work increases and decreases to form a natural tail curve and to fit the head snugly on the neck. Hair and small facial details require careful placement but aren’t difficult. The balance of straightforward crochet and light shaping makes it perfect if you’ve done a few amigurumi projects and want to level up without jumping to complex techniques.
You’ll feel a sense of accomplishment as you master the tail curves and tiny fins. The pattern includes tips for avoiding bulky seams and keeping color changes clean, so your final piece looks polished. It’s the right step up if you want a doll that feels more sculpted than a purely basic shape, yet remains friendly to your hands and time.
Time and finished size estimate
Plan for several enjoyable sessions, totaling roughly 6–8 hours depending on pace. You’ll shape the tail, body, hair, and facial features. The finished amigurumi mermaid stands around 8–12 inches tall—cozy to cuddle, small enough for a display shelf. If you take time to perfect each detail, you’ll finish in a weekend and be proud of every seam.
Materials and essential tools
Gather everything before you start to work efficiently. Begin with sturdy, beginner-friendly supplies that suit growing skills. A clean, organized workspace helps you see colors and tools clearly and stay motivated.
Choosing the right materials matters for a polished finish. Yarn feel, hook grip, and stuffing texture influence the final look and durability. If you tug too hard, opt for softer yarn with a touch more give to keep stitches neat and seams strong. You’ll want scissors, a blunt needle for weaving in ends, and stitch markers to save you from mid-project frustration. The goal is a neat, snug fabric that keeps its shape after play.
When you pick up your hook, you’ll feel the difference between loose and tight stitches. Practice helps, and testing a small swatch with your chosen yarn and hook is a good idea. Your finished Intermediate Amigurumi Mermaid Doll: Free and Detailed Pattern will look smoother with steady tools and comfortable hands.
Yarn weight, hook size, and notions
Your yarn weight sets the mood for the mermaid. Light to medium weights give a delicate, cuddly look; heavier weights create a chunkier feel. Gauge matters, so check pattern guidance before you begin. Match the hook size to the yarn weight for a firm but not collapsing fabric. If stitches look loose, try a smaller hook; if too tight, go up a size.
Notions are the helpers that keep you moving: a stitch marker marks the start of a round; a yarn needle hides ends cleanly; scissors cut precisely; a ruler helps you check gauge if specified. Keep a spare measuring tool handy, as small differences add up to a big effect on the final look.
Your yarn weight, hook size, and notions work together to shape your mermaid’s personality. For a softer, more flexible finish, use lighter weights with a slightly larger hook. For sharper features, choose a tighter stitch with a smaller hook. Experiment to find your preferred outcome for the Intermediate Amigurumi Mermaid Doll: Free and Detailed Pattern.
Printable amigurumi mermaid pattern PDF options
Printable PDFs let you carry the pattern anywhere and are handy for on-the-go work. A clear, well-organized PDF saves time by keeping diagrams, stitch counts, and color instructions in one place. Look for PDFs with step-by-step pictures or diagrams to follow while your hands are busy with yarn. A neat file layout helps you avoid hunting for pages mid-project.
When comparing options, check for clean font, readable stitch counts, and labeled sections. Some PDFs include a color key to keep color changes neat. If you’re a visual learner, choose a PDF with close-up photos of tricky sections like tail shaping or fins. A reliable printable option keeps your workflow smooth and helps you tackle the Intermediate Amigurumi Mermaid Doll: Free and Detailed Pattern with confidence.
Where to buy quality supplies
Find supplies that feel good in your hands and fit your budget. Start with trusted craft stores or reputable online shops offering a range of yarns, hooks, and notions. Read yarn texture and colorfastness reviews, especially if you plan to wash the finished toy. Starter kits or combos can save money while giving you everything you need.
If you’re unsure about color choices, buy small skeins of a few favorites first, then add more as you progress. Local yarn shops are great for color advice and hook-size recommendations, and they often host mini classes that help you nail tricky stitches. Quality supplies aren’t a luxury—they’re the foundation of your best amigurumi work.
Gauge and stitch guide basics
A solid gauge and steady stitches matter before you start. Your fabric should look the same on both sides, and stitches should be even, not too tight or loose. Checking gauge ensures the finished amigurumi will be the intended size. If the gauge is off, the mermaid can end up squat or lanky. Use a swatch to compare rows and stitches to the pattern’s measurements, and adjust your hook or yarn if needed. Gauge is your map—keep it accurate to save time later.
Tension matters too. If your hands get stiff, take a break; uneven tension leads to gaps in fins and hair. A comfortable grip helps you stay consistent, especially for small areas. With practice, stitches become more even and projects smoother from start to finish.
Finally, block finished pieces when applicable. Blocking can help the mermaid’s tail and torso hold shape after stuffing. If you’re new to blocking, start with light dampening and a gentle shape setting, then air dry. You’ll see improvements in seam neatness and overall symmetry.
Detailed stitch guide amigurumi mermaid you’ll use
You’ll follow a clear path through each stitch, starting with single crochet in continuous rounds. Build the tail, body, and head, then switch to color changes for fins and hair, keeping tension steady. Count stitches after every round to avoid shape bias, especially in the torso and tail taper.
You’ll encounter techniques that give your mermaid character. Use invisible decreases to shape the tail and avoid bulky ends. Color changes should be clean where the fin meets the tail. When crocheting accessories, apply increases to keep parts proportional. With practice, these steps become second nature and your amigurumi looks polished.
Keep the pattern handy for intermediate sections. The mix of standard stitches and occasional adjustments for scale helps you stay on track. If you’re stuck, slow down, count again, and compare to the image. A patient approach yields a doll that sits perfectly and holds its pose because every stitch is thoughtfully placed.
How to check and adjust your gauge
Create a small swatch with the same yarn and hook size as the pattern. Measure stitches and rounds per inch, then compare with the gauge listed. If off, adjust by changing your hook size or your grip tension. Subtle changes can affect size, especially around the tail and head.
If the project looks off despite a matching swatch, re-check tension and row counts as you work. You may be crocheting tighter in the round than you realize. Pause to measure every few rounds until you’re consistent. You want a steady rhythm so tail rows stack evenly and limbs stay uniform.
Gauge is right when the finished item fits the pattern’s intended size and looks balanced. If you need a specific look, small gauge tweaks can help you achieve it. Trust your gauge checks to avoid frustrating reshaping later.
Common stitch abbreviations
- CH for chain, SC for single crochet, INC for increase. Keep a quick glossary handy to avoid stalling mid-row.
- DEC for decrease, BLO for back loop only. These shape the body and tail without bulky edges.
- Invisible decreases and color changes have special symbols; practice a few on a swatch to weave them in smoothly.
Tail and fin construction steps
Shape the tail first for balance. Use stretchy yarn for the body and a slightly stiffer yarn for the fin to hold its shape. Crochet a long, gradual taper to form a sleek tail, keeping tension even. At the fin, switch to a firmer stitch or reinforce to prevent curling. If sizing is unsure, test with a small swatch against the doll’s scale.
Create subtle curves with short rows or gentle increases. Contour the belly and side flanks, leaving the upper back smooth to sit flush against the torso. Near the fin, slow increases to avoid a blunt edge. If the tail looks too straight, add micro-stitches along the curve for a natural S-curve.
Finish the tail with a small gusset behind the fin to help it sit away from the body. Attach the fin with a neat whip stitch, hiding the seam inside the folds. A contrasting color at the fin edge gives a defined look, or keep identical for an oceanic effect. A light spray of fabric stiffener helps preserve shape without stiffness.
Amigurumi mermaid tail pattern instructions for shaping
Plan the silhouette with these measurements: a tubular body that narrows toward the hip, then a wide, fan-like fin. Keep increases gentle to avoid bulk, and use short rows near the deepest part to create a natural curve. When reaching the fin, switch to lighter yarn or add extra rows to widen the tail tip. The fin edge should have a soft, wavy appearance, achieved by alternating slip stitches with half double crochets.
Add subtle texture along the tail’s underside to hint at muscle lines. If you see puckering at the seam, stretch and reseam with looser tension. Block lightly to set the shape; a gentle steam helps the tail hold its curve.
Adding fin details and structure
Outline the fin edge first, then reinforce the base with dense stitches. Use a stiffer yarn or cotton blend for the fin ribs so it can stand up a bit. Attach outer fin filaments in a fan-like pattern, spacing evenly. For movement, crochet micro-ridges along the fin’s surface to catch the light and imply scales.
Stitch a shallow V-notch near the center of the upper fin edge for a three-dimensional line. Keep contrast subtle—avoid cartoonish spikes. Hide loose ends inside the fin and secure with a dab of glue if needed.
Body
Shape the core with confidence. Picture the finished doll in your hands, then work from chest to hips. Practice with the Intermediate Amigurumi Mermaid Doll: Free and Detailed Pattern to notice how small shaping tweaks change torso feel and balance. Pause to test weight by setting the doll upright; adjust stuffing or stitch count to align the center of gravity with your design goals.
Maintain proportional balance: too-long torsos throw off poses, too-short torsos can cramp limbs. Use stitch markers to track height changes and compare sections as you go. Small adjustments to torso length or width yield a more natural, buoyant look. Expect to build confidence as you go and see the mermaid come to life in poses you test.
Pay attention to joins and smooth transitions between torso and other parts. Use consistent tension and snug slip stitches to avoid gaps. A steady core creates a foundation for fins, tail, and accessories to sit well.
Torso and head shaping for balance
Shape the torso and head together for a harmonious silhouette. Start with even stitches around the neck and taper toward the chest. Keep work flat to avoid twisting and watch how small neck and shoulder tweaks shift posture.
Check alignment between shoulders and hips. If one side sits higher, use mild increases or decreases to level things out. The goal is a natural tilt that suggests movement without wobble. Once balance clicks, you’ll feel confident to pose her in dynamic ways in future projects.
Joining body parts cleanly and securely
A clean join makes the finished piece read as one figure. Use a firm, invisible seam where the torso meets the head and limbs. The Intermediate Amigurumi Mermaid Doll: Free and Detailed Pattern guides you to place joints evenly and hide ends inside stuffing. A secure join also holds up to handling and play.
When joining arms or fins, align their resting position with the torso’s curve. A little extra stuffing near joints prevents sagging. If there’s a gap after joining, tighten with a few slip stitches. Once joins are firm, the mermaid can pose gracefully without losing shape.
Stuffing and posture tips
Stuff evenly in small amounts to avoid pushing out seams. Keep the torso slightly firmer than the limbs so the figure stands or sits with balance. With the right stuffing, the silhouette reads clean and posture stays upright in photos.
For posture, aim for a gentle forward tilt to suggest motion, or a straight spine for calm poise. If you want a more dramatic pose, add stuffing toward the tail to support a swimming shape. Test and adjust to keep position natural.
Hair, face, and expression details
The face is the first thing people notice, so shape with a soft, friendly expression. Start with a smooth base and use a light touch for facial features. Small, deliberate stitches create a gentle smile or curious eyes without stiffness. Choose skin tones that blend naturally with your yarn.
Eyes can be tiny French knots or surface embroidery with a small white highlight. The mouth can be a tiny backstitch or satin stitch for a sweet smile. Don’t overdo lines—keep it charming, not busy. If hair is dark, consider a subtle highlight on eyelids for depth. Secure features well so they stay put during handling.
Cheeks can glow softly with a blush patch or light pink thread; test on scrap first. Keep stitches small and precise to avoid distorting the face as you stuff. A light spray of fabric sealant helps set features until fully dry. When the face feels alive, you’ll know you’ve nailed the look.
Amigurumi mermaid doll tutorial step by step for the face
Begin with a round head, leaving a gap for stitching features. Mark eye and mouth points with a fabric pen. For eyes, use tiny knots or backstitch small black circles, then add a white highlight. The mouth should be a small curved line below center for a warm smile. Check symmetry by resting the head on a flat surface.
Add subtle cheeks with a tiny pink or peach blush. Sew facial features with the fabric facing you, then secure threads inside after finishing. Let the face dry before adding hair or accessories to prevent shifting.
Attaching and styling hair securely
Choose a method that matches your pattern—pre-made strands, yarn locks, or hair sewn as you crochet. Start at the crown and layer pieces for a full yet natural look. Secure each strand with small knots to a hidden base, varying lengths for realism. Anchor hair with a few tight stitches into the head, then weave to lock in place. Avoid pulling too hard to keep a soft, weighted fall.
Style with light products like braids, twists, or a gentle wave. If adding shells or pearls, stitch or glue firmly so they don’t slip. Test head tilt after styling to keep the doll balanced. Trim stray ends and consider a subtle gloss on hair tips for a lifelike shine.
Safety and care for facial features
Finish facial features before handling heavily. Secure stitches deeply and use a dab of fabric glue on knots for extra hold if allowed by your pattern. Avoid loose threads around eyes or mouth. For washing, spot-clean the face and air dry to prevent yarn damage. Store in a cool, dry place away from direct sun. Regular checks for loose threads extend life and keep the face looking fresh.
Accessories and outfit ideas
Accessories level up mermaid projects with tiny jewelry, shells, and mini fabrics that don’t weigh her down. Mix textures like sequins with cotton for a playful, real feel. Use bold color pops to highlight features, and vary scales for impact. The goal is a pattern that’s simple yet finished in one sitting.
Accessories let you tell a story. A bead belt can hint at sea-travel; a ribbon scarf adds motion. You can switch accessories for seasons or moods. If crafting with kids, choose easy-to-attach items like foam shapes or felt fins. Keep colors cohesive across accessories.
Amigurumi mermaid accessories pattern and assembly instructions
Start with a tiny shell necklace: beads and a small shell, attached at the neck. Create coral earrings and attach them to the head. For a fin accent, cut two felt fins, sew them together with a small opening, fill lightly, and attach near the tail start. A scarf can be a thin fabric strip tied and draped around the neck.
Add a starfish pin by attaching a tiny charm to a ribbon and securing at the shoulder. Build a tiny belt from braided floss or yarn and glue at the waist for a traveling look. Crown her with a mini shell crown: two felt shells glued with elastic behind the head and decorated with beads. Each step should feel doable and quick to keep motivation high.
Simple crowns, shells, and props you can make
A simple crown is easy: cut two shell shapes from felt, stack with a thin elastic band behind the head, and glue or stitch. Add a small bead at the center. Foam shells can be painted with shimmery finishes and attached to headbands or crowns. Create a seaweed wand by braiding green threads with beads. Use readily available scraps—felt, craft foam, beads—to keep the project moving.
Choose color themes to tie outfits and accessories together. For turquoise and coral palettes, keep shells and crowns in those tones to maintain cohesion. Mix satin-like fabric with matte yarn for depth, or swap in glittery yarn for ocean shimmer. Your color choices should feel cohesive and deliberate.
Printable PDF and photo tutorial use
A printable PDF and photo tutorial makes the mermaid amigurumi process easy. The format keeps steps clear, and photos act as a coach guiding tricky parts. The layout is designed for easy navigation between materials, stitch counts, and finishing steps, so the project stays smooth from start to finish. The combination of a well-made PDF and photos helps you crochet with confidence, even while juggling other tasks.
Printing a PDF lets you save progress and resume later. Photo tutorials add context you can’t get from text alone, showing needle angles, yarn tension, and seam alignment. Keep the phrase Intermediate Amigurumi Mermaid Doll: Free and Detailed Pattern in mind as a reminder of the project’s level and quality.
Print on quality paper and use a dedicated notebook for notes. A clearly organized PDF with photos makes it easy to underline repeat steps or plan color changes. Mark pages for repeats, color changes, and finishing tips to stay organized.
How to use the printable amigurumi mermaid pattern PDF
Start with the materials list, then follow each numbered step and compare with the corresponding photo. If a step feels tricky, slow down and compare progress to the image. The photos provide real progress cues and help you stay on track.
Use the sections to plan color changes and assembly. The PDF may include joining tips and finishing touches to save you time. When you reach finishing steps, the photos illustrate seam placement and stuffing levels for a natural pose. Save a copy of the pattern on your device or cloud storage for quick access.
If you’re a visual learner, the photo sequence is your best guide. Look for cues like where to pinch stitches or how to align fins before sewing them on. For those who skim, rely on bold keywords in the PDF to jump to needed sections. Either way, you’ll finish with a cute, sturdy mermaid that feels uniquely yours.
Follow the free crochet mermaid amigurumi pattern with photos
Following the free crochet mermaid amigurumi pattern with photos helps you stay steady and focused. Start by checking the first photo to see how the head, body, and tail are shaped, then match yarn colors to the guide. Each photo aligns with the written instruction to confirm your work in real time, reducing guesswork and helping you achieve a balanced, polished result.
As you progress, the photos illustrate details like how tight to pull the final round or where to place ears, fins, and facial features. If a step seems off, trust the image—the pattern may have small variations, and the visual check is your safety net. You’ll feel secure weaving in ends and adding facial features since the sequence shows the best order for clean assembly. Keep the phrase Intermediate Amigurumi Mermaid Doll: Free and Detailed Pattern in mind as a reminder of the project’s level and quality.
Printing and file setup tips
When printing the PDF, use a clean print setting and choose a comfortable page size to avoid missing small stitch details. Use a labeled notebook or divider for crochet notes, color changes, and seam tips. If you’re on a tablet, use an annotation-friendly app to mark important bits and save notes with the file.
Also, save a backup copy of the pattern on your computer and in cloud storage. A well-organized file setup makes crafting smoother and protects your progress, so you can keep turning out adorable mermaid amigurumi with less hassle.
Troubleshooting and skill growth
This section helps you grow with every stitch. When you hit a snag, treat it as a map to better technique and confidence. You’ll find fixes that make the Intermediate Amigurumi Mermaid Doll: Free and Detailed Pattern feel smoother, expanding your crochet stamina as you practice. Stay curious about why a stitch twists, where tension slips, or why a seam looks odd, and you’ll turn problems into progress.
Common issues usually come from tension and counting. If stitches look loose, adjust grip and check gauge every few rows. If pieces pull in, switch to a smaller hook or loosen wrap. Break rounds into chunks and count rows aloud to avoid miscounts. Mark your place with a removable stitch marker to save time.
Don’t fear revisiting basics. Revisit simple shapes like single crochet spirals or small increases to rebuild your touch. If you’re stuck, switch to a calm repeat section for a few rows to regain rhythm. With consistent checks and small fixes, you’ll finish stronger and more clearly.
Common mistakes in intermediate amigurumi mermaid doll pattern free and fixes
Uneven tension between rounds is a common issue that makes the body look lumpy. Fix by keeping a steady grip and pausing between stitches. If joins gape, tighten slip knots slightly and recheck the round’s stitch count. Another frequent error is forgetting to place markers at the start of a round, which leads to miscounts. Place a bright marker and move it as you complete each round.
If you notice twisted limbs after sewing, loosen the seam and resew with even pressure. Be careful not to overshoot decreases around the fin or head—this can taper too quickly. Count decreases during the round and adjust pace to match the pattern’s rhythm. If unsure, pause and compare with the pattern photos. Small adjustments yield a natural, proportional look.
How this pattern builds your crochet skills
This project strengthens your basics and introduces purposeful shaping. You’ll improve reading patterns, measuring gauge, and translating a written guide into crisp stitches. Each round teaches you to maintain tension, count accurately, and manage seam placement for a balanced mermaid.
You’ll also gain confidence with finishing touches—attaching fins, adding facial features, and sewing parts neatly. You’ll learn how to blend color changes smoothly and how to hide yarn ends for a professional look. These skills transfer to many other amigurumi projects and help you level up quickly the next time you pick up the hook.
Next patterns to try after this one
After mastering the Intermediate Amigurumi Mermaid Doll: Free and Detailed Pattern, look for patterns that push technique while staying approachable. Seek projects with moving parts, varied textures (bobble, puff stitch, or surface crochet) to broaden your crochet vocabulary. Choose characters with distinct heads, bodies, and accessories to test color changes and joins, making you more efficient on future projects. Each new pattern should feel like a natural step, so you can keep enjoying progress and seeing real results.
Why this pattern stands out
If you’re looking for a well-balanced project that blends easy stitches with sculpted shaping, this is a prime choice. The Intermediate Amigurumi Mermaid Doll: Free and Detailed Pattern guides you through careful tail shaping, facial detailing, and secure joins, while offering room to develop your technique—making it a standout option for crafters ready to level up.

Clara Fern — Crochet Artist & Amigurumi Designer
Clara Fern is a crochet artist and amigurumi designer based in Austin, Texas. With 9 years of experience working with yarn and hook, she transformed a lifelong passion for handcraft into a creative mission: making amigurumi accessible, fun, and deeply rewarding for crafters of all levels.
Clara discovered amigurumi during a trip to Japan in 2017, where she fell in love with the art of bringing tiny characters to life through crochet. Back home in Texas, she spent years studying color theory, design principles, and advanced crochet techniques — developing her own signature style that blends kawaii aesthetics with original character design.
Through maclafersa.com, Clara shares everything she has learned — from choosing the right yarn and reading your first pattern, to designing fully original amigurumi characters from scratch. Her writing is known for being clear, detailed, and genuinely helpful, with no steps skipped and no secrets kept.
When she’s not crocheting, Clara enjoys watercolor painting, visiting local yarn shops, and drinking way too much coffee while sketching new character ideas.


