Introduction
Few things are more frustrating than completing an amigurumi doll only to discover that the head wobbles precariously on the neck, threatening to topple over at the slightest touch. A wobbly head undermines the entire project, making even a beautifully crafted doll appear amateurish and unstable. The problem stems from a combination of factors: insufficient neck support, improper head-to-body proportions, inadequate stuffing, and weak attachment methods. Fortunately, preventing wobbly heads is entirely within the maker’s control through careful planning and execution. This article explores the techniques that professional doll makers use to create heads that sit firmly and confidently on their bodies.
Understanding Why Heads Wobble
Before addressing solutions, it’s important to understand the mechanics of head wobble. A head wobbles when the connection between head and body cannot support the head’s weight and resist lateral movement. This occurs when one or more of these conditions exist: the neck is too thin relative to the head size, the head is overstuffed and heavy while the neck is lightly stuffed, the attachment stitches are weak or too few, or the body lacks sufficient weight and density to anchor the head.
The physics are straightforward: a head that weighs more than the body can support will naturally want to fall. A head that is loosely attached will move freely. A head that is attached to a thin, flexible neck will wobble like a bobblehead toy. Preventing wobble requires addressing all three factors simultaneously.
Proper Head-to-Body Proportions
The first step in preventing wobble is establishing correct proportions during the design phase. For realistic amigurumi dolls, the head should be approximately one-quarter to one-third the total height of the figure. A doll that is 12 inches tall should have a head that is 3 to 4 inches in diameter. This proportion ensures that the body is substantial enough to support the head without appearing disproportionate.
For stylized amigurumi with exaggerated features, proportions can vary more widely. However, even stylized dolls benefit from a body that appears capable of supporting its head. If the body is extremely thin or small relative to the head, wobble becomes inevitable regardless of other reinforcement techniques.
Creating a Robust Neck Structure
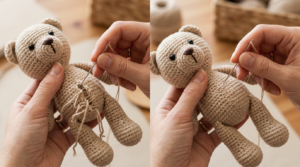
The neck is the critical connection point, and its construction determines whether the head will wobble. Rather than crocheting a thin neck as part of the body, professional makers create a separate, sturdy neck piece that serves as a structural bridge between head and body.
The Reinforced Neck Technique involves crocheting a cylindrical neck piece using a hook one size smaller than the main body, creating tighter stitches and denser fabric. Stuff this neck piece very firmly—more firmly than you would stuff any other part of the doll. The goal is a rigid cylinder that can support the head’s weight without flexing. Before attaching the head, wrap the top of the neck with embroidery floss multiple times, creating a reinforced band that distributes the head’s weight across a wider area.
The Double-Neck Technique involves crocheting two separate neck pieces and stacking them before attachment. The first neck piece is crocheted and stuffed normally. The second neck piece is crocheted around the first, creating a double-walled structure with exceptional rigidity. This technique is more time-consuming but nearly eliminates wobble entirely.
The Wrapped-Neck Technique involves crocheting a standard neck, then wrapping it extensively with embroidery floss or yarn before stuffing. The wrapping creates internal reinforcement that prevents the neck from compressing or flexing. Wrap in a spiral pattern, covering the entire neck surface, then stuff firmly. The wrapping holds the stuffing in place and prevents it from settling or compressing over time.
Stuffing Strategy for Head Stability
How the head is stuffed dramatically affects wobble. A head that is lightly stuffed will compress over time, becoming lighter and more prone to movement. A head that is overstuffed will be heavy and may pull the neck out of shape.
The optimal approach is graduated stuffing: stuff the bottom of the head (the part closest to the neck) very firmly, using densely packed fiberfill or wool roving. This creates a heavy, stable base that anchors the head firmly to the neck. Stuff the middle sections with medium density, and the top of the head with slightly looser stuffing. This distribution creates a head that is heaviest at its base, naturally resisting wobble.
Before closing the head, insert a small weight—a fishing sinker, a marble, or even a wrapped coin—into the bottom of the head before the final stuffing. This weight lowers the head’s center of gravity and dramatically improves stability. The weight should be small enough to be unnoticeable but heavy enough to make a difference—typically 0.5 to 1 ounce.
Attachment Methods That Prevent Wobble
Even a perfectly constructed head will wobble if attached with weak stitches. Professional makers use multiple attachment techniques in combination to create an unshakeable connection.
The Ladder Stitch Method involves sewing the head to the neck using a ladder stitch (also called a mattress stitch), which creates an invisible seam with exceptional strength. Make stitches every quarter-inch around the entire circumference of the neck, ensuring complete coverage. Use thread that matches the head color for invisibility. The ladder stitch distributes stress across many small connection points rather than concentrating it on a few stitches.
The Whip Stitch Reinforcement involves making multiple passes around the head-neck junction with a whip stitch, creating layers of stitching that reinforce the connection. After completing the initial ladder stitch, make a second pass with whip stitches, offset slightly from the first pass. This creates a reinforced band of stitching that can support substantial weight.
The Embroidery Floss Wrap involves wrapping embroidery floss around the head-neck junction multiple times before sewing, creating a reinforced band similar to the wrapped-neck technique. The floss provides internal reinforcement that prevents the connection from separating even under stress.
Testing Head Stability
Before declaring a doll complete, test the head’s stability thoroughly. Gently tilt the doll forward, backward, and to each side. The head should remain firmly in place without wobbling. Gently rotate the head—it should move smoothly without excessive play. Lift the doll by the head—it should support the entire body weight without the neck bending or stretching. If any of these tests reveal instability, add reinforcement before finishing the doll.
Conclusion
Preventing wobbly heads requires attention to multiple factors: proper proportions, a robust neck structure, strategic stuffing, and strong attachment methods. By implementing these techniques during the design and construction phases, makers can create amigurumi dolls with heads that sit confidently and securely. A stable head transforms a doll from a fragile craft project into a sturdy, displayable piece that can be handled and posed without fear of toppling. The extra effort invested in head stability pays dividends in the form of professional-quality results.

Clara Fern — Crochet Artist & Amigurumi Designer
Clara Fern is a crochet artist and amigurumi designer based in Austin, Texas. With 9 years of experience working with yarn and hook, she transformed a lifelong passion for handcraft into a creative mission: making amigurumi accessible, fun, and deeply rewarding for crafters of all levels.
Clara discovered amigurumi during a trip to Japan in 2017, where she fell in love with the art of bringing tiny characters to life through crochet. Back home in Texas, she spent years studying color theory, design principles, and advanced crochet techniques — developing her own signature style that blends kawaii aesthetics with original character design.
Through maclafersa.com, Clara shares everything she has learned — from choosing the right yarn and reading your first pattern, to designing fully original amigurumi characters from scratch. Her writing is known for being clear, detailed, and genuinely helpful, with no steps skipped and no secrets kept.
When she’s not crocheting, Clara enjoys watercolor painting, visiting local yarn shops, and drinking way too much coffee while sketching new character ideas.