
Introduction
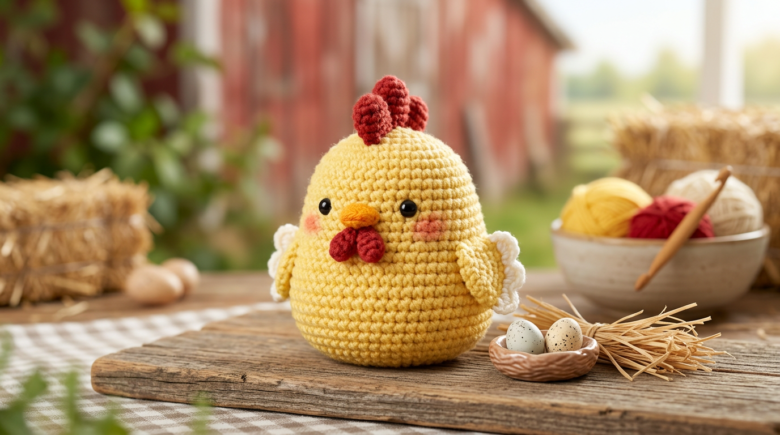
The chicken is a delightful amigurumi project that combines simple shapes with charming personality. Its round body, small wings, distinctive comb, and expressive face make it instantly recognizable and endearing. The chicken pattern teaches essential amigurumi techniques while remaining accessible to beginners. This article provides a complete, easy-to-follow chicken pattern with detailed instructions, helpful tips, and creative variations to personalize your creation.
Materials Needed
Yarn: Worsted-weight yarn in yellow (body), red (comb and wattle), white (wings), and a small amount of black or dark gray (eyes and beak). Approximately 100-150 yards total.
Hook: Size 5.5mm (I/9) crochet hook for worsted-weight yarn.
Notions: Polyester fiberfill for stuffing, tapestry needle for weaving in ends and sewing pieces together, stitch markers, scissors.
Optional: Safety eyes (6mm) for a finished look, or embroidery floss for embroidered eyes.
Pattern: Chicken Body
Rnd 1: 6 sc in magic ring (6) Rnd 2: inc in each st around (12) Rnd 3: sc 1, inc repeat around (18) Rnd 4: sc 2, inc repeat around (24) Rnd 5-8: sc in each st around (24) — 4 rounds total Rnd 9: sc 2, dec repeat around (18) Rnd 10: sc 1, dec repeat around (12)
Stuff firmly. Cut yarn and pull through last stitch to close. Weave in ends.
Pattern: Chicken Head
Rnd 1: 6 sc in magic ring (6) Rnd 2: inc in each st around (12) Rnd 3-4: sc in each st around (12) — 2 rounds total Rnd 5: dec around (6)
Stuff lightly. Cut yarn and pull through last stitch to close. Weave in ends.
Pattern: Chicken Comb
Using red yarn:
Rnd 1: 6 sc in magic ring (6) Rnd 2: inc in each st around (12) Rnd 3: sc in each st around (12)
Cut yarn and pull through last stitch to close. Weave in ends. Do not stuff.
Pattern: Chicken Wattle
Using red yarn:
Rnd 1: 4 sc in magic ring (4) Rnd 2: inc in each st around (8)
Cut yarn and pull through last stitch to close. Weave in ends. Do not stuff.
Pattern: Chicken Wings (Make 2)
Using white yarn:
Rnd 1: 6 sc in magic ring (6) Rnd 2: inc in each st around (12) Rnd 3: sc in each st around (12)
Cut yarn and pull through last stitch to close. Weave in ends. Do not stuff.
Pattern: Chicken Beak
Using black or orange yarn:
Rnd 1: 4 sc in magic ring (4)
Cut yarn and pull through last stitch to close. Weave in ends. Do not stuff.
Pattern: Chicken Legs (Make 2)
Using black or orange yarn:
Ch 6: Chain 6 stitches. Row 2: sc in 2nd ch from hook and in each ch across (5)
Cut yarn leaving a 6-inch tail for sewing. Weave in ends.
Assembly Instructions
Attaching the Head: Position the head on the front of the body. Using a tapestry needle and matching yarn, sew the head to the body using a ladder stitch, making stitches every quarter-inch around the entire circumference.
Attaching the Comb: Position the comb on top of the head. Sew the comb to the head using a ladder stitch around the outer edge.
Attaching the Wattle: Position the wattle below the head, under the chin. Sew the wattle to the head using a ladder stitch.
Attaching the Wings: Position the two wings on the sides of the body. Sew each wing to the body using a ladder stitch around the outer edge.
Attaching the Legs: Position the two legs on the bottom of the body. Sew each leg to the body using a ladder stitch.
Adding the Beak: Position the beak on the front of the head. Sew the beak to the head using a ladder stitch.
Adding Eyes: If using safety eyes, insert them into the head before stuffing. If embroidering eyes, use black embroidery floss to make two small dots on the front of the head, positioned above the beak.
Beginner Tips for Success
Comb Positioning: Position the comb on top of the head for a realistic appearance. The comb should sit upright and centered.
Wattle Placement: Position the wattle below the head, creating a natural-looking chin detail.
Wing Symmetry: Ensure wings are positioned symmetrically on both sides of the body.
Leg Stability: Position legs so the chicken stands stably without tipping.
Troubleshooting Common Problems
Comb Won’t Stay Attached: If the comb seems loose, reinforce the attachment by making additional stitches around the comb edge.
Wattle Looks Unnatural: If the wattle appears too large or too small, adjust the number of rounds in the wattle pattern.
Chicken Won’t Stand: If the chicken tips over, adjust leg positions or add more stuffing to the legs for stability.
Variations and Customization
Different Colors: Create chickens in different colors—brown, white, or multicolored for a flock.
Rooster Version: Add a longer tail using chain stitches for a rooster appearance.
Accessory Additions: Add a small egg or a tiny corn accessory for extra charm.
Conclusion
The chicken pattern teaches assembly and customization techniques while producing a charming farm animal character. By following these instructions and practicing piece attachment, you’ll create an adorable chicken that showcases your growing crochet skills. This chicken makes an excellent project for intermediate beginners and a wonderful gift for farm animal enthusiasts.

Clara Fern — Crochet Artist & Amigurumi Designer
Clara Fern is a crochet artist and amigurumi designer based in Austin, Texas. With 9 years of experience working with yarn and hook, she transformed a lifelong passion for handcraft into a creative mission: making amigurumi accessible, fun, and deeply rewarding for crafters of all levels.
Clara discovered amigurumi during a trip to Japan in 2017, where she fell in love with the art of bringing tiny characters to life through crochet. Back home in Texas, she spent years studying color theory, design principles, and advanced crochet techniques — developing her own signature style that blends kawaii aesthetics with original character design.
Through maclafersa.com, Clara shares everything she has learned — from choosing the right yarn and reading your first pattern, to designing fully original amigurumi characters from scratch. Her writing is known for being clear, detailed, and genuinely helpful, with no steps skipped and no secrets kept.
When she’s not crocheting, Clara enjoys watercolor painting, visiting local yarn shops, and drinking way too much coffee while sketching new character ideas.


